Samsung SCL610 Research

Related Manual Pages


Similar Questions


Samsung Scl610 Camcorder Instructions
HELP! We are preparing to do our first live on-line sports broadcast throuhg NFHS & Playon! Spor...
HELP! We are preparing to do our first live on-line sports broadcast throuhg NFHS & Playon! Spor...
(Posted by greece 10 years ago)

I Need A Replacement Battery!
Where can i buy a replacement battery? I live in chicago il.
Where can i buy a replacement battery? I live in chicago il.
(Posted by 3154 11 years ago)

How To Reset Samsung Hmx-f80 To Factory Settings
just opened my new samsung camcorder and clicked wrong button to put the time and date in when first...
just opened my new samsung camcorder and clicked wrong button to put the time and date in when first...
(Posted by Anonymous-91462 11 years ago)

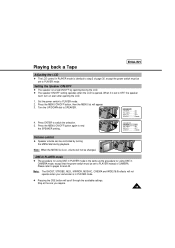
How Do You Play Back Tape In The Camera ?
I justr bought a used samsung scl610 8 mm camcorder with nio instruction book. How do you playback t...
I justr bought a used samsung scl610 8 mm camcorder with nio instruction book. How do you playback t...
(Posted by jimgorenc 12 years ago)
Related Terms
The following terms were also used when searching for Samsung SCL610 Research:- samsung scl610
- samsung scl610 camcorder
- scl610 camcorder
- samsung scl610 hi8
- scl610 8mm camcorder
- scl610 hi8
- samsung scl610 battery
- scl610 charger
- samsung camcorder scl610
- scl610 manual
- samsung scl610 8mm camcorder
- samsung scl610 manual
- scl610 hi8 camcorder
- scl610 price
- scl610 parts
- scl610 power cord
- scl610 camcorder charger
- scl610 battery
- scl610 accessories
- scl610 ac adapter
- scl610 tapes
- video camera scl610
- video camera samsung scl610
- video camara scl610
- scl610 adapter
- video camara samsung scl610
- scl610 battery charger
- scl610 users manual
- scl610 camcorder battery
- scl610 user's manual
- scl610 camcorder instructions
- scl610 user guide
- scl610 tv adapter
- scl610 samsung
- scl610 hi8 camcorder manual
- scl610 software
- scl610 ntsc
- scl610 service manual
- scl610 ntsc pal playback
- scl610 owners manual
- scl610 samsung manual
- scl610 samsung camcorder l.emg eject
- scl610 power adapter
- scl610
- scl610 samsung camcorder
- samsung model scl610
- samsung scl610 camcorder charger
- samsung scl610 camcorder battery
- samsung scl610 battery charger
- samsung scl610 adapter
- samsung scl610 accessories
- samsung scl610 ac adapter
- samsung scl610 a/v cable
- samsung scl610 8mm
- samsung scl610 camcorder instructions
- samsung camcorder scl610 manual
- model scl610
- camera scl610
- camera samsung scl610
- camcorder scl610 manual
- camcorder scl610
- camara scl610
- camara samsung scl610
- samsung scl610 power cord
- scl610 8mm
- battery for scl610
- samsung scl610 user guide
- samsung scl610 tv adapter
- samsung scl610 tapes
- samsung scl610 software
- samsung scl610 service manual
- samsung scl610 price
- scl610 a/v cable
- samsung scl610 power adapter
- samsung scl610 parts
- samsung scl610 owners manual
- samsung scl610 ntsc
- samsung scl610 hi8 camcorder manual
- samsung scl610 hi8 camcorder
- samsung scl610 charger