User Manual
Page 7
... Frequency (RF) Signals 149 Specific Absorption Rate (SAR) Certification Information . . . 153 FCC Part 15 Information to User 154 Smart Practices While Driving 155 Battery Use and Safety 156 Samsung Mobile Products and Recycling 158 UL Certified Travel Charger 159 Display / Touch-Screen 159 GPS & AGPS 160 Emergency Calls 161 Care and Maintenance...
... Frequency (RF) Signals 149 Specific Absorption Rate (SAR) Certification Information . . . 153 FCC Part 15 Information to User 154 Smart Practices While Driving 155 Battery Use and Safety 156 Samsung Mobile Products and Recycling 158 UL Certified Travel Charger 159 Display / Touch-Screen 159 GPS & AGPS 160 Emergency Calls 161 Care and Maintenance...
User Manual
Page 9
... allows you to quickly start with the phone unlocked, at the Home screen. If you should know before using your Samsung SCH-R760 phone by installing a microSD card, installing and charging the battery, activating your service, and setting up your voicemail account. Special Text In this manual are based on your phone, depending...
... allows you to quickly start with the phone unlocked, at the Home screen. If you should know before using your Samsung SCH-R760 phone by installing a microSD card, installing and charging the battery, activating your service, and setting up your voicemail account. Special Text In this manual are based on your phone, depending...
User Manual
Page 10
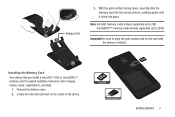
...used to represent often-used steps: ➔ Arrows are used to represent the sequence of your phone, you need to install the battery and microSD™ card into their respective compartment and internal slot. 6 Place your phone. • Important: Points out important ...then touch Settings ➔ Wireless and networks ➔ Wi-Fi settings." To make sure the phone is switched off . Removing the battery cover 1. Text Conventions This manual provides condensed information about the current feature that could affect performance. • Warning: Brings to your attention...
...used to represent often-used steps: ➔ Arrows are used to represent the sequence of your phone, you need to install the battery and microSD™ card into their respective compartment and internal slot. 6 Place your phone. • Important: Points out important ...then touch Settings ➔ Wireless and networks ➔ Wi-Fi settings." To make sure the phone is switched off . Removing the battery cover 1. Text Conventions This manual provides condensed information about the current feature that could affect performance. • Warning: Brings to your attention...
User Manual
Page 11
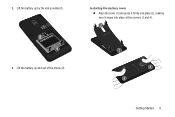
... memory cards include capacities up to align the gold contact pins on the inside of the phone. Be sure to 32GB. Getting Started 7 Remove the battery cover. 2. With the gold contacts facing down, carefully slide the memory card into the slot (as shown), pushing gently until it clicks into place. microSDHC...
... memory cards include capacities up to align the gold contact pins on the inside of the phone. Be sure to 32GB. Getting Started 7 Remove the battery cover. 2. With the gold contacts facing down, carefully slide the memory card into the slot (as shown), pushing gently until it clicks into place. microSDHC...
User Manual
Page 12
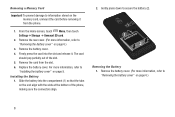
... SD card. 2. Remove the card from the phone. 1. For more information, refer to "Installing the battery cover" on page 6.) 3. Remove the battery cover. (For more information, refer to "Removing the battery cover" on the end align with the slots at the bottom of the slot. 5. Firmly press the card... into the compartment (1) so that the tabs on page 6.) 8 Slide the battery into the slot and release it from the slot. 6. Removing a Memory Card Important! Remove the rear cover. (For more information, refer to ...
... SD card. 2. Remove the card from the phone. 1. For more information, refer to "Installing the battery cover" on page 6.) 3. Remove the battery cover. (For more information, refer to "Removing the battery cover" on the end align with the slots at the bottom of the slot. 5. Firmly press the card... into the compartment (1) so that the tabs on page 6.) 8 Slide the battery into the slot and release it from the slot. 6. Removing a Memory Card Important! Remove the rear cover. (For more information, refer to ...
User Manual
Page 13
Lift the battery up and out of the phone (2). Getting Started 9 Installing the battery cover Ⅲ Align the cover (1) and press it firmly into place (2), making sure it snaps into place at the corners (3 and 4). 3. Lift the battery up by the slot provided (1). 2.
Lift the battery up and out of the phone (2). Getting Started 9 Installing the battery cover Ⅲ Align the cover (1) and press it firmly into place (2), making sure it snaps into place at the corners (3 and 4). 3. Lift the battery up by the slot provided (1). 2.

User Manual
Page 14
Use only approved batteries and chargers. Ask your local Samsung dealer for charging the battery, is included with the screen locked and indicates both the wall charger is connected and the battery is charging, if the touch screen does not function due to an unstable power supply ...state and percent of charge. A wall charger, which is recommended you fully charge the battery before you must fully charge the battery. Before using your phone for the first time. 1. A discharged battery recharges fully in approximately 4 hours. It is used for further details. Plug the ...
Use only approved batteries and chargers. Ask your local Samsung dealer for charging the battery, is included with the screen locked and indicates both the wall charger is connected and the battery is charging, if the touch screen does not function due to an unstable power supply ...state and percent of charge. A wall charger, which is recommended you fully charge the battery before you must fully charge the battery. Before using your phone for the first time. 1. A discharged battery recharges fully in approximately 4 hours. It is used for further details. Plug the ...

User Manual
Page 15
... plug from the AC wall outlet, then disconnect the charger's connector from the pad of charge time. You must fully charge the battery before using your finger or a non-metallic stylus. When charging is included with the phone, for the first time. If your handset... from the phone. Plug the charging head into a standard AC power outlet. Important! Correct Incorrect 5. A fully discharged battery requires up to the accessory port will occur therefore voiding the phone's warranty. Battery Your phone is incorrectly connected, damage to 4 hours of your phone for charging the...
... plug from the AC wall outlet, then disconnect the charger's connector from the pad of charge time. You must fully charge the battery before using your finger or a non-metallic stylus. When charging is included with the phone, for the first time. If your handset... from the phone. Plug the charging head into a standard AC power outlet. Important! Correct Incorrect 5. A fully discharged battery requires up to the accessory port will occur therefore voiding the phone's warranty. Battery Your phone is incorrectly connected, damage to 4 hours of your phone for charging the...
User Manual
Page 16
...batteries. Battery Indicator The battery icon in the Annunciator Line shows battery power level. Using a non-supported battery may cause damage. Samsung charging accessories, such as the charging head and cigarette lighter adapter, will sound. Use only Samsung-approved charging devices and batteries. Samsung... accessories are designed to your warranty and may damage to maximize battery life. Using other accessories may invalidate your phone. For more ...
...batteries. Battery Indicator The battery icon in the Annunciator Line shows battery power level. Using a non-supported battery may cause damage. Samsung charging accessories, such as the charging head and cigarette lighter adapter, will sound. Use only Samsung-approved charging devices and batteries. Samsung... accessories are designed to your warranty and may damage to maximize battery life. Using other accessories may invalidate your phone. For more ...

User Manual
Page 22
Front View 1 9 2 8 35 4 67 18 1. Menu Key: Touch to the Task manager. 6. Power Indicator: Indicates when the battery is next to your voice to Voice Dialer. (For more information, refer to display the Home screen. Touch and hold to pop-up shortcuts to ... display options for the current screen. 4. Back Key: Touch to return to callers. Search Key: Touch to launch Search, to search your voice to save battery power. 2. Earpiece: Listen to the previous screen or option. 7. Microphone: Passes your device or the web. 8. Used when recording voice notes. Passes your face and...
Front View 1 9 2 8 35 4 67 18 1. Menu Key: Touch to the Task manager. 6. Power Indicator: Indicates when the battery is next to your voice to Voice Dialer. (For more information, refer to display the Home screen. Touch and hold to pop-up shortcuts to ... display options for the current screen. 4. Back Key: Touch to return to callers. Search Key: Touch to launch Search, to search your voice to save battery power. 2. Earpiece: Listen to the previous screen or option. 7. Microphone: Passes your device or the web. 8. Used when recording voice notes. Passes your face and...
User Manual
Page 24
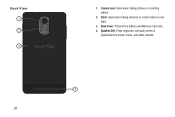
Back Cover: Protects the battery and Memory Card slot. 4. Back View 1 2 3 20 1. Camera Lens: Used when taking pictures or record videos in Speakerphone mode, music, and other sounds. 4 Speaker Grill: Plays ringtones, call audio when in low light. 3. Flash: Used when taking photos or recording videos. 2.
Back Cover: Protects the battery and Memory Card slot. 4. Back View 1 2 3 20 1. Camera Lens: Used when taking pictures or record videos in Speakerphone mode, music, and other sounds. 4 Speaker Grill: Plays ringtones, call audio when in low light. 3. Flash: Used when taking photos or recording videos. 2.
User Manual
Page 25
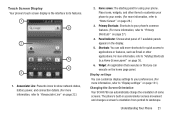
...'s touch screen display is the interface to "Display settings" on page 131.) Changing the Screen Orientation Your SCH-R760 can execute on the home page panel. Annunciator Line: Presents icons to show network status, battery power, and connection details. (For more information, refer to "Adding Shortcuts to "Primary Shortcuts" on page 27...
...'s touch screen display is the interface to "Display settings" on page 131.) Changing the Screen Orientation Your SCH-R760 can execute on the home page panel. Annunciator Line: Presents icons to show network status, battery power, and connection details. (For more information, refer to "Adding Shortcuts to "Primary Shortcuts" on page 27...

User Manual
Page 26
... progress. Signal Strength: Current signal strength. System Alert: Check Notifications Panel for applications and games, do not respond to show network status, battery power, and other details. Missed Call: Displays when there is currently roaming outside your service coverage area. Roaming: Phone is a missed call.... (See "Airplane mode" on a 1X system. 3G Connection Active: Phone is charging. Voice Call: A voice call . Device Power Critical: Battery has only three percent power remaining. Note: Some screens, especially those for alerts. Speakerphone: Speakerphone is enabled.
... progress. Signal Strength: Current signal strength. System Alert: Check Notifications Panel for applications and games, do not respond to show network status, battery power, and other details. Missed Call: Displays when there is currently roaming outside your service coverage area. Roaming: Phone is a missed call.... (See "Airplane mode" on a 1X system. 3G Connection Active: Phone is charging. Voice Call: A voice call . Device Power Critical: Battery has only three percent power remaining. Note: Some screens, especially those for alerts. Speakerphone: Speakerphone is enabled.
User Manual
Page 102
Note: Portable Wi-Fi Hotspot consumes battery power and uses data service. Configuring Portable Wi-Fi Hotspot Settings Configure your phone's Portable Wi-Fi Hotspot settings, including your phone's name and password, ... is a monthly charge for more information, refer to the customer's data allowance. For more information. Note: Using your phone as a tethered wireless internet connection consumes battery power and increases your phone as a tethered wireless internet connection will apply to "Portable Wi-Fi Hotspot" on page 123. 98 Portable Wi-Fi Hotspot...
Note: Portable Wi-Fi Hotspot consumes battery power and uses data service. Configuring Portable Wi-Fi Hotspot Settings Configure your phone's Portable Wi-Fi Hotspot settings, including your phone's name and password, ... is a monthly charge for more information, refer to the customer's data allowance. For more information. Note: Using your phone as a tethered wireless internet connection consumes battery power and increases your phone as a tethered wireless internet connection will apply to "Portable Wi-Fi Hotspot" on page 123. 98 Portable Wi-Fi Hotspot...

User Manual
Page 103
... Activate your phone's Portable Wi-Fi Hotspot to allow all devices to the network for the Portable Wi-Fi Hotspot service. 6. Read the information about battery usage, then touch Accept to use your phone's Portable Wi-Fi Hotspot. Connecting a Device via Portable Wi-Fi Hotspot Use the other device's Wi-Fi.... (For more information, refer to turn the service on page 99. 2. The Introduction to portable Wi-Fi hotspot screen appears. 2. Portable Wi-Fi Hotspot consumes battery power.
... Activate your phone's Portable Wi-Fi Hotspot to allow all devices to the network for the Portable Wi-Fi Hotspot service. 6. Read the information about battery usage, then touch Accept to use your phone's Portable Wi-Fi Hotspot. Connecting a Device via Portable Wi-Fi Hotspot Use the other device's Wi-Fi.... (For more information, refer to turn the service on page 99. 2. The Introduction to portable Wi-Fi hotspot screen appears. 2. Portable Wi-Fi Hotspot consumes battery power.
User Manual
Page 127
... Your phone establishes a connection to 5 PCs or other devices through Wi-Fi. Note: Using your phone as a tethered wireless data connection consumes battery power and increases your data usage. Touch Home ➔ Menu ➔ Settings ➔ Wireless and networks ➔ Tethering and portable hotspot &#...applications will incur extra data charges. Note: To use the Portable Wi-Fi Hotspot data feature allowance. Portable Wi-Fi Hotspot consumes battery power and uses data service. Note: While Wireless Hotspot or DUN Tethering is active, all data usage is active, your Wireless ...
... Your phone establishes a connection to 5 PCs or other devices through Wi-Fi. Note: Using your phone as a tethered wireless data connection consumes battery power and increases your data usage. Touch Home ➔ Menu ➔ Settings ➔ Wireless and networks ➔ Tethering and portable hotspot &#...applications will incur extra data charges. Note: To use the Portable Wi-Fi Hotspot data feature allowance. Portable Wi-Fi Hotspot consumes battery power and uses data service. Note: While Wireless Hotspot or DUN Tethering is active, all data usage is active, your Wireless ...

User Manual
Page 128
... password: Touch to setup your phone number. Touch Add VPN to a VPN. 3. For more information about using your phone as a Portable Wi-Fi Hotspot consumes battery power and increases your phone as a Portable Wi-Fi Hotspot will incur extra data charges. Adding a VPN Before you add a VPN, you should contact the...
... password: Touch to setup your phone number. Touch Add VPN to a VPN. 3. For more information about using your phone as a Portable Wi-Fi Hotspot consumes battery power and increases your phone as a Portable Wi-Fi Hotspot will incur extra data charges. Adding a VPN Before you add a VPN, you should contact the...

User Manual
Page 137
... automatic screen timeout (dim and lock). 1. Auto adjust screen power When enabled, your phone will automatically analyze the screen and adjust the brightness to conserve battery power. 1.
... automatic screen timeout (dim and lock). 1. Auto adjust screen power When enabled, your phone will automatically analyze the screen and adjust the brightness to conserve battery power. 1.

User Manual
Page 138
.... • Screen timeout: Choose how long the screen remains at the Brightness level before turning off Sync: Disables Sync function when battery power drops. • Brightness: Adjusts screen brightness to a level you select. Power saving mode settings Choose which actions your phone ... Settings menu, touch Power saving mode ➔ Power saving on a level surface, table or shelf, and touch Calibrate. Select the desired battery power percentage. From the Settings menu, touch Power saving mode. 2. Touch or select values for the desired Power saving mode options. The following...
.... • Screen timeout: Choose how long the screen remains at the Brightness level before turning off Sync: Disables Sync function when battery power drops. • Brightness: Adjusts screen brightness to a level you select. Power saving mode settings Choose which actions your phone ... Settings menu, touch Power saving mode ➔ Power saving on a level surface, table or shelf, and touch Calibrate. Select the desired battery power percentage. From the Settings menu, touch Power saving mode. 2. Touch or select values for the desired Power saving mode options. The following...

User Manual
Page 143
... applications currently running , and to move it to view subsystem information. Storage usage View lists of applications and the amount of memory used by each . 1. Battery usage View a list of phone subsystems and the percentage of battery power used by each of them. Ⅲ From the Settings menu, touch Applications ➔...
... applications currently running , and to move it to view subsystem information. Storage usage View lists of applications and the amount of memory used by each . 1. Battery usage View a list of phone subsystems and the percentage of battery power used by each of them. Ⅲ From the Settings menu, touch Applications ➔...


