User Manual (ENGLISH)
Page 1
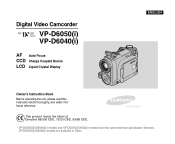
Digital Video Camcorder VP-D6050(i) VP-D6040(i) AF Auto Focus CCD Charge Coupled Device LCD Liquid Crystal Display ENGLISH Owner's Instruction Book Before operating the unit, please read this Instruction Book thoroughly, and retain it for future reference. ELECTRONICS * VP-D6050S(i)/D6040S(i) models and VP-D6050(i)/D6040(i) models have the same technical specification whereas VP-D6050S(i)/D6040(i) models are available in Silver.
Digital Video Camcorder VP-D6050(i) VP-D6040(i) AF Auto Focus CCD Charge Coupled Device LCD Liquid Crystal Display ENGLISH Owner's Instruction Book Before operating the unit, please read this Instruction Book thoroughly, and retain it for future reference. ELECTRONICS * VP-D6050S(i)/D6040S(i) models and VP-D6050(i)/D6040(i) models have the same technical specification whereas VP-D6050S(i)/D6040(i) models are available in Silver.
User Manual (ENGLISH)
Page 3
...33 Using the Viewfinder ...34 Adjusting the Focus ...34 Controlling the Sound from the Built-In Speaker...35 Using the MENU ...36 The Camcorder : Functions 38 Setting the Clock ...38 Setting the DATE/TIME ...39 Setting the Wireless Remote Control Acceptance (WL.REMOTE)...40 Setting ...44 Manual Focus / Auto Focus (MF/AF) ...45 Auto Focusing ...45 Manual Focusing ...45 Zooming In and Out with the Digital Zoom ...46 Zooming In and Out ...46 The Camcorder : Basic Recording 47 Inserting and Ejecting a Cassette ...47 Inserting a Cassette ...47 Ejecting a Cassette ...47 Protecting a Cassette ......
...33 Using the Viewfinder ...34 Adjusting the Focus ...34 Controlling the Sound from the Built-In Speaker...35 Using the MENU ...36 The Camcorder : Functions 38 Setting the Clock ...38 Setting the DATE/TIME ...39 Setting the Wireless Remote Control Acceptance (WL.REMOTE)...40 Setting ...44 Manual Focus / Auto Focus (MF/AF) ...45 Auto Focusing ...45 Manual Focusing ...45 Zooming In and Out with the Digital Zoom ...46 Zooming In and Out ...46 The Camcorder : Basic Recording 47 Inserting and Ejecting a Cassette ...47 Inserting a Cassette ...47 Ejecting a Cassette ...47 Protecting a Cassette ......
User Manual (ENGLISH)
Page 4
...Programmed Automatic Exposure Modes (PROGRAM AE) ...52 Setting the PROGRAM AE ...53 Setting the White Balance for Camcorder Use (WHT.BALANCE) ...54 Setting the Digital Zoom for Camcorder Use ...60 Cutting Off Wind Noise (WIND CUT) ...61 Using Backlight Compensation Mode (BLC) ...62 Setting...DATE/TIME ...68 WL.REMOTE( ) ...68 DIS( ) ...68 DSE (Digital Special Effects) ...69 PROGRAM AE ...69 WHT.BALANCE ...69 SHUTTER / EXPOSURE ...70 Taking Photos ...71 Various Recording Techniques ...72 The Camcorder : Playback 73 Playing Back a Recorded Tape ...73 Various Functions in PLAY modes...
...Programmed Automatic Exposure Modes (PROGRAM AE) ...52 Setting the PROGRAM AE ...53 Setting the White Balance for Camcorder Use (WHT.BALANCE) ...54 Setting the Digital Zoom for Camcorder Use ...60 Cutting Off Wind Noise (WIND CUT) ...61 Using Backlight Compensation Mode (BLC) ...62 Setting...DATE/TIME ...68 WL.REMOTE( ) ...68 DIS( ) ...68 DSE (Digital Special Effects) ...69 PROGRAM AE ...69 WHT.BALANCE ...69 SHUTTER / EXPOSURE ...70 Taking Photos ...71 Various Recording Techniques ...72 The Camcorder : Playback 73 Playing Back a Recorded Tape ...73 Various Functions in PLAY modes...
User Manual (ENGLISH)
Page 7
... a USB cable ...153 Maintenance 156 Cleaning and Maintaining the Camcorder ...156 After Using Your Camcorder...156 Cleaning the Camera Body and Video Heads...157 Using Your Camcorder Abroad ...158 Troubleshooting 159 Troubleshooting ...159 Self Diagnosis Display ...159 Specifications 162 INDEX 164 7 Contents ENGLISH Using the Digital Zoom...128 Rotating a Stored Picture...129 Resizing a Stored Picture...
... a USB cable ...153 Maintenance 156 Cleaning and Maintaining the Camcorder ...156 After Using Your Camcorder...156 Cleaning the Camera Body and Video Heads...157 Using Your Camcorder Abroad ...158 Troubleshooting 159 Troubleshooting ...159 Self Diagnosis Display ...159 Specifications 162 INDEX 164 7 Contents ENGLISH Using the Digital Zoom...128 Rotating a Stored Picture...129 Resizing a Stored Picture...
User Manual (ENGLISH)
Page 9
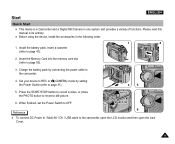
Start ENGLISH Quick Start ✤ This device is a Camcorder and a Digital Still Camera in the following order: 1. Charge the battery pack by setting the Power Switch (refer to page 31). 34 5. When finished, set the Power Switch to...to OFF. SSSTTTAAARRRTTT//S/SSTTTOOOPPP Reference 56 ✤ To connect DC Power In / Multi-AV / DV / USB cable to record a still picture. Install the battery pack. PPPHHHOOOTTTOOO 6. Set your device to REC or (CAMERA) mode by connecting the power cable to page 47). 1 2 2. Press the START/STOP button to record a video, or press...
Start ENGLISH Quick Start ✤ This device is a Camcorder and a Digital Still Camera in the following order: 1. Charge the battery pack by setting the Power Switch (refer to page 31). 34 5. When finished, set the Power Switch to...to OFF. SSSTTTAAARRRTTT//S/SSTTTOOOPPP Reference 56 ✤ To connect DC Power In / Multi-AV / DV / USB cable to record a still picture. Install the battery pack. PPPHHHOOOTTTOOO 6. Set your device to REC or (CAMERA) mode by connecting the power cable to page 47). 1 2 2. Press the START/STOP button to record a video, or press...
User Manual (ENGLISH)
Page 15
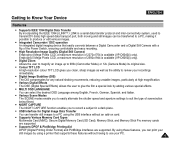
... a special look by using the USB interface without having to use your PC. 15 G Digital Image Stabiliser (DIS) The DIS compensates for Digital Image Data Transfer You can transfer still images to a PC using a printer that easily converts between a Digital Camcorder and a Digital Still Camera with a flip of 2272x1704 is available (VP-D6050(i) only). G Supports DPOF & PictBridge Printing...
... a special look by using the USB interface without having to use your PC. 15 G Digital Image Stabiliser (DIS) The DIS compensates for Digital Image Data Transfer You can transfer still images to a PC using a printer that easily converts between a Digital Camcorder and a Digital Still Camera with a flip of 2272x1704 is available (VP-D6050(i) only). G Supports DPOF & PictBridge Printing...
User Manual (ENGLISH)
Page 16
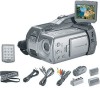
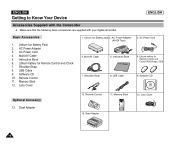
.... Instruction Book 6. Shoulder Strap 8. Software CD 10. Lens Cover 13. Multi-AV Cable 5. Basic Accessories 1. ENGLISH Getting to Know Your Device Accessories Supplied with the Camcorder ✤ Make sure that the following basic accessories are supplied with your digital camcorder. AC Power Adapter 3. AC Power Cord 6.
.... Instruction Book 6. Shoulder Strap 8. Software CD 10. Lens Cover 13. Multi-AV Cable 5. Basic Accessories 1. ENGLISH Getting to Know Your Device Accessories Supplied with the Camcorder ✤ Make sure that the following basic accessories are supplied with your digital camcorder. AC Power Adapter 3. AC Power Cord 6.
User Manual (ENGLISH)
Page 31
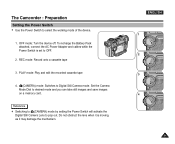
... Record onto a cassette tape 3. ENGLISH 1 2 3 4 31 Set the Camera Mode Dial to Digital Still Camera mode. OFF mode: Turn the device off. Do not obstruct the lens when it may damage the mechanism. The Camcorder : Preparation Setting the Power Switch ✤ Use the Power Switch to pop out.... Reference ✤ Switching to (CAMERA) mode by setting the Power Switch will activate the Digital Still Camera Lens to select the working mode of the ...
... Record onto a cassette tape 3. ENGLISH 1 2 3 4 31 Set the Camera Mode Dial to Digital Still Camera mode. OFF mode: Turn the device off. Do not obstruct the lens when it may damage the mechanism. The Camcorder : Preparation Setting the Power Switch ✤ Use the Power Switch to pop out.... Reference ✤ Switching to (CAMERA) mode by setting the Power Switch will activate the Digital Still Camera Lens to select the working mode of the ...
User Manual (ENGLISH)
Page 36
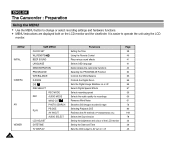
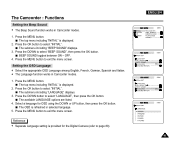
... 61 76 80 148 78 33 39 43 It is easier to AV out on the LCD monitor and the viewfinder. MENU INITIAL CAMERA A/V VIEWER 36 SUB MENU CLOCK SET WL.REMOTE BEEP SOUND LANGUAGE DEMONSTRATION PROGRAM AE WHT.BALANCE D.ZOOM DIS DSE SELECT REC MODE...Selects OSD language Demonstrates the camcorder functions Selecting the PROGRAM AE Function Controls the White Balance Controls the Digital Zoom Sets the Digital Image Stabiliser on or off Selects Digital Special Effects Selects recording speed Selects the audio quality for recordings Removes Wind Noise Searches Still Images recorded in tape ...
... 61 76 80 148 78 33 39 43 It is easier to AV out on the LCD monitor and the viewfinder. MENU INITIAL CAMERA A/V VIEWER 36 SUB MENU CLOCK SET WL.REMOTE BEEP SOUND LANGUAGE DEMONSTRATION PROGRAM AE WHT.BALANCE D.ZOOM DIS DSE SELECT REC MODE...Selects OSD language Demonstrates the camcorder functions Selecting the PROGRAM AE Function Controls the White Balance Controls the Digital Zoom Sets the Digital Image Stabiliser on or off Selects Digital Special Effects Selects recording speed Selects the audio quality for recordings Removes Wind Noise Searches Still Images recorded in tape ...
User Manual (ENGLISH)
Page 38
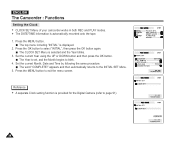
... the same procedure. Press the MENU button. The top menu including "INITIAL" is provided for the Digital Camera (refer to exit the menu screen. ENGLISH The Camcorder : Functions Setting the Clock ✤ CLOCK SET Menu of your camcorder works in both REC and PLAY modes. ✤ The DATE/TIME information is automatically recorded onto...
... the same procedure. Press the MENU button. The top menu including "INITIAL" is provided for the Digital Camera (refer to exit the menu screen. ENGLISH The Camcorder : Functions Setting the Clock ✤ CLOCK SET Menu of your camcorder works in both REC and PLAY modes. ✤ The DATE/TIME information is automatically recorded onto...
User Manual (ENGLISH)
Page 40
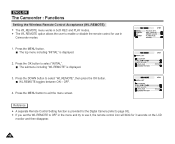
... submenu including "WL.REMOTE" is displayed. 2. Press the MENU button to exit the menu screen. The top menu including "INITIAL" is displayed. 3. ENGLISH The Camcorder : Functions Setting the Wireless Remote Control Acceptance (WL.REMOTE) ✤ The WL.REMOTE menu works in both REC and PLAY modes. ✤ The WL.REMOTE...enable or disable the remote control for use in the menu and try to use it, the remote control icon will blink for the Digital Camera (refer to page 93). ✤ If you set the WL.REMOTE to OFF in Camcorder modes. 1. WL.REMOTE toggles between ON - OFF. 4.
... submenu including "WL.REMOTE" is displayed. 2. Press the MENU button to exit the menu screen. The top menu including "INITIAL" is displayed. 3. ENGLISH The Camcorder : Functions Setting the Wireless Remote Control Acceptance (WL.REMOTE) ✤ The WL.REMOTE menu works in both REC and PLAY modes. ✤ The WL.REMOTE...enable or disable the remote control for use in the menu and try to use it, the remote control icon will blink for the Digital Camera (refer to page 93). ✤ If you set the WL.REMOTE to OFF in Camcorder modes. 1. WL.REMOTE toggles between ON - OFF. 4.
User Manual (ENGLISH)
Page 41
...Select a language for the Digital Camera (refer to page 89). ENGLISH 41 The top menu including "INITIAL" is displayed. 2. Setting the OSD Language ✤ Select the appropriate OSD Language among English, French, German, Spanish and Italian. ✤ The Language function works in Camcorder modes. 1. The submenu ... OK button to exit the menu screen. Press the MENU button to select "INITIAL". The Camcorder : Functions Setting the Beep Sound ✤ The Beep Sound function works in Camcorder modes. 1. The available LANGUAGE options are listed. 4. Press the OK button to select ...
...Select a language for the Digital Camera (refer to page 89). ENGLISH 41 The top menu including "INITIAL" is displayed. 2. Setting the OSD Language ✤ Select the appropriate OSD Language among English, French, German, Spanish and Italian. ✤ The Language function works in Camcorder modes. 1. The submenu ... OK button to exit the menu screen. Press the MENU button to select "INITIAL". The Camcorder : Functions Setting the Beep Sound ✤ The Beep Sound function works in Camcorder modes. 1. The available LANGUAGE options are listed. 4. Press the OK button to select ...
User Manual (ENGLISH)
Page 46
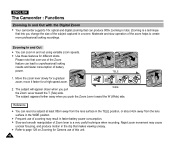
...more professional looking results and faster consumption of battery 1-1 power. 1-2 TELE 1. ENGLISH The Camcorder : Functions Zooming In and Out with the Digital Zoom ✤ Your camcorder supports 10x optical and digital zooming that can lead to unprofessional looking recordings. Zooming is a very useful technique when ...the WIDE position. ✤ Frequent use of the Zoom feature can produce 900x zooming in a scene. move it faster for Camera use of zooming may cause unclear focusing, and produce motion in and out using variable zoom speeds. ✤ Use these features...
...more professional looking results and faster consumption of battery 1-1 power. 1-2 TELE 1. ENGLISH The Camcorder : Functions Zooming In and Out with the Digital Zoom ✤ Your camcorder supports 10x optical and digital zooming that can lead to unprofessional looking recordings. Zooming is a very useful technique when ...the WIDE position. ✤ Frequent use of the Zoom feature can produce 900x zooming in a scene. move it faster for Camera use of zooming may cause unclear focusing, and produce motion in and out using variable zoom speeds. ✤ Use these features...
User Manual (ENGLISH)
Page 54
... 1. The available White Balance options are provided and will maintain optimum colour balance in EASYQ mode. ✤ Turn the Digital Zoom off for Camcorder Use (WHT.BALANCE) ✤ The CCD (Charge Coupled Device) determines colour using colour temperature, White Balance is a ...press the OK button. INDOOR - OUTDOOR 5. The top menu including "CAMERA" is standard indoor lighting. AUTO : Automatically maintains optimum colour balance in most lighting conditions. Select an option using digital functions or in a given scene/environment. The selected option is displayed. ...
... 1. The available White Balance options are provided and will maintain optimum colour balance in EASYQ mode. ✤ Turn the Digital Zoom off for Camcorder Use (WHT.BALANCE) ✤ The CCD (Charge Coupled Device) determines colour using colour temperature, White Balance is a ...press the OK button. INDOOR - OUTDOOR 5. The top menu including "CAMERA" is standard indoor lighting. AUTO : Automatically maintains optimum colour balance in most lighting conditions. Select an option using digital functions or in a given scene/environment. The selected option is displayed. ...
User Manual (ENGLISH)
Page 55
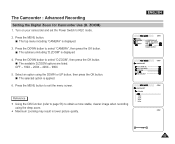
... 3. ENGLISH 55 Select an option using the deep zoom. ✤ Maximum zooming may result in lower picture quality. The top menu including "CAMERA" is displayed. 4. Press the DOWN button to exit the menu screen. Press the MENU button to select "D.ZOOM", then press the OK ...button. Turn on your camcorder and set the Power Switch to select "CAMERA", then press the OK button. Press the MENU button. The selected option is applied. 6. The available D.ZOOM options are listed. The Camcorder : Advanced Recording Setting the Digital Zoom for Camcorder Use (D. Press the DOWN ...
... 3. ENGLISH 55 Select an option using the deep zoom. ✤ Maximum zooming may result in lower picture quality. The top menu including "CAMERA" is displayed. 4. Press the DOWN button to exit the menu screen. Press the MENU button to select "D.ZOOM", then press the OK ...button. Turn on your camcorder and set the Power Switch to select "CAMERA", then press the OK button. Press the MENU button. The selected option is applied. 6. The available D.ZOOM options are listed. The Camcorder : Advanced Recording Setting the Digital Zoom for Camcorder Use (D. Press the DOWN ...
User Manual (ENGLISH)
Page 56
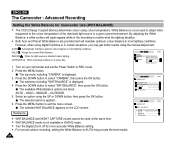
... Press the DOWN button to select "DIS ", then press the OK button to REC mode. 2. ENGLISH The Camcorder : Advanced Recording Setting the Digital Image Stabiliser (DIS) ✤ The Digital Image Stabiliser works only in REC mode. ✤ DIS is recommended to turn DIS mode Off when recording using... It is a function that, within reasonable limits, compensates for shaking movements produced when filming hand-held. The top menu including "CAMERA" is displayed. 4. Recording a close up picture of a small object - The submenu including "DIS " is displayed. 3. Press the MENU button ...
... Press the DOWN button to select "DIS ", then press the OK button to REC mode. 2. ENGLISH The Camcorder : Advanced Recording Setting the Digital Image Stabiliser (DIS) ✤ The Digital Image Stabiliser works only in REC mode. ✤ DIS is recommended to turn DIS mode Off when recording using... It is a function that, within reasonable limits, compensates for shaking movements produced when filming hand-held. The top menu including "CAMERA" is displayed. 4. Recording a close up picture of a small object - The submenu including "DIS " is displayed. 3. Press the MENU button ...
User Manual (ENGLISH)
Page 57
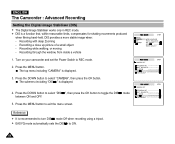
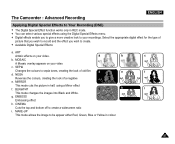
...the image to be appear either Red, Green, Blue or Yellow in half, using the Digital Special Effects menu. ✤ Digital effects enable you wish to create. ✤ Available Digital Special Effects: a. MIRROR This mode cuts the picture in colour. 57 CINEMA Cuts the ... on your video. BLK&WHT g h i This mode changes the images into Black and White. The Camcorder : Advanced Recording ENGLISH Applying Digital Special Effects to Your Recording (DSE) ✤ The Digital Special Effect function works only in REC mode. ✤ You can select various special effects using a Mirror...
...the image to be appear either Red, Green, Blue or Yellow in half, using the Digital Special Effects menu. ✤ Digital effects enable you wish to create. ✤ Available Digital Special Effects: a. MIRROR This mode cuts the picture in colour. 57 CINEMA Cuts the ... on your video. BLK&WHT g h i This mode changes the images into Black and White. The Camcorder : Advanced Recording ENGLISH Applying Digital Special Effects to Your Recording (DSE) ✤ The Digital Special Effect function works only in REC mode. ✤ You can select various special effects using a Mirror...
User Manual (ENGLISH)
Page 58
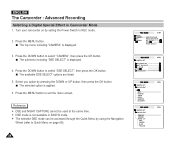
... MENU button. The top menu including "CAMERA" is applied. 6. Press the MENU button to select "DSE SELECT", then press the OK button. Select you option by setting the Power Switch to REC mode. 2. ENGLISH The Camcorder : Advanced Recording Selecting a Digital Special Effect in EASYQ mode. ✤..." is not available in Camcorder Mode 1. Turn your camcorder on page 68). 58 The available DSE SELECT options are listed. 5. Reference ✤ DSE and NIGHT CAPTURE cannot be accessed through the Quick Menu by using the Navigation Wheel (refer to select "CAMERA", then press the OK...
... MENU button. The top menu including "CAMERA" is applied. 6. Press the MENU button to select "DSE SELECT", then press the OK button. Select you option by setting the Power Switch to REC mode. 2. ENGLISH The Camcorder : Advanced Recording Selecting a Digital Special Effect in EASYQ mode. ✤..." is not available in Camcorder Mode 1. Turn your camcorder on page 68). 58 The available DSE SELECT options are listed. 5. Reference ✤ DSE and NIGHT CAPTURE cannot be accessed through the Quick Menu by using the Navigation Wheel (refer to select "CAMERA", then press the OK...

User Manual (ENGLISH)
Page 63
... user to record dark subjects or in darker areas, making them even brighter than they would be used at the same time. 63 Turn your camcorder on by setting the Power Switch to S1/25, S1/13, S1/6 and Normal. 1/25 Reference ✤ The SLOW SHUTTER works only in dark... environment. ✤ The SLOW SHUTTER and DIS (Digital Image Stabiliser) cannot be used at the same time. ✤ The SLOW SHUTTER and DIGITAL ZOOM cannot be under good natural lighting. Press the SLOW SHUTTER button. The SLOW SHUTTER function allows users...
... user to record dark subjects or in darker areas, making them even brighter than they would be used at the same time. 63 Turn your camcorder on by setting the Power Switch to S1/25, S1/13, S1/6 and Normal. 1/25 Reference ✤ The SLOW SHUTTER works only in dark... environment. ✤ The SLOW SHUTTER and DIS (Digital Image Stabiliser) cannot be used at the same time. ✤ The SLOW SHUTTER and DIGITAL ZOOM cannot be under good natural lighting. Press the SLOW SHUTTER button. The SLOW SHUTTER function allows users...
User Manual (ENGLISH)
Page 65
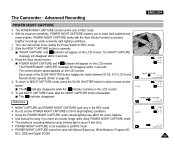
...CAPTURE message will disappear within 3 seconds. POWER NIGHT CAPTURE works with Manual Exposure, White Balance, Program AE, BLC, DSE and Digital ZOOM. "NIGHT CAPTURE" and indicator will appear on by setting the Power Switch to make dark subjects and areas brighter. ENGLISH...indicator disappears while the indicator remains on the LCD monitor. 5. To exit NIGHT CAPTURE mode, slide the NIGHT CAPTURE button downwards. The Camcorder : Advanced Recording POWER NIGHT CAPTURE ✤ The POWER NIGHT CAPTURE function works only in REC mode. ✤ With its maximum sensitivity,...
...CAPTURE message will disappear within 3 seconds. POWER NIGHT CAPTURE works with Manual Exposure, White Balance, Program AE, BLC, DSE and Digital ZOOM. "NIGHT CAPTURE" and indicator will appear on by setting the Power Switch to make dark subjects and areas brighter. ENGLISH...indicator disappears while the indicator remains on the LCD monitor. 5. To exit NIGHT CAPTURE mode, slide the NIGHT CAPTURE button downwards. The Camcorder : Advanced Recording POWER NIGHT CAPTURE ✤ The POWER NIGHT CAPTURE function works only in REC mode. ✤ With its maximum sensitivity,...


