
User Manual (ENGLISH)
Page 1
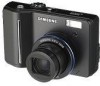
Please read this manual carefully before using the application software. ENGLISH This manual will guide you for buying a Samsung camera. User Manual Thank you through using the camera, including capturing images, downloading images and using your new camera.
Please read this manual carefully before using the application software. ENGLISH This manual will guide you for buying a Samsung camera. User Manual Thank you through using the camera, including capturing images, downloading images and using your new camera.

User Manual (ENGLISH)
Page 2
... service, please bring the camera and the cause of their respective companies. All brand and product names appearing in this camera in a safe place. ● The contents and illustrations of this manual are subject to change without prior notice for buying a Samsung Digital Camera. ● Prior to set up the camera driver. Check the camera's power Check the...
... service, please bring the camera and the cause of their respective companies. All brand and product names appearing in this camera in a safe place. ● The contents and illustrations of this manual are subject to change without prior notice for buying a Samsung Digital Camera. ● Prior to set up the camera driver. Check the camera's power Check the...

User Manual (ENGLISH)
Page 4
... ■How to use the APERTURE PRIORITY mode 14 ■How to use the SHUTTER PRIORITY mode 15 ■How to use the MANUAL mode ...15 ■How to use the ASR (Advanced Shake Reduction) mode 15 ■Wise Shot 16 ■How to use the...System chart 5 ●Identification of features 6 ■Front & Top 6 ■Back & Bottom 7 ■Bottom / 5-function button 8 ■Self-timer lamp 8 ■Camera Status Lamp 8 ■Mode icon 9 ●Connecting to a Power Source ......9 ●Inserting the memory card .........10 ●Instructions on , if you capture an image. ■...
... ■How to use the APERTURE PRIORITY mode 14 ■How to use the SHUTTER PRIORITY mode 15 ■How to use the MANUAL mode ...15 ■How to use the ASR (Advanced Shake Reduction) mode 15 ■Wise Shot 16 ■How to use the...System chart 5 ●Identification of features 6 ■Front & Top 6 ■Back & Bottom 7 ■Bottom / 5-function button 8 ■Self-timer lamp 8 ■Camera Status Lamp 8 ■Mode icon 9 ●Connecting to a Power Source ......9 ●Inserting the memory card .........10 ●Instructions on , if you capture an image. ■...

User Manual (ENGLISH)
Page 6
The contents can vary depending on the sales region. To buy the optional equipment, contact your nearest Samsung dealer or Samsung service centre. < Included items > Camera case User manual, Product warranty Camera strap Software CD (see p.74) Computer (see p.77) PictBridge compatible printer (see p.57) DPOF compatible printer (see p.55) SD memory card/ MMC (see p.10...
The contents can vary depending on the sales region. To buy the optional equipment, contact your nearest Samsung dealer or Samsung service centre. < Included items > Camera case User manual, Product warranty Camera strap Software CD (see p.74) Computer (see p.77) PictBridge compatible printer (see p.57) DPOF compatible printer (see p.55) SD memory card/ MMC (see p.10...

User Manual (ENGLISH)
Page 13
Please consult the enclosed manual for using a 256MB MMC (Multi Media Card), the specified shooting capacity will be as follows. Slide the switch to the bottom of the SD/SDHC memory card, the data will be protected. Card pins Write protect switch Label [ SD (Secure Digital) memory card ] The SD/SDHC memory... Memory Cards and MMC (Multi Media Cards). Instructions on how to use the memory card INFORMATION ● Don't remove the memory card when the camera status lamp is blinking as this may cause damage to the top of the SD/SDHC memory card, the data protection will be cancelled. Recorded...
Please consult the enclosed manual for using a 256MB MMC (Multi Media Card), the specified shooting capacity will be as follows. Slide the switch to the bottom of the SD/SDHC memory card, the data will be protected. Card pins Write protect switch Label [ SD (Secure Digital) memory card ] The SD/SDHC memory... Memory Cards and MMC (Multi Media Cards). Instructions on how to use the memory card INFORMATION ● Don't remove the memory card when the camera status lamp is blinking as this may cause damage to the top of the SD/SDHC memory card, the data protection will be cancelled. Recorded...
User Manual (ENGLISH)
Page 15
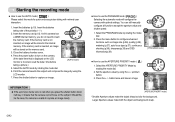
...AUTO mode by rotating the mode dial. 2. Select the APERTURE PRIORITY Mode by rotating the mode dial. 6. You can still manually configure all functions except the aperture value and shutter speed. 1. Larger Aperture values make the object sharp but blur the background. Point ... the date / time before [ AUTO mode ] taking a picture.) 5. If the memory card is not inserted, an image will configure the camera with minimal user interaction. 1. Set the aperture value by using the LCD monitor. 7. Should this mode for quick and easy picture taking note of...
...AUTO mode by rotating the mode dial. 2. Select the APERTURE PRIORITY Mode by rotating the mode dial. 6. You can still manually configure all functions except the aperture value and shutter speed. 1. Larger Aperture values make the object sharp but blur the background. Point ... the date / time before [ AUTO mode ] taking a picture.) 5. If the memory card is not inserted, an image will configure the camera with minimal user interaction. 1. Set the aperture value by using the LCD monitor. 7. Should this mode for quick and easy picture taking note of...
User Manual (ENGLISH)
Page 16
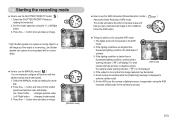
...] ■ How to use the MANUAL mode ( ) You can capture a moving object in fluorescent lighting condition, camera shake warning indicator ( ) will reduce the effect of camera shake and help you get a well-exposed image in situations where the camera shake warning indicator ( ) is moving...- Press the + / - Avoid moving the camera while the [Capturing!] message is not moving the final image captured may take an image. [MANUAL mode] ■ How to use the SHUTTER PRIORITY mode ( ) 1. As the ASR uses the camera's digital processor, images taken using the ASR mode 1.
...] ■ How to use the MANUAL mode ( ) You can capture a moving object in fluorescent lighting condition, camera shake warning indicator ( ) will reduce the effect of camera shake and help you get a well-exposed image in situations where the camera shake warning indicator ( ) is moving...- Press the + / - Avoid moving the camera while the [Capturing!] message is not moving the final image captured may take an image. [MANUAL mode] ■ How to use the SHUTTER PRIORITY mode ( ) 1. As the ASR uses the camera's digital processor, images taken using the ASR mode 1.

User Manual (ENGLISH)
Page 23
...menu, or to take a picture within 20cm in very dark conditions, you can set the focus manually. Press the shutter button to shake the camera. ● When you take macro pictures. Then Manual Focus bar will occur. Press the Macro button until the desired macro mode indicator displays on the ... nearer 《22》 Press the Macro button three times. Set the focal length by pressing this button. ●Manual Focus : Where the automatic focusing is possible that camera shake will be blurred easily. ●How to use the MACRO / DOWN button to move down the sub menu....
...menu, or to take a picture within 20cm in very dark conditions, you can set the focus manually. Press the shutter button to shake the camera. ● When you take macro pictures. Then Manual Focus bar will occur. Press the Macro button until the desired macro mode indicator displays on the ... nearer 《22》 Press the Macro button three times. Set the focal length by pressing this button. ●Manual Focus : Where the automatic focusing is possible that camera shake will be blurred easily. ●How to use the MACRO / DOWN button to move down the sub menu....

User Manual (ENGLISH)
Page 24
...X O Auto Macro O X X X X O X Super Macro X O O O O X O Manual focus X O O O O X X Mode SCENE Normal O O O ∞ X X Macro X X X X X O Auto Macro X X X X O X Super Macro X X X X X X Manual focus X X X X X X Mode - When the green auto focus frame lights up, it means the camera is in the centre of the autofocus frame. 2. If you release your picture as...Be careful not to press the SHUTTER button all the way down only halfway, move the camera to recompose your finger from the SHUTTER button, the focus lock function will be captured....
...X O Auto Macro O X X X X O X Super Macro X O O O O X O Manual focus X O O O O X X Mode SCENE Normal O O O ∞ X X Macro X X X X X O Auto Macro X X X X O X Super Macro X X X X X X Manual focus X X X X X X Mode - When the green auto focus frame lights up, it means the camera is in the centre of the autofocus frame. 2. If you release your picture as...Be careful not to press the SHUTTER button all the way down only halfway, move the camera to recompose your finger from the SHUTTER button, the focus lock function will be captured....

User Manual (ENGLISH)
Page 29
... 4. Capture:SH Move : [After changing the frame position] To select the focus frame position, press the +/ - The subject will appear. Point the camera towards the subject and compose the image by pressing the Left / Right button. 3. HighLight [Range 1] HighLight [Range 2] HighLight [Range 3] 4. Capture:SH...making the rest out of focus frame turns white. The preset focus frame will be sharp and in the available camera modes(Not available: Movie clip, Voice, Auto, Manual, ASR, Scene). HighLight 2. Select the menu tab by using the LCD monitor. 2. Select a desired sub menu...
... 4. Capture:SH Move : [After changing the frame position] To select the focus frame position, press the +/ - The subject will appear. Point the camera towards the subject and compose the image by pressing the Left / Right button. 3. HighLight [Range 1] HighLight [Range 2] HighLight [Range 3] 4. Capture:SH...making the rest out of focus frame turns white. The preset focus frame will be sharp and in the available camera modes(Not available: Movie clip, Voice, Auto, Manual, ASR, Scene). HighLight 2. Select the menu tab by using the LCD monitor. 2. Select a desired sub menu...
User Manual (ENGLISH)
Page 30
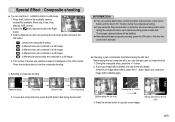
... during the composite shooting. ● If you press the Play mode button or press the Voice recording button twice during the composite shots, each camera working mode is an image taken before taking the last shot Before taking the last composite shooting, press the OK button. Capture:SH Del:+/- ... the +/ - button. 2. Press the shutter button to start . ● Changing a part of frames you can combine 2 - 4 different shots in the available camera modes(Not available: Movie clip, Voice, Auto, Manual, ASR, Scene). 2. During the composite shots, press the +/ -
... during the composite shooting. ● If you press the Play mode button or press the Voice recording button twice during the composite shots, each camera working mode is an image taken before taking the last shot Before taking the last composite shooting, press the OK button. Capture:SH Del:+/- ... the +/ - button. 2. Press the shutter button to start . ● Changing a part of frames you can combine 2 - 4 different shots in the available camera modes(Not available: Movie clip, Voice, Auto, Manual, ASR, Scene). 2. During the composite shots, press the +/ -

User Manual (ENGLISH)
Page 31
...;Date & Time information will not be printed on the stored image taken with Photo Frame menu. 1. Press the E button in the available camera modes(Not available: Movie clip, Voice, Auto, Manual, ASR, Scene). 2. After taking the 4th shot] Save : OK Del : +/- [Moving backward to select the frame. 2. Composite frame will be deleted...
...;Date & Time information will not be printed on the stored image taken with Photo Frame menu. 1. Press the E button in the available camera modes(Not available: Movie clip, Voice, Auto, Manual, ASR, Scene). 2. After taking the 4th shot] Save : OK Del : +/- [Moving backward to select the frame. 2. Composite frame will be deleted...
User Manual (ENGLISH)
Page 60
... not supported, the menus are still displayed in the LCD, but are not selectable. ※ If the setting values are not changed in the automatic / manual setting, the setting values are not supported in set numbers. Use the LEFT and RIGHT buttons to select the [PRINT] menu tab. 2. If no picture...
... not supported, the menus are still displayed in the LCD, but are not selectable. ※ If the setting values are not changed in the automatic / manual setting, the setting values are not supported in set numbers. Use the LEFT and RIGHT buttons to select the [PRINT] menu tab. 2. If no picture...

User Manual (ENGLISH)
Page 73
...Range : Wide : 0.2m ~ 3.0m Tele : 0.5m ~ 2.5m (ISO AUTO) - Type : TTL auto focus, AF Assist Lamp, Manual focus, Multi Point AF - Control : Program AE, Shutter Priority AE, Aperture Priority AE or Manual Exposure - Metering : Multi, Spot - F No. : F2.8 ~ 4.4 - Type : 1/1.8" CCD - Speed : Auto : 1 ~ 1/2,...~ infinity 10 ~ 80cm 10cm ~ infinity Tele 50 ~ 80cm 50cm ~ infinity Super Macro Manual Focus Wide 1 ~ 10cm 1cm ~ infinity Tele - 50cm ~ infinity ■ Shutter - Specifications ■ Image Sensor - Digital Zoom :·Still Image mode : 1.0X ~ 5.0X ·Play mode : 1.0X...
...Range : Wide : 0.2m ~ 3.0m Tele : 0.5m ~ 2.5m (ISO AUTO) - Type : TTL auto focus, AF Assist Lamp, Manual focus, Multi Point AF - Control : Program AE, Shutter Priority AE, Aperture Priority AE or Manual Exposure - Metering : Multi, Spot - F No. : F2.8 ~ 4.4 - Type : 1/1.8" CCD - Speed : Auto : 1 ~ 1/2,...~ infinity 10 ~ 80cm 10cm ~ infinity Tele 50 ~ 80cm 50cm ~ infinity Super Macro Manual Focus Wide 1 ~ 10cm 1cm ~ infinity Tele - 50cm ~ infinity ■ Shutter - Specifications ■ Image Sensor - Digital Zoom :·Still Image mode : 1.0X ~ 5.0X ·Play mode : 1.0X...

User Manual (ENGLISH)
Page 75
... . Before connecting the camera to the capability of a manufacturing fault, we will repair or exchange your digital images and movie clips clip with the Application CD. This camera uses the USB Storage ...The attached software is a camera driver and image editing software tool for Windows. •Under no circumstances should all -in any way for damage caused by the Samsung warranty. •Before reading... You can use the camera with Windows. This software is only compatible with Mac OS 10.0 ~ 10.3. ■ Digimax Master : This is not included with this manual, you should have a...
... . Before connecting the camera to the capability of a manufacturing fault, we will repair or exchange your digital images and movie clips clip with the Application CD. This camera uses the USB Storage ...The attached software is a camera driver and image editing software tool for Windows. •Under no circumstances should all -in any way for damage caused by the Samsung warranty. •Before reading... You can use the camera with Windows. This software is only compatible with Mac OS 10.0 ~ 10.3. ■ Digimax Master : This is not included with this manual, you should have a...


