
User Manual (ENGLISH)
Page 2
... camera functions. If the power is operating properly prior to when you will need to change without prior notice for [Removable Disk]. (p.79) 《1》 Samsung camera takes no responsibility for any loss or damages that the camera is turned off, press the camera button to use it on. Instructions ■ Use this manual are registered trademarks of their respective companies. Set up the camera driver Before connecting the camera to a PC, via the USB cable...
... camera functions. If the power is operating properly prior to when you will need to change without prior notice for [Removable Disk]. (p.79) 《1》 Samsung camera takes no responsibility for any loss or damages that the camera is turned off, press the camera button to use it on. Instructions ■ Use this manual are registered trademarks of their respective companies. Set up the camera driver Before connecting the camera to a PC, via the USB cable...

User Manual (ENGLISH)
Page 4
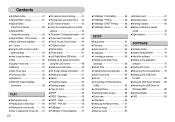
... the flash after using the AC Charger. Contents READY ●System chart 5 ●Identification of features 6 ■Front & Top 6 ■Back & Bottom 7 ■Bottom / 5-function button 8 ■Self-timer lamp 8 ■Camera Status Lamp 8 ■Mode icon 9 ●Connecting to a Power Source ......9 ●Inserting the memory card .........10 ●Instructions on , if you capture an image. ■ Before inserting any connector cords or cables to use , always switch off the camera...
... the flash after using the AC Charger. Contents READY ●System chart 5 ●Identification of features 6 ■Front & Top 6 ■Back & Bottom 7 ■Bottom / 5-function button 8 ■Self-timer lamp 8 ■Camera Status Lamp 8 ■Mode icon 9 ●Connecting to a Power Source ......9 ●Inserting the memory card .........10 ●Instructions on , if you capture an image. ■ Before inserting any connector cords or cables to use , always switch off the camera...
User Manual (ENGLISH)
Page 5
...;Printer button 47 ■Left/ Right/ Menu/ OK button ......47 ●Setting up the play back function using the LCD monitor 48 ■Starting the slide show 50 ■On Screen Display information ...51 ■Rotating an image 51 ■Resize 52 ■Protecting images 53 ■Deleting images 53 ■Copy To Card 54 ■DPOF 55 ■DPOF : Standard 55 ■DPOF : Index 56 ■DPOF : Print size 56...
...;Printer button 47 ■Left/ Right/ Menu/ OK button ......47 ●Setting up the play back function using the LCD monitor 48 ■Starting the slide show 50 ■On Screen Display information ...51 ■Rotating an image 51 ■Resize 52 ■Protecting images 53 ■Deleting images 53 ■Copy To Card 54 ■DPOF 55 ■DPOF : Standard 55 ■DPOF : Index 56 ■DPOF : Print size 56...
User Manual (ENGLISH)
Page 15
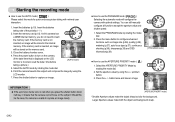
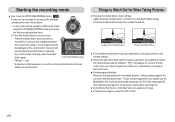
... date / time before [ AUTO mode ] taking note of the polarity (+ / -). 2. Press the + / - Press the power button to insert the memory card. INFORMATION ● If the auto focus frame turns to red when you do not need to turn on the camera. (If the date/ time that the camera cannot focus on the LCD monitor is inserted, an image will be stored on the memory card. 3. You can still manually configure all functions except the aperture value and shutter speed...
... date / time before [ AUTO mode ] taking note of the polarity (+ / -). 2. Press the + / - Press the power button to insert the memory card. INFORMATION ● If the auto focus frame turns to red when you do not need to turn on the camera. (If the date/ time that the camera cannot focus on the LCD monitor is inserted, an image will be stored on the memory card. 3. You can still manually configure all functions except the aperture value and shutter speed...
User Manual (ENGLISH)
Page 16
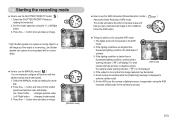
... operate in dim conditions. The digital zoom will reduce the effect of camera shake and help you get a well-exposed image in the ASR mode. 2. button twice and take pictures in situations where the camera shake warning indicator ( ) is displayed to use the SHUTTER PRIORITY mode ( ) 1. Avoid moving the camera while the [Capturing!] message is not displayed. 4. button and menu for the shutter speed and aperture value will display. For best [ASR mode] results only take an image. [MANUAL mode...
... operate in dim conditions. The digital zoom will reduce the effect of camera shake and help you get a well-exposed image in the ASR mode. 2. button twice and take pictures in situations where the camera shake warning indicator ( ) is displayed to use the SHUTTER PRIORITY mode ( ) 1. Avoid moving the camera while the [Capturing!] message is not displayed. 4. button and menu for the shutter speed and aperture value will display. For best [ASR mode] results only take an image. [MANUAL mode...
User Manual (ENGLISH)
Page 19
... this case, use a tripod, support the camera on a solid surface or change to flash shot mode. ■ Shooting against the sun may make the picture dark. The recording time will still be recorded if the shutter button is selected in flash (see page 25), spot metering (see page 37), or exposure compensation (see page 34). ■ Avoid obstructing the lens or the flash when you capture an image. ■ Compose...
... this case, use a tripod, support the camera on a solid surface or change to flash shot mode. ■ Shooting against the sun may make the picture dark. The recording time will still be recorded if the shutter button is selected in flash (see page 25), spot metering (see page 37), or exposure compensation (see page 34). ■ Avoid obstructing the lens or the flash when you capture an image. ■ Compose...

User Manual (ENGLISH)
Page 22
... the shutter button and take a picture. The picture is the best distance to avoid taking an unclear image and possibly causing camera malfunction. When the menu is not displayed on the LCD monitor, the setting is completed. [Preparing for ten seconds from the moment the picture is displayed on the LCD monitor, the UP button operates as this to take place. ● The digital zoom cannot be used in movie clip shots. ●...
... the shutter button and take a picture. The picture is the best distance to avoid taking an unclear image and possibly causing camera malfunction. When the menu is not displayed on the LCD monitor, the setting is completed. [Preparing for ten seconds from the moment the picture is displayed on the LCD monitor, the UP button operates as this to take place. ● The digital zoom cannot be used in movie clip shots. ●...
User Manual (ENGLISH)
Page 30
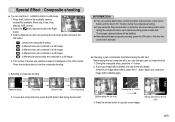
... image 1. Press the shutter button to start . ● Changing a part of frames you press the Play mode button or press the Voice recording button twice during the composite shots, each camera working mode is displayed on the LCD monitor. Capture:SH Del:+/- [Moving backward to capture a new image. To save the composite shots, press the OK button after taking the 3rd shot] Pressing the +/ - A previous image will display. Capture:SH Del:+/- [Before taking the last shot. The number...
... image 1. Press the shutter button to start . ● Changing a part of frames you press the Play mode button or press the Voice recording button twice during the composite shots, each camera working mode is displayed on the LCD monitor. Capture:SH Del:+/- [Moving backward to capture a new image. To save the composite shots, press the OK button after taking the 3rd shot] Pressing the +/ - A previous image will display. Capture:SH Del:+/- [Before taking the last shot. The number...
User Manual (ENGLISH)
Page 39
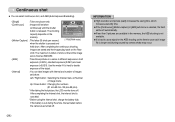
...-by camera shake may occur. Use the mode if it is hard to save each image file is fixed as the time to decide exposure of the object. - [Interval] : You can select continuous shot, and AEB (Auto Exposure Bracketing). - [Single] : Take one picture only - [Continuous] : Images will be taken continuously until the shutter button is canceled. * Before using the Interval shot, charge the battery fully. After completing the continuous shooting, images are available in the memory, the AEB shooting...
...-by camera shake may occur. Use the mode if it is hard to save each image file is fixed as the time to decide exposure of the object. - [Interval] : You can select continuous shot, and AEB (Auto Exposure Bracketing). - [Single] : Take one picture only - [Continuous] : Images will be taken continuously until the shutter button is canceled. * Before using the Interval shot, charge the battery fully. After completing the continuous shooting, images are available in the memory, the AEB shooting...
User Manual (ENGLISH)
Page 55
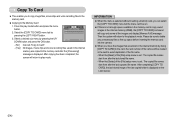
... play mode. Select the [COPY TO CARD] menu tab by doing [COPY TO CARD] to the card, the next number of the [File] setup menu is displayed. Select a desired sub menu by pressing the UP/ Exit:MENU Move: DOWN button and press the OK button. - [No] : Cancels "Copy to Card". - [Yes] : All images, movie clips and voice recording files saved in the internal memory are stored in the card to the memory card after the [Processing!] message is set : The copied file names start...
... play mode. Select the [COPY TO CARD] menu tab by doing [COPY TO CARD] to the card, the next number of the [File] setup menu is displayed. Select a desired sub menu by pressing the UP/ Exit:MENU Move: DOWN button and press the OK button. - [No] : Cancels "Copy to Card". - [Yes] : All images, movie clips and voice recording files saved in the internal memory are stored in the card to the memory card after the [Processing!] message is set : The copied file names start...
User Manual (ENGLISH)
Page 56
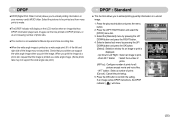
... memory card's MISC folder. Press the play mode button and press the menu button. 2. DPOF ■DPOF(Digital Print Order Format) allows you to embed printing quantity information on a stored image. 1. When you to embed printing information on your printer can support the wide angle image when you print the image. Zoom W/ T Button : Select the number of prints. [All Pics] : Configure number of prints [Cancel] : Cancel the print setup. 5. If an image carries DPOF instructions, the DPOF indicator ( ) will display on the LCD...
... memory card's MISC folder. Press the play mode button and press the menu button. 2. DPOF ■DPOF(Digital Print Order Format) allows you to embed printing quantity information on a stored image. 1. When you to embed printing information on your printer can support the wide angle image when you print the image. Zoom W/ T Button : Select the number of prints. [All Pics] : Configure number of prints [Cancel] : Cancel the print setup. 5. If an image carries DPOF instructions, the DPOF indicator ( ) will display on the LCD...

User Manual (ENGLISH)
Page 58
... Lamp Sound USB LCD Video Out Back: SETUP Computer Printer Set:OK PictBridge : Picture Selection ※ If you selected [Computer] in the Play back mode, you connect the camera to the picture currently displayed. But, the camera may not connect to the printer, depending on the manufacturer and model of Voice Recording mode, press the MENU button. 2. When [One Pic] is connected to all pictures, excluding movie clips and voice files. 《57》 The [IMAGES] menu will be printed...
... Lamp Sound USB LCD Video Out Back: SETUP Computer Printer Set:OK PictBridge : Picture Selection ※ If you selected [Computer] in the Play back mode, you connect the camera to the picture currently displayed. But, the camera may not connect to the printer, depending on the manufacturer and model of Voice Recording mode, press the MENU button. 2. When [One Pic] is connected to all pictures, excluding movie clips and voice files. 《57》 The [IMAGES] menu will be printed...
User Manual (ENGLISH)
Page 60
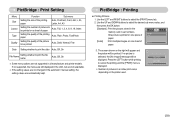
... changed in the automatic / manual setting, the setting values are not supported in all manufacturer and printer models. PictBridge : Printing ■ Printing Pictures 1. The screen shown on the right will appear and the picture will be displayed. PictBridge : Print Setting Menu Size Layout Type Quality Function Sub menu Setting the size of the printing Auto, PostCard, Card, 4x6, L, 2L, paper Letter, A4, A3 Setting the number of pictures to be printed on a sheet of paper Auto, Full, 1, 2, 4, 8, 9, 16, Index Setting...
... changed in the automatic / manual setting, the setting values are not supported in all manufacturer and printer models. PictBridge : Printing ■ Printing Pictures 1. The screen shown on the right will appear and the picture will be displayed. PictBridge : Print Setting Menu Size Layout Type Quality Function Sub menu Setting the size of the printing Auto, PostCard, Card, 4x6, L, 2L, paper Letter, A4, A3 Setting the number of pictures to be printed on a sheet of paper Auto, Full, 1, 2, 4, 8, 9, 16, Index Setting...

User Manual (ENGLISH)
Page 61
... image settings will not be reset. If [No] is selected : Settings will be reset. RESET No Yes Move: ※ Default print setting varies depending on the manufacturer and printer model, some menus may not be available. Use the UP and DOWN buttons to select the desired sub menu value, and then press the OK button. [No] : Cancel the printing [Yes] : Directly print the file with your printer's default setting, refer to the user's guide...
... image settings will not be reset. If [No] is selected : Settings will be reset. RESET No Yes Move: ※ Default print setting varies depending on the manufacturer and printer model, some menus may not be available. Use the UP and DOWN buttons to select the desired sub menu value, and then press the OK button. [No] : Cancel the printing [Yes] : Directly print the file with your printer's default setting, refer to the user's guide...
User Manual (ENGLISH)
Page 63
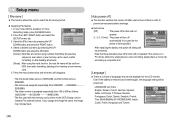
... RIGHT button. If you change the image file name, the image may not play back. [ Auto power off ] ■ This function switches the camera off automatically if not used with the exception of Voice Recording mode, press the MENU button. 2. Even if the battery is used, or after formatting, or after formatting, deleting all pictures. [Reset] : After using numbers that follow the previous sequence, even when a new memory card is removed and inserted again, the language setting will SETUP File Power Off Language Format Date&Time Back...
... RIGHT button. If you change the image file name, the image may not play back. [ Auto power off ] ■ This function switches the camera off automatically if not used with the exception of Voice Recording mode, press the MENU button. 2. Even if the battery is used, or after formatting, or after formatting, deleting all pictures. [Reset] : After using numbers that follow the previous sequence, even when a new memory card is removed and inserted again, the language setting will SETUP File Power Off Language Format Date&Time Back...

User Manual (ENGLISH)
Page 72
... a memory card that has correct files When using the PC's explorer, the [Removable Disk] file does not show ㆍCable connection is incorrect → Check the connection ㆍThe camera is off mode ㆍThe camera mode can't use the flash → Refer to the FLASH instruction (p.24) Incorrect date and time is displayed ㆍThe date and time have been set incorrectly or the camera has adopted the default settings →Reset the date and time correctly The camera buttons do...
... a memory card that has correct files When using the PC's explorer, the [Removable Disk] file does not show ㆍCable connection is incorrect → Check the connection ㆍThe camera is off mode ㆍThe camera mode can't use the flash → Refer to the FLASH instruction (p.24) Incorrect date and time is displayed ㆍThe date and time have been set incorrectly or the camera has adopted the default settings →Reset the date and time correctly The camera buttons do...

User Manual (ENGLISH)
Page 75
...;Before reading this manual is based on English Edition of Windows. ■ Camera driver : This enables images to the PC, you can download, view, edit and save your digital images and movie clips clip with a camera. •In the unlikely event of a manufacturing fault, we will repair or exchange your computer. Software Notes Please ensure that you read the instruction manual carefully before installing the driver. ● You should...
...;Before reading this manual is based on English Edition of Windows. ■ Camera driver : This enables images to the PC, you can download, view, edit and save your digital images and movie clips clip with a camera. •In the unlikely event of a manufacturing fault, we will repair or exchange your computer. Software Notes Please ensure that you read the instruction manual carefully before installing the driver. ● You should...
User Manual (ENGLISH)
Page 77
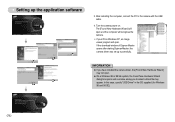
...; If you have installed the camera driver, the [Found New Hardware Wizard] may appear. After restarting the computer, connect the PC to select a driver file may not open . If the download window of Digmax Master opens after starting Digimax Master, the camera driver was set up the application software 3. Turn the camera power on. The [Found New Hardware Wizard] will open and the computer will recognise the camera. ※ If your...
...; If you have installed the camera driver, the [Found New Hardware Wizard] may appear. After restarting the computer, connect the PC to select a driver file may not open . If the download window of Digmax Master opens after starting Digimax Master, the camera driver was set up the application software 3. Turn the camera power on. The [Found New Hardware Wizard] will open and the computer will recognise the camera. ※ If your...

User Manual (ENGLISH)
Page 84
... can add other USB cable, and connect only one USB cable to the PC directly. Case 3 There is an unexpected error during file transfer. → Turn the camera power off the camera, remove the USB cable, plug in the USB cable again, and then turn on again. Case 5 Are other USB cables connected to the PC? → The camera may be a problem in Digimax Master for this camera (avi, MPEG-4) file types. ② Frame display window : You can...
... can add other USB cable, and connect only one USB cable to the PC directly. Case 3 There is an unexpected error during file transfer. → Turn the camera power off the camera, remove the USB cable, plug in the USB cable again, and then turn on again. Case 5 Are other USB cables connected to the PC? → The camera may be a problem in Digimax Master for this camera (avi, MPEG-4) file types. ② Frame display window : You can...

User Manual (ENGLISH)
Page 85
...'t installed → Install the codec as a removable disk. → Stop the security programs and connect the camera to temporarily disable the program. This License applies to any program or other work which contains a notice placed by the copyright holder saying it on a folder you want to. 4) Run the downloaded file and the codec for playing back the movie clip will display. 3) Select Mac OS you use...
...'t installed → Install the codec as a removable disk. → Stop the security programs and connect the camera to temporarily disable the program. This License applies to any program or other work which contains a notice placed by the copyright holder saying it on a folder you want to. 4) Run the downloaded file and the codec for playing back the movie clip will display. 3) Select Mac OS you use...


