
User Manual Ver.1.0 (English)
Page 2
... the USB cable Insert the supplied USB cable into the PC's USB port and the camera's USB connection terminal. (p.97) Check the camera's power. Set up the camera driver. Samsung takes no responsibility for buying a Samsung Digital Camera. åPrior to using this camera, please read the user manual thoroughly. åIf you intend to use it on...
... the USB cable Insert the supplied USB cable into the PC's USB port and the camera's USB connection terminal. (p.97) Check the camera's power. Set up the camera driver. Samsung takes no responsibility for buying a Samsung Digital Camera. åPrior to using this camera, please read the user manual thoroughly. åIf you intend to use it on...

User Manual Ver.1.0 (English)
Page 3
... or in fire, injury, electric shock or severe damage to you or your dealer or Samsung Camera Service centre. å Please do not cover the camera or Charger. Do not continue to use the camera as this could increase the risk of explosion. å Should any way. Warning WARNING indicates a... close proximity to flammable or explosive gases, as this product and accessories out of reach of electric shock. Should this camera in places subject to your dealer or Samsung Camera Service centre. Always use and it time to cool. å Do not leave this be carried out by your...
... or in fire, injury, electric shock or severe damage to you or your dealer or Samsung Camera Service centre. å Please do not cover the camera or Charger. Do not continue to use the camera as this could increase the risk of explosion. å Should any way. Warning WARNING indicates a... close proximity to flammable or explosive gases, as this product and accessories out of reach of electric shock. Should this camera in places subject to your dealer or Samsung Camera Service centre. Always use and it time to cool. å Do not leave this be carried out by your...

User Manual Ver.1.0 (English)
Page 4
...is switched on the [Setup] > [Battery Type] menu (p. 56) are using it is in contact with the camera specification may result in a minor or moderate injury. å Leaking, overheating, or damaged battery could result...features 008 Front & Top 009 Back 010 Bottom / 5 Function button 010 Self-timer lamp 010 Camera Status Lamp 011 Mode icon 011 Connecting to a Power Source 012 Inserting the memory card 013 ...use the Scene modes 019 How to use the Portrait mode 019 How to use the camera for the camera. - Do not touch the flash after using the AC Charger. After use the...
...is switched on the [Setup] > [Battery Type] menu (p. 56) are using it is in contact with the camera specification may result in a minor or moderate injury. å Leaking, overheating, or damaged battery could result...features 008 Front & Top 009 Back 010 Bottom / 5 Function button 010 Self-timer lamp 010 Camera Status Lamp 011 Mode icon 011 Connecting to a Power Source 012 Inserting the memory card 013 ...use the Scene modes 019 How to use the Portrait mode 019 How to use the camera for the camera. - Do not touch the flash after using the AC Charger. After use the...

User Manual Ver.1.0 (English)
Page 5
Contents 021 Things to Watch Out for When Taking Pictures 022 Using the camera buttons to set the camera 022 POWER button 022 SHUTTER button 022 ZOOM W / T button 024 Info / Up button 024 Macro / Down button 026 Focus lock 026 Flash / Left button 028 ... 44 044 044 045 045 047 047 048 048 049 049 049 049 049 050 050 050 051 Using the LCD monitor to adjust the camera settings Recording Sharpness Contrast Auto Focus type Voice Memo Voice Recording Recording the movie clip without voice SCENE mode Sound menu Sound Volume Start up...
Contents 021 Things to Watch Out for When Taking Pictures 022 Using the camera buttons to set the camera 022 POWER button 022 SHUTTER button 022 ZOOM W / T button 024 Info / Up button 024 Macro / Down button 026 Focus lock 026 Flash / Left button 028 ... 44 044 044 045 045 047 047 048 048 049 049 049 049 049 050 050 050 051 Using the LCD monitor to adjust the camera settings Recording Sharpness Contrast Auto Focus type Voice Memo Voice Recording Recording the movie clip without voice SCENE mode Sound menu Sound Volume Start up...

User Manual Ver.1.0 (English)
Page 6
... play mode Playing back a still image Playing back a movie clip Movie clip capture function On camera movie trimming Playing back a recorded voice Playing back a voice memo 060 LCD monitor Indicator 060 Using the camera buttons to set the camera 060 Thumbnail / Enlargement button 062 Info / Up button 062 Play & Pause / Down button 063...
... play mode Playing back a still image Playing back a movie clip Movie clip capture function On camera movie trimming Playing back a recorded voice Playing back a voice memo 060 LCD monitor Indicator 060 Using the camera buttons to set the camera 060 Thumbnail / Enlargement button 062 Info / Up button 062 Play & Pause / Down button 063...

User Manual Ver.1.0 (English)
Page 8
The contents can vary depending on the sales region. To buy the optional equipment, contact your nearest Samsung dealer or Samsung service centre. < Included items > Camera case User manual, Product warranty Camera strap Software CD (see p.93) Computer (see p.97) PictBridge compatible printer (see p.82) 01 READY DPOF compatible printer (see p.79) SD/SDHC memory...
The contents can vary depending on the sales region. To buy the optional equipment, contact your nearest Samsung dealer or Samsung service centre. < Included items > Camera case User manual, Product warranty Camera strap Software CD (see p.93) Computer (see p.97) PictBridge compatible printer (see p.82) 01 READY DPOF compatible printer (see p.79) SD/SDHC memory...

User Manual Ver.1.0 (English)
Page 11
... MENU / OK button Flash / Left button Self-timer / Right button 10 _READY Macro / Down button Play & Pause button Self-timer lamp Icon Status Description - Camera Status Lamp Status Power on After taking a picture When the USB cable is inserted to a PC Transmitting Data with a PC When the USB cable is... button, the image is printing The lamp blinks When the AF activates The lamp turns on (The camera focus on the subject) The lamp blinks (The camera doesn't focus on and off when the camera is ready to take a picture The lamp blinks while saving the image data and turns off when...
... MENU / OK button Flash / Left button Self-timer / Right button 10 _READY Macro / Down button Play & Pause button Self-timer lamp Icon Status Description - Camera Status Lamp Status Power on After taking a picture When the USB cable is inserted to a PC Transmitting Data with a PC When the USB cable is... button, the image is printing The lamp blinks When the AF activates The lamp turns on (The camera focus on the subject) The lamp blinks (The camera doesn't focus on and off when the camera is ready to take a picture The lamp blinks while saving the image data and turns off when...
User Manual Ver.1.0 (English)
Page 12
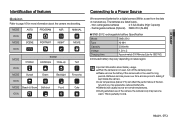
... setting. READY_ 11 01 READY Identification of features Mode icon Refer to page 16 for a digital camera (Within a year from the date of manufacture). Non rechargeable batteries : 2 X AA Alkaline (High Capacity) - Rechargeable batteries (Optional) : SNB-2512 (Ni-MH) Ê... reduced battery life. å Batteries will not be used , turn off the camera power. å Please remove the battery if the camera will usually recover at normal temperatures. å During extended use of the camera, the camera body may vary depending on sales region. This is not used for SBC-N2...
... setting. READY_ 11 01 READY Identification of features Mode icon Refer to page 16 for a digital camera (Within a year from the date of manufacture). Non rechargeable batteries : 2 X AA Alkaline (High Capacity) - Rechargeable batteries (Optional) : SNB-2512 (Ni-MH) Ê... reduced battery life. å Batteries will not be used , turn off the camera power. å Please remove the battery if the camera will usually recover at normal temperatures. å During extended use of the camera, the camera body may vary depending on sales region. This is not used for SBC-N2...

User Manual Ver.1.0 (English)
Page 13
... Ê Insert the memory card as shown - Have the front of the memory card facing toward the front of the camera (Lens) and the card pins toward the back of the camera (LCD monitor). - Connecting to a Power Source Ê Insert the battery as shown. - Do not insert the memory card the wrong... way round. Battery indicator Battery status ihgf The battery is opened, do not press the battery chamber cover by force. If the camera does not turn on the LCD monitor. This may damage the memory card slot. 12 _READY Doing so may cause damage to the battery chamber...
... Ê Insert the memory card as shown - Have the front of the memory card facing toward the front of the camera (Lens) and the card pins toward the back of the camera (LCD monitor). - Connecting to a Power Source Ê Insert the battery as shown. - Do not insert the memory card the wrong... way round. Battery indicator Battery status ihgf The battery is opened, do not press the battery chamber cover by force. If the camera does not turn on the LCD monitor. This may damage the memory card slot. 12 _READY Doing so may cause damage to the battery chamber...

User Manual Ver.1.0 (English)
Page 14
...digital camera. near loud speakers or TV receivers. å Please do not use , you will eventually reduce the memory card's performance. READY_ 13 Should this happen, clean the memory card with a different camera. å Turn off or the memory card is removed while recording, deleting (formatting) or reading. å Samsung...and after periods of the memory card will need to copy important data onto other media as this camera. å Do not use a memory card formatted by the Samsung warranty. å The memory card is used in an environment where there are using this may ...
...digital camera. near loud speakers or TV receivers. å Please do not use , you will eventually reduce the memory card's performance. READY_ 13 Should this happen, clean the memory card with a different camera. å Turn off or the memory card is removed while recording, deleting (formatting) or reading. å Samsung...and after periods of the memory card will need to copy important data onto other media as this camera. å Do not use a memory card formatted by the Samsung warranty. å The memory card is used in an environment where there are using this may ...

User Manual Ver.1.0 (English)
Page 15
... memory card before taking a picture. These figures are approximate as image capacities can be protected. Card pins Write protect switch Label [SD (Secure Digital) memory card] å The SD/ SDHC memory card has a write protect switch that prevents image files from being deleted or formatted. When ... 663 *Movie ì - - About 3'36" About 7'2" - About 13'18" About 25'38" å The recording times can use the memory card The camera can be as subject matter and memory card type. By sliding the switch to the top of the SD memory card, the data will be...
... memory card before taking a picture. These figures are approximate as image capacities can be protected. Card pins Write protect switch Label [SD (Secure Digital) memory card] å The SD/ SDHC memory card has a write protect switch that prevents image files from being deleted or formatted. When ... 663 *Movie ì - - About 3'36" About 7'2" - About 13'18" About 25'38" å The recording times can use the memory card The camera can be as subject matter and memory card type. By sliding the switch to the top of the SD memory card, the data will be...

User Manual Ver.1.0 (English)
Page 16
...monitor indicator Ê The LCD monitor displays information about the shooting functions and selections. [Image & Full Status] No. Description 5 Optical / Digital Zoom bar / Digital Zoom rate 6 Battery 7 Image Size 8 Image Quality / Frame Rate 9 Metering 10 Drive mode 11 ISO 12 White Balance 13 Exposure ...compensation 14 Date / Time 15 Camera shake Warning 16 Auto Focus Frame 17 Sharpness / Without Sound 18 Contrast 19...
...monitor indicator Ê The LCD monitor displays information about the shooting functions and selections. [Image & Full Status] No. Description 5 Optical / Digital Zoom bar / Digital Zoom rate 6 Battery 7 Image Size 8 Image Quality / Frame Rate 9 Metering 10 Drive mode 11 ISO 12 White Balance 13 Exposure ...compensation 14 Date / Time 15 Camera shake Warning 16 Auto Focus Frame 17 Sharpness / Without Sound 18 Contrast 19...

User Manual Ver.1.0 (English)
Page 17
... White Balance (p.42) and Exposure Value(p.43). Insert the memory card (p.12). Press the power button to turn on the camera. (If the date/time that the camera cannot focus on the LCD monitor is displayed on the subject. Select the PROGRAM mode by rotating the mode dial. 6. As...that is incorrect, reset the date/time before taking note of the polarity (+ / -). 2. Press the Fn button to capture an image. Point the camera towards the subject and compose the image by using the LCD monitor. 7. Starting the recording mode How to use the Program mode ( ¶ ) Selecting...
... White Balance (p.42) and Exposure Value(p.43). Insert the memory card (p.12). Press the power button to turn on the camera. (If the date/time that the camera cannot focus on the LCD monitor is displayed on the subject. Select the PROGRAM mode by rotating the mode dial. 6. As...that is incorrect, reset the date/time before taking note of the polarity (+ / -). 2. Press the Fn button to capture an image. Point the camera towards the subject and compose the image by using the LCD monitor. 7. Starting the recording mode How to use the Program mode ( ¶ ) Selecting...

User Manual Ver.1.0 (English)
Page 18
... Press the Fn button twice and take pictures in fluorescent lighting conditions, camera shake warning indicator ( Ã ) will display. As the ASR uses the camera's digital signal processor, it may be blurred. 5. Press the Fn button and menu for the camera to use the ASR mode ( · ) Advanced Shake Reduction (ASR) ...This mode will not operate in dim conditions. Ê Things to achieve a better result. 6. For best results only take an image. The digital zoom will reduce the effect of camera shake and help you get a wellexposed image in the ASR mode. 2.
... Press the Fn button twice and take pictures in fluorescent lighting conditions, camera shake warning indicator ( Ã ) will display. As the ASR uses the camera's digital signal processor, it may be blurred. 5. Press the Fn button and menu for the camera to use the ASR mode ( · ) Advanced Shake Reduction (ASR) ...This mode will not operate in dim conditions. Ê Things to achieve a better result. 6. For best results only take an image. The digital zoom will reduce the effect of camera shake and help you get a wellexposed image in the ASR mode. 2.

User Manual Ver.1.0 (English)
Page 19
... and insects. ( p ) : Use this mode to appear in the image. ( ... ) : For taking delicious looking food. ( ˆ ) : For taking pictures in cafes and restaurants. Point the camera towards the subject and compose the image by rotating the Mode dial. (p.48) 2.
... and insects. ( p ) : Use this mode to appear in the image. ( ... ) : For taking delicious looking food. ( ˆ ) : For taking pictures in cafes and restaurants. Point the camera towards the subject and compose the image by rotating the Mode dial. (p.48) 2.

User Manual Ver.1.0 (English)
Page 20
... clips will display on the LCD monitor.). 2. Select the Movie clip mode by using mode dial. Select Night mode using the LCD monitor. 3. Point the camera towards the subject and compose the image by rotating the Mode dial. ( The Movie clip mode icon and available recording time will still be recorded...
... clips will display on the LCD monitor.). 2. Select the Movie clip mode by using mode dial. Select Night mode using the LCD monitor. 3. Point the camera towards the subject and compose the image by rotating the Mode dial. ( The Movie clip mode icon and available recording time will still be recorded...

User Manual Ver.1.0 (English)
Page 21
... stop recording, press the shutter button again. 20 _RECORDING Press the Menu button. 5. Press the OK button. Pausing while recording a movie clip (Successive Recording) This camera allows you to pause recording. 5. If you can record your favourite scenes into a movie clip without having to stop during unwanted scenes, while recording a movie...
... stop recording, press the shutter button again. 20 _RECORDING Press the Menu button. 5. Press the OK button. Pausing while recording a movie clip (Successive Recording) This camera allows you to pause recording. 5. If you can record your favourite scenes into a movie clip without having to stop during unwanted scenes, while recording a movie...

User Manual Ver.1.0 (English)
Page 22
... a picture against the sun. In this case, use the [BACKLIGHT] in the scene shooting mode (see page 18), fill-in a low lighting condition, the camera shake warning indicator ( Ã ) may make the picture dark. To take pictures against the light, please use a tripod, support the... the LCD monitor. When the surroundings are dark. å The available memory capacity may vary depending on shooting conditions and camera settings. å When the Flash Off or Slow synchro mode is selected in flash (see page 26), spot metering (see page 40), or exposure ...
... a picture against the sun. In this case, use the [BACKLIGHT] in the scene shooting mode (see page 18), fill-in a low lighting condition, the camera shake warning indicator ( Ã ) may make the picture dark. To take pictures against the light, please use a tripod, support the... the LCD monitor. When the surroundings are dark. å The available memory capacity may vary depending on shooting conditions and camera settings. å When the Flash Off or Slow synchro mode is selected in flash (see page 26), spot metering (see page 40), or exposure ...

User Manual Ver.1.0 (English)
Page 23
... shutter button again. å In STILL IMAGE mode Pressing the shutter button down fully takes and stores the image. This camera has a 5X optical zoom and a 5X digital zoom function. If you select voice memo recording, the recording will zoom into the subject i.e. Using both will have no ...zoom is recorded for as long as the OPTICAL ZOOM or DIGITAL ZOOM button. Using the camera buttons to set the camera The recording mode function can be turned off automatically to save battery life. This will start after the camera has finished storing the image data. If there is...
... shutter button again. å In STILL IMAGE mode Pressing the shutter button down fully takes and stores the image. This camera has a 5X optical zoom and a 5X digital zoom function. If you select voice memo recording, the recording will zoom into the subject i.e. Using both will have no ...zoom is recorded for as long as the OPTICAL ZOOM or DIGITAL ZOOM button. Using the camera buttons to set the camera The recording mode function can be turned off automatically to save battery life. This will start after the camera has finished storing the image data. If there is...

User Manual Ver.1.0 (English)
Page 24
...RECORDING_ 23 02 RECORDING the subject will set the camera to its furthest from the subject i.e. Releasing ZOOM W button stops digital zooming. This will reduce the digital zooming in image quality when using the digital zoom may cause a camera malfunction. Pressing the ZOOM W button Pressing the ZOOM... ZOOM W button will zoom out from the camera. Pressing the ZOOM W button Pressing the ZOOM W button [Digital zoom 5.0X] [TELE zoom] [WIDE zoom] å Images taken using the digital zoom. å To view a clearer digital zoom image, press the shutter button halfway at...
...RECORDING_ 23 02 RECORDING the subject will set the camera to its furthest from the subject i.e. Releasing ZOOM W button stops digital zooming. This will reduce the digital zooming in image quality when using the digital zoom may cause a camera malfunction. Pressing the ZOOM W button Pressing the ZOOM... ZOOM W button will zoom out from the camera. Pressing the ZOOM W button Pressing the ZOOM W button [Digital zoom 5.0X] [TELE zoom] [WIDE zoom] å Images taken using the digital zoom. å To view a clearer digital zoom image, press the shutter button halfway at...


