User Manual
Page 2
... [Removable Disk] Open WindowŖs EXPLORER and search for loss or damage of the camera malfunction (such as battery, Memory card etc.) to the A/S centre. ƃ Please check that may result from www.Manualslib.com manuals search engine Install the camera driver that is operating properly prior to when you intend to set up the camera driver Before connecting the camera to a PC, via the USB cable, you will need to use...
... [Removable Disk] Open WindowŖs EXPLORER and search for loss or damage of the camera malfunction (such as battery, Memory card etc.) to the A/S centre. ƃ Please check that may result from www.Manualslib.com manuals search engine Install the camera driver that is operating properly prior to when you intend to set up the camera driver Before connecting the camera to a PC, via the USB cable, you will need to use...

User Manual
Page 3
... camera before moving parts. ƈ Battery and camera may damage the cords or cables and cause a fire or electric shock. ƈ Take care not to touch the lens or lens cover to use , always switch off the camera, and then disconnect the power source. You must contact your camera. the memory card slot and battery chamber. This could result in fire or injury. ҮUse battery with the correct specification...
... camera before moving parts. ƈ Battery and camera may damage the cords or cables and cause a fire or electric shock. ƈ Take care not to touch the lens or lens cover to use , always switch off the camera, and then disconnect the power source. You must contact your camera. the memory card slot and battery chamber. This could result in fire or injury. ҮUse battery with the correct specification...

User Manual
Page 4
...;Bottom / 5-function button 7 ƈCradle(Optional) 7 ƈSelf-timer lamp 8 ƈCamera Status Lamp 8 ƈMode icon 8 ƃConnecting to a Power Source 8 ƈUsing the batteries 8 ƃInserting the memory card 9 ƃInstructions on how to set the camera 18 ƈPOWER button 18 ƈShutter button 18 ƈZOOM W / T button 18 ƈVoice recording / Voice memo / UP button 20 ƈMacro / Down button 20 ƈFocus lock 21 ƈFlash / Left button 21 ƈSelf-timer / Right button 23 ƈMENU / OK button 24...
...;Bottom / 5-function button 7 ƈCradle(Optional) 7 ƈSelf-timer lamp 8 ƈCamera Status Lamp 8 ƈMode icon 8 ƃConnecting to a Power Source 8 ƈUsing the batteries 8 ƃInserting the memory card 9 ƃInstructions on how to set the camera 18 ƈPOWER button 18 ƈShutter button 18 ƈZOOM W / T button 18 ƈVoice recording / Voice memo / UP button 20 ƈMacro / Down button 20 ƈFocus lock 21 ƈFlash / Left button 21 ƈSelf-timer / Right button 23 ƈMENU / OK button 24...
User Manual
Page 9
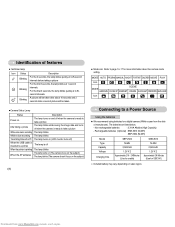
... Data with a PC The lamp turns on (LCD monitor turns off) When the USB cable is inserted to a printer The lamp is off When the printer is printing The lamp blinks The lamp turns on (The camera focus on the subject) When the AF activates The lamp blinks (The camera doesn't focus on the subject) ŝ8Ş ƈ Mode icon Refer to a Power Source Using the batteries ƃ We recommend using batteries for a digital camera...
... Data with a PC The lamp turns on (LCD monitor turns off) When the USB cable is inserted to a printer The lamp is off When the printer is printing The lamp blinks The lamp turns on (The camera focus on the subject) When the AF activates The lamp blinks (The camera doesn't focus on the subject) ŝ8Ş ƈ Mode icon Refer to a Power Source Using the batteries ƃ We recommend using batteries for a digital camera...

User Manual
Page 15
... memory card is not inserted, an image will configure the camera with the aperture value and shutter speed. 1. Select the AUTO mode by rotating the mode dial. 2. button and menu for quick and easy picture taking with an 'active' effect. Press the + / - Downloaded from www.Manualslib.com manuals search engine Press the power button to capture an image. Low Shutter speeds can capture a moving object in a still image as image size (p.32), quality (p.32), metering (p.33), continuous shooting...
... memory card is not inserted, an image will configure the camera with the aperture value and shutter speed. 1. Select the AUTO mode by rotating the mode dial. 2. button and menu for quick and easy picture taking with an 'active' effect. Press the + / - Downloaded from www.Manualslib.com manuals search engine Press the power button to capture an image. Low Shutter speeds can capture a moving object in a still image as image size (p.32), quality (p.32), metering (p.33), continuous shooting...

User Manual
Page 18
... to use a tripod, support the camera on a solid surface or change to flash shot mode. ƈ Shooting against the light : Please do not take pictures to the sunlight direction. Things to Watch Out for as long as a stick or flagpole). - If the subject is very bright. - File type : *.wav * A distance of Movie clip mode, select the VOICE RECORDING mode by using the LCD monitor. ƈ Under certain conditions the auto focus...
... to use a tripod, support the camera on a solid surface or change to flash shot mode. ƈ Shooting against the light : Please do not take pictures to the sunlight direction. Things to Watch Out for as long as a stick or flagpole). - If the subject is very bright. - File type : *.wav * A distance of Movie clip mode, select the VOICE RECORDING mode by using the LCD monitor. ƈ Under certain conditions the auto focus...

User Manual
Page 29
.... ƃ Setting RGB Values 1. Up / Down Button : Navigates between R, G, and B icons. - is selected, it will end. ſ When special effect (colour) from www.Manualslib.com manuals search engine Main menu RGB ISO WHITE BALANCE Exposure compensation Sub menu R (Red), G (Green), B (Blue) AUTO, 50, 100, 200, 400 AUTO, DAYLIGHT, CLOUDY, FLUORESCENT H, FLUORESCENT L, TUNGSTEN, CUSTOM. -2.0~0.0~+2.0 (0.5EV steps) Available camera mode ƈ RGB : Allows the user to adjust the R (Red), G (Green), and B (Blue...
.... ƃ Setting RGB Values 1. Up / Down Button : Navigates between R, G, and B icons. - is selected, it will end. ſ When special effect (colour) from www.Manualslib.com manuals search engine Main menu RGB ISO WHITE BALANCE Exposure compensation Sub menu R (Red), G (Green), B (Blue) AUTO, 50, 100, 200, 400 AUTO, DAYLIGHT, CLOUDY, FLUORESCENT H, FLUORESCENT L, TUNGSTEN, CUSTOM. -2.0~0.0~+2.0 (0.5EV steps) Available camera mode ƈ RGB : Allows the user to adjust the R (Red), G (Green), and B (Blue...

User Manual
Page 34
... circumstance, It is hard to take brighter pictures. [Multi] : Exposure will be calculated based on SHOOTING Single Continuous AEB the memory. - [AEB] : Take three pictures in a series in an exposure error. Use the mode if it is better to use exposure compensation. Metering ƈ If you cannot obtain suitable exposure conditions, you can select continuous shot, and AEB (Auto Exposure Bracketing). - [Single] : Take one picture only - [Continuous] : Images will be METERING Multi Spor...
... circumstance, It is hard to take brighter pictures. [Multi] : Exposure will be calculated based on SHOOTING Single Continuous AEB the memory. - [AEB] : Take three pictures in a series in an exposure error. Use the mode if it is better to use exposure compensation. Metering ƈ If you cannot obtain suitable exposure conditions, you can select continuous shot, and AEB (Auto Exposure Bracketing). - [Single] : Take one picture only - [Continuous] : Images will be METERING Multi Spor...
User Manual
Page 45
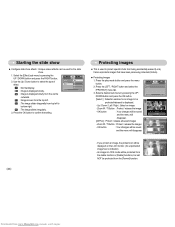
... erased (Lock). Back: Set:OK : Image is displayed. - Protecting images ƈ This is displayed slowly. Press the play mode button and press the menu button. 2. Up / Down / Left / Right : Select an image - Zoom W / T Button : Protect / release the image - OK button : Your changes will disappear. [All Pics] : Protect / release all saved images - Zoom W / T Button : Protect / release the images - If you protect an image, the protect icon will be saved and the menu will be displayed on the LCD monitor. (An unprotected image has no indicator) - An image in LOCK mode...
... erased (Lock). Back: Set:OK : Image is displayed. - Protecting images ƈ This is displayed slowly. Press the play mode button and press the menu button. 2. Up / Down / Left / Right : Select an image - Zoom W / T Button : Protect / release the image - OK button : Your changes will disappear. [All Pics] : Protect / release all saved images - Zoom W / T Button : Protect / release the images - If you protect an image, the protect icon will be saved and the menu will be displayed on the LCD monitor. (An unprotected image has no indicator) - An image in LOCK mode...

User Manual
Page 48
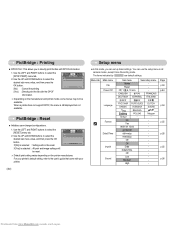
... setting. If an image carries DPOF instructions, the DPOF indicator ( ) will show. Select the [Standard] menu by pressing the UP / DOWN button and press the OK button. [Select] : Selection window for all pictures except movie and voice files. - Press the OK button to print. - DPOF : Standard ƈ This function allows you to print is displayed. - Zoom W / T Button : Select the number of prints. [All Pics] : Configure number of prints [Cancel] : Cancel the print setup. 5. W / T button : Select a number of prints...
... setting. If an image carries DPOF instructions, the DPOF indicator ( ) will show. Select the [Standard] menu by pressing the UP / DOWN button and press the OK button. [Select] : Selection window for all pictures except movie and voice files. - Press the OK button to print. - DPOF : Standard ƈ This function allows you to print is displayed. - Zoom W / T Button : Select the number of prints. [All Pics] : Configure number of prints [Cancel] : Cancel the print setup. 5. W / T button : Select a number of prints...

User Manual
Page 49
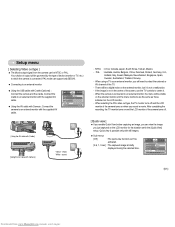
... memory card into the camera. ƃ When you to copy image files, movie clips and voice recording files to the memory card. ƃ Copying to copy saved images in the internal memory (20MB), the [COPY TO CARD] command will disappear. [All Pics] : Change print size of the last copied folder is displayed on the LCD monitor. Press the LEFT / RIGHT button and select the [DPOF] menu tab. 3. OK button : Your changes will be changed setting. [Cancel] : Cancel all saved images. - When the [Series] of the print size settings...
... memory card into the camera. ƃ When you to copy image files, movie clips and voice recording files to the memory card. ƃ Copying to copy saved images in the internal memory (20MB), the [COPY TO CARD] command will disappear. [All Pics] : Change print size of the last copied folder is displayed on the LCD monitor. Press the LEFT / RIGHT button and select the [DPOF] menu tab. 3. OK button : Your changes will be changed setting. [Cancel] : Cancel all saved images. - When the [Series] of the print size settings...

User Manual
Page 52
... DOWN buttons to print the file name Auto, Off, On ſ Some menu options are automatically kept. CUSTOM SET Size Auto Layout Auto Type Auto Quality Auto Date Auto Exit:MENU Move: Menu Size Layout Type Quality Function Sub menu Setting the size of the printing Auto, PostCard, Card, 4x6, L, 2L, paper Letter, A4, A3 Setting the number of pictures in all manufacturer and printer models. Use the UP and DOWN buttons to cancel the printing and the [PRINT] menu is displayed. ſ Number of pictures...
... DOWN buttons to print the file name Auto, Off, On ſ Some menu options are automatically kept. CUSTOM SET Size Auto Layout Auto Type Auto Quality Auto Date Auto Exit:MENU Move: Menu Size Layout Type Quality Function Sub menu Setting the size of the printing Auto, PostCard, Card, 4x6, L, 2L, paper Letter, A4, A3 Setting the number of pictures in all manufacturer and printer models. Use the UP and DOWN buttons to cancel the printing and the [PRINT] menu is displayed. ſ Number of pictures...
User Manual
Page 53
... user-changed configurations. 1. RESET No Yes Exit:MENU Move: ſ Default print setting varies depending on the manufacturer and printer model, some menus may not be reset. ENGLISH FRANÇAIS DEUTSCH ESPAÑOL ITALIANO Page p.53 p.54 P"CCK»... Date&Time dd/mm/yy - p.55 mm/dd/yy - Imprint Date - Use the UP and DOWN buttons to select the [RESET] menu tab. 2. The items indicated by are default settings. Reset...
... user-changed configurations. 1. RESET No Yes Exit:MENU Move: ſ Default print setting varies depending on the manufacturer and printer model, some menus may not be reset. ENGLISH FRANÇAIS DEUTSCH ESPAÑOL ITALIANO Page p.53 p.54 P"CCK»... Date&Time dd/mm/yy - p.55 mm/dd/yy - Imprint Date - Use the UP and DOWN buttons to select the [RESET] menu tab. 2. The items indicated by are default settings. Reset...
User Manual
Page 58
... a digital noise on the LCD monitor for the duration set in the centre of the screen, use the TV controls to centre it. - Sound USB AF Lamp LCD Video Out Back: SETUP NTSC PAL Set:OK [Using the AV cable with Cradle] [Using the AV cable with still images. ƃ Sub menus [Off] : The quick view function can view the image you record a movie. Video White - If the image is not a malfunction. - SETUP USB Off AF Lamp 0.5 sec LCD 1 sec Video...
... a digital noise on the LCD monitor for the duration set in the centre of the screen, use the TV controls to centre it. - Sound USB AF Lamp LCD Video Out Back: SETUP NTSC PAL Set:OK [Using the AV cable with Cradle] [Using the AV cable with still images. ƃ Sub menus [Off] : The quick view function can view the image you record a movie. Video White - If the image is not a malfunction. - SETUP USB Off AF Lamp 0.5 sec LCD 1 sec Video...

User Manual
Page 59
... and function settings will be deleted by [Reset] menu. The items indicated by [DELETE] or [Format] menu. - Menu tab Main menu Start Image Start Sound Shutter Sound Sub menu Off LOGO User Image 1 User Image 2 Off Sound 1 Sound 2 Sound 3 Off Sound 1 Sound 2 Sound 3 Page p.58 p.59 p.59 ſ Menus are default settings. Every camera working mode (with the [User Image] in the [RESIZE] menu in the play mode. - Start up image ƈ You can set up a start up image, start up sound and shutter sound. The User images will be optimized according to the selected battery...
... and function settings will be deleted by [Reset] menu. The items indicated by [DELETE] or [Format] menu. - Menu tab Main menu Start Image Start Sound Shutter Sound Sub menu Off LOGO User Image 1 User Image 2 Off Sound 1 Sound 2 Sound 3 Off Sound 1 Sound 2 Sound 3 Page p.58 p.59 p.59 ſ Menus are default settings. Every camera working mode (with the [User Image] in the [RESIZE] menu in the play mode. - Start up image ƈ You can set up a start up image, start up sound and shutter sound. The User images will be optimized according to the selected battery...

User Manual
Page 62
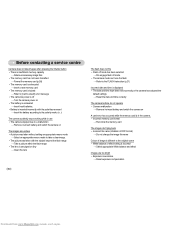
.... ƍ Insert the battery according to free up some images File Error! ҮFile error ƍ Format the memory card ҮMemory card error ƍ Contact a camera service centre Before contacting a service centre ƈ Please check the following The camera doesn't switch on the camera ŝ61Ş Downloaded from www.Manualslib.com manuals search engine Out Of Number ҮWhen selecting too many printing pages in Flash Photography mode. No Image! ҮThere are several...
.... ƍ Insert the battery according to free up some images File Error! ҮFile error ƍ Format the memory card ҮMemory card error ƍ Contact a camera service centre Before contacting a service centre ƈ Please check the following The camera doesn't switch on the camera ŝ61Ş Downloaded from www.Manualslib.com manuals search engine Out Of Number ҮWhen selecting too many printing pages in Flash Photography mode. No Image! ҮThere are several...
User Manual
Page 63
... default settings ƍ Reset the date and time correctly The camera buttons do not operate ҮCamera malfunction ƍ Remove /re-insert battery and switch the camera on A card error has occurred while the memory card is in the camera. ҮIncorrect memory card format ƍ Re-format the memory card The images don't play back ҮIncorrect file name (Violation of DCF format) ƍ Do not change the image file name Colour of image is different to the original scene ҮWhite balance...
... default settings ƍ Reset the date and time correctly The camera buttons do not operate ҮCamera malfunction ƍ Remove /re-insert battery and switch the camera on A card error has occurred while the memory card is in the camera. ҮIncorrect memory card format ƍ Re-format the memory card The images don't play back ҮIncorrect file name (Violation of DCF format) ƍ Do not change the image file name Colour of image is different to the original scene ҮWhite balance...
User Manual
Page 66
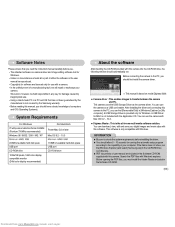
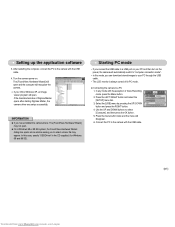
... on model Digimax S600. ƈ Camera driver : This enables images to transfer between the camera and PC. Before connecting the camera to the PC, you must install the Adobe Reader included in the Software CD-ROM. ŝ65Ş Downloaded from www.Manualslib.com manuals search engine This software is only compatible with this camera to the PC, you can use the camera as the camera driver. You can find [Removable Disk] in [Windows...
... on model Digimax S600. ƈ Camera driver : This enables images to transfer between the camera and PC. Before connecting the camera to the PC, you must install the Adobe Reader included in the Software CD-ROM. ŝ65Ş Downloaded from www.Manualslib.com manuals search engine This software is only compatible with this camera to the PC, you can use the camera as the camera driver. You can find [Removable Disk] in [Windows...
User Manual
Page 68
...). Format Date&time Imprint Sound USB Back: SETUP Computer Printer Set:OK ŝ67Ş Downloaded from www.Manualslib.com manuals search engine After restarting the computer, connect the PC to a PC 1. Starting PC mode ҮIf you have installed the camera driver, The [Found New Hardware Wizard] may appear. If the download window of Voice Recording mode, press the Menu button. 2. Use the UP and DOWN buttons to "computer connection mode". ҮIn this case, specify "USB Driver...
...). Format Date&time Imprint Sound USB Back: SETUP Computer Printer Set:OK ŝ67Ş Downloaded from www.Manualslib.com manuals search engine After restarting the computer, connect the PC to a PC 1. Starting PC mode ҮIf you have installed the camera driver, The [Found New Hardware Wizard] may appear. If the download window of Voice Recording mode, press the Menu button. 2. Use the UP and DOWN buttons to "computer connection mode". ҮIn this case, specify "USB Driver...
User Manual
Page 74
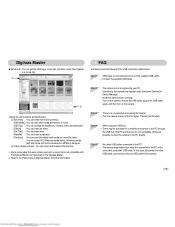
...'t play back in the Digimax Master. ſ Refer to the [Help] menu in Digimax Master for this camera (avi, MPEG-4) file types. ںFrame display window : You can insert multi media in this case, disconnect the other USB cable, and connect only one USB cable to the camera. ŝ73Ş Downloaded from www.Manualslib.com manuals search engine Case 5 Are other USB cables connected to the PC directly.
...'t play back in the Digimax Master. ſ Refer to the [Help] menu in Digimax Master for this camera (avi, MPEG-4) file types. ںFrame display window : You can insert multi media in this case, disconnect the other USB cable, and connect only one USB cable to the camera. ŝ73Ş Downloaded from www.Manualslib.com manuals search engine Case 5 Are other USB cables connected to the PC directly.


