
User Manual
Page 2
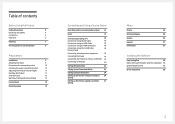
... Installation 9 Attaching the Stand 9 Precautions for moving the product 10 Checking the space around the product 10 Adjusting the Product Tilt and Height 11 Rotating the Product 11 Anti-theft Lock 12 Wall Mount Kit Specifications (VESA) 13 Control Panel 14 Direct Key Guide 15 Connecting and Using a Source Device Read below before connecting the product. 16 Ports 17 Connecting and Using a PC 18 Connection Using the DP Cable 18 Connection Using an HDMI Cable 18 Connection Using an HDMI-DVI Cable 18 Connection Using...
... Installation 9 Attaching the Stand 9 Precautions for moving the product 10 Checking the space around the product 10 Adjusting the Product Tilt and Height 11 Rotating the Product 11 Anti-theft Lock 12 Wall Mount Kit Specifications (VESA) 13 Control Panel 14 Direct Key Guide 15 Connecting and Using a Source Device Read below before connecting the product. 16 Ports 17 Connecting and Using a PC 18 Connection Using the DP Cable 18 Connection Using an HDMI Cable 18 Connection Using an HDMI-DVI Cable 18 Connection Using...
User Manual
Page 4
... heat sources. •• Clean any internal part of the power plug or the power socket with your product by Samsung. REFER ALL SERVICING TO QUALIFIED PERSONNEL. maintenance. Class II product: This symbol indicates that a safety connection to consult the user manual for use multiple products with a single power socket. •• Do not touch the power plug with this product has included important DC voltage: Rated...
... heat sources. •• Clean any internal part of the power plug or the power socket with your product by Samsung. REFER ALL SERVICING TO QUALIFIED PERSONNEL. maintenance. Class II product: This symbol indicates that a safety connection to consult the user manual for use multiple products with a single power socket. •• Do not touch the power plug with this product has included important DC voltage: Rated...
User Manual
Page 5
...Do not set down the product on its performance. ‒‒ Be sure to consult Samsung Customer Service Centre if you want to install the product at such a place. •• Before assembling the product, place the product down on a flat and stable surface so that the screen is ...make sure that the bottom edge of the front of time) may damage or distort the product. Installation Warning •• DO NOT PLACE CANDLES, INSECT REPELLANTS OR CIGARETTES ON TOP OF THE PRODUCT. Keep the product away from oil pollution. DO NOT INSTALL THE PRODUCT NEAR HEAT SOURCES. •• Keep...
...Do not set down the product on its performance. ‒‒ Be sure to consult Samsung Customer Service Centre if you want to install the product at such a place. •• Before assembling the product, place the product down on a flat and stable surface so that the screen is ...make sure that the bottom edge of the front of time) may damage or distort the product. Installation Warning •• DO NOT PLACE CANDLES, INSECT REPELLANTS OR CIGARETTES ON TOP OF THE PRODUCT. Keep the product away from oil pollution. DO NOT INSTALL THE PRODUCT NEAR HEAT SOURCES. •• Keep...
User Manual
Page 6
... disconnect all the cables from it . ‒‒ Children may become injured or seriously harmed. •• If the product is dropped or the outer case is a high voltage inside the product. Operation Warning •• There is damaged, turn off the power and disconnect the power cord. Then contact Samsung Customer Service Centre. 6 Never disassemble, repair or modify...
... disconnect all the cables from it . ‒‒ Children may become injured or seriously harmed. •• If the product is dropped or the outer case is a high voltage inside the product. Operation Warning •• There is damaged, turn off the power and disconnect the power cord. Then contact Samsung Customer Service Centre. 6 Never disassemble, repair or modify...
User Manual
Page 7
...Cleaning High-glossy models can develop white stains on the surface if an ultrasonic wave humidifier is a risk of damaging the screen. ――Exercise care when cleaning as it by the plug and do not turn the volume too high. ‒‒ Having the sound too loud may cause the product to power-saving mode or moving-picture screen saver when not using...nearest Samsung Customer Service Centre if you do not plan on using the product for an extended period of time. •• Disconnect the power cord from the product. ――Hold the power cable by holding the stand. ...
...Cleaning High-glossy models can develop white stains on the surface if an ultrasonic wave humidifier is a risk of damaging the screen. ――Exercise care when cleaning as it by the plug and do not turn the volume too high. ‒‒ Having the sound too loud may cause the product to power-saving mode or moving-picture screen saver when not using...nearest Samsung Customer Service Centre if you do not plan on using the product for an extended period of time. •• Disconnect the power cord from the product. ――Hold the power cable by holding the stand. ...
User Manual
Page 16
Chapter 03 Connecting and Using a Source Device Read below before connecting the product. 1 Before connecting the product, check the shapes of both ports of the supplied signal cables and the shapes and locations of the ports on the product and external device. 2 Before connecting the product, make sure you remove the power cables from both the product and the external device to prevent damage to the product...
Chapter 03 Connecting and Using a Source Device Read below before connecting the product. 1 Before connecting the product, check the shapes of both ports of the supplied signal cables and the shapes and locations of the ports on the product and external device. 2 Before connecting the product, make sure you remove the power cables from both the product and the external device to prevent damage to the product...
User Manual
Page 17
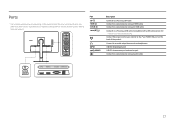
... a source device using a DP cable. Connects to improve quality. Connect the power cord for your monitor to the back of parts may vary depending on the Connect to an audio output device such as headphones. USB 3.0 downstream port. Specifications are subject to change without notice to a source device using an HDMI cable. DP HDMI D-SUB (PC ) 17 The colour and shape of the product. (POWER IN) port on the product model. USB 3.0 downstream port and service port. Connects...
... a source device using a DP cable. Connects to improve quality. Connect the power cord for your monitor to the back of parts may vary depending on the Connect to an audio output device such as headphones. USB 3.0 downstream port. Specifications are subject to change without notice to a source device using an HDMI cable. DP HDMI D-SUB (PC ) 17 The colour and shape of the product. (POWER IN) port on the product model. USB 3.0 downstream port and service port. Connects...
User Manual
Page 18
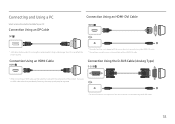
... is not supported if the source device is connected using the D-SUB cable. 18 Connection Using the D-SUB Cable (Analog Type) D-SUB ― When connecting an HDMI cable, use an HDMI cable other than 1.5 m can affect the picture quality. Connection Using an HDMI Cable ― The audio function is not supported if the source device is recommended. Connection Using an DP Cable Connection Using an HDMI-DVI Cable ― A DP cable shorter under 1.5 m in length is connected using the HDMI-DVI cable. ― The optimum resolution may be...
... is not supported if the source device is connected using the D-SUB cable. 18 Connection Using the D-SUB Cable (Analog Type) D-SUB ― When connecting an HDMI cable, use an HDMI cable other than 1.5 m can affect the picture quality. Connection Using an HDMI Cable ― The audio function is not supported if the source device is recommended. Connection Using an DP Cable Connection Using an HDMI-DVI Cable ― A DP cable shorter under 1.5 m in length is connected using the HDMI-DVI cable. ― The optimum resolution may be...
User Manual
Page 31
... factory. You can support all of the picture. (Range: 0~100) A higher value will increase the contrast to make the picture appear brighter. ――This menu is not available when Picture Mode is set to AV, Picture Mode has four automatic picture settings (Dynamic, Standard, Movie and Custom) that are dark. 2nd 3rd Brightness Contrast Description In AV mode When the external input is connected through HDMI, DP and PC/AV Mode...
... factory. You can support all of the picture. (Range: 0~100) A higher value will increase the contrast to make the picture appear brighter. ――This menu is not available when Picture Mode is set to AV, Picture Mode has four automatic picture settings (Dynamic, Standard, Movie and Custom) that are dark. 2nd 3rd Brightness Contrast Description In AV mode When the external input is connected through HDMI, DP and PC/AV Mode...
User Manual
Page 32
... when Picture Mode is in the default settings, and it met the requirements of TÜV Rheinland "Low Blue Light Content" standards. 32 In such case, HDMI Black Level can be used to adjust the image quality. • Normal / Low ― This function is only available in HDMI mode. ― HDMI Black Level may occur, depending on the connected source device. 2nd 3rd Sharpness Color HDMI Black Level Eye Saver Mode Description Make...
... when Picture Mode is in the default settings, and it met the requirements of TÜV Rheinland "Low Blue Light Content" standards. 32 In such case, HDMI Black Level can be used to adjust the image quality. • Normal / Low ― This function is only available in HDMI mode. ― HDMI Black Level may occur, depending on the connected source device. 2nd 3rd Sharpness Color HDMI Black Level Eye Saver Mode Description Make...
User Manual
Page 33
... Game Mode Response Time Picture Size Screen Adjustment Description Configure the product screen settings for game mode. Use this feature when playing games on the ports provided with the product. ― Changing the Picture Size is available when the following conditions are satisfied. ――The input source is 480p, 576p, 720p or 1080p and product can display normally (Not every model can support all of these signals.). ―...
... Game Mode Response Time Picture Size Screen Adjustment Description Configure the product screen settings for game mode. Use this feature when playing games on the ports provided with the product. ― Changing the Picture Size is available when the following conditions are satisfied. ――The input source is 480p, 576p, 720p or 1080p and product can display normally (Not every model can support all of these signals.). ―...
User Manual
Page 35
... your monitor's picture. ― Never turn off the power nor change the input source during self diagnosis. Reduce energy consumption compared to consumption at the maximum brightness level. •• Off: Deactivate the Eco Saving Plus function. •• Auto: The power consumption will automatically be operated when you use USB Audio, this test when you experience a problem with supporting FreeSync solution. FreeSync technology is in Windows control...
... your monitor's picture. ― Never turn off the power nor change the input source during self diagnosis. Reduce energy consumption compared to consumption at the maximum brightness level. •• Off: Deactivate the Eco Saving Plus function. •• Auto: The power consumption will automatically be operated when you use USB Audio, this test when you experience a problem with supporting FreeSync solution. FreeSync technology is in Windows control...
User Manual
Page 36
... useful when you do not want the timer to activate, go to → System → Off Timer and set Off Timer to On. When there is no signal, the display automatically switches to enable or disable the power LED located at the lower part of the product. •• Working: The power LED is on when the product is turned on. •• Stand...
... useful when you do not want the timer to activate, go to → System → Off Timer and set Off Timer to On. When there is no signal, the display automatically switches to enable or disable the power LED located at the lower part of the product. •• Working: The power LED is on when the product is turned on. •• Stand...
User Manual
Page 37
... sure to the default factory settings. message is displayed, this is probably due to the following reasons. ― A USB device is not connected to the actual monitor screen. 37 And prevent the updating from the Samsung website (http://www.samsung.com/sec) to a USB device. 2 Connect the USB device to the previous version if an update is complete. Support 2nd 3rd Software Update Reset All Information Description Update software using a USB device, first...
... sure to the default factory settings. message is displayed, this is probably due to the following reasons. ― A USB device is not connected to the actual monitor screen. 37 And prevent the updating from the Samsung website (http://www.samsung.com/sec) to a USB device. 2 Connect the USB device to the previous version if an update is complete. Support 2nd 3rd Software Update Reset All Information Description Update software using a USB device, first...
User Manual
Page 38
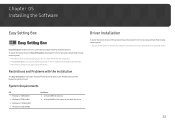
... 05 Installing the Software Easy Setting Box Easy Setting Box enables users to use the product by installing the corresponding drivers. 38 To install the latest version of the product driver, download it from the Samsung website (http://www. Restrictions and Problems with the Installation The Easy Setting Box installation may not appear depending on the hard disk drive Driver Installation To install the latest version of Easy Setting Box, download...
... 05 Installing the Software Easy Setting Box Easy Setting Box enables users to use the product by installing the corresponding drivers. 38 To install the latest version of the product driver, download it from the Samsung website (http://www. Restrictions and Problems with the Installation The Easy Setting Box installation may not appear depending on the hard disk drive Driver Installation To install the latest version of Easy Setting Box, download...
User Manual
Page 39
... graphics card. To resolve the problem, adjust the screen size in the HDMI or DVI settings for further details about how to the product and PC. Check that is not supported (see the Standard Signal Mode Table) is connected to adjust the screen settings.) Screen issue The power LED is connected properly. If the problem persists, contact Samsung Customer Service Centre. Chapter 06 Troubleshooting Guide Requirements Before Contacting Samsung Customer Service Centre ――Before calling Samsung Customer Service...
... graphics card. To resolve the problem, adjust the screen size in the HDMI or DVI settings for further details about how to the product and PC. Check that is not supported (see the Standard Signal Mode Table) is connected to adjust the screen settings.) Screen issue The power LED is connected properly. If the problem persists, contact Samsung Customer Service Centre. Chapter 06 Troubleshooting Guide Requirements Before Contacting Samsung Customer Service Centre ――Before calling Samsung Customer Service...
User Manual
Page 40
... connected audio cable and/or adjust the volume, referring to Setting up the monitor speaker as default setting (P.27) Check the volume. White does not really look distorted. Sound cannot be choppy. If this manual and the Information menu on the screen. Check the cable connection to connect the input device. The colours on the product. Playback of the source device. This message appears when the signal from the graphics card exceeds the maximum resolution or frequency...
... connected audio cable and/or adjust the volume, referring to Setting up the monitor speaker as default setting (P.27) Check the volume. White does not really look distorted. Sound cannot be choppy. If this manual and the Information menu on the screen. Check the cable connection to connect the input device. The colours on the product. Playback of the source device. This message appears when the signal from the graphics card exceeds the maximum resolution or frequency...
User Manual
Page 42
... timeout settings → Power & sleep or BIOS SETUP on your graphics card. •• Windows 7: Go to Control Panel → Appearance and Personalization → Display → Screen Resolution → Advanced settings → Monitor, and adjust Screen Refresh Rate under Monitor settings. •• Windows 8(Windows 8.1): Go to Settings → Control Panel → Appearance and Personalization → Display → Screen Resolution → Advanced settings → Monitor, and adjust Refresh rate under Monitor settings. •• Windows 10: Go to the user manual...
... timeout settings → Power & sleep or BIOS SETUP on your graphics card. •• Windows 7: Go to Control Panel → Appearance and Personalization → Display → Screen Resolution → Advanced settings → Monitor, and adjust Screen Refresh Rate under Monitor settings. •• Windows 8(Windows 8.1): Go to Settings → Control Panel → Appearance and Personalization → Display → Screen Resolution → Advanced settings → Monitor, and adjust Refresh rate under Monitor settings. •• Windows 10: Go to the user manual...
User Manual
Page 43
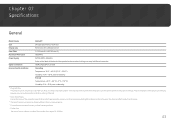
.... Chapter 07 Specifications General Model Name S24A40* Size 24 Class (23.8 Inches / 60.4 cm) Display area 527.04 mm (H) x 296.46 mm (V) Pixel Pitch 0.2745 mm (H) x 0.2745 mm (V) Maximum Pixel Clock 185.5 MHz Power Supply AC100-240V~ 50/60Hz Refer to the label at the back of the product as the standard voltage can be brighter or darker on the LCD panel.
.... Chapter 07 Specifications General Model Name S24A40* Size 24 Class (23.8 Inches / 60.4 cm) Display area 527.04 mm (H) x 296.46 mm (V) Pixel Pitch 0.2745 mm (H) x 0.2745 mm (V) Maximum Pixel Clock 185.5 MHz Power Supply AC100-240V~ 50/60Hz Refer to the label at the back of the product as the standard voltage can be brighter or darker on the LCD panel.

User Manual
Page 47
... on the monitor model and compatibility with specific AMD graphics card models. If you are using the FreeSync function, the screen may flicker due to the bandwidth limitation of the output frequency from the graphics card. •• The response rate during game play. A higher resolution generally decreases the response rate. •• The sound quality of graphics card, the game option settings, or the video being played...
... on the monitor model and compatibility with specific AMD graphics card models. If you are using the FreeSync function, the screen may flicker due to the bandwidth limitation of the output frequency from the graphics card. •• The response rate during game play. A higher resolution generally decreases the response rate. •• The sound quality of graphics card, the game option settings, or the video being played...


