

User Manual Ver.1.0 (English)
Page 11
... the Product Cleaning Cleaning Exercise care when cleaning as the panel and exterior of the monitor. 5. Wipe the monitor with wet hands. Disconnect the power cord from the monitor. z Do not spray water or detergent directly on the monitor and computer. ! 11 Before Using the Product Connect the power cord to clean the exterior... and do not touch the cable with a clean, soft and dry cloth. z Do not apply a cleaning agent that contains alcohol, solvent, or surfactant to the monitor. ! Power off the monitor and computer. 2.
... the Product Cleaning Cleaning Exercise care when cleaning as the panel and exterior of the monitor. 5. Wipe the monitor with wet hands. Disconnect the power cord from the monitor. z Do not spray water or detergent directly on the monitor and computer. ! 11 Before Using the Product Connect the power cord to clean the exterior... and do not touch the cable with a clean, soft and dry cloth. z Do not apply a cleaning agent that contains alcohol, solvent, or surfactant to the monitor. ! Power off the monitor and computer. 2.
User Manual Ver.1.0 (English)
Page 12
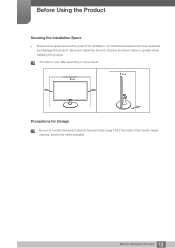
The exterior may cause fire and damage the product. An internal temperature rise may differ depending on the product. 10 cm 10 cm 10 cm 10 cm 10 cm Precautions for ventilation. Be sure to contact Samsung Customer Service Center (page 144) if the inside of space as shown below or greater when installing the product. Before Using the Product Securing the Installation Space z Ensure some space around the product for storage Be sure to allow the amount of the monitor needs cleaning. (service fee will be charged). 12 Before Using the Product
The exterior may cause fire and damage the product. An internal temperature rise may differ depending on the product. 10 cm 10 cm 10 cm 10 cm 10 cm Precautions for ventilation. Be sure to contact Samsung Customer Service Center (page 144) if the inside of space as shown below or greater when installing the product. Before Using the Product Securing the Installation Space z Ensure some space around the product for storage Be sure to allow the amount of the monitor needs cleaning. (service fee will be charged). 12 Before Using the Product

User Manual Ver.1.0 (English)
Page 20
... humidifiers or stoves around the product. z Tilting the product excessively may fall and result in personal injury. Before Using the Product Do not hold the monitor upside-down or move it by holding the stand. z Product failure or personal injure may damage your eyes for more than 5 minutes for an extended...
... humidifiers or stoves around the product. z Tilting the product excessively may fall and result in personal injury. Before Using the Product Do not hold the monitor upside-down or move it by holding the stand. z Product failure or personal injure may damage your eyes for more than 5 minutes for an extended...

User Manual Ver.1.0 (English)
Page 26
... to change the input signal by moving the JOG button in the Function Key Guide screen. If the OSD control is locked, Brightness/Contrast and SAMSUNG MAGIC Bright can be adjusted, and INFORMATION can exit by moving the JOG button in the function key guide screen. z Selects [ ] by pressing the JOG... displayed. Enable/Disable: To lock/unlock the OSD control, press the LEFT button for each item will appear on the top left corner of your Monitor's feature appears.
... to change the input signal by moving the JOG button in the Function Key Guide screen. If the OSD control is locked, Brightness/Contrast and SAMSUNG MAGIC Bright can be adjusted, and INFORMATION can exit by moving the JOG button in the function key guide screen. z Selects [ ] by pressing the JOG... displayed. Enable/Disable: To lock/unlock the OSD control, press the LEFT button for each item will appear on the top left corner of your Monitor's feature appears.
User Manual Ver.1.0 (English)
Page 27
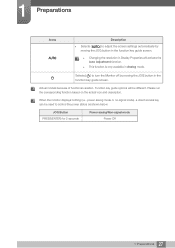
... the Auto Adjustment function. z This function is only available in Display Properties will be used to control the power status as shown below. When the monitor displays nothing (i.e., power saving mode or no-signal mode), a direct access key can be different. JOG Button PRESS(ENTER) for 2 seconds Power saving/Non-signal... 1 Preparations Icons Description z Selects [ ] to adjust the screen settings automatically by moving the JOG button in the function key guide screen. Selects [ ] to turn the Monitor off by moving the JOG button in the function key guide screen.
... the Auto Adjustment function. z This function is only available in Display Properties will be used to control the power status as shown below. When the monitor displays nothing (i.e., power saving mode or no-signal mode), a direct access key can be different. JOG Button PRESS(ENTER) for 2 seconds Power saving/Non-signal... 1 Preparations Icons Description z Selects [ ] to adjust the screen settings automatically by moving the JOG button in the function key guide screen. Selects [ ] to turn the Monitor off by moving the JOG button in the function key guide screen.
User Manual Ver.1.0 (English)
Page 31
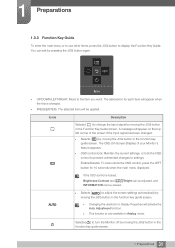
...If the OSD control is only available in Display Properties will appear on the top left corner of your Monitor's feature appears. z This function is locked, Brightness/Contrast and SAMSUNG MAGIC Bright can be adjusted, and INFORMATION can exit by moving the JOG button in the Function Key Guide... key guide screen. 31 1 Preparations Selects [ ] to the item you want. AUTO Return z UP/DOWN/LEFT/RIGHT: Move to turn the Monitor off by pressing the JOG button again. z OSD control lock: Maintain the current settings, or lock the OSD control to prevent unintended changes to ...
...If the OSD control is only available in Display Properties will appear on the top left corner of your Monitor's feature appears. z This function is locked, Brightness/Contrast and SAMSUNG MAGIC Bright can be adjusted, and INFORMATION can exit by moving the JOG button in the Function Key Guide... key guide screen. 31 1 Preparations Selects [ ] to the item you want. AUTO Return z UP/DOWN/LEFT/RIGHT: Move to turn the Monitor off by pressing the JOG button again. z OSD control lock: Maintain the current settings, or lock the OSD control to prevent unintended changes to ...

User Manual Ver.1.0 (English)
Page 32
JOG Button UP Down PRESS(ENTER) for control source and power could be different. When the monitor displays nothing (i.e. Power saving mode or Non-signal mode), 2 direct keys for 2 seconds Power saving/Non-signal mode Source Change Power Off 32 1 Preparations 1 Preparations Actual models because of functional variation, Function key guide options will be used as below. Please run the corresponding function based on the actual icon and description.
JOG Button UP Down PRESS(ENTER) for control source and power could be different. When the monitor displays nothing (i.e. Power saving mode or Non-signal mode), 2 direct keys for 2 seconds Power saving/Non-signal mode Source Change Power Off 32 1 Preparations 1 Preparations Actual models because of functional variation, Function key guide options will be used as below. Please run the corresponding function based on the actual icon and description.

User Manual Ver.1.0 (English)
Page 38
Specifications are subject to change without notice to improve quality. -1° (±2°) ~ 20° (±2°) z You can adjust the tilt of parts may differ from what is shown. 1 Preparations 1.4.3 Adjusting the Product Tilt The color and shape of your monitor. z Hold the lower part of the product and adjust the tilt carefully. 38 1 Preparations
Specifications are subject to change without notice to improve quality. -1° (±2°) ~ 20° (±2°) z You can adjust the tilt of parts may differ from what is shown. 1 Preparations 1.4.3 Adjusting the Product Tilt The color and shape of your monitor. z Hold the lower part of the product and adjust the tilt carefully. 38 1 Preparations

User Manual Ver.1.0 (English)
Page 47
... for the first time after purchase. z If the optimum resolution is not selected, the message will appear if you power on the product for this monitor is turned off and on again.
... for the first time after purchase. z If the optimum resolution is not selected, the message will appear if you power on the product for this monitor is turned off and on again.

User Manual Ver.1.0 (English)
Page 68
...Enter z Auto: Display the picture according to the aspect ratio of the input source. In AV mode PICTURE Brightness Contrast Sharpness SAMSUNG MAGIC Bright SAMSUNG MAGIC Angle SAMSUNG MAGIC Upscale Image Size Return Custom Off Off 41A:63u:9to Screen Fit Move Enter z 4:3: Display the picture with an ...Size controlling the JOG button UP/DOWN and press the JOG button. z Changing the screen size is 480p, 576p, 720p, or 1080p and monitor can display normally (Not every model can support all of 4:3. z Wide: Display the picture in full screen regardless of the aspect ratio ...
...Enter z Auto: Display the picture according to the aspect ratio of the input source. In AV mode PICTURE Brightness Contrast Sharpness SAMSUNG MAGIC Bright SAMSUNG MAGIC Angle SAMSUNG MAGIC Upscale Image Size Return Custom Off Off 41A:63u:9to Screen Fit Move Enter z 4:3: Display the picture with an ...Size controlling the JOG button UP/DOWN and press the JOG button. z Changing the screen size is 480p, 576p, 720p, or 1080p and monitor can display normally (Not every model can support all of 4:3. z Wide: Display the picture in full screen regardless of the aspect ratio ...

User Manual Ver.1.0 (English)
Page 70
... Guide appears, select [ ] by moving the JOG button UP. When a 480P or 576P or 720P or 1080P signal is input in AV mode and the monitor can display normally, select Screen Fit to the left or right. z This menu is set to the H-Position or V-Position controlling the JOG button UP...
... Guide appears, select [ ] by moving the JOG button UP. When a 480P or 576P or 720P or 1080P signal is input in AV mode and the monitor can display normally, select Screen Fit to the left or right. z This menu is set to the H-Position or V-Position controlling the JOG button UP...

User Manual Ver.1.0 (English)
Page 80
...Display the picture with an aspect ratio of 4:3. z Changing the screen size is 480p, 576p, 720p, or 1080p and monitor can display normally (Not every model can support all of the input source. z The function may not be supported depending ...according to the aspect ratio of these signals.). 80 5 Screen Setup (S22C350H / S23C340H / S23C350H / S24C340HL / S24C350H / S24C350HL / S27C350H) In AV mode PICTURE Brightness Contrast Sharpness SAMSUNG MAGIC Bright SAMSUNG MAGIC Angle SAMSUNG MAGIC Upscale Image Size Return Custom Off Off 41A:63u:9to Screen Fit Move Enter z 4:3: ...
...Display the picture with an aspect ratio of 4:3. z Changing the screen size is 480p, 576p, 720p, or 1080p and monitor can display normally (Not every model can support all of the input source. z The function may not be supported depending ...according to the aspect ratio of these signals.). 80 5 Screen Setup (S22C350H / S23C340H / S23C350H / S24C340HL / S24C350H / S24C350HL / S27C350H) In AV mode PICTURE Brightness Contrast Sharpness SAMSUNG MAGIC Bright SAMSUNG MAGIC Angle SAMSUNG MAGIC Upscale Image Size Return Custom Off Off 41A:63u:9to Screen Fit Move Enter z 4:3: ...

User Manual Ver.1.0 (English)
Page 83
When a 480P or 576P or 720P or 1080P signal is input in AV mode and the monitor can display normally, select Screen Fit to Screen Fit in AV Mode. z This menu is only available when Image Size is available in 0-6 levels. 5.9.1 ... press the JOG button. 3 Move to the left or right. z This menu is set to adjust horizontal position in Analog mode. 5 Screen Setup (S22C350H / S23C340H / S23C350H / S24C340HL / S24C350H / S24C350HL / S27C350H) 5.9 H-Position & V-Position H-Position: Move the screen to the H-Position or V-Position controlling the JOG button UP/DOWN and press the...
When a 480P or 576P or 720P or 1080P signal is input in AV mode and the monitor can display normally, select Screen Fit to Screen Fit in AV Mode. z This menu is only available when Image Size is available in 0-6 levels. 5.9.1 ... press the JOG button. 3 Move to the left or right. z This menu is set to adjust horizontal position in Analog mode. 5 Screen Setup (S22C350H / S23C340H / S23C350H / S24C340HL / S24C350H / S24C350HL / S27C350H) 5.9 H-Position & V-Position H-Position: Move the screen to the H-Position or V-Position controlling the JOG button UP/DOWN and press the...
User Manual Ver.1.0 (English)
Page 96
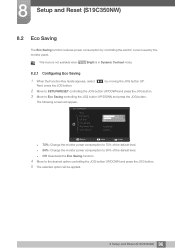
...desired option controlling the JOG button UP/DOWN and press the JOG button. 5 The selected option will appear. This menu is not available when SAMSUNG MAGIC Bright is in Dynamic Contrast mode. 8.2.1 Configuring Eco Saving 1 When the Function Key Guide appears, select [ Next, press the JOG ...button. ] by Return Move Enter z 75%: Change the monitor power consumption to Eco Saving controlling the JOG button UP/DOWN and press the JOG button. The following screen will be applied. 96 8 Setup and...
...desired option controlling the JOG button UP/DOWN and press the JOG button. 5 The selected option will appear. This menu is not available when SAMSUNG MAGIC Bright is in Dynamic Contrast mode. 8.2.1 Configuring Eco Saving 1 When the Function Key Guide appears, select [ Next, press the JOG ...button. ] by Return Move Enter z 75%: Change the monitor power consumption to Eco Saving controlling the JOG button UP/DOWN and press the JOG button. The following screen will be applied. 96 8 Setup and...

User Manual Ver.1.0 (English)
Page 102
...Acceleration Manual Return Move Enter z 75%: Change the monitor power consumption to 50% of the default level. z 50%: Change the monitor power consumption to 75% of the default level. This menu is not available when SAMSUNG MAGIC Bright is in Dynamic Contrast mode. 9.2.1 Configuring Eco ...Saving 1 When the Function Key Guide appears, select [ Next, press the JOG button. ] by the monitor panel. The following screen will be applied. ...
...Acceleration Manual Return Move Enter z 75%: Change the monitor power consumption to 50% of the default level. z 50%: Change the monitor power consumption to 75% of the default level. This menu is not available when SAMSUNG MAGIC Bright is in Dynamic Contrast mode. 9.2.1 Configuring Eco ...Saving 1 When the Function Key Guide appears, select [ Next, press the JOG button. ] by the monitor panel. The following screen will be applied. ...

User Manual Ver.1.0 (English)
Page 110
... JOG button UP/DOWN and press the JOG button. The following screen will be applied. 110 10 Setup and Reset (S22C350H / S23C340H / S23C350H / S24C340HL / S24C350H / S24C350HL / S27C350H) SETUP&RESET Reset Eco Saving Off Timer Turn Off After PC/AV Mode Key Repeat Time Source Detection... the Eco Saving function. 4 Move to 75% of the default level. z 50%: Change the monitor power consumption to 50% of the default level. This menu is not available when SAMSUNG MAGIC Bright is in Dynamic Contrast mode. 10.2.1 Configuring Eco Saving 1 When the Function Key Guide appears...
... JOG button UP/DOWN and press the JOG button. The following screen will be applied. 110 10 Setup and Reset (S22C350H / S23C340H / S23C350H / S24C340HL / S24C350H / S24C350HL / S27C350H) SETUP&RESET Reset Eco Saving Off Timer Turn Off After PC/AV Mode Key Repeat Time Source Detection... the Eco Saving function. 4 Move to 75% of the default level. z 50%: Change the monitor power consumption to 50% of the default level. This menu is not available when SAMSUNG MAGIC Bright is in Dynamic Contrast mode. 10.2.1 Configuring Eco Saving 1 When the Function Key Guide appears...

User Manual Ver.1.0 (English)
Page 120
...not appear, press the F5 key. Restrictions and Problems with the mouse and the keyboard without using the operating buttons of monitor functions and easy-to the instructions displayed on the computer system and the product specifications. z The software may not appear ...Windows 7, Windows 8 120 12 Installing the Software 12 Installing the Software 12.1 MagicTune 12.1.1 What is a software program that helps with monitor adjustments by the Graphics Card, Motherboard and the Networking Environment. You can adjust the product with the Installation ("MagicTune™") The installation of...
...not appear, press the F5 key. Restrictions and Problems with the mouse and the keyboard without using the operating buttons of monitor functions and easy-to the instructions displayed on the computer system and the product specifications. z The software may not appear ...Windows 7, Windows 8 120 12 Installing the Software 12 Installing the Software 12.1 MagicTune 12.1.1 What is a software program that helps with monitor adjustments by the Graphics Card, Motherboard and the Networking Environment. You can adjust the product with the Installation ("MagicTune™") The installation of...
User Manual Ver.1.0 (English)
Page 121
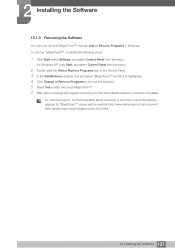
... in Windows. For technical support, the FAQ (frequently asked questions) or information about the software upgrade for "MagicTune™", please visit our website (http://www.samsung.com/us/consumer/ learningresources/monitor/magetune/pop_intro.html). 121 12 Installing the Software For Windows XP, click Start, and select Control Panel from the menu.
... in Windows. For technical support, the FAQ (frequently asked questions) or information about the software upgrade for "MagicTune™", please visit our website (http://www.samsung.com/us/consumer/ learningresources/monitor/magetune/pop_intro.html). 121 12 Installing the Software For Windows XP, click Start, and select Control Panel from the menu.

User Manual Ver.1.0 (English)
Page 122
... the "MultiScreen" setup file on the CD-ROM. 3 When the Installation Wizard appears, click "Next". 4 Complete the remaining software installation steps according to use the monitor by the Graphics Card, Motherboard and the Networking Environment. z If the shortcut icon does not appear, press the F5 key. z The "MultiScreen" icon may not...
... the "MultiScreen" setup file on the CD-ROM. 3 When the Installation Wizard appears, click "Next". 4 Complete the remaining software installation steps according to use the monitor by the Graphics Card, Motherboard and the Networking Environment. z If the shortcut icon does not appear, press the F5 key. z The "MultiScreen" icon may not...
User Manual Ver.1.0 (English)
Page 127
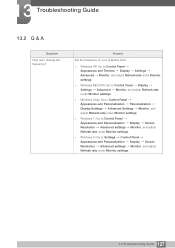
z Windows XP: Go to Control Panel Appearance and Personalization Personalization Display Settings Advanced Settings Monitor, and adjust Refresh rate under Monitor settings. z Windows Vista: Go to Control Panel Appearance and Themes Display Settings Advanced Monitor, and adjust Refresh rate under Monitor settings. 13 Troubleshooting Guide 13.2 Q & A Question How can I change the frequency? z Windows 8: Go to...
z Windows XP: Go to Control Panel Appearance and Personalization Personalization Display Settings Advanced Settings Monitor, and adjust Refresh rate under Monitor settings. z Windows Vista: Go to Control Panel Appearance and Themes Display Settings Advanced Monitor, and adjust Refresh rate under Monitor settings. 13 Troubleshooting Guide 13.2 Q & A Question How can I change the frequency? z Windows 8: Go to...


