
User Manual Ver.1.0 (English)
Page 1
SyncMaster S19B300N/S19B300B/S19B300NW/S20B300N/S20B300B/ S22B300N/S22B300B/S22B300H/S23B300N/S23B300B/S23B300H/ S24B300BL/S24B300HL/S24B300N/S24B300B/S24B300H Monitor User Manual The color and the appearance may differ depending on the product, and the specifications are subject to change without prior notice to improve the performance.
SyncMaster S19B300N/S19B300B/S19B300NW/S20B300N/S20B300B/ S22B300N/S22B300B/S22B300H/S23B300N/S23B300B/S23B300H/ S24B300BL/S24B300HL/S24B300N/S24B300B/S24B300H Monitor User Manual The color and the appearance may differ depending on the product, and the specifications are subject to change without prior notice to improve the performance.
User Manual Ver.1.0 (English)
Page 2
Table Of Contents MAJOR SAFETY PRECAUTIONS Before You Start 1-1 Custody and Maintenance 1-2 Cleaning the Monitor 1-3 Safety Precautions 1-4 INSTALLING THE PRODUCT Package Contents 2-1 Installing the Stand 2-2 Connecting with a PC 2-3 Connecting a HDMI cable 2-4 Kensington Lock 2-5 USING THE PRODUCT Setting the Optimal ...18 Product Operating Buttons 3-19 Using the Screen Adjustment Menu (OSD: On Screen Display 3-20 INSTALLING THE SOFTWARE Natural Color 4-1 MagicTune 4-2 MultiScreen 4-3 TROUBLESHOOTING Monitor Self-Diagnosis 5-1 Before Requesting Service 5-2 FAQ 5-3
Table Of Contents MAJOR SAFETY PRECAUTIONS Before You Start 1-1 Custody and Maintenance 1-2 Cleaning the Monitor 1-3 Safety Precautions 1-4 INSTALLING THE PRODUCT Package Contents 2-1 Installing the Stand 2-2 Connecting with a PC 2-3 Connecting a HDMI cable 2-4 Kensington Lock 2-5 USING THE PRODUCT Setting the Optimal ...18 Product Operating Buttons 3-19 Using the Screen Adjustment Menu (OSD: On Screen Display 3-20 INSTALLING THE SOFTWARE Natural Color 4-1 MagicTune 4-2 MultiScreen 4-3 TROUBLESHOOTING Monitor Self-Diagnosis 5-1 Before Requesting Service 5-2 FAQ 5-3
User Manual Ver.1.0 (English)
Page 6
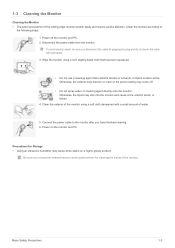
...you contact the nearest service center (paid service) for Storage • Using an ultrasonic humidifier may cause white stains on the monitor and PC. Clean the monitor according to the monitor after you disconnect the cable by gripping the plug and do not touch the cable with a small amount of water. 5. ...Clean the exterior of the monitor using a soft, slightly damp cloth that has been squeezed . • Do not use a cleaning agent that contains alcohol or solvents, or that is ...
...you contact the nearest service center (paid service) for Storage • Using an ultrasonic humidifier may cause white stains on the monitor and PC. Clean the monitor according to the monitor after you disconnect the cable by gripping the plug and do not touch the cable with a small amount of water. 5. ...Clean the exterior of the monitor using a soft, slightly damp cloth that has been squeezed . • Do not use a cleaning agent that contains alcohol or solvents, or that is ...
User Manual Ver.1.0 (English)
Page 12
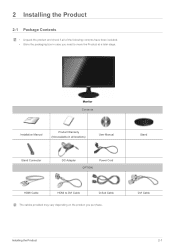
Stand DVI Cable Installing the Product 2-1 Monitor Contents Installation Manual Product Warranty (Not available in case you purchase. 2 Installing the Product 2-1 Package Contents • Unpack the product and check if all of the following contents have been included. • Store the packaging box in all locations) User Manual Stand Connector DC-Adapter OPTION Power Cord HDMI Cable HDMI to DVI Cable D-Sub Cable The cables provided may vary depending on the product you need to move the Product at a later stage.
Stand DVI Cable Installing the Product 2-1 Monitor Contents Installation Manual Product Warranty (Not available in case you purchase. 2 Installing the Product 2-1 Package Contents • Unpack the product and check if all of the following contents have been included. • Store the packaging box in all locations) User Manual Stand Connector DC-Adapter OPTION Power Cord HDMI Cable HDMI to DVI Cable D-Sub Cable The cables provided may vary depending on the product you need to move the Product at a later stage.
User Manual Ver.1.0 (English)
Page 18
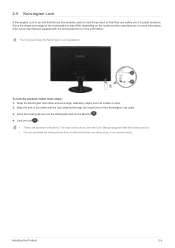
... Lock separately. Slide the end of the cable with the lock attached through the looped end of the locking device may differ depending on the Monitor( ). 4. 2-5 Kensington Lock A Kensington Lock is an anti-theft device that enables users to the User Manual supplied with the locking device. • You can safely...
... Lock separately. Slide the end of the cable with the lock attached through the looped end of the locking device may differ depending on the Monitor( ). 4. 2-5 Kensington Lock A Kensington Lock is an anti-theft device that enables users to the User Manual supplied with the locking device. • You can safely...
User Manual Ver.1.0 (English)
Page 37
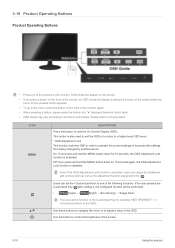
... presses the Customized Key [ ] after setting it, the configured function will appear on the screen. • If you press a button on the monitor. You can set the function of the following functions. 3-19 Product Operating Buttons Product Operating Buttons • Press one of the Customized Key by another...DESCRIPTION Press this button to the menu, press the button on the front of the monitor again. • When pressing a button, please press the bottom of the buttons on the front of the monitor, an OSD Guide will display showing the function of the button before the menu for ...
... presses the Customized Key [ ] after setting it, the configured function will appear on the screen. • If you press a button on the monitor. You can set the function of the following functions. 3-19 Product Operating Buttons Product Operating Buttons • Press one of the Customized Key by another...DESCRIPTION Press this button to the menu, press the button on the front of the monitor again. • When pressing a button, please press the bottom of the buttons on the front of the monitor, an OSD Guide will display showing the function of the button before the menu for ...
User Manual Ver.1.0 (English)
Page 39
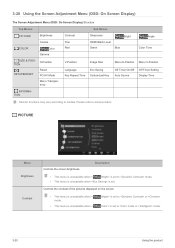
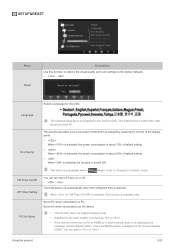
... Size Language Key Repeat Time Eco Saving Customized Key Menu H-Position Menu V-Position Off Timer On/Off Auto Source Off Timer Setting Display Time INFORMATION Monitor functions may vary according to actual product. Controls the contrast of the pictures displayed on the screen • This menu is unavailable when < mode. •...
... Size Language Key Repeat Time Eco Saving Customized Key Menu H-Position Menu V-Position Off Timer On/Off Auto Source Off Timer Setting Display Time INFORMATION Monitor functions may vary according to actual product. Controls the contrast of the pictures displayed on the screen • This menu is unavailable when < mode. •...
User Manual Ver.1.0 (English)
Page 41
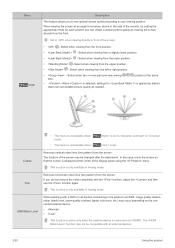
... < Bright> is set to your viewing position. This function is only available in Analog mode. Select when viewing from the screen. The location of the monitor, by setting the appropriate mode for is applied by default. If you cannot remove the noise completely with a DVD or set-top box connecting to...
... < Bright> is set to your viewing position. This function is only available in Analog mode. Select when viewing from the screen. The location of the monitor, by setting the appropriate mode for is applied by default. If you cannot remove the noise completely with a DVD or set-top box connecting to...
User Manual Ver.1.0 (English)
Page 44
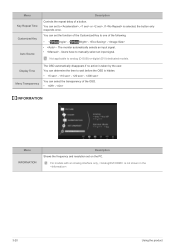
... not support Analog mode. • Supplied for the OSD. Select a language for the wide models only such as 16:9 or 16:10. • If the monitor (when set to the product OSD.
... not support Analog mode. • Supplied for the OSD. Select a language for the wide models only such as 16:9 or 16:10. • If the monitor (when set to the product OSD.
User Manual Ver.1.0 (English)
Page 45
... disappears if no action is selected, the button only responds once. If is taken by the user. You can select the transparency of a button. The monitor automatically selects an input signal. • - Menu Key Repeat Time Customized Key Auto Source Description Controls the repeat delay of the OSD. • - Users have...
... disappears if no action is selected, the button only responds once. If is taken by the user. You can select the transparency of a button. The monitor automatically selects an input signal. • - Menu Key Repeat Time Customized Key Auto Source Description Controls the repeat delay of the OSD. • - Users have...
User Manual Ver.1.0 (English)
Page 46
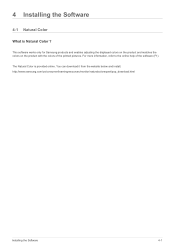
http://www.samsung.com/us/consumer/learningresources/monitor/naturalcolorexpert/pop_download.html Installing the Software 4-1 For more information, refer to the online help of the printed pictures. 4 Installing the Software 4-1 Natural Color What is provided online. You can download it from the website below and install; This software works only for Samsung products and enables adjusting the displayed colors on the product and matches the colors on the product with the colors of the software (F1). The Natural Color is Natural Color ?
http://www.samsung.com/us/consumer/learningresources/monitor/naturalcolorexpert/pop_download.html Installing the Software 4-1 For more information, refer to the online help of the printed pictures. 4 Installing the Software 4-1 Natural Color What is provided online. You can download it from the website below and install; This software works only for Samsung products and enables adjusting the displayed colors on the product and matches the colors on the product with the colors of the software (F1). The Natural Color is Natural Color ?
User Manual Ver.1.0 (English)
Page 47
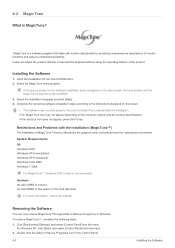
...To remove MagicTune™, complete the following steps. 1. 4-2 MagicTune What is recommended. MagicTune is a software program that helps with monitor adjustments by providing comprehensive descriptions of MagicTune™may not appear depending on the screen. • The software may not work properly...Panel] from the menu. 2. Removing the Software You can adjust the product with the Installation (MagicTune™) The installation of monitor functions and easy-to the instructions displayed on the computer system and the product specifications. •If the shortcut icon does not...
...To remove MagicTune™, complete the following steps. 1. 4-2 MagicTune What is recommended. MagicTune is a software program that helps with monitor adjustments by providing comprehensive descriptions of MagicTune™may not appear depending on the screen. • The software may not work properly...Panel] from the menu. 2. Removing the Software You can adjust the product with the Installation (MagicTune™) The installation of monitor functions and easy-to the instructions displayed on the computer system and the product specifications. •If the shortcut icon does not...
User Manual Ver.1.0 (English)
Page 49
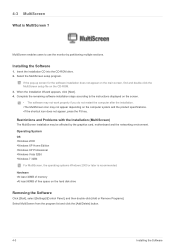
4-3 MultiScreen What is recommended. Complete the remaining software installation steps according to use the monitor by the graphics card, motherboard and the networking environment. MultiScreen enables users to the instructions displayed on the computer system and the product specifications. •...
4-3 MultiScreen What is recommended. Complete the remaining software installation steps according to use the monitor by the graphics card, motherboard and the networking environment. MultiScreen enables users to the instructions displayed on the computer system and the product specifications. •...

User Manual Ver.1.0 (English)
Page 50
... the Power LED blinks even if the product and the PC are properly connected, perform the self-diagnosis function according to the procedures below. 1. 5 Troubleshooting 5-1 Monitor Self-Diagnosis • You can check if the product is working properly using the Self-Diagnosis function. • If a blank screen is no problem with...
... the Power LED blinks even if the product and the PC are properly connected, perform the self-diagnosis function according to the procedures below. 1. 5 Troubleshooting 5-1 Monitor Self-Diagnosis • You can check if the product is working properly using the Self-Diagnosis function. • If a blank screen is no problem with...

User Manual Ver.1.0 (English)
Page 51
If the problem continues, please contact your nearest Samsung Electronics Service Center. Is a blank screen displayed and does the power LED blink at...when an [HDMI] or [HDMI-DVI] cable is the PC or graphics card, and can differ according to the monitor and PC. Did you cancel the screen adjustment? Blank spaces are not caused by adjusting the screen size in the HDMI... Check the cable connecting the PC and the product. (Connected using a PC, the screen may not be fixed by the monitor. In this case, reboot the PC while the DVI cable is set for the product. The on Is the power cord ...
If the problem continues, please contact your nearest Samsung Electronics Service Center. Is a blank screen displayed and does the power LED blink at...when an [HDMI] or [HDMI-DVI] cable is the PC or graphics card, and can differ according to the monitor and PC. Did you cancel the screen adjustment? Blank spaces are not caused by adjusting the screen size in the HDMI... Check the cable connecting the PC and the product. (Connected using a PC, the screen may not be fixed by the monitor. In this case, reboot the PC while the DVI cable is set for the product. The on Is the power cord ...

User Manual Ver.1.0 (English)
Page 52
... Themes → Display → Settings. Install the device driver referring to the user manual. When I connect the monitor, the 'Unknown monitor, Plug&Play (VESA DDC) monitor found' message is displayed. Since this product is designed so that the color has a soft appearance by coating it ... color again by selecting Control Panel → Appearance and Personalization → Display → Adjust resolution → Advanced settings → Monitor. (For more times when booting up the graphics card referring to the product? Did you install the device driver for the computer.) ...
... Themes → Display → Settings. Install the device driver referring to the user manual. When I connect the monitor, the 'Unknown monitor, Plug&Play (VESA DDC) monitor found' message is displayed. Since this product is designed so that the color has a soft appearance by coating it ... color again by selecting Control Panel → Appearance and Personalization → Display → Adjust resolution → Advanced settings → Monitor. (For more times when booting up the graphics card referring to the product? Did you install the device driver for the computer.) ...
User Manual Ver.1.0 (English)
Page 53
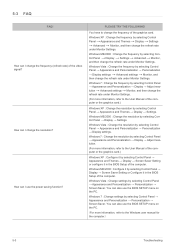
... : Change the frequency by selecting Control Panel → Appearance and Themes → Display → Settings → Advanced → Monitor, and then change the frequency of the computer. How can also use the BIOS SETUP menu on the PC. Windows 7 : Change...selecting Control Panel → Appearance and Personalization → Personalization → Screen Saver. You can I change the refresh rate under Monitor Settings. Windows 7 : Change settings by selecting Control Panel → Appearance and Personalization → Personalization → Screen Saver. ...
... : Change the frequency by selecting Control Panel → Appearance and Themes → Display → Settings → Advanced → Monitor, and then change the frequency of the computer. How can also use the BIOS SETUP menu on the PC. Windows 7 : Change...selecting Control Panel → Appearance and Personalization → Personalization → Screen Saver. You can I change the refresh rate under Monitor Settings. Windows 7 : Change settings by selecting Control Panel → Appearance and Personalization → Personalization → Screen Saver. ...

User Manual Ver.1.0 (English)
Page 55
... returns to normal operation when you press a key on your monitor OFF when it is disconnected. 6-2 More Information Use the software utility installed on the keyboard. The PowerSaver system operates with a VESA DPM compliant video card ...
... returns to normal operation when you press a key on your monitor OFF when it is disconnected. 6-2 More Information Use the software utility installed on the keyboard. The PowerSaver system operates with a VESA DPM compliant video card ...
User Manual Ver.1.0 (English)
Page 57
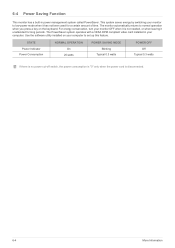
... when it is disconnected. 6-4 More Information 6-4 Power Saving Function This monitor has a built-in your computer. The PowerSaver system operates with a VESA DPM compliant video card installed in power management system called PowerSaver. STATE Power Indicator ... used for long periods. This system saves energy by switching your computer to low-power mode when it unattended for a certain amount of time. The monitor automatically returns to normal operation when you press a key on your monitor to set up this feature. Use the software utility installed on the keyboard.
... when it is disconnected. 6-4 More Information 6-4 Power Saving Function This monitor has a built-in your computer. The PowerSaver system operates with a VESA DPM compliant video card installed in power management system called PowerSaver. STATE Power Indicator ... used for long periods. This system saves energy by switching your computer to low-power mode when it unattended for a certain amount of time. The monitor automatically returns to normal operation when you press a key on your monitor to set up this feature. Use the software utility installed on the keyboard.

User Manual Ver.1.0 (English)
Page 59
... power consumption is "0" only when the power cord is not needed, or when leaving it unattended for a certain amount of time. 6-6 Power Saving Function This monitor has a built-in your monitor OFF when it is disconnected. 6-6 More Information The monitor automatically returns to normal operation when you press a key on your...
... power consumption is "0" only when the power cord is not needed, or when leaving it unattended for a certain amount of time. 6-6 Power Saving Function This monitor has a built-in your monitor OFF when it is disconnected. 6-6 More Information The monitor automatically returns to normal operation when you press a key on your...


