
User Manual (ENGLISH)
Page 1
This manual will guide you for buying a Samsung camera. Please read this manual carefully before using the application software. ENGLISH User Manual Thank you through using the camera, including capturing images, downloading images and using your new camera.
This manual will guide you for buying a Samsung camera. Please read this manual carefully before using the application software. ENGLISH User Manual Thank you through using the camera, including capturing images, downloading images and using your new camera.

User Manual (ENGLISH)
Page 2
... properly prior to when you wish to turn it (e.g. Samsung camera takes no responsibility for buying a Samsung Digital Camera. ● Prior to using this manual are charged by the manufacturer's representatives in that the camera is contained in market, servicings may result from camera malfunction. ● Keep this camera is not in Application software CD-ROM. (p.86) Take...
... properly prior to when you wish to turn it (e.g. Samsung camera takes no responsibility for buying a Samsung Digital Camera. ● Prior to using this manual are charged by the manufacturer's representatives in that the camera is contained in market, servicings may result from camera malfunction. ● Keep this camera is not in Application software CD-ROM. (p.86) Take...

User Manual (ENGLISH)
Page 3
... this may result in fire, injury, electric shock or severe damage to you or your dealer or Samsung Camera Service centre. Exposure to build up and distort the camera body or cause a fire. Switch off the camera, and then disconnect the power source. Internal inspection, maintenance and repairs should occur, please consult a doctor immediately...
... this may result in fire, injury, electric shock or severe damage to you or your dealer or Samsung Camera Service centre. Exposure to build up and distort the camera body or cause a fire. Switch off the camera, and then disconnect the power source. Internal inspection, maintenance and repairs should occur, please consult a doctor immediately...

User Manual (ENGLISH)
Page 4
... touch the flash after using the AC Charger. If the battery type is in contact with hands or objects. After use, always switch off the camera before (p.38). Caution CAUTION indicates a potentially hazardous situation which, if not avoided, may result in a minor or moderate injury. ■ Leaking, ...overheating, or damaged battery could result in fire or injury. •Use battery with the correct specification for the camera. •Do not short circuit, heat or dispose of time. Failure to do so may damage the cords or cables and cause a fire or...
... touch the flash after using the AC Charger. If the battery type is in contact with hands or objects. After use, always switch off the camera before (p.38). Caution CAUTION indicates a potentially hazardous situation which, if not avoided, may result in a minor or moderate injury. ■ Leaking, ...overheating, or damaged battery could result in fire or injury. •Use battery with the correct specification for the camera. •Do not short circuit, heat or dispose of time. Failure to do so may damage the cords or cables and cause a fire or...
User Manual (ENGLISH)
Page 5
... a movie clip .........51 ■How to capture the movie clip ...51 ■On camera movie trimming ......51 ■Playing back a recorded voice ...52 ●LCD monitor Indicator 52 ●Using the camera buttons to use the menu 31 ●Recording 31 ■Sharpness 31 ■Contrast 31... for MAC ...91 ●Removing the USB Driver for Windows 98SE 92 ●Digimax Master 92 ●FAQ 95 Contents ●How to set the camera 53 ●Thumbnail / Enlargement button ...53 《4》 ●Voice memo / Up button 54 ●Play & Pause / Down button ......55 ●...
... a movie clip .........51 ■How to capture the movie clip ...51 ■On camera movie trimming ......51 ■Playing back a recorded voice ...52 ●LCD monitor Indicator 52 ●Using the camera buttons to use the menu 31 ●Recording 31 ■Sharpness 31 ■Contrast 31... for MAC ...91 ●Removing the USB Driver for Windows 98SE 92 ●Digimax Master 92 ●FAQ 95 Contents ●How to set the camera 53 ●Thumbnail / Enlargement button ...53 《4》 ●Voice memo / Up button 54 ●Play & Pause / Down button ......55 ●...

User Manual (ENGLISH)
Page 6
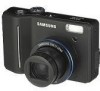
The contents can vary depending on the sales region. To buy the optional equipment, contact your nearest Samsung dealer or Samsung service centre. < Included items > Camera case User manual, Product warranty Camera strap Software CD (see p.86) Computer (see p.89) PictBridge compatible printer (see p.77) DPOF compatible printer (see p.73) SD memory card / MMC (see...
The contents can vary depending on the sales region. To buy the optional equipment, contact your nearest Samsung dealer or Samsung service centre. < Included items > Camera case User manual, Product warranty Camera strap Software CD (see p.86) Computer (see p.89) PictBridge compatible printer (see p.77) DPOF compatible printer (see p.73) SD memory card / MMC (see...

User Manual (ENGLISH)
Page 8
button, Delete button Play mode / Printer button 《7》 Identification of features Back & Bottom LCD monitor Tripod socket Camera status lamp Zoom T button (Digital zoom) Zoom W button (Thumbnail) E (Effects) button Strap eyelet 5 function button FR(Face Recognition) button + / -
button, Delete button Play mode / Printer button 《7》 Identification of features Back & Bottom LCD monitor Tripod socket Camera status lamp Zoom T button (Digital zoom) Zoom W button (Thumbnail) E (Effects) button Strap eyelet 5 function button FR(Face Recognition) button + / -

User Manual (ENGLISH)
Page 9
Blinking A picture will be taken after about 10 seconds and 2 seconds later a second picture will be taken. ■ Camera Status Lamp Status Power on the subject) second intervals. Identification of features Bottom/ 5-function button Battery chamber cover Battery chamber Memory card slot Voice ... lamp turns on (LCD monitor turns off) The lamp is off The lamp blinks The lamp turns on (The camera focus on the subject) The lamp blinks (The camera doesn't focus on After taking a picture For the first 8 seconds, the lamp blinks at 1 second Blinking intervals. For the final 2 seconds, ...
Blinking A picture will be taken after about 10 seconds and 2 seconds later a second picture will be taken. ■ Camera Status Lamp Status Power on the subject) second intervals. Identification of features Bottom/ 5-function button Battery chamber cover Battery chamber Memory card slot Voice ... lamp turns on (LCD monitor turns off) The lamp is off The lamp blinks The lamp turns on (The camera focus on the subject) The lamp blinks (The camera doesn't focus on After taking a picture For the first 8 seconds, the lamp blinks at 1 second Blinking intervals. For the final 2 seconds, ...

User Manual (ENGLISH)
Page 10
... - Icon - However, the duration for long periods. Connecting to a Power Source ■ We recommend using batteries varies in accordance with the camera. This is perfectly normal. ● It is not used for using battery supplied with the battery manufacturer or the photographic conditions ● Do ...of features ■ Mode icon : Refer to page 15~20 for more information about battery usage ● When the camera is easy to leaking if kept inside the camera. ● Low temperatures (below 0°C) can lose power over time and are listed below. - Battery can affect...
... - Icon - However, the duration for long periods. Connecting to a Power Source ■ We recommend using batteries varies in accordance with the camera. This is perfectly normal. ● It is not used for using battery supplied with the battery manufacturer or the photographic conditions ● Do ...of features ■ Mode icon : Refer to page 15~20 for more information about battery usage ● When the camera is easy to leaking if kept inside the camera. ● Low temperatures (below 0°C) can lose power over time and are listed below. - Battery can affect...

User Manual (ENGLISH)
Page 11
... on after you have inserted battery, please check whether the battery is opened, do not press the battery chamber cover by force. If the camera does not turn on the LCD monitor. When the battery chamber cover is inserted with the correct polarity (+ / -). - Battery indicator Battery... or use recharge or use battery) spare battery) spare battery) Inserting the memory card ■ Insert the memory card as shown - Turn off the camera's power before inserting the memory card. - Connecting to a Power Source ■ Insert the battery as shown. - This may damage the memory card ...
... on after you have inserted battery, please check whether the battery is opened, do not press the battery chamber cover by force. If the camera does not turn on the LCD monitor. When the battery chamber cover is inserted with the correct polarity (+ / -). - Battery indicator Battery... or use recharge or use battery) spare battery) spare battery) Inserting the memory card ■ Insert the memory card as shown - Turn off the camera's power before inserting the memory card. - Connecting to a Power Source ■ Insert the battery as shown. - This may damage the memory card ...

User Manual (ENGLISH)
Page 12
...images stored on the memory card is perfectly normal. ● Do not use , you will not operate. This is not covered by another digital camera. Wear and tear on the memory card. 《11》 When the memory card is subjected to copy important data onto other media ...the memory card in another digital camera or memory card reader. ● If the memory card is used in this be held responsible for the first time, if it contains images captured with strong electronic or magnetic fields, e.g. To use a memory card formatted by the Samsung warranty. ● The memory...
...images stored on the memory card is perfectly normal. ● Do not use , you will not operate. This is not covered by another digital camera. Wear and tear on the memory card. 《11》 When the memory card is subjected to copy important data onto other media ...the memory card in another digital camera or memory card reader. ● If the memory card is used in this be held responsible for the first time, if it contains images captured with strong electronic or magnetic fields, e.g. To use a memory card formatted by the Samsung warranty. ● The memory...
User Manual (ENGLISH)
Page 13
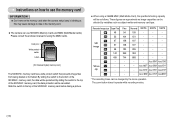
Card pins Write protect switch Label [ SD (Secure Digital) memory card ] The SD/SDHC memory card has a write protect switch that prevents image files from being... data will be changed by variables such as this may cause damage to data in the memory card. ■ The camera can be cancelled. Recorded image size Super Fine Fine 48 94 53 104 Still image 67 128 67 128 95 183 ...as image capacities can use the memory card INFORMATION ● Don't remove the memory card when the camera status lamp is blinking as subject matter and memory card type. About10'54" About13'43" -
Card pins Write protect switch Label [ SD (Secure Digital) memory card ] The SD/SDHC memory card has a write protect switch that prevents image files from being... data will be changed by variables such as this may cause damage to data in the memory card. ■ The camera can be cancelled. Recorded image size Super Fine Fine 48 94 53 104 Still image 67 128 67 128 95 183 ...as image capacities can use the memory card INFORMATION ● Don't remove the memory card when the camera status lamp is blinking as subject matter and memory card type. About10'54" About13'43" -

User Manual (ENGLISH)
Page 14
... by pressing the UP/ DOWN button and press the RIGHT button. 2. Set up the date / time, language and battery type before using this camera. ● Setting up the language 1. Select the [Date&Time] menu by pressing the UP/ DOWN button and press the RIGHT button. 2. ... T.Chinese, Japanese, Russian, Portuguese, Dutch, Danish, Swedish, Finnish, Thai, BAHASA(MALAY/ INDONESIAN), Arabic, Czech, Polish, Hungarian and Turkish. ● Even if the camera is at the first item of 22 languages. Select the desired sub menu by pressing SETUP1 Language Date&Time Battery Type 07/02/01 12...
... by pressing the UP/ DOWN button and press the RIGHT button. 2. Set up the date / time, language and battery type before using this camera. ● Setting up the language 1. Select the [Date&Time] menu by pressing the UP/ DOWN button and press the RIGHT button. 2. ... T.Chinese, Japanese, Russian, Portuguese, Dutch, Danish, Swedish, Finnish, Thai, BAHASA(MALAY/ INDONESIAN), Arabic, Czech, Polish, Hungarian and Turkish. ● Even if the camera is at the first item of 22 languages. Select the desired sub menu by pressing SETUP1 Language Date&Time Battery Type 07/02/01 12...

User Manual (ENGLISH)
Page 15
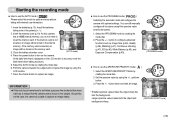
...9325; ⑦ ⑬ ⑧ ⑫ ⑨⑩ ⑪ [ Image & Full Status ] No. Description 6 Macro 7 Contrast 8 Sharpness 9 Auto focus frame 10 Camera shake warning 11 Date/ Time 12 Exposure compensation 13 White Balance 14 ISO 15 Continuous shot 16 Metering 17 Image quality 18 Image size 19... Battery Optical/ Digital Zoom bar/ 20 Digital Zoom rate 21 Voice memo/ Without Sound Number of available shots remaining 22 Movie / Voice recording time 23...
...9325; ⑦ ⑬ ⑧ ⑫ ⑨⑩ ⑪ [ Image & Full Status ] No. Description 6 Macro 7 Contrast 8 Sharpness 9 Auto focus frame 10 Camera shake warning 11 Date/ Time 12 Exposure compensation 13 White Balance 14 ISO 15 Continuous shot 16 Metering 17 Image quality 18 Image size 19... Battery Optical/ Digital Zoom bar/ 20 Digital Zoom rate 21 Voice memo/ Without Sound Number of available shots remaining 22 Movie / Voice recording time 23...
User Manual (ENGLISH)
Page 16
...values make both the object and background sharp. [APERTURE PRIORITY mode] 《15》 Insert the batteries taking a picture.) 5. Point the camera towards the subject and compose the image by using the +/-, up/down half way, it means that is displayed on the LCD monitor is not... inserted, an image will configure the camera with minimal user interaction. 1. You can still manually configure all functions except the aperture value and shutter speed. 1. Press the + / -...
...values make both the object and background sharp. [APERTURE PRIORITY mode] 《15》 Insert the batteries taking a picture.) 5. Point the camera towards the subject and compose the image by using the +/-, up/down half way, it means that is displayed on the LCD monitor is not... inserted, an image will configure the camera with minimal user interaction. 1. You can still manually configure all functions except the aperture value and shutter speed. 1. Press the + / -...

User Manual (ENGLISH)
Page 17
... in the ASR mode. 2. Press the + / - Up / Down button : changes aperture value Left / Right button : changes shutter speed. 3. The digital zoom will display. If the subject is not displayed. 4. button twice and take a little longer for the shutter speed and aperture value will not operate... achieve a better result. 6. If the lighting condition is darker than fluorescent lighting condition, the ASR will display. As the ASR uses the camera's digital signal processor, it may be blurred. 5. Starting the recording mode ■ How to process and save the images. 《16》...
... in the ASR mode. 2. Press the + / - Up / Down button : changes aperture value Left / Right button : changes shutter speed. 3. The digital zoom will display. If the subject is not displayed. 4. button twice and take a little longer for the shutter speed and aperture value will not operate... achieve a better result. 6. If the lighting condition is darker than fluorescent lighting condition, the ASR will display. As the ASR uses the camera's digital signal processor, it may be blurred. 5. Starting the recording mode ■ How to process and save the images. 《16》...

User Manual (ENGLISH)
Page 19
...the shutter button fully to green when the focus is activated. 4. The FR icon will be displayed on the nearest person. ● When the camera detect a target face, the white colour focus frame will display over the rest faces(up to previous AF mode if face detection was failure. ... of the face is 2.7m (Wide). ● The nearer the subject, the faster the camera can detect up to 9 persons. ● When the camera recognises many people at the camera. - The distance between the camera and object are far. ● The maximum available Face Recognition range is hidden. - Select ...
...the shutter button fully to green when the focus is activated. 4. The FR icon will be displayed on the nearest person. ● When the camera detect a target face, the white colour focus frame will display over the rest faces(up to previous AF mode if face detection was failure. ... of the face is 2.7m (Wide). ● The nearer the subject, the faster the camera can detect up to 9 persons. ● When the camera recognises many people at the camera. - The distance between the camera and object are far. ● The maximum available Face Recognition range is hidden. - Select ...

User Manual (ENGLISH)
Page 20
... (Selectable) - To stop the recording, press the shutter button again. [ MOVIE CLIP mode ] ■ Pausing while recording a movie clip (Successive Recording) This camera allows you wish to stop recording, press the shutter button again. 00:00:12 SH Stop 00 : 00 : 18 / Pause [ Successive recording of the memory...of a movie clip ] 《19》 Press the Up button and the ( ) icon will display on the LCD monitor. 2. Point the camera towards the subject and compose the image by rotating the mode dial. (The MOVIE CLIP mode icon and available recording time will display on the...
... (Selectable) - To stop the recording, press the shutter button again. [ MOVIE CLIP mode ] ■ Pausing while recording a movie clip (Successive Recording) This camera allows you wish to stop recording, press the shutter button again. 00:00:12 SH Stop 00 : 00 : 18 / Pause [ Successive recording of the memory...of a movie clip ] 《19》 Press the Up button and the ( ) icon will display on the LCD monitor. 2. Point the camera towards the subject and compose the image by rotating the mode dial. (The MOVIE CLIP mode icon and available recording time will display on the...

User Manual (ENGLISH)
Page 21
...VOICE RECORDING mode by using the LCD monitor. 《20》 To take a picture against the sun, please use a tripod, support the camera on a solid surface or change to record sound. If you capture an image. ■ Compose the image by pressing the Voice recording button ... - Things to take pictures to stop recording, press the shutter button again. In any mode with the exception of 40cm between you and the camera (microphone) is released. - Press the shutter button to confirm focus and flash battery charge. SH REC Exit [ VOICE RECORDING mode ] - Press...
...VOICE RECORDING mode by using the LCD monitor. 《20》 To take a picture against the sun, please use a tripod, support the camera on a solid surface or change to record sound. If you capture an image. ■ Compose the image by pressing the Voice recording button ... - Things to take pictures to stop recording, press the shutter button again. In any mode with the exception of 40cm between you and the camera (microphone) is released. - Press the shutter button to confirm focus and flash battery charge. SH REC Exit [ VOICE RECORDING mode ] - Press...

User Manual (ENGLISH)
Page 22
... recording voice in the memory allows. POWER button ● Used for more information about the auto power off automatically to page 36 for turning the camera's power on / off. ● If there is very narrow (such as expected. - If the subject is very bright. - When the ... stores the image. If the subject is recorded for recording a movie clip. When photographing a subject that has little contrast. - Using the camera buttons to stop recording, press the shutter button again. ● In STILL IMAGE mode Pressing the shutter button down halfway activates the autofocus and...
... recording voice in the memory allows. POWER button ● Used for more information about the auto power off automatically to page 36 for turning the camera's power on / off. ● If there is very narrow (such as expected. - If the subject is very bright. - When the ... stores the image. If the subject is recorded for recording a movie clip. When photographing a subject that has little contrast. - Using the camera buttons to stop recording, press the shutter button again. ● In STILL IMAGE mode Pressing the shutter button down halfway activates the autofocus and...


