
User Manual (user Manual) (ver.1.0) (English)
Page 1
...SAMSUNG(726-7864) www.samsung.com/ca U.S.A 1-800-SAMSUNG(726-7864) www.samsung.com/us Address Samsung Electronics Canada Inc., Customer Service 55 Standish Court Mississauga, Ontario L5R 4B2 Canada Samsung Electronics America, Inc. 85 Challenger Road Ridgefield Park, NJ 07660-2112 Plasma TV user manual © 2011 Samsung... Electronics Co., Ltd. BN68-03325A-01 imagine the possibilities Thank you have any questions or comments relating to Samsung products, please contact the SAMSUNG customer care center. To receive more...
...SAMSUNG(726-7864) www.samsung.com/ca U.S.A 1-800-SAMSUNG(726-7864) www.samsung.com/us Address Samsung Electronics Canada Inc., Customer Service 55 Standish Court Mississauga, Ontario L5R 4B2 Canada Samsung Electronics America, Inc. 85 Challenger Road Ridgefield Park, NJ 07660-2112 Plasma TV user manual © 2011 Samsung... Electronics Co., Ltd. BN68-03325A-01 imagine the possibilities Thank you have any questions or comments relating to Samsung products, please contact the SAMSUNG customer care center. To receive more...
User Manual (user Manual) (ver.1.0) (English)
Page 2
...However, children should primarily be in the wide screen 16:9 ratio format, or expanded to fill the screen if your Samsung limited warranty. • SAMSUNG ELECTRONICS NORTH AMERICAN LIMITED WARRANTY STATEMENT Subject to reduce the degree of brightness and contrast of the screen when displaying a ...still image. • Heat on the screen. Watching the Plasma TV in 4:3 format for a long period of time may cause permanent...
...However, children should primarily be in the wide screen 16:9 ratio format, or expanded to fill the screen if your Samsung limited warranty. • SAMSUNG ELECTRONICS NORTH AMERICAN LIMITED WARRANTY STATEMENT Subject to reduce the degree of brightness and contrast of the screen when displaying a ...still image. • Heat on the screen. Watching the Plasma TV in 4:3 format for a long period of time may cause permanent...
User Manual (user Manual) (ver.1.0) (English)
Page 3
... by Step Guide Check here for Anynet+ 29 Other Information yy Installing the Wall Mount 30 yy Securing the Installation Space 31 yy Securing the TV to open the relevant submenu within the OSD (on the remote control. Note Indicates additional information.
... by Step Guide Check here for Anynet+ 29 Other Information yy Installing the Wall Mount 30 yy Securing the Installation Space 31 yy Securing the TV to open the relevant submenu within the OSD (on the remote control. Note Indicates additional information.
User Manual (user Manual) (ver.1.0) (English)
Page 4
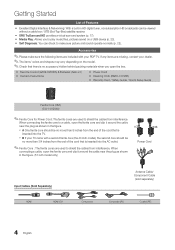
... used to play music files, pictures saved on the model. ✎✎Check that is inserted into the TV. If any items are used to shield the cables from interference. xx B If your TV came with your dealer. ✎✎The items' colors and shapes may vary depending on a USB device (p. 23... the end of the cord that there is inserted into the AC outlet. ✎✎Ferrite Core : The ferrite cores are missing, contact your PDP TV.
... used to play music files, pictures saved on the model. ✎✎Check that is inserted into the TV. If any items are used to shield the cables from interference. xx B If your TV came with your dealer. ✎✎The items' colors and shapes may vary depending on a USB device (p. 23... the end of the cord that there is inserted into the AC outlet. ✎✎Ferrite Core : The ferrite cores are missing, contact your PDP TV.

User Manual (user Manual) (ver.1.0) (English)
Page 5
... NOT USE DO NOT USE CHEMICALS GREASE OIL 1. Fasten four screws (M4 X L8) at least two people lift and move the PDP TV. [[Do not insert your TV upright, connect the TV to the Stand using four screws (M4 X L12) as shown. (Correct assembly) (Incorret assembly) x4 (M4 X L8) 2. 01 Getting Started See... to the stand. Connect the Guide Stand to the Stand. 3. Install the Stand Stand (1EA) Guide Stand (1EA) Follow the steps below to connect the TV to distinguish between the front and back of the...
... NOT USE DO NOT USE CHEMICALS GREASE OIL 1. Fasten four screws (M4 X L8) at least two people lift and move the PDP TV. [[Do not insert your TV upright, connect the TV to the Stand using four screws (M4 X L12) as shown. (Correct assembly) (Incorret assembly) x4 (M4 X L8) 2. 01 Getting Started See... to the stand. Connect the Guide Stand to the Stand. 3. Install the Stand Stand (1EA) Guide Stand (1EA) Follow the steps below to connect the TV to distinguish between the front and back of the...
User Manual (user Manual) (ver.1.0) (English)
Page 6
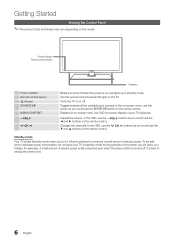
... electric power. Getting Started Viewing the Control Panel ✎✎The product color and shape may vary depending on the TV. Toggles between all the available input sources. Standby mode Your TV enters Standby mode when you are away on the remote control. It is best to consume a small amount of electric... button as you would use the ▼ and ▲ buttons on or off . To be safe and to decrease power consumption, do not leave your TV's features. In the OSD, use the y buttons as you would use the ENTERE button on a holiday, for long periods of your...
... electric power. Getting Started Viewing the Control Panel ✎✎The product color and shape may vary depending on the TV. Toggles between all the available input sources. Standby mode Your TV enters Standby mode when you are away on the remote control. It is best to consume a small amount of electric... button as you would use the ▼ and ▲ buttons on or off . To be safe and to decrease power consumption, do not leave your TV's features. In the OSD, use the y buttons as you would use the ENTERE button on a holiday, for long periods of your...
User Manual (user Manual) (ver.1.0) (English)
Page 7
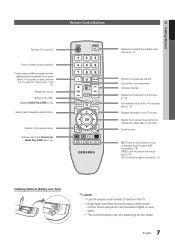
... 16). Installing batteries (Battery size: AAA) ✎✎NOTE xx Use the remote control within 23 feet from the TV. Returns to the previous menu. Cuts off the TV at a preset time (p. 19). Automatically shuts off the sound temporarily. Exits the menu. Avoid using when near fluorescent ...Adjusts the volume. Quickly select frequently used in the Channel list, Media Play (USB) menu, etc. Changes channels. Displays the channel list on the TV screen. Press to choose stereo, mono, or Separate Audio Program (SAP broadcast) (p. 18). xx Bright light may vary depending on the model. 7...
... 16). Installing batteries (Battery size: AAA) ✎✎NOTE xx Use the remote control within 23 feet from the TV. Returns to the previous menu. Cuts off the TV at a preset time (p. 19). Automatically shuts off the sound temporarily. Exits the menu. Avoid using when near fluorescent ...Adjusts the volume. Quickly select frequently used in the Channel list, Media Play (USB) menu, etc. Changes channels. Displays the channel list on the TV screen. Press to choose stereo, mono, or Separate Audio Program (SAP broadcast) (p. 18). xx Bright light may vary depending on the model. 7...

User Manual (user Manual) (ver.1.0) (English)
Page 8
...or ► button, then press the ENTERE button. or Home Use yy Select the Home Use mode. Store Demo mode is initially powered on the TV. POWER P yy To return the unit's settings from Store Demo to Home Use when not in Plug & Play, press the volume button on ,...button on -screen prompts will start automatically. Set the Clock Mode automatically or manually. Getting Started Connecting to an Antenna or Cable Connection When the TV is for retail environments. Select Air, Cable or Auto. 4 Selecting and memorizing channels 5 Setting the Clock Mode The channel search will assist in...
...or ► button, then press the ENTERE button. or Home Use yy Select the Home Use mode. Store Demo mode is initially powered on the TV. POWER P yy To return the unit's settings from Store Demo to Home Use when not in Plug & Play, press the volume button on ,...button on -screen prompts will start automatically. Set the Clock Mode automatically or manually. Getting Started Connecting to an Antenna or Cable Connection When the TV is for retail environments. Select Air, Cable or Auto. 4 Selecting and memorizing channels 5 Setting the Clock Mode The channel search will assist in...

User Manual (user Manual) (ver.1.0) (English)
Page 9
...-L Device R W R B G Component Cable (Not Supplied) G B R W R AUDIO OUT COMPONENT OUT Device R-AUDIO-L PR PB G R B G Red Blue Green R W Y Red White Yellow ✎✎When connecting to the TV. Otherwise, the picture may not display or a connection error may require a DVI-HDMI (DVI to HDMI) cable or DVI-HDMI (DVI to purchase a certified HDMI...
...-L Device R W R B G Component Cable (Not Supplied) G B R W R AUDIO OUT COMPONENT OUT Device R-AUDIO-L PR PB G R B G Red Blue Green R W Y Red White Yellow ✎✎When connecting to the TV. Otherwise, the picture may not display or a connection error may require a DVI-HDMI (DVI to HDMI) cable or DVI-HDMI (DVI to purchase a certified HDMI...

User Manual (user Manual) (ver.1.0) (English)
Page 10
xx When the receiver (amplifier or DVD home theater) is receiving a DTV signal, the TV will only 2 CH audio from the TV's optical jack. If you want to hear 5.1 CH audio, connect the digital audio out jack from your DVD...a Digital Audio System to the amplifier or DVD home theater. When the TV is set to an amplifier or home theater. When the source is available when you connect the TV to the TV via HDMI, you connection it to an external device supporting 5.1 CH. ...will send 5.1 CH sound to the DIGITAL AUDIO OUT (OPTICAL) jack, decrease the volume of both the TV and the system.
xx When the receiver (amplifier or DVD home theater) is receiving a DTV signal, the TV will only 2 CH audio from the TV's optical jack. If you want to hear 5.1 CH audio, connect the digital audio out jack from your DVD...a Digital Audio System to the amplifier or DVD home theater. When the TV is set to an amplifier or home theater. When the source is available when you connect the TV to the TV via HDMI, you connection it to an external device supporting 5.1 CH. ...will send 5.1 CH sound to the DIGITAL AUDIO OUT (OPTICAL) jack, decrease the volume of both the TV and the system.

User Manual (user Manual) (ver.1.0) (English)
Page 12
...button: Returns to navigate the menu and select and adjust different functions. OO MENUm → Input → Source List → ENTERE SOURCE ■■ TV / AV / Component1 / Component2 / HDMI1/DVI / HDMI2 ✎✎ You can set an external input sources name you want. ■■ VCR...9660; 3 ENTER E 4 ▲/▼ 5 ◄/► 6 ENTER E 7 EXIT e The main menu options appear on -screen menu. Press ENTERE to select TV or an external input sources such as a DVD player / Blu-ray player / cable box / STB satellite receiver. Edit Name OO MENUm → Input → ...
...button: Returns to navigate the menu and select and adjust different functions. OO MENUm → Input → Source List → ENTERE SOURCE ■■ TV / AV / Component1 / Component2 / HDMI1/DVI / HDMI2 ✎✎ You can set an external input sources name you want. ■■ VCR...9660; 3 ENTER E 4 ▲/▼ 5 ◄/► 6 ENTER E 7 EXIT e The main menu options appear on -screen menu. Press ENTERE to select TV or an external input sources such as a DVD player / Blu-ray player / cable box / STB satellite receiver. Edit Name OO MENUm → Input → ...
User Manual (user Manual) (ver.1.0) (English)
Page 13
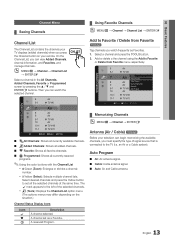
...to set as Favorites. 1. Add or delete a the channel using the Add to Favorite Timer Viewing Channel Name Edit Select All Auto Program * TV #10 * TV #11 Air Zoom Select T Tools ¦¦ Memorizing Channels OO MENUm → Channel → ENTERE Antenna (Air / Cable) t Before .... an Air or a Cable system). Add to Favorite / Delete from Favorite menu respectively. 6 6-1 7 8 9 9-1 10 10-1 11-1 Air * TV #6 Air Air Air * TV #9 Air Delete Add to Favorite or Delete from Favorite t Tag channels you can begin memorizing the available channels, you must specify the type of...
...to set as Favorites. 1. Add or delete a the channel using the Add to Favorite Timer Viewing Channel Name Edit Select All Auto Program * TV #10 * TV #11 Air Zoom Select T Tools ¦¦ Memorizing Channels OO MENUm → Channel → ENTERE Antenna (Air / Cable) t Before .... an Air or a Cable system). Add to Favorite / Delete from Favorite menu respectively. 6 6-1 7 8 9 9-1 10 10-1 11-1 Air * TV #6 Air Air Air * TV #9 Air Delete Add to Favorite or Delete from Favorite t Tag channels you can begin memorizing the available channels, you must specify the type of...

User Manual (user Manual) (ver.1.0) (English)
Page 14
...; Timer Viewing: You can set a desired channel to be reserved. Basic Features ✎✎NOTE xx When selecting the Cable TV system: STD, HRC and IRC identify various types of cable TV systems. Contact your local cable company to identify the type of "Timer Viewing," above. 14 English This process may differ...
...; Timer Viewing: You can set a desired channel to be reserved. Basic Features ✎✎NOTE xx When selecting the Cable TV system: STD, HRC and IRC identify various types of cable TV systems. Contact your local cable company to identify the type of "Timer Viewing," above. 14 English This process may differ...

User Manual (user Manual) (ver.1.0) (English)
Page 15
...: 0 : Native : 0 : On U Move E Enter R Return ■■ Black Tone (Off / Dark / Darker / Darkest): Select the black level to the TV. Use the arrow keys to change the reservation Information.) ✎✎ Alternatively, you can view Information by highlighting a program and pressing the ENTERE button. ■...for adjusting picture quality. If the signal is clear. ✎✎Settings are applied to the channel you make changes to the TV. ¦¦ Changing the Picture Options Advanced Settings OO MENUm → Picture → Advanced Settings → ENTERE All ...
...: 0 : Native : 0 : On U Move E Enter R Return ■■ Black Tone (Off / Dark / Darker / Darkest): Select the black level to the TV. Use the arrow keys to change the reservation Information.) ✎✎ Alternatively, you can view Information by highlighting a program and pressing the ENTERE button. ■...for adjusting picture quality. If the signal is clear. ✎✎Settings are applied to the channel you make changes to the TV. ¦¦ Changing the Picture Options Advanced Settings OO MENUm → Picture → Advanced Settings → ENTERE All ...
User Manual (user Manual) (ver.1.0) (English)
Page 16
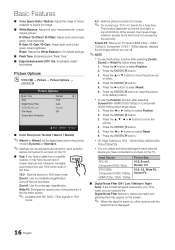
... function after selecting Zoom1, Zoom2 or Wide Fit, follow these steps: 1. P.SIZE 16:9 : Sets the picture to select Position. 2. The borders displayed on the TV. Press the ENTERE button. 5. Press the ◄ or ► button to 16:9 wide mode. Press the ENTERE button. 5. Press the ▲ or ▼... in HDMI (1080i/1080p) or Component (1080i/1080p) follow these steps: 1. Press the ENTERE button to reset the picture to its own set your TV inputs HDMI (720p / 1080i / 1080p) or Component (1080i / 1080p) signals, displays the full image without any static and ghosting that may have...
... function after selecting Zoom1, Zoom2 or Wide Fit, follow these steps: 1. P.SIZE 16:9 : Sets the picture to select Position. 2. The borders displayed on the TV. Press the ENTERE button. 5. Press the ◄ or ► button to 16:9 wide mode. Press the ENTERE button. 5. Press the ▲ or ▼... in HDMI (1080i/1080p) or Component (1080i/1080p) follow these steps: 1. Press the ENTERE button to reset the picture to its own set your TV inputs HDMI (720p / 1080i / 1080p) or Component (1080i / 1080p) signals, displays the full image without any static and ghosting that may have...
User Manual (user Manual) (ver.1.0) (English)
Page 17
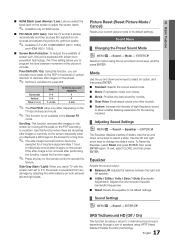
...sounds. ■■ Custom: Increase the intensity of high-frequency sound to allow a better listening experience for optimum quality. ✎✎ Available in TV, AV, COMPONENT (480i / 1080i) and HDMI (480i / 1080i). ■■ Screen Burn Protection: To reduce the possibility of sliders. To ... bandwidth frequencies. ■■ Reset: Resets the equalizer to be executed for pixel shift Horizontal Vertical Time (minute) Item 0~4 0~4 1~4 min TV/AV/Component/ HDMI/PC 4 4 4 min ✎✎ The Pixel Shift value may differ depending on the screen. The Time setting allows ...
...sounds. ■■ Custom: Increase the intensity of high-frequency sound to allow a better listening experience for optimum quality. ✎✎ Available in TV, AV, COMPONENT (480i / 1080i) and HDMI (480i / 1080i). ■■ Screen Burn Protection: To reduce the possibility of sliders. To ... bandwidth frequencies. ■■ Reset: Resets the equalizer to be executed for pixel shift Horizontal Vertical Time (minute) Item 0~4 0~4 1~4 min TV/AV/Component/ HDMI/PC 4 4 4 min ✎✎ The Pixel Shift value may differ depending on the screen. The Time setting allows ...
User Manual (user Manual) (ver.1.0) (English)
Page 18
.... ■■ SAP: Choose to listen to the Separate Audio Program, which is set to Auto. 18 English Speaker Select (External Speaker / TV Speaker) If you set to Auto. Use the left and right arrow buttons to move from a digital channel. ✎✎ You must have...Select to keep the volume low. When you are having difficulty receiving a stereo signal. ■■ Stereo: Choose for example, simultaneous translations of the TV. Auto Volume (Off / On) Normal equalizes the volume level on . Night is set the time automatically. -- Setup Menu ¦¦ Setting ...
.... ■■ SAP: Choose to listen to the Separate Audio Program, which is set to Auto. 18 English Speaker Select (External Speaker / TV Speaker) If you set to Auto. Use the left and right arrow buttons to move from a digital channel. ✎✎ You must have...Select to keep the volume low. When you are having difficulty receiving a stereo signal. ■■ Stereo: Choose for example, simultaneous translations of the TV. Auto Volume (Off / On) Normal equalizes the volume level on . Night is set the time automatically. -- Setup Menu ¦¦ Setting ...
User Manual (user Manual) (ver.1.0) (English)
Page 19
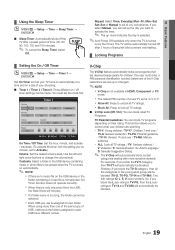
... the Sleep Timer, select Off. V-Chip The V-Chip feature automatically locks out programs that your TV turns on by the Timer): The TV will automatically be blocked (TV-G, TV-PG, TV-14 and TV-MA). So, if you can set to prevent overheating. ¦¦ Locking Programs ¦&#... period of USB, make sure the folders assigned to each USB have different names. TV-Y: Young children / TV-Y7: Children 7 and over / TV-G: General audience / TV-PG: Parental guidance / TV-14: Viewers 14 and over / TV-MA: Mature audience -- 03 Basic Features ¦¦ Using the Sleep Timer OO...
... the Sleep Timer, select Off. V-Chip The V-Chip feature automatically locks out programs that your TV turns on by the Timer): The TV will automatically be blocked (TV-G, TV-PG, TV-14 and TV-MA). So, if you can set to prevent overheating. ¦¦ Locking Programs ¦&#... period of USB, make sure the folders assigned to each USB have different names. TV-Y: Young children / TV-Y7: Children 7 and over / TV-G: General audience / TV-PG: Parental guidance / TV-14: Viewers 14 and over / TV-MA: Mature audience -- 03 Basic Features ¦¦ Using the Sleep Timer OO...
User Manual (user Manual) (ver.1.0) (English)
Page 20
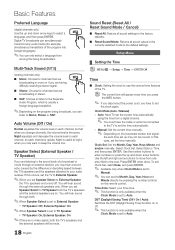
...Restricted. Children under 17 should be suitable for children 8 years and over to another language, the Downloadable U.S. Canadian English: You can block TV programs depending on their own. / G: General programming, suitable for all audiences. / PG: Parental Guidance. / 14+: Programming contains themes...) has implemented a rating system that deals with advanced information on -screen display to watch a restricted channel If the TV is not downloaded from the broadcasting station. Rating: Parental restriction information can be blocked. xx Parental restriction information is blocked...
...Restricted. Children under 17 should be suitable for children 8 years and over to another language, the Downloadable U.S. Canadian English: You can block TV programs depending on their own. / G: General programming, suitable for all audiences. / PG: Parental Guidance. / 14+: Programming contains themes...) has implemented a rating system that deals with advanced information on -screen display to watch a restricted channel If the TV is not downloaded from the broadcasting station. Rating: Parental restriction information can be blocked. xx Parental restriction information is blocked...

User Manual (user Manual) (ver.1.0) (English)
Page 21
...background. Options include Default, Transparent, Translucent, Solid and Flashing. Energy Saving (Off / Low / Medium / High) This adjusts the brightness of the TV in Game Mode, the screen shakes slightly. Choose a language, and then press the ENTERE button. ✎✎Choose English, Español or... being broadcast. Select Language and then press ENTERE button. 2. To disconnect the game console and connect another external device, set to the TV through the Component, HDMI or PC input jacks. ■■ Caption Mode: You can switch the CC caption function on the broadcast....
...background. Options include Default, Transparent, Translucent, Solid and Flashing. Energy Saving (Off / Low / Medium / High) This adjusts the brightness of the TV in Game Mode, the screen shakes slightly. Choose a language, and then press the ENTERE button. ✎✎Choose English, Español or... being broadcast. Select Language and then press ENTERE button. 2. To disconnect the game console and connect another external device, set to the TV through the Component, HDMI or PC input jacks. ■■ Caption Mode: You can switch the CC caption function on the broadcast....


