
Quick Guide (easy Manual) (ver.1.0) (English)
Page 2
... to a change in normal use for a long time. • Warranty Warranty does not cover any damage caused by your Samsung limited warranty. • SAMSUNG ELECTRONICS NORTH AMERICAN LIMITED WARRANTY STATEMENT Subject to the PDP Panel. This is the responsibility of the product. Burn-in ). Product...be in the selection of the screen. In Canada : 1-800-SAMSUNG Important User Information • Screen Image retention Do not display a still image (such as that offer picture sizing features, use as a full screen picture. Still images can cause uneven aging of the TV may have ...
... to a change in normal use for a long time. • Warranty Warranty does not cover any damage caused by your Samsung limited warranty. • SAMSUNG ELECTRONICS NORTH AMERICAN LIMITED WARRANTY STATEMENT Subject to the PDP Panel. This is the responsibility of the product. Burn-in ). Product...be in the selection of the screen. In Canada : 1-800-SAMSUNG Important User Information • Screen Image retention Do not display a still image (such as that offer picture sizing features, use as a full screen picture. Still images can cause uneven aging of the TV may have ...
Quick Guide (easy Manual) (ver.1.0) (English)
Page 7
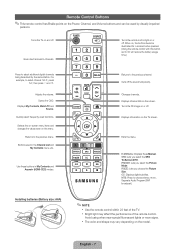
... frequently used in My Contents and Anynet+ (HDMI-CEC) modes. Changes channels. Displays information on the model. SRS: Lets you select the Picture Mode. Displays My Contents, Watch TV and Source. xx The color and shape may affect the performance of the TV. Gives direct access to... button set to On will reduce the battery usage time.) Press to the previous channel. Exits the menu. P.SIZE: Lets you choose the Picture Size. CC: Displays digital subtitles. Installing batteries (Battery size: AAA) ✎✎NOTE xx Use the remote control within 23 feet of ...
... frequently used in My Contents and Anynet+ (HDMI-CEC) modes. Changes channels. Displays information on the model. SRS: Lets you select the Picture Mode. Displays My Contents, Watch TV and Source. xx The color and shape may affect the performance of the TV. Gives direct access to... button set to On will reduce the battery usage time.) Press to the previous channel. Exits the menu. P.SIZE: Lets you choose the Picture Size. CC: Displays digital subtitles. Installing batteries (Battery size: AAA) ✎✎NOTE xx Use the remote control within 23 feet of ...

Quick Guide (easy Manual) (ver.1.0) (English)
Page 8
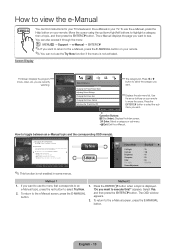
... Supplied) or Cable ANT OUT Power Input English - 8 How to Operate the OSD (On Screen Display) The access steps may differ depending on the screen: Picture, Sound, Channel, System, Support. Confirm the setting. 3 RETURN button: Returns to the previous menu. 4 EXIT button: Exits the on -screen menu. 2 ENTERE / Direction button: Move...
... Supplied) or Cable ANT OUT Power Input English - 8 How to Operate the OSD (On Screen Display) The access steps may differ depending on the screen: Picture, Sound, Channel, System, Support. Confirm the setting. 3 RETURN button: Returns to the previous menu. 4 EXIT button: Exits the on -screen menu. 2 ENTERE / Direction button: Move...

Quick Guide (easy Manual) (ver.1.0) (English)
Page 10
... problem occurs, ask the manufacturer of the external device about the HDMI version and, if out of date, request an upgrade. Otherwise, the picture may not display or a connection error may not work if you connect an external device that supports Ethernet. English - 10 Using a Component...Audio Cable (Not Supplied) Device Component Adapter (Not Supplied) Video Cable (Not Supplied) Audio Cable (Not Supplied) Device ✎✎For better picture quality, we recommend the Component connection over the A/V connection. ✎✎When connecting to AV IN, the color of the AV IN [Y/...
... problem occurs, ask the manufacturer of the external device about the HDMI version and, if out of date, request an upgrade. Otherwise, the picture may not display or a connection error may not work if you connect an external device that supports Ethernet. English - 10 Using a Component...Audio Cable (Not Supplied) Device Component Adapter (Not Supplied) Video Cable (Not Supplied) Audio Cable (Not Supplied) Device ✎✎For better picture quality, we recommend the Component connection over the A/V connection. ✎✎When connecting to AV IN, the color of the AV IN [Y/...
Quick Guide (easy Manual) (ver.1.0) (English)
Page 13
...Try Now. 2. Displays the sub-menu list. Basic Features > Changing the Preset Picture Mode (1/1) ‰ Changing the Preset Picture Mode O MENUm → Picture → Picture Mode → ENTERE ■ Picture Mode Picture modes apply preset adjustments to move the cursor. Select Yes, and then press ... screen, press the E-MANUAL button. Move the cursor using the up the TV with Your PC } Index E Enter e Exit The category list. Picture Picture Mode : Standard ▶ Cell Light Contrast Brightness Sharpness Color Tint (G/R) Screen Adjustment : 10 : 100 : 45 : 50 : 50 : G50/R50...
...Try Now. 2. Displays the sub-menu list. Basic Features > Changing the Preset Picture Mode (1/1) ‰ Changing the Preset Picture Mode O MENUm → Picture → Picture Mode → ENTERE ■ Picture Mode Picture modes apply preset adjustments to move the cursor. Select Yes, and then press ... screen, press the E-MANUAL button. Move the cursor using the up the TV with Your PC } Index E Enter e Exit The category list. Picture Picture Mode : Standard ▶ Cell Light Contrast Brightness Sharpness Color Tint (G/R) Screen Adjustment : 10 : 100 : 45 : 50 : 50 : G50/R50...

Quick Guide (easy Manual) (ver.1.0) (English)
Page 14
...movies and games. Viewing the Contents Basic Features > Changing the Preset Picture Mode (1/1) ‰‰ Changing the Preset Picture Mode OO MENUm → Picture → Picture Mode → ENTERE ■■ Picture Mode Picture modes apply preset adjustments to the topic. Select a mode using ...return to the screen to normal size, press the RETURN button. ‰‰Changing the Preset Picture Mode OO MENUm → Picture → Picture Mode → ENTERE ■■Picture Mode Picture modes apply preset adjustments to previous or next page. a Try Now b Home { Zoom } ...
...movies and games. Viewing the Contents Basic Features > Changing the Preset Picture Mode (1/1) ‰‰ Changing the Preset Picture Mode OO MENUm → Picture → Picture Mode → ENTERE ■■ Picture Mode Picture modes apply preset adjustments to the topic. Select a mode using ...return to the screen to normal size, press the RETURN button. ‰‰Changing the Preset Picture Mode OO MENUm → Picture → Picture Mode → ENTERE ■■Picture Mode Picture modes apply preset adjustments to previous or next page. a Try Now b Home { Zoom } ...

Quick Guide (easy Manual) (ver.1.0) (English)
Page 15
...are powered on. • Be sure to the Cable/Set user manual for the SAMSUNG TV code. ✎✎Some functions and pictures shown in this list of the troubleshooting tips apply, visit "www.samsung.com," then click on , refer to operate the TV. If none of possible ...the remote. • Try pointing the remote directly at 1-800-SAMSUNG. yy Anynet+(HDMI-CEC): Allows you to make sure the problem is no picture/video. • Check the cable connections. Remove and reconnect all connected Samsung devices that support Anynet+ with your connected devices are installed with...
...are powered on. • Be sure to the Cable/Set user manual for the SAMSUNG TV code. ✎✎Some functions and pictures shown in this list of the troubleshooting tips apply, visit "www.samsung.com," then click on , refer to operate the TV. If none of possible ...the remote. • Try pointing the remote directly at 1-800-SAMSUNG. yy Anynet+(HDMI-CEC): Allows you to make sure the problem is no picture/video. • Check the cable connections. Remove and reconnect all connected Samsung devices that support Anynet+ with your connected devices are installed with...
User Manual (user Manual) (ver.1.0) (English)
Page 2
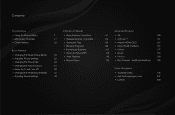
...Channel Menu • Memorizing Channels • Other Features Basic Features • Changing the Preset Picture Mode • Adjusting Picture Settings • Changing the Picture Size • Changing the Picture Options • Using the TV with Your PC • Changing the Preset Sound Modes &#... Network Connection 17 • Wireless Network Connection 22 • Setting the Time • Blocking Programs • Economical Solutions • Picture In Picture (PIP) 24 • Other Features 25 • Support Menu 26 31 38 42 43 Advanced Features 51 • 3D 139 62...
...Channel Menu • Memorizing Channels • Other Features Basic Features • Changing the Preset Picture Mode • Adjusting Picture Settings • Changing the Picture Size • Changing the Picture Options • Using the TV with Your PC • Changing the Preset Sound Modes &#... Network Connection 17 • Wireless Network Connection 22 • Setting the Time • Blocking Programs • Economical Solutions • Picture In Picture (PIP) 24 • Other Features 25 • Support Menu 26 31 38 42 43 Advanced Features 51 • 3D 139 62...
User Manual (user Manual) (ver.1.0) (English)
Page 26
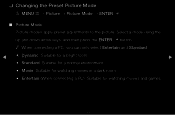
.... ●● Entertain (When connecting a PC): Suitable for watching movies and games. Picture Menu English Basic Features ❑❑ Changing the Preset Picture Mode OO MENUm → Picture → Picture Mode → ENTERE ■■ Picture Mode Picture modes apply preset adjustments to the picture. Select a mode using the up and down arrow keys, and then press...
.... ●● Entertain (When connecting a PC): Suitable for watching movies and games. Picture Menu English Basic Features ❑❑ Changing the Preset Picture Mode OO MENUm → Picture → Picture Mode → ENTERE ■■ Picture Mode Picture modes apply preset adjustments to the picture. Select a mode using the up and down arrow keys, and then press...
User Manual (user Manual) (ver.1.0) (English)
Page 27
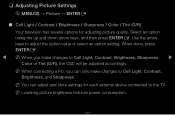
... reduces power consumption. When done, press ENTERE. ◀ NN When you can adjust and store settings for adjusting picture quality. Use the arrow keys to the TV. NN When connecting a PC, you make changes to Cell Light, Contrast, Brightness, Sharpness, &#... arrow keys, and then press ENTERE. NN You can only make changes to Cell Light, Contrast, Brightness, and Sharpness. ❑❑ Adjusting Picture Settings OO MENUm → Picture → ENTERE ■■ Cell Light / Contrast / Brightness / Sharpness / Color / Tint (G/R) Your television has several options for each ...
... reduces power consumption. When done, press ENTERE. ◀ NN When you can adjust and store settings for adjusting picture quality. Use the arrow keys to the TV. NN When connecting a PC, you make changes to Cell Light, Contrast, Brightness, Sharpness, &#... arrow keys, and then press ENTERE. NN You can only make changes to Cell Light, Contrast, Brightness, and Sharpness. ❑❑ Adjusting Picture Settings OO MENUm → Picture → ENTERE ■■ Cell Light / Contrast / Brightness / Sharpness / Color / Tint (G/R) Your television has several options for each ...

User Manual (user Manual) (ver.1.0) (English)
Page 28
...; Screen Adjustment → ENTERE ■■ Screen Adjustment Screen Adjustment provides various picture size and aspect ratio options. Select an option using the up and down arrow keys, and the press ENTERE. English Use the arrow keys to ... recommend you have a cable box or satellite receiver, it may have its own ◀ set of the time. 16:9: Sets the picture to select an option in the sub-menu, and then press ENTERE. ●● Picture Size: If you use your TV's ▶ 16:9 mode most of screen sizes as well.
...; Screen Adjustment → ENTERE ■■ Screen Adjustment Screen Adjustment provides various picture size and aspect ratio options. Select an option using the up and down arrow keys, and the press ENTERE. English Use the arrow keys to ... recommend you have a cable box or satellite receiver, it may have its own ◀ set of the time. 16:9: Sets the picture to select an option in the sub-menu, and then press ENTERE. ●● Picture Size: If you use your TV's ▶ 16:9 mode most of screen sizes as well.
User Manual (user Manual) (ver.1.0) (English)
Page 29
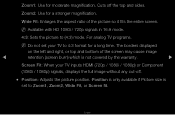
...any cut-off the top and sides. NN Available with HD 1080i / 720p signals in 16:9 mode. 4:3: Sets the picture to 4:3 format for a long time. Position is only available if Picture size is not covered by the warranty. ▶ Screen Fit: When your TV to (4:3) mode. Zoom1: Use for ...a stronger magnification. Zoom2: Use for moderate magnification. The borders displayed on the left and right, or top and bottom of the picture so it fits the...
...any cut-off the top and sides. NN Available with HD 1080i / 720p signals in 16:9 mode. 4:3: Sets the picture to 4:3 format for a long time. Position is only available if Picture size is not covered by the warranty. ▶ Screen Fit: When your TV to (4:3) mode. Zoom1: Use for ...a stronger magnification. Zoom2: Use for moderate magnification. The borders displayed on the left and right, or top and bottom of the picture so it fits the...

User Manual (user Manual) (ver.1.0) (English)
Page 30
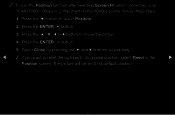
To reset the picture ◀ position, press Reset. ▶ NN If you want to reset the pictures to its original position, select Reset in the Position screen, and then press ENTERE. The picture will be reset to its default position. Press the d button to move the picture up or down. 4. Press the ENTERE button. 3. Select Close by pressing the d and r buttons sequentially. NN To use the Position function after selecting Zoom1, Zoom2 or Wide Fit, follow these steps: 1. English Press the ENTERE button. 5. Press the u or d button to select Position. 2.
To reset the picture ◀ position, press Reset. ▶ NN If you want to reset the pictures to its original position, select Reset in the Position screen, and then press ENTERE. The picture will be reset to its default position. Press the d button to move the picture up or down. 4. Press the ENTERE button. 3. Select Close by pressing the d and r buttons sequentially. NN To use the Position function after selecting Zoom1, Zoom2 or Wide Fit, follow these steps: 1. English Press the ENTERE button. 5. Press the u or d button to select Position. 2.
User Manual (user Manual) (ver.1.0) (English)
Page 31
English The picture will be set to select Position. 2. Press the d button to its original position, select Reset in the ▶ Position screen. Press the ENTERE button. 5. Press the ENTERE button. 3. Press the u, d, l or r button to its default position. Select Close by pressing the d and r buttons sequentially. ◀ NN If you want to reset the pictures to move the picture. 4. NN To use the Position function after selecting Screen Fit when connected to an HDMI (1080i/1080p) or Component (1080i/1080p) source, follow these steps: 1.
English The picture will be set to select Position. 2. Press the d button to its original position, select Reset in the ▶ Position screen. Press the ENTERE button. 5. Press the ENTERE button. 3. Press the u, d, l or r button to its default position. Select Close by pressing the d and r buttons sequentially. ◀ NN If you want to reset the pictures to move the picture. 4. NN To use the Position function after selecting Screen Fit when connected to an HDMI (1080i/1080p) or Component (1080i/1080p) source, follow these steps: 1.
User Manual (user Manual) (ver.1.0) (English)
Page 32
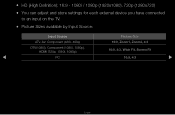
●● HD (High Definition): 16:9 - 1080i / 1080p (1920x1080), 720p (1280x720) ●● You can adjust and store settings for each external device you have connected to an input on the TV. ●● Picture Sizes available by Input Source: Input Source Picture Size ATV, AV, Component (480i, 480p) 16:9, Zoom1, Zoom2, 4:3 DTV(1080i), Component (1080i, 1080p), HDMI (720p, 1080i, 1080p) 16:9, 4:3, Wide Fit, Screen Fit ◀ PC 16:9, 4:3 ▶ English
●● HD (High Definition): 16:9 - 1080i / 1080p (1920x1080), 720p (1280x720) ●● You can adjust and store settings for each external device you have connected to an input on the TV. ●● Picture Sizes available by Input Source: Input Source Picture Size ATV, AV, Component (480i, 480p) 16:9, Zoom1, Zoom2, 4:3 DTV(1080i), Component (1080i, 1080p), HDMI (720p, 1080i, 1080p) 16:9, 4:3, Wide Fit, Screen Fit ◀ PC 16:9, 4:3 ▶ English
User Manual (user Manual) (ver.1.0) (English)
Page 33
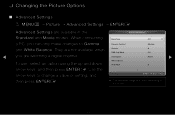
... then press ENTERE. When connecting Black Tone : Off ► a PC, you are available in the Advanced Settings Standard and Movie modes. ❑❑ Changing the Picture Options ■■ Advanced Settings OO MENUm → Picture → Advanced Settings → ENTERE Advanced Settings are watching a digital channel. English
... then press ENTERE. When connecting Black Tone : Off ► a PC, you are available in the Advanced Settings Standard and Movie modes. ❑❑ Changing the Picture Options ■■ Advanced Settings OO MENUm → Picture → Advanced Settings → ENTERE Advanced Settings are watching a digital channel. English
User Manual (user Manual) (ver.1.0) (English)
Page 35
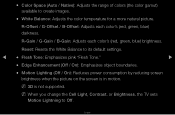
... the Cell Light, Contrast, or Brightness, the TV sets Motion Lightning to create images. ●● White Balance: Adjusts the color temperature for a more natural picture. R-Gain / G-Gain / B-Gain: Adjusts each color's (red, green, blue) darkness. Reset: Resets the White Balance to its default settings. ◀ ●● Flesh Tone: Emphasizes...." ▶ ●● Edge Enhancement (Off / On): Emphasizes object boundaries. ●● Motion Lighting (Off / On): Reduces power consumption by reducing screen brightness when the picture on the screen is not supported.
... the Cell Light, Contrast, or Brightness, the TV sets Motion Lightning to create images. ●● White Balance: Adjusts the color temperature for a more natural picture. R-Gain / G-Gain / B-Gain: Adjusts each color's (red, green, blue) darkness. Reset: Resets the White Balance to its default settings. ◀ ●● Flesh Tone: Emphasizes...." ▶ ●● Edge Enhancement (Off / On): Emphasizes object boundaries. ●● Motion Lighting (Off / On): Reduces power consumption by reducing screen brightness when the picture on the screen is not supported.
User Manual (user Manual) (ver.1.0) (English)
Page 36
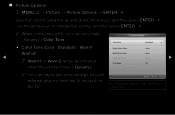
Picture Options Color Tone Digital Noise Filter MPEG Noise Filter HDMI Black Level Film Mode : Standard : Auto : Auto : Normal : Off ► ▶ NN You can only ... is Dynamic. U Move E Enter R Return ●● The displayed image may differ depending on the TV. ■■ Picture Options OO MENUm → Picture → Picture Options → ENTERE Select an option using the up and down arrow keys, and then press ENTERE. English Use the arrow keys to change the ...
Picture Options Color Tone Digital Noise Filter MPEG Noise Filter HDMI Black Level Film Mode : Standard : Auto : Auto : Normal : Off ► ▶ NN You can only ... is Dynamic. U Move E Enter R Return ●● The displayed image may differ depending on the TV. ■■ Picture Options OO MENUm → Picture → Picture Options → ENTERE Select an option using the up and down arrow keys, and then press ENTERE. English Use the arrow keys to change the ...
User Manual (user Manual) (ver.1.0) (English)
Page 37
English NN When the signal is green, you can activate the Digital Noise Filter feature to provide improved picture quality. Auto Visualization: When changing analog channels, displays signal strength. ●● Digital Noise Filter (Off / Low / Medium / High / Auto / Auto Visualization): If the broadcast ... the screen. NN Only available for analog channels. ◀ NN When the bar is weak, try each option until the the TV displays the best picture.
English NN When the signal is green, you can activate the Digital Noise Filter feature to provide improved picture quality. Auto Visualization: When changing analog channels, displays signal strength. ●● Digital Noise Filter (Off / Low / Medium / High / Auto / Auto Visualization): If the broadcast ... the screen. NN Only available for analog channels. ◀ NN When the bar is weak, try each option until the the TV displays the best picture.
User Manual (user Manual) (ver.1.0) (English)
Page 38
The Cinema Smooth function is only activated when the TV inputs an HDMI 24Hz signal. ◀ NN Available in HDMI mode. ●● Film Mode (Off / Auto1 / Auto2 / Cinema Smooth for PDP 550 Series and above ): Sets the TV so that it senses and then processes film signals from all sources automatically and adjusts the picture for optimum quality. NN Available only in TV, AV, COMPONENT (480i / 1080i) and HDMI (1080i). ▶ English ●● HDMI Black Level (Low / Normal): Lets you select the black level on the screen to adjust the screen depth.
The Cinema Smooth function is only activated when the TV inputs an HDMI 24Hz signal. ◀ NN Available in HDMI mode. ●● Film Mode (Off / Auto1 / Auto2 / Cinema Smooth for PDP 550 Series and above ): Sets the TV so that it senses and then processes film signals from all sources automatically and adjusts the picture for optimum quality. NN Available only in TV, AV, COMPONENT (480i / 1080i) and HDMI (1080i). ▶ English ●● HDMI Black Level (Low / Normal): Lets you select the black level on the screen to adjust the screen depth.


