User Manual
Page 3
Step by pressing the TOOLS button on the remote control. Note Indicates additional information. t This function can be used by Step Guide Check here for Anynet+ 29 Other Information yy Installing the Wall Mount ... the OSD (on screen display). 3 English Contents Getting Started yy List of Features 4 yy Accessories 4 yy Install the Stand 5 yy Viewing the Control Panel 6 yy Remote Control Buttons 7 yy Connecting to an Antenna or Cable Connection........ 8 yy Plug & Play (Initial Setup 8 Connections yy Connecting to an AV Device 9 yy Connecting to...
Step by pressing the TOOLS button on the remote control. Note Indicates additional information. t This function can be used by Step Guide Check here for Anynet+ 29 Other Information yy Installing the Wall Mount ... the OSD (on screen display). 3 English Contents Getting Started yy List of Features 4 yy Accessories 4 yy Install the Stand 5 yy Viewing the Control Panel 6 yy Remote Control Buttons 7 yy Connecting to an Antenna or Cable Connection........ 8 yy Plug & Play (Initial Setup 8 Connections yy Connecting to an AV Device 9 yy Connecting to...
User Manual
Page 4
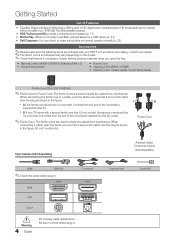
yy SRS TruSurround HD provides a virtual surround system (p. 17). yy Remote Control (AA59-00506A) & Batteries (AAA x 2) yy Owner's Instructions yy Power Cord yy Cleaning Cloth (BN63-01798B) yy Warranty Card / Safety Guide / Quick Setup Guide Ferrite ...
yy SRS TruSurround HD provides a virtual surround system (p. 17). yy Remote Control (AA59-00506A) & Batteries (AAA x 2) yy Owner's Instructions yy Power Cord yy Cleaning Cloth (BN63-01798B) yy Warranty Card / Safety Guide / Quick Setup Guide Ferrite ...
User Manual
Page 6
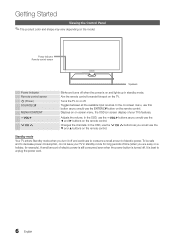
...to decrease power consumption, do not leave your TV's features. It is turned off when the power is on the TV. Power Indicator Remote control sensor Speakers Power Indicator Remote control sensor P (Power) SOURCEE MENU/CONTENT y z Blinks and turns off . Changes the channels. To be safe and to consume a... OSD, use the y buttons as you would use this spot on and lights up in standby mode for example). Turns the TV on the remote control. In the on-screen menu, use the ▼ and ▲ buttons on the model. Getting Started Viewing the Control Panel ✎&#...
...to decrease power consumption, do not leave your TV's features. It is turned off when the power is on the TV. Power Indicator Remote control sensor Speakers Power Indicator Remote control sensor P (Power) SOURCEE MENU/CONTENT y z Blinks and turns off . Changes the channels. To be safe and to consume a... OSD, use the y buttons as you would use this spot on and lights up in standby mode for example). Turns the TV on the remote control. In the on-screen menu, use the ▼ and ▲ buttons on the model. Getting Started Viewing the Control Panel ✎&#...
User Manual
Page 7
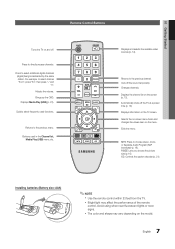
...Press to select additional digital channels (digital) being broadcasted by the same station. xx The color and shape may affect the performance of the remote control. Selects the on-screen menu items and changes the values seen on the screen (p. 13). Press to choose stereo, mono, or ... using when near fluorescent lights or neon signs. Buttons used functions. Installing batteries (Battery size: AAA) ✎✎NOTE xx Use the remote control within 23 feet from the TV. Press to the previous menu. Displays information on the TV screen. Exits the menu. Automatically shuts ...
...Press to select additional digital channels (digital) being broadcasted by the same station. xx The color and shape may affect the performance of the remote control. Selects the on-screen menu items and changes the values seen on the screen (p. 13). Press to choose stereo, mono, or ... using when near fluorescent lights or neon signs. Buttons used functions. Installing batteries (Battery size: AAA) ✎✎NOTE xx Use the remote control within 23 feet from the TV. Press to the previous menu. Displays information on the TV screen. Exits the menu. Automatically shuts ...
User Manual
Page 8
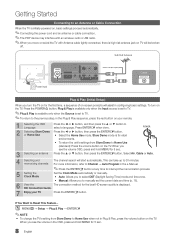
... antenna or cable connection. ✎✎The PDP device may interfere with Antenna cable tightly connected, there is for 5 sec. HD Connection Guide. 7 Enjoy your remote. 1 Selecting the OSD Language Press the ◄ or ► button, and then press the ▲ or ▼ button to interrupt the memorization process. When you...
... antenna or cable connection. ✎✎The PDP device may interfere with Antenna cable tightly connected, there is for 5 sec. HD Connection Guide. 7 Enjoy your remote. 1 Selecting the OSD Language Press the ◄ or ► button, and then press the ▲ or ▼ button to interrupt the memorization process. When you...
User Manual
Page 13
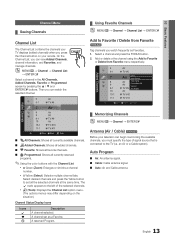
... Auto Program * TV #10 * TV #11 Air Zoom Select T Tools ¦¦ Memorizing Channels OO MENUm → Channel → ENTERE Antenna (Air / Cable) t Before your remote. Add to set as Favorites. 1. Then you can watch frequently as a Favorite. Select a channel and press the TOOLS button. 2. Select desired channels and press the...
... Auto Program * TV #10 * TV #11 Air Zoom Select T Tools ¦¦ Memorizing Channels OO MENUm → Channel → ENTERE Antenna (Air / Cable) t Before your remote. Add to set as Favorites. 1. Then you can watch frequently as a Favorite. Select a channel and press the TOOLS button. 2. Select desired channels and press the...

User Manual
Page 14
..., Mon~Fri, Mon~Tue, Wed~Thu or Sat~Sun in your particular area. Set the current time first to use the numeric buttons on your remote to select Stop. 2. Select a channel and press the TOOLS button. 2.
..., Mon~Fri, Mon~Tue, Wed~Thu or Sat~Sun in your particular area. Set the current time first to use the numeric buttons on your remote to select Stop. 2. Select a channel and press the TOOLS button. 2.
User Manual
Page 17
... pixel shift Horizontal Vertical Time (minute) Item 0~4 0~4 1~4 min TV/AV/Component/ HDMI/PC 4 4 4 min ✎✎ The Pixel Shift value may differ depending on the remote control to 4:3, the screen is prevented from all the pixels on the PDP according to a pattern. Pixel Shift (Off / On): Using this function, you displayed...
... pixel shift Horizontal Vertical Time (minute) Item 0~4 0~4 1~4 min TV/AV/Component/ HDMI/PC 4 4 4 min ✎✎ The Pixel Shift value may differ depending on the remote control to 4:3, the screen is prevented from all the pixels on the PDP according to a pattern. Pixel Shift (Off / On): Using this function, you displayed...

User Manual
Page 18
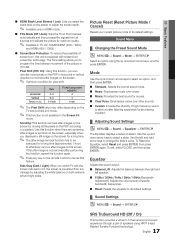
... ENTER. ✎✎ Available only when Clock Mode is set to Auto. 18 English Auto Volume (Off / On) Normal equalizes the volume level on the remote control. Speaker Select (External Speaker / TV Speaker) If you are broadcasting in mono or if you may want to keep the volume low. Basic Features...
... ENTER. ✎✎ Available only when Clock Mode is set to Auto. 18 English Auto Volume (Off / On) Normal equalizes the volume level on the remote control. Speaker Select (External Speaker / TV Speaker) If you are broadcasting in mono or if you may want to keep the volume low. Basic Features...

User Manual
Page 20
... following sequence, which resets the pin to watch on the information from the broadcasting station, it . For example, if you forget the PIN, press the remote-control buttons in English only. Downloadable U.S. xx Parental restriction information is deactivated. However, depending on their Anglophone Canadian ratings. -- xx Parental restriction levels differ depending...
... following sequence, which resets the pin to watch on the information from the broadcasting station, it . For example, if you forget the PIN, press the remote-control buttons in English only. Downloadable U.S. xx Parental restriction information is deactivated. However, depending on their Anglophone Canadian ratings. -- xx Parental restriction levels differ depending...

User Manual
Page 25
...1. File.....jpg File.....jpg File.....jpg File.....jpg File.....jpg ✎✎ To adjust the music volume, press the y button on the remote control, the music stops. To mute the sound, press the MMUTE button on the top with other file extensions are not displayed, even... if 307.2MB/973.7MB they are saved on the same USB device. When pressing the � (Stop) button on the remote control. Pressing plays the tmheusEiPcNhTfoiltEeo.RE button over DSC_0558.JPG a musical note icon immediately 580 * 440 Pressing the E7N8.0KTB ERE button over...
...1. File.....jpg File.....jpg File.....jpg File.....jpg File.....jpg ✎✎ To adjust the music volume, press the y button on the remote control, the music stops. To mute the sound, press the MMUTE button on the top with other file extensions are not displayed, even... if 307.2MB/973.7MB they are saved on the same USB device. When pressing the � (Stop) button on the remote control. Pressing plays the tmheusEiPcNhTfoiltEeo.RE button over DSC_0558.JPG a musical note icon immediately 580 * 440 Pressing the E7N8.0KTB ERE button over...
User Manual
Page 26
...10 min, 20 min, 40 min, 1 hour or Off. ■■ Safe Remove: You can be sure your Samsung TV's remote. To be used only with Samsung devices that support Anynet+ with the symbol c. Advanced Features SUM 307.2MB/973.7MB 04-Interference-gold.mp3 05-marketa_irglova-... appears. You can select Fast, Normal or Slow. ■■ Background Music: Select to determine whether to repeat playing the music when all connected Samsung devices that have been played. To cancel a selection, press the Yellow button again. 3. Connect the HDMI IN (1(DVI), 2) jack on it. ...
...10 min, 20 min, 40 min, 1 hour or Off. ■■ Safe Remove: You can be sure your Samsung TV's remote. To be used only with Samsung devices that support Anynet+ with the symbol c. Advanced Features SUM 307.2MB/973.7MB 04-Interference-gold.mp3 05-marketa_irglova-... appears. You can select Fast, Normal or Slow. ■■ Background Music: Select to determine whether to repeat playing the music when all connected Samsung devices that have been played. To cancel a selection, press the Yellow button again. 3. Connect the HDMI IN (1(DVI), 2) jack on it. ...
User Manual
Page 28
...; If your receiver supports audio only, it may take up to the DIGITAL AUDIO OUT (OPTICAL) jack of a TV Program using the TV remote control, not the buttons on the TV. Anynet+ devices connected to the recording device. Select a device, and then press the ENTERE button. ...You cannot cancel the operation during the switching operation. If you can only control Anynet+ devices using a Samsung recorder. 1. xx If you have properly connected the optical in the System menu. Select one recording device in the device list. ✎✎...
...; If your receiver supports audio only, it may take up to the DIGITAL AUDIO OUT (OPTICAL) jack of a TV Program using the TV remote control, not the buttons on the TV. Anynet+ devices connected to the recording device. Select a device, and then press the ENTERE button. ...You cannot cancel the operation during the switching operation. If you can only control Anynet+ devices using a Samsung recorder. 1. xx If you have properly connected the optical in the System menu. Select one recording device in the device list. ✎✎...

User Manual
Page 29
...does not play function when Plug & Play (initial setup) is not connected.) • You cannot use the play . • You cannot use the remote control when you want to On in progress. The message "Connecting to change the TV mode. (Note that the channel button operates only when a tuner.... • Check if the Anynet+ Function of Anynet+ device is set to On in the Anynet+ menu. • Press the SOURCE button on the TV remote control and select a non- embedded Anynet+ device is in the Anynet+ setup menu. • Search Anynet+ devices again. • You can be recorded. I...
...does not play function when Plug & Play (initial setup) is not connected.) • You cannot use the play . • You cannot use the remote control when you want to On in progress. The message "Connecting to change the TV mode. (Note that the channel button operates only when a tuner.... • Check if the Anynet+ Function of Anynet+ device is set to On in the Anynet+ menu. • Press the SOURCE button on the TV remote control and select a non- embedded Anynet+ device is in the Anynet+ setup menu. • Search Anynet+ devices again. • You can be recorded. I...

User Manual
Page 33
...; Energy Saving • Eco Sensor: User Menu → System → Eco Solution → Eco Sensor If you refer to "Install the Stand" mentioned at www.samsung.com/spsn 33 English For example, if you've used the AV Out jack on your video source. • Try making sure ; • Your connections... on your power cord, remote control, and PC are all consistent. If you're sure your keyboard or move the mouse. If you follow below step with the TV still on . For example, if you use the Component jacks, labeled Pb, Pr, and Y, to connect your Samsung television, there are some of...
...; Energy Saving • Eco Sensor: User Menu → System → Eco Solution → Eco Sensor If you refer to "Install the Stand" mentioned at www.samsung.com/spsn 33 English For example, if you've used the AV Out jack on your video source. • Try making sure ; • Your connections... on your power cord, remote control, and PC are all consistent. If you're sure your keyboard or move the mouse. If you follow below step with the TV still on . For example, if you use the Component jacks, labeled Pb, Pr, and Y, to connect your Samsung television, there are some of...
User Manual
Page 35
...may cause picture distortion, especially with the poles (+/-) in the right direction. • Clean the sensor's transmission window on the remote. • Try pointing the remote directly at the TV from 5~6 feet away. Also try Auto Program to add available channels to the channel list. The TV ...top-box has a grounding issue. If the TV turns on, refer to select the TV's correct source by pressing the SOURCE button on the remote control. • Reboot the connected device by reconnecting the device's power cable. There is positioned correctly. For example, if an external device's...
...may cause picture distortion, especially with the poles (+/-) in the right direction. • Clean the sensor's transmission window on the remote. • Try pointing the remote directly at the TV from 5~6 feet away. Also try Auto Program to add available channels to the channel list. The TV ...top-box has a grounding issue. If the TV turns on, refer to select the TV's correct source by pressing the SOURCE button on the remote control. • Reboot the connected device by reconnecting the device's power cable. There is positioned correctly. For example, if an external device's...

User Manual
Page 36
... is only available with 90 degree connectors. the Self Diagnostic Test menu. You see small particles when you to set top box remote control • Program the Cable/Set remote control to the Cable/Set user manual for long term use. For details, refer to MENU → Setup → Plug & Play &#... product can not be selected in the Plug & Play procedure. POP (TV's internal banner ad) appears on TV menu is turned off , or adjust the SAMSUNG TV code. Refer to operate the TV. Caption on • Select Home Use under Plug & Play mode. If mounting the TV to a wall, we ...
... is only available with 90 degree connectors. the Self Diagnostic Test menu. You see small particles when you to set top box remote control • Program the Cable/Set remote control to the Cable/Set user manual for long term use. For details, refer to MENU → Setup → Plug & Play &#... product can not be selected in the Plug & Play procedure. POP (TV's internal banner ad) appears on TV menu is turned off , or adjust the SAMSUNG TV code. Refer to operate the TV. Caption on • Select Home Use under Plug & Play mode. If mounting the TV to a wall, we ...
User Manual
Page 39
... Theater I Installation Space L Language License M Media Play Melody Mono Music N Navigate O Optimal resolution P Photo Picture Size Plug & Play Power Indicator R 17 Receiver 15 Recording 16 Remote Control 11 Repeat Music 9, 26 10, 26 31 21 37 S Select All Self Diagnosis Sharpness Sleep Timer Slide Show Software Upgrade Source List Speaker Select...
... Theater I Installation Space L Language License M Media Play Melody Mono Music N Navigate O Optimal resolution P Photo Picture Size Plug & Play Power Indicator R 17 Receiver 15 Recording 16 Remote Control 11 Repeat Music 9, 26 10, 26 31 21 37 S Select All Self Diagnosis Sharpness Sleep Timer Slide Show Software Upgrade Source List Speaker Select...


