P2570 Stand - Samsung LCD Monitor
P2570 Stand
Related Manual Pages


Related Videos

Samsung P2570 24.6" Widescreen HD LCD Monitor - 70000:1 (DC
Duration: :54
Total Views: 18,115
Duration: :54
Total Views: 18,115
Similar Questions

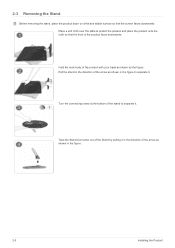
Removing The Stand From My T24a350 24inch Tv
how to remove the stand from my Samsung T24A350 24inch t
how to remove the stand from my Samsung T24A350 24inch t
(Posted by bushhouse43 4 years ago)


Stand Removable Install Wall Mount
how do you remove the stand from unit
how do you remove the stand from unit
(Posted by devineassociates 12 years ago)