
Owners Manual
Page 1
Microwave Oven Owner's Manual ME1060WB/BB/SB ME1260WB/BB/SB ME1460WB/BB/SB MW1030WA/BA/SB MW1060WA/BA MW1150WA/BA MW1230WA/BA MW1235WA/BA MW1250WA/BA MW1255WA/BA 123 MW1260WA/BA 456 789 MW1430WA/BA 0 MW1455WA/BA MW1460WA/BA MW1660WA/BA Code No.: DE68-00064C-02
Microwave Oven Owner's Manual ME1060WB/BB/SB ME1260WB/BB/SB ME1460WB/BB/SB MW1030WA/BA/SB MW1060WA/BA MW1150WA/BA MW1230WA/BA MW1235WA/BA MW1250WA/BA MW1255WA/BA 123 MW1260WA/BA 456 789 MW1430WA/BA 0 MW1455WA/BA MW1460WA/BA MW1660WA/BA Code No.: DE68-00064C-02
Owners Manual
Page 2
...and latches (broken or loosened), 3) Door seals and sealing surfaces. (d) The oven should be serviced only by anyone except properly qualified service personnel. Connect only to accumulate on your oven. If the oven needs to microwave energy. SAVE THESE INSTRUCTIONS 2 WARNING Always observe Safety Precautions when using the ...TO EXCESSIVE MICROWAVE ENERGY: (a) Do not attempt to operate this oven with the door open since open-door operation can result in harmful exposure to be repaired, call 1-800-SAMSUNG for the name of an authorized service center near you. This type of oven is ...
...and latches (broken or loosened), 3) Door seals and sealing surfaces. (d) The oven should be serviced only by anyone except properly qualified service personnel. Connect only to accumulate on your oven. If the oven needs to microwave energy. SAVE THESE INSTRUCTIONS 2 WARNING Always observe Safety Precautions when using the ...TO EXCESSIVE MICROWAVE ENERGY: (a) Do not attempt to operate this oven with the door open since open-door operation can result in harmful exposure to be repaired, call 1-800-SAMSUNG for the name of an authorized service center near you. This type of oven is ...
Owners Manual
Page 4
...-120 voltage, 60 Hz. WARNING Do not cut or remove the third (ground) prong from the power cord under any circumstances. Note Connect the oven to a 15A circuit, make sure that is provided to reduce the risk of becoming entangled in their use of electric shock. Consult a qualified electrician...on. The longer cord should be the only appliance on by providing an escape wire for the electrical current. Cooking times may vary when the microwave oven is equipped with a cord that it will not drape over the counter top or tabletop where it must be arranged so that includes a ...
...-120 voltage, 60 Hz. WARNING Do not cut or remove the third (ground) prong from the power cord under any circumstances. Note Connect the oven to a 15A circuit, make sure that is provided to reduce the risk of becoming entangled in their use of electric shock. Consult a qualified electrician...on. The longer cord should be the only appliance on by providing an escape wire for the electrical current. Cooking times may vary when the microwave oven is equipped with a cord that it will not drape over the counter top or tabletop where it must be arranged so that includes a ...
Owners Manual
Page 5
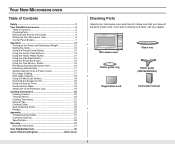
... of Contents 5 Checking Parts 5 Warranty and Service Information 6 Setting Up Your Microwave Oven 6 Control Panel Buttons 7 Operation 12 Turning on the Power and Selecting a Weight 12 Setting the Clock 12 Using the Pause/Cancel Button 12 Using the ... 28 Warranty 31 Warranty Information 31 Guía Rápida(Spanish 35 Quick Reference(English Back Cover Checking Parts Unpack your dealer. 123 456 789 0 Microwave oven Roller guide ring Registration card Glass tray Roller guide (MW1660WA/BA) Instruction manual 5 If any part is missing or broken, call your...
... of Contents 5 Checking Parts 5 Warranty and Service Information 6 Setting Up Your Microwave Oven 6 Control Panel Buttons 7 Operation 12 Turning on the Power and Selecting a Weight 12 Setting the Clock 12 Using the Pause/Cancel Button 12 Using the ... 28 Warranty 31 Warranty Information 31 Guía Rápida(Spanish 35 Quick Reference(English Back Cover Checking Parts Unpack your dealer. 123 456 789 0 Microwave oven Roller guide ring Registration card Glass tray Roller guide (MW1660WA/BA) Instruction manual 5 If any part is missing or broken, call your...

Owners Manual
Page 6
...fit securely into a grounded outlet. Place the glass tray secerely in the center of the oven. 2 Open the oven door by leaving at 1-800- Setting Up Your Microwave Oven 1 Place the oven on the back or bottom of your sales receipt to aid in identification in , the display...in the indentation in the center of the oven with the other requested information. Your New Microwave oven Warranty and Service Information To help us better serve you, please complete the enclosed registration card and promptly return it by a Samsung Authorized Service Center. Make sure there is ...
...fit securely into a grounded outlet. Place the glass tray secerely in the center of the oven. 2 Open the oven door by leaving at 1-800- Setting Up Your Microwave Oven 1 Place the oven on the back or bottom of your sales receipt to aid in identification in , the display...in the indentation in the center of the oven with the other requested information. Your New Microwave oven Warranty and Service Information To help us better serve you, please complete the enclosed registration card and promptly return it by a Samsung Authorized Service Center. Make sure there is ...
Owners Manual
Page 7
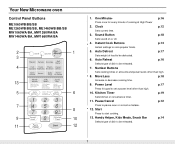
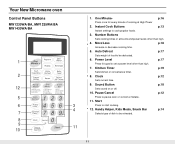
... 13. More/Less p.18 Increase or decrease cooking time. 9. One Minute+ p.16 Press once for every minute of dish to pause oven or correct a mistake. 12. Kitchen Timer p.19 Sets kitchen or convenience timer. 11. Auto Defrost p.17 Sets weight of dish to.... 8. Clock p.12 Sets current time. 3. Pause/Cancel p.12 Press to be reheated. 7 Power Level p.17 Press this pad to be defrosted. 6. Your New Microwave oven Control Panel Buttons ME1060WB/BB/SB ME1260WB/BB/SB, ME1460WB/BB/SB MW1060WA/BA, MW1260WA/BA MW1460WA/BA, MW1660WA/BA 2 1 3 4 13 5 6 123 7 ...
... 13. More/Less p.18 Increase or decrease cooking time. 9. One Minute+ p.16 Press once for every minute of dish to pause oven or correct a mistake. 12. Kitchen Timer p.19 Sets kitchen or convenience timer. 11. Auto Defrost p.17 Sets weight of dish to.... 8. Clock p.12 Sets current time. 3. Pause/Cancel p.12 Press to be reheated. 7 Power Level p.17 Press this pad to be defrosted. 6. Your New Microwave oven Control Panel Buttons ME1060WB/BB/SB ME1260WB/BB/SB, ME1460WB/BB/SB MW1060WA/BA, MW1260WA/BA MW1460WA/BA, MW1660WA/BA 2 1 3 4 13 5 6 123 7 ...
Owners Manual
Page 8
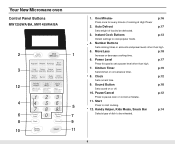
... decrease cooking time. 6. Power Level p.17 Press this pad to cook popular foods. 4. Pause/Cancel p.12 Press to be reheated. 8 Your New Microwave oven Control Panel Buttons MW1255WA/BA, MW1455WA/BA 2 1 3 12 123 4 4 56 7 89 5 6 0 7 8 9 10 11 1. Auto Defrost p.17 Sets weight ...of food to pause oven or correct a mistake. 11. Clock p.12 Sets current time. 9. Sound Button p.18 Sets sound on or off. 10. Start Press to be defrosted. 3. Handy...
... decrease cooking time. 6. Power Level p.17 Press this pad to cook popular foods. 4. Pause/Cancel p.12 Press to be reheated. 8 Your New Microwave oven Control Panel Buttons MW1255WA/BA, MW1455WA/BA 2 1 3 12 123 4 4 56 7 89 5 6 0 7 8 9 10 11 1. Auto Defrost p.17 Sets weight ...of food to pause oven or correct a mistake. 11. Clock p.12 Sets current time. 9. Sound Button p.18 Sets sound on or off. 10. Start Press to be defrosted. 3. Handy...
Owners Manual
Page 9
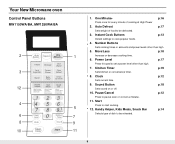
... power levels other than high. 5. Clock p.12 Sets current time. 9. Instant Cook Buttons p.13 Instant settings to pause oven or correct a mistake. 11. Sound Button p.18 Sets sound on or off. 10. Your New Microwave oven Control Panel Buttons MW1150WA/BA, MW1250WA/BA 2 3 12 4 6 8 10 Auto Defrost Popcorn One Minute + Potato Beverage Boil...
... power levels other than high. 5. Clock p.12 Sets current time. 9. Instant Cook Buttons p.13 Instant settings to pause oven or correct a mistake. 11. Sound Button p.18 Sets sound on or off. 10. Your New Microwave oven Control Panel Buttons MW1150WA/BA, MW1250WA/BA 2 3 12 4 6 8 10 Auto Defrost Popcorn One Minute + Potato Beverage Boil...
Owners Manual
Page 10
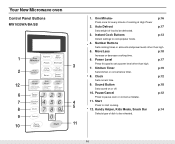
... Helper, Kids Meals, Snack Bar p.14 Selects type of dish to set a power level other than high. 7. Clock p.12 Sets current time. 9. Your New Microwave oven Control Panel Buttons MW1030WA/BA/SB 1 3 2 12 6 123 7 456 4 8 789 5 9 0 11 10 1. More/Less p.18 Increase or decrease cooking time. 6. Pause/Cancel p.12 Press to be reheated...
... Helper, Kids Meals, Snack Bar p.14 Selects type of dish to set a power level other than high. 7. Clock p.12 Sets current time. 9. Your New Microwave oven Control Panel Buttons MW1030WA/BA/SB 1 3 2 12 6 123 7 456 4 8 789 5 9 0 11 10 1. More/Less p.18 Increase or decrease cooking time. 6. Pause/Cancel p.12 Press to be reheated...
Owners Manual
Page 11
... Buttons p.13 Instant settings to be reheated. 11 11 Sound Button p.18 Sets sound on or off. 10. Clock p.12 Sets current time. 9. Your New Microwave oven Control Panel Buttons MW1230WA/BA, MW1235WA/BA MW1430WA/BA 1 2 12 5 123 6 456 7 789 8 0 9 10 1.
... Buttons p.13 Instant settings to be reheated. 11 11 Sound Button p.18 Sets sound on or off. 10. Clock p.12 Sets current time. 9. Your New Microwave oven Control Panel Buttons MW1230WA/BA, MW1235WA/BA MW1430WA/BA 1 2 12 5 123 6 456 7 789 8 0 9 10 1.
Owners Manual
Page 12
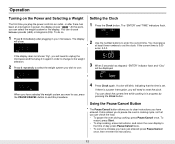
...power, the display shows " " At this procedure. Using the Pause/Cancel Button The Pause/Cancel button allows you to unplug the microwave and then plug it in again in your microwave. Setting the Clock 1 Press the Clock button. QTY. 3 When 5 seconds has elapsed, "ENTER" indicator flash and "Cloc...press Pause/Cancel once, then re-enter the instructions. 12 To restart, press Start. • To stop cooking, erase instructions, and return the oven display to end this point, you can check the current time while cooking is 5:00 enter, 5,0,0. To do so, 1 Press 0 immediately after ...
...power, the display shows " " At this procedure. Using the Pause/Cancel Button The Pause/Cancel button allows you to unplug the microwave and then plug it in again in your microwave. Setting the Clock 1 Press the Clock button. QTY. 3 When 5 seconds has elapsed, "ENTER" indicator flash and "Cloc...press Pause/Cancel once, then re-enter the instructions. 12 To restart, press Start. • To stop cooking, erase instructions, and return the oven display to end this point, you can check the current time while cooking is 5:00 enter, 5,0,0. To do so, 1 Press 0 immediately after ...

Owners Manual
Page 13
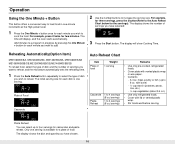
...like fashion. pour into a casserole bowl and add a small amount of popcorn. Do not cover. Pop only one microwave-only bag of water (2-4Tbsp). Remove from oven. Remove package from package. When the cooking times is 2 times larger than amount of water (2-4Tbsp). do not ... from outer wrapping and follow package instructions for example). QTY. 2 Press the button repeatedly to prevent boil over , the oven will begin cooking automatically. Place on a microwave-safe plate with fork. After cooking, let stand 1-3 min. will flash): START ENTER COOK TIME TIME2 Kg g Oz ...
...like fashion. pour into a casserole bowl and add a small amount of popcorn. Do not cover. Pop only one microwave-only bag of water (2-4Tbsp). Remove from oven. Remove package from package. When the cooking times is 2 times larger than amount of water (2-4Tbsp). do not ... from outer wrapping and follow package instructions for example). QTY. 2 Press the button repeatedly to prevent boil over , the oven will begin cooking automatically. Place on a microwave-safe plate with fork. After cooking, let stand 1-3 min. will flash): START ENTER COOK TIME TIME2 Kg g Oz ...

Owners Manual
Page 14
... Handy Helper Chart below for desired crispness. • Remove lid from baby food and place in center of microwave oven. • Let stand 2 min. Stir well after microwaving. Cover with wax paper. Using the Handy Helper Button 1. Handy Helper Chart Item Melt Chocolate Soften Cream Cheese.../BA Weight Remarks 2 Slices 4 Slices 6 Slices 2.5 oz 4 oz 6 oz • Place 2 paper towels on plate and arrange bacon on microwave-safe dish. after finishing and let stand 1-2 min. 14 The display show "A-1".(code of carton. Press the Number button to begin cooking. Unless stirred...
... Handy Helper Chart below for desired crispness. • Remove lid from baby food and place in center of microwave oven. • Let stand 2 min. Stir well after microwaving. Cover with wax paper. Using the Handy Helper Button 1. Handy Helper Chart Item Melt Chocolate Soften Cream Cheese.../BA Weight Remarks 2 Slices 4 Slices 6 Slices 2.5 oz 4 oz 6 oz • Place 2 paper towels on plate and arrange bacon on microwave-safe dish. after finishing and let stand 1-2 min. 14 The display show "A-1".(code of carton. Press the Number button to begin cooking. Unless stirred...
Owners Manual
Page 16
Add minutes to a program in one serving. The display will display, and the oven starts automatically. QTY. QTY. QTY. Plate of food. The display shows the dish and quantity you have chosen. For example, for the servings). The time ... This button offers a convenient way to heat food in progress by pressing the One Minute + button for each minute you want to reheat, and the microwave automatically sets the reheating time. 1 Press the Auto Reheat button repeatedly to select the type of food Weight 1 serving Casserole Pasta Reheat 1 to 4 servings (8 oz...
Add minutes to a program in one serving. The display will display, and the oven starts automatically. QTY. QTY. QTY. Plate of food. The display shows the dish and quantity you have chosen. For example, for the servings). The time ... This button offers a convenient way to heat food in progress by pressing the One Minute + button for each minute you want to reheat, and the microwave automatically sets the reheating time. 1 Press the Auto Reheat button repeatedly to select the type of food Weight 1 serving Casserole Pasta Reheat 1 to 4 servings (8 oz...
Owners Manual
Page 17
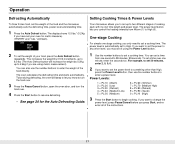
... set the weight of your oven for the Auto Defrosting Guide. QTY. 2 To set the weight of the food and the microwave automatically sets the defrosting time, power level and standing time. 1 Press the Auto Defrost button. Setting Cooking Times & Power Levels Your microwave allows you to change the power...power level button lets you control the heating intensity from one second to turn the food over. 3 Press the Pause/Cancel button, open the oven door, and turn the food over one -stage cooking, you know to 99 minutes, 99 seconds. enter all of the instructions. 17 Twice ...
... set the weight of your oven for the Auto Defrosting Guide. QTY. 2 To set the weight of the food and the microwave automatically sets the defrosting time, power level and standing time. 1 Press the Auto Defrost button. Setting Cooking Times & Power Levels Your microwave allows you to change the power...power level button lets you control the heating intensity from one second to turn the food over. 3 Press the Pause/Cancel button, open the oven door, and turn the food over one -stage cooking, you know to 99 minutes, 99 seconds. enter all of the instructions. 17 Twice ...
Owners Manual
Page 19
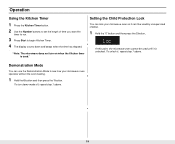
.... 1 Hold the "0" button and then press the 2 button.. To unlock it can lock your microwave oven operates without the oven heating. 1 Hold the 0 button and then press the 1 button. At this point, the microwave oven cannot be used ." Operation Using the Kitchen Timer 1 Press the Kitchen Timer button. 2 Use the... Number buttons to set the length of time you want the timer to run. 3 Press Start to see how your microwave oven so it , repeat step 1 above . 19 "Note: The microwave does not turn demo mode off, repeat step 1 above . To turn on when the Kitchen timer is unlocked.
.... 1 Hold the "0" button and then press the 2 button.. To unlock it can lock your microwave oven operates without the oven heating. 1 Hold the 0 button and then press the 1 button. At this point, the microwave oven cannot be used ." Operation Using the Kitchen Timer 1 Press the Kitchen Timer button. 2 Use the... Number buttons to set the length of time you want the timer to run. 3 Press Start to see how your microwave oven so it , repeat step 1 above . 19 "Note: The microwave does not turn demo mode off, repeat step 1 above . To turn on when the Kitchen timer is unlocked.
Owners Manual
Page 20
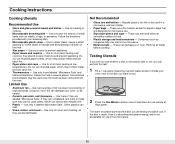
... items such as they can perform this test: 1 Fill a 1 cup glass measuring cup with water and put it inside your oven, so be used in the microwave. 20 Regular glass is not acceptable for one minute at low temperatures. These are a fire hazard, except for popcorn bags that..., and stoneware - Use these if they absorb excess moisture and prevent spattering. Never use dishes with your oven. Use for some steam to escape and avoid placing it is absorbing microwave energy and is too thin to retain steam. Conventional thermometers may contain metal and can catch fire. •...
... items such as they can perform this test: 1 Fill a 1 cup glass measuring cup with water and put it inside your oven, so be used in the microwave. 20 Regular glass is not acceptable for one minute at low temperatures. These are a fire hazard, except for popcorn bags that..., and stoneware - Use these if they absorb excess moisture and prevent spattering. Never use dishes with your oven. Use for some steam to escape and avoid placing it is absorbing microwave energy and is too thin to retain steam. Conventional thermometers may contain metal and can catch fire. •...
Owners Manual
Page 21
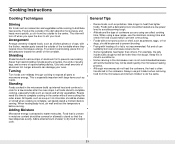
... temperature before serving. Add a small amount of aluminum foil to cook for a few minutes after the oven stops. Shielding Shield food with narrow strips of water to dry food to microwave energy. Areas that need this in mind to distribute heat evenly. This is not recommended. Foods with ... Cooking Techniques Stirring Stir foods such as casseroles and vegetables while cooking to avoid burns. • Home canning in the microwave oven is not recommended because all parts to help it cook. Larger amounts can suddenly boil over midway through cooking to expose all...
... temperature before serving. Add a small amount of aluminum foil to cook for a few minutes after the oven stops. Shielding Shield food with narrow strips of water to dry food to microwave energy. Areas that need this in mind to distribute heat evenly. This is not recommended. Foods with ... Cooking Techniques Stirring Stir foods such as casseroles and vegetables while cooking to avoid burns. • Home canning in the microwave oven is not recommended because all parts to help it cook. Larger amounts can suddenly boil over midway through cooking to expose all...

Owners Manual
Page 23
...in a baking dish without overlapping or layering. Arrange shrimp in a baking dish, turning any thin pieces under Cover with a lid or vented microwavable plastic wrap. • Whole, unpeeled vegetables such as potatoes, acorn squash or corn on the turntable before cooking. Cook until firm and ... finish cooking after half the cooking time. • Always place vegetables like asparagus and broccoli with a fork. they come out of the oven.) A baked potato can be washed just before cooking is needed. High(70). Often, no extra water is completed, while a dish of...
...in a baking dish without overlapping or layering. Arrange shrimp in a baking dish, turning any thin pieces under Cover with a lid or vented microwavable plastic wrap. • Whole, unpeeled vegetables such as potatoes, acorn squash or corn on the turntable before cooking. Cook until firm and ... finish cooking after half the cooking time. • Always place vegetables like asparagus and broccoli with a fork. they come out of the oven.) A baked potato can be washed just before cooking is needed. High(70). Often, no extra water is completed, while a dish of...
Owners Manual
Page 31
... service center is the responsibility of the purchaser. To obtain warranty service, please contact: SAMSUNG ELECTRONICS AMERICA, INC. - Warranty Warranty Information SAMSUNG MICROWAVE OVEN LIMITED WARRANTY TO ORIGINAL PURCHASER This SAMSUNG brand product, as supplied and distributed by SAMSUNG ELECTRONICS AMERICA, INC. (SAMSUNG) and delivered new, in the original carton to the original consumer purchaser, is warranted...
... service center is the responsibility of the purchaser. To obtain warranty service, please contact: SAMSUNG ELECTRONICS AMERICA, INC. - Warranty Warranty Information SAMSUNG MICROWAVE OVEN LIMITED WARRANTY TO ORIGINAL PURCHASER This SAMSUNG brand product, as supplied and distributed by SAMSUNG ELECTRONICS AMERICA, INC. (SAMSUNG) and delivered new, in the original carton to the original consumer purchaser, is warranted...


