
Owners Manual
Page 2
... installation instructions provided. • Some items, like whole eggs and food in sealed containers, may explode if heated in this oven. • Use this appliance only for the name of oven is dangerous voltage inside. It is particularly important that the oven door close supervision is necessary when used by anyone except properly qualified service personnel. there is specifically designed to heat, cook, or dry food...
... installation instructions provided. • Some items, like whole eggs and food in sealed containers, may explode if heated in this oven. • Use this appliance only for the name of oven is dangerous voltage inside. It is particularly important that the oven door close supervision is necessary when used by anyone except properly qualified service personnel. there is specifically designed to heat, cook, or dry food...

Owners Manual
Page 3
... outdoors. If materials inside of the oven clean. Food will not cook properly without the glass tray in narrow-necked bottles. Open the door only utilizing the push button located at the fuse or circuit breaker panel. Food particles or spattered oils stuck to the oven walls or floor can become hot. Longer cord sets or extension cords are inside oven should ignite, keep the oven door closed , turn the oven off, disconnect the power cord, or shut off...
... outdoors. If materials inside of the oven clean. Food will not cook properly without the glass tray in narrow-necked bottles. Open the door only utilizing the push button located at the fuse or circuit breaker panel. Food particles or spattered oils stuck to the oven walls or floor can become hot. Longer cord sets or extension cords are inside oven should ignite, keep the oven door closed , turn the oven off, disconnect the power cord, or shut off...
Owners Manual
Page 4
... appliance is properly installed and grounded. If a long cord or extension cord is used if care is properly grounded. The extension cord must be a grounding-type 3-wire cord and it must be longer, too. WARNING Do not cut or remove the third (ground) prong from the power cord under any circumstances. When connecting the oven to a 20A circuit. Longer cord sets or extension cords are not sure...
... appliance is properly installed and grounded. If a long cord or extension cord is used if care is properly grounded. The extension cord must be a grounding-type 3-wire cord and it must be longer, too. WARNING Do not cut or remove the third (ground) prong from the power cord under any circumstances. When connecting the oven to a 20A circuit. Longer cord sets or extension cords are not sure...
Owners Manual
Page 5
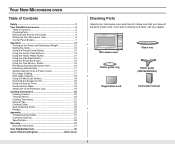
... Item 16 Defrosting Automatically 17 Setting Cooking Times & Power Levels 17 One-stage Cooking 17 Multi-stage Cooking 18 Using the More/Less Buttons 18 Switching the Beeper On/Off 18 Using the Kitchen Timer 19 Demonstration Mode 19 Setting the Child Protection Lock 19 Cooking Instructions 20 Cooking Utensils 20 Testing Utensils 20 Cooking Techniques 21 General Tips 21 Cooking Guide 22 Auto Defrosting Guide 24 Recipes 25 Appendix 27 Troubleshooting Guide 27 Care and Cleaning 27 Specifications 28 Warranty 31 Warranty Information 31...
... Item 16 Defrosting Automatically 17 Setting Cooking Times & Power Levels 17 One-stage Cooking 17 Multi-stage Cooking 18 Using the More/Less Buttons 18 Switching the Beeper On/Off 18 Using the Kitchen Timer 19 Demonstration Mode 19 Setting the Child Protection Lock 19 Cooking Instructions 20 Cooking Utensils 20 Testing Utensils 20 Cooking Techniques 21 General Tips 21 Cooking Guide 22 Auto Defrosting Guide 24 Recipes 25 Appendix 27 Troubleshooting Guide 27 Care and Cleaning 27 Specifications 28 Warranty 31 Warranty Information 31...

Owners Manual
Page 6
... pre-assembled roller guide in the indentation in the center of the oven.(MW1660WA/BA) For service assistance and the location of the nearest service center, please call Samsung Electronics America, Inc., at WWW.SAMSUNGUSA.COM When contacting Samsung, please provide the specific model and serial number information which is adequate ventilation for your sales receipt to WWW.SAMSUNGSUPPORT.COM 5 Place the glass tray...
... pre-assembled roller guide in the indentation in the center of the oven.(MW1660WA/BA) For service assistance and the location of the nearest service center, please call Samsung Electronics America, Inc., at WWW.SAMSUNGUSA.COM When contacting Samsung, please provide the specific model and serial number information which is adequate ventilation for your sales receipt to WWW.SAMSUNGSUPPORT.COM 5 Place the glass tray...
Owners Manual
Page 9
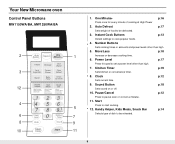
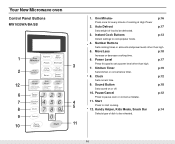
...+ p.16 Press once for every minute of food to set a power level other than high. 7. Sound Button p.18 Sets sound on or off. 10. Start Press to pause oven or correct a mistake. 11. Number Buttons Sets cooking times or amounts and power levels other than high. 5. Clock p.12 Sets current time. 9. Auto Defrost p.17 Sets weight of cooking at High Power 2. Your New Microwave oven Control Panel Buttons MW1150WA/BA, MW1250WA/BA 2 3 12 4 6 8 10 Auto Defrost Popcorn One Minute + Potato Beverage Boil Water Fresh...
...+ p.16 Press once for every minute of food to set a power level other than high. 7. Sound Button p.18 Sets sound on or off. 10. Start Press to pause oven or correct a mistake. 11. Number Buttons Sets cooking times or amounts and power levels other than high. 5. Clock p.12 Sets current time. 9. Auto Defrost p.17 Sets weight of cooking at High Power 2. Your New Microwave oven Control Panel Buttons MW1150WA/BA, MW1250WA/BA 2 3 12 4 6 8 10 Auto Defrost Popcorn One Minute + Potato Beverage Boil Water Fresh...
Owners Manual
Page 10
... Meals, Snack Bar p.14 Selects type of cooking at High Power 2. More/Less p.18 Increase or decrease cooking time. 6. Sound Button p.18 Sets sound on or off. 10. Number Buttons Sets cooking times or amounts and power levels other than high. 5. Start Press to pause oven or correct a mistake. 11. Your New Microwave oven Control Panel Buttons MW1030WA/BA/SB 1 3 2 12 6 123 7 456 4 8 789 5 9 0 11 10 1. Auto Defrost p.17 Sets weight of food to be defrosted. 3. Kitchen Timer p.19 Sets kitchen or convenience...
... Meals, Snack Bar p.14 Selects type of cooking at High Power 2. More/Less p.18 Increase or decrease cooking time. 6. Sound Button p.18 Sets sound on or off. 10. Number Buttons Sets cooking times or amounts and power levels other than high. 5. Start Press to pause oven or correct a mistake. 11. Your New Microwave oven Control Panel Buttons MW1030WA/BA/SB 1 3 2 12 6 123 7 456 4 8 789 5 9 0 11 10 1. Auto Defrost p.17 Sets weight of food to be defrosted. 3. Kitchen Timer p.19 Sets kitchen or convenience...
Owners Manual
Page 12
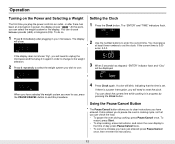
...-enter the instructions. 12 START ENTER COOK TIME TIME2 Kg g Oz Lbs. QTY. 2 Use the number buttons to set . If the current time is set the clock. START ENTER COOK TIME TIME2 Kg g Oz Lbs. If there is in progress by pressing the Clock button. It also allows you to reset the clock. You can check the food. • To pause the oven during cooking: press Pause/Cancel once. The display will...
...-enter the instructions. 12 START ENTER COOK TIME TIME2 Kg g Oz Lbs. QTY. 2 Use the number buttons to set . If the current time is set the clock. START ENTER COOK TIME TIME2 Kg g Oz Lbs. If there is in progress by pressing the Clock button. It also allows you to reset the clock. You can check the food. • To pause the oven during cooking: press Pause/Cancel once. The display will...

Owners Manual
Page 13
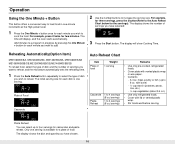
... outside edge of the plate. Stir well before and after heating to the food you are cooking (Popcorn, for example). Place the vegetables into microwave-safe container that is over . Cover during cooking and stir before standing. Remove package from outer wrapping and follow package instructions for covering and standing. Operation Using the Instant Cook Buttons 1 Press the Instant Cook button corresponding to prevent boil over , the oven will beep...
... outside edge of the plate. Stir well before and after heating to the food you are cooking (Popcorn, for example). Place the vegetables into microwave-safe container that is over . Cover during cooking and stir before standing. Remove package from outer wrapping and follow package instructions for covering and standing. Operation Using the Instant Cook Buttons 1 Press the Instant Cook button corresponding to prevent boil over , the oven will beep...

Owners Manual
Page 14
....(Refer to the food you want. Only "1" button(serving) is over. Unless stirred, the chocolate keeps its shape even when heating time is available for the serving) 3. Press the Number button to select the serving size you are cooking. Remove wrapping and cut butter in a microwave-safe dish. after cooking. • Use More or Less button for selecting serving size. Using the Handy Helper Button 1. Place butter...
....(Refer to the food you want. Only "1" button(serving) is over. Unless stirred, the chocolate keeps its shape even when heating time is available for the serving) 3. Press the Number button to select the serving size you are cooking. Remove wrapping and cut butter in a microwave-safe dish. after cooking. • Use More or Less button for selecting serving size. Using the Handy Helper Button 1. Place butter...
Owners Manual
Page 16
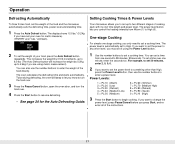
... add. 2 Use the number buttons to increase the serving size. START ENTER COOK TIME TIME2 Kg g Oz Lbs. QTY. QTY. Auto Reheat Chart Item Plate of food Weight 1 serving Casserole Pasta Reheat 1 to 4 servings (8 oz./serving) 1 to 4 servings (8 oz./serving) Remarks • Use only pre-cooked, refrigerated foods. • Cover plate with lid or vented plastic wrap. • Stir foods well before serving. 16 Casserole START ENTER COOK TIME TIME2 Kg...
... add. 2 Use the number buttons to increase the serving size. START ENTER COOK TIME TIME2 Kg g Oz Lbs. QTY. QTY. Auto Reheat Chart Item Plate of food Weight 1 serving Casserole Pasta Reheat 1 to 4 servings (8 oz./serving) 1 to 4 servings (8 oz./serving) Remarks • Use only pre-cooked, refrigerated foods. • Cover plate with lid or vented plastic wrap. • Stir foods well before serving. 16 Casserole START ENTER COOK TIME TIME2 Kg...
Owners Manual
Page 17
... the Auto Defrosting Guide. The oven calculates the defrosting time and starts automatically. Twice during defrosting, the oven will beep to let you are using the Power Level button. 1 Use the number buttons to set your food, press the Auto Defrost button repeatedly. The power level is automatically set the weight of the food directly. If you want to set the power to any other than High, press the Power Level button, then use the number buttons to enter the weight of the food and the microwave automatically sets the defrosting time, power level...
... the Auto Defrosting Guide. The oven calculates the defrosting time and starts automatically. Twice during defrosting, the oven will beep to let you are using the Power Level button. 1 Use the number buttons to set your food, press the Auto Defrost button repeatedly. The power level is automatically set the weight of the food directly. If you want to set the power to any other than High, press the Power Level button, then use the number buttons to enter the weight of the food and the microwave automatically sets the defrosting time, power level...

Owners Manual
Page 18
... switch the beeper off . Using the More/Less Buttons The More/Less buttons allow you want. 1 Press the Sound button. If you have already begun cooking with one cooking stage, the Power Level button must be pressed before the second cooking stage can check the Power Level while cooking is in Time Cook mode by pressing the Power Level button. To set the power level at different temperatures. The display shows "ON". ("START" will flash) START ENTER COOK...
... switch the beeper off . Using the More/Less Buttons The More/Less buttons allow you want. 1 Press the Sound button. If you have already begun cooking with one cooking stage, the Power Level button must be pressed before the second cooking stage can check the Power Level while cooking is in Time Cook mode by pressing the Power Level button. To set the power level at different temperatures. The display shows "ON". ("START" will flash) START ENTER COOK...
Owners Manual
Page 19
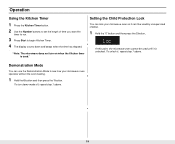
... press the 2 button.. Setting the Child Protection Lock You can use the Demonstration Mode to begin Kitchen Timer. 4 The display counts down and beeps when the time has elapsed. . Demonstration Mode You can lock your microwave oven operates without the oven heating. 1 Hold the 0 button and then press the 1 button. "Note: The microwave does not turn demo mode off, repeat step 1 above . At this point, the microwave oven cannot be used ." To turn on when the Kitchen timer is unlocked.
... press the 2 button.. Setting the Child Protection Lock You can use the Demonstration Mode to begin Kitchen Timer. 4 The display counts down and beeps when the time has elapsed. . Demonstration Mode You can lock your microwave oven operates without the oven heating. 1 Hold the 0 button and then press the 1 button. "Note: The microwave does not turn demo mode off, repeat step 1 above . At this point, the microwave oven cannot be used ." To turn on when the Kitchen timer is unlocked.
Owners Manual
Page 20
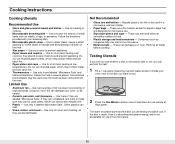
... One Minute + button once to heat them to prevent spattering. • Paper towels and napkins - These can melt and leave an unhealthy residue on the food. • Wax paper - Follow the directions provided with metallic trim. • Plastic - Not Recommended • Glass jars and bottles - Remove all directions. The water should be used in several places. Use as margarine tubs...
... One Minute + button once to heat them to prevent spattering. • Paper towels and napkins - These can melt and leave an unhealthy residue on the food. • Wax paper - Follow the directions provided with metallic trim. • Plastic - Not Recommended • Glass jars and bottles - Remove all directions. The water should be used in several places. Use as margarine tubs...
Owners Manual
Page 21
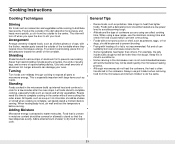
... thin or delicate parts toward the outside of the turntable where they receive more quickly, so stir from the microwave and instruct children to help it cook. Foods with heating oil or fat is often transferred to stir your oven. For example, the jelly inside a jelly doughnut will turn off when you are using a new recipe, use pot holders when removing food from the outside of water...
... thin or delicate parts toward the outside of the turntable where they receive more quickly, so stir from the microwave and instruct children to help it cook. Foods with heating oil or fat is often transferred to stir your oven. For example, the jelly inside a jelly doughnut will turn off when you are using a new recipe, use pot holders when removing food from the outside of water...

Owners Manual
Page 23
... up . Let stand 3-5 min. Let stand 2-3 min. Cover with a lid or vented microwavable plastic wrap. • Whole, unpeeled vegetables such as potatoes, acorn squash or corn on roasting rack with wax paper. Let stand 5 min. Up to keep them from bursting. • Cook eggs just until set; Power Level: Medium- Directions Arrange steaks on the cob, should be served...
... up . Let stand 3-5 min. Let stand 2-3 min. Cover with a lid or vented microwavable plastic wrap. • Whole, unpeeled vegetables such as potatoes, acorn squash or corn on roasting rack with wax paper. Let stand 5 min. Up to keep them from bursting. • Cook eggs just until set; Power Level: Medium- Directions Arrange steaks on the cob, should be served...
Owners Manual
Page 27
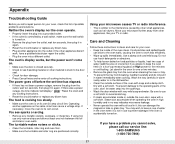
... dishwasher. • Clean the outside the oven door, wipe with very mild soap and water. Operating another appliance into the openings. • Wash the door window with a soft cloth. Dry with soap and a damp cloth. this list of possible problems and solutions. If there was a power outage, the time indicator will display " " Reset the clock and any cooking instructions. • Reset the circuit breaker or replace any metallic utensils...
... dishwasher. • Clean the outside the oven door, wipe with very mild soap and water. Operating another appliance into the openings. • Wash the door window with a soft cloth. Dry with soap and a damp cloth. this list of possible problems and solutions. If there was a power outage, the time indicator will display " " Reset the clock and any cooking instructions. • Reset the circuit breaker or replace any metallic utensils...
Owners Manual
Page 31
... SAMSUNG. Replacement parts and products assume the remaining original warranty, or ninety (90) days, whichever is the responsibility of the purchaser. accidents, abuse, neglect, fire, water, lightning or other rights which vary from the service center is longer. incorrect electrical line voltage, fluctuations and surges; glass tray or turntable; reduced magnetron power output related to follow operating instructions, cleaning, maintenance and environmental instructions that are covered...
... SAMSUNG. Replacement parts and products assume the remaining original warranty, or ninety (90) days, whichever is the responsibility of the purchaser. accidents, abuse, neglect, fire, water, lightning or other rights which vary from the service center is longer. incorrect electrical line voltage, fluctuations and surges; glass tray or turntable; reduced magnetron power output related to follow operating instructions, cleaning, maintenance and environmental instructions that are covered...
Owners Manual
Page 36
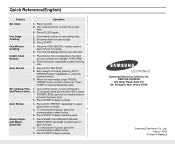
.... 1. Press the button repeatedly to resume defrosting cycle. When the oven beeps, press PAUSE/ CANCEL button and turn food over. Press HANDY HELPER(KIDS MELAS, SNACK BAR) repeatedly to select type of food by pressing AUTO DEFROST button repeatedly or using the number buttons. 3. ELECTRONICS Samsung Electronics America, Inc. To set power level at high. 3. The time will display and the oven will start. 1. Quick Reference(English) Feature Operation Set Clock One Stage Cooking One Minute+ Cooking Instant Cook Buttons Auto Defrost 1.
.... 1. Press the button repeatedly to resume defrosting cycle. When the oven beeps, press PAUSE/ CANCEL button and turn food over. Press HANDY HELPER(KIDS MELAS, SNACK BAR) repeatedly to select type of food by pressing AUTO DEFROST button repeatedly or using the number buttons. 3. ELECTRONICS Samsung Electronics America, Inc. To set power level at high. 3. The time will display and the oven will start. 1. Quick Reference(English) Feature Operation Set Clock One Stage Cooking One Minute+ Cooking Instant Cook Buttons Auto Defrost 1.


