User Manual (ENGLISH)
Page 7
... damage your nearest Samsung dealer. * AWG: American Wire Gauge i Improper adjustment of other risks. to conform to the requirements of DHHS 21 CFR, chapter 1 Subchapter J for assistance. 5 Unplug the machine from the AC wall socket before cleaning. The laser system and printer are designed so ...dangerous voltage points, creating a risk of the power cord, plug, or connecting cable is certified in performance. 14 Adjust only those controls covered by a qualified service technician to restore the machine to normal operation. 15 Avoid using a cord which is longer than 2 m with your...
... damage your nearest Samsung dealer. * AWG: American Wire Gauge i Improper adjustment of other risks. to conform to the requirements of DHHS 21 CFR, chapter 1 Subchapter J for assistance. 5 Unplug the machine from the AC wall socket before cleaning. The laser system and printer are designed so ...dangerous voltage points, creating a risk of the power cord, plug, or connecting cable is certified in performance. 14 Adjust only those controls covered by a qualified service technician to restore the machine to normal operation. 15 Avoid using a cord which is longer than 2 m with your...

User Manual (ENGLISH)
Page 8
...to Part 15 of packaging materials for help. representative. If you have lost the fuse cover, do not have another fuse cover. Please contact the people from that to replace the fuse cover. You need to which can radiate radio frequency energy and, if not installed and ... the plug and you plug it into an outlet on a circuit different from you must earth this product symbolises Samsung Electronics Co., Ltd. Power Saver This printer contains advanced energy conservation technology that reduces power consumption when it is not in the UK and should be suitable....
...to Part 15 of packaging materials for help. representative. If you have lost the fuse cover, do not have another fuse cover. Please contact the people from that to replace the fuse cover. You need to which can radiate radio frequency energy and, if not installed and ... the plug and you plug it into an outlet on a circuit different from you must earth this product symbolises Samsung Electronics Co., Ltd. Power Saver This printer contains advanced energy conservation technology that reduces power consumption when it is not in the UK and should be suitable....
User Manual (ENGLISH)
Page 11
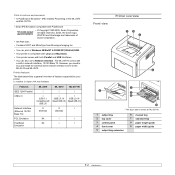
...need to buy and install the external wired network interface server to the ML-2510 and ML-2570. Zoran, the Zoran logo, IPS/PS3 and OneImage are trademarks of features supported by your printer. (I: Installed, O: Option, NA: Not Available) Features IEEE 1284 ...Parallel USB 2.0 Network Interface (Ethernet 10/100 Base TX) PCL Emulation PostScript Emulation ML-2510 ML-2570 ML-2571N I I I I Front view Printer overview * The figure above shows an ML-2571N. 1 output tray 2 top cover 3 control panel 4 front cover 5 output tray extension 6 manual tray 7 standard tray 8 paper length guide ...
...need to buy and install the external wired network interface server to the ML-2510 and ML-2570. Zoran, the Zoran logo, IPS/PS3 and OneImage are trademarks of features supported by your printer. (I: Installed, O: Option, NA: Not Available) Features IEEE 1284 ...Parallel USB 2.0 Network Interface (Ethernet 10/100 Base TX) PCL Emulation PostScript Emulation ML-2510 ML-2570 ML-2571N I I I I Front view Printer overview * The figure above shows an ML-2571N. 1 output tray 2 top cover 3 control panel 4 front cover 5 output tray extension 6 manual tray 7 standard tray 8 paper length guide ...

User Manual (ENGLISH)
Page 13
Do not set the printer close to the edge of heat, cold, and humidity. Allow extra space for air circulation. Selecting a location Select a level, stable place with adequate space for opening covers and trays. Clearance space Front: 482.6 mm (enough space so that tray can be well-ventilated and away from direct sunlight or sources of your desk or table. The area should be opened) Back: 100 mm (enough space for ventilation) Right: 100 mm (enough space for ventilation) Left: 100 mm (enough space for ventilation) 1.4
Do not set the printer close to the edge of heat, cold, and humidity. Allow extra space for air circulation. Selecting a location Select a level, stable place with adequate space for opening covers and trays. Clearance space Front: 482.6 mm (enough space so that tray can be well-ventilated and away from direct sunlight or sources of your desk or table. The area should be opened) Back: 100 mm (enough space for ventilation) Right: 100 mm (enough space for ventilation) Left: 100 mm (enough space for ventilation) 1.4
User Manual (ENGLISH)
Page 20
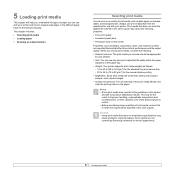
... print media, consider the following problems: • Poor print quality • Increased paper jams • Premature wear on the printer Properties, such as weight, composition, grain, and moisture content, are not covered by Samsung's warranty or service agreements. 5.1 This chapter includes: • Selecting print media • Loading paper • Knowing an output location...
... print media, consider the following problems: • Poor print quality • Increased paper jams • Premature wear on the printer Properties, such as weight, composition, grain, and moisture content, are not covered by Samsung's warranty or service agreements. 5.1 This chapter includes: • Selecting print media • Loading paper • Knowing an output location...
User Manual (ENGLISH)
Page 22
...and 70%. • Store unused print media in a moisture-proof wrap, such as they print out. Weight: The weight of the top cover may occur. - The extra flaps and strips might cause wrinkling, creasing, or jams, and may even damage the fuser. • For the... cause it . Condition: Envelopes should not contain air. - Do not place heavy objects on envelopes depends upon the quality of these guidelines in laser printers. • Avoid using the following factors: - Erasable bond paper - Multi-paged paper - Please exercise caution. Construction: Prior to printing, envelopes...
...and 70%. • Store unused print media in a moisture-proof wrap, such as they print out. Weight: The weight of the top cover may occur. - The extra flaps and strips might cause wrinkling, creasing, or jams, and may even damage the fuser. • For the... cause it . Condition: Envelopes should not contain air. - Do not place heavy objects on envelopes depends upon the quality of these guidelines in laser printers. • Avoid using the following factors: - Erasable bond paper - Multi-paged paper - Please exercise caution. Construction: Prior to printing, envelopes...
User Manual (ENGLISH)
Page 28
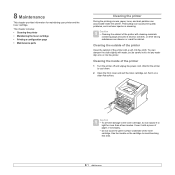
... not to let any water drip onto or into the printer. Wait for maintaining your printer and the toner cartridge. Use the handle on a clean flat surface. 8 Maintenance This chapter provides information for the printer to cool down. 2 Open the front cover and pull the toner cartridge out. Caution • Cleaning... the cabinet of the toner cartridge. Cleaning the inside the printer. Cover it to the toner cartridge, do not expose it with a soft, lint-free cloth. Caution • To prevent damage to light for more than...
... not to let any water drip onto or into the printer. Wait for maintaining your printer and the toner cartridge. Use the handle on a clean flat surface. 8 Maintenance This chapter provides information for the printer to cool down. 2 Open the front cover and pull the toner cartridge out. Caution • Cleaning... the cabinet of the toner cartridge. Cleaning the inside the printer. Cover it to the toner cartridge, do not expose it with a soft, lint-free cloth. Caution • To prevent damage to light for more than...

User Manual (ENGLISH)
Page 29
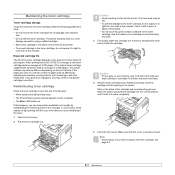
... locate. 8.2 Note • The long strip of glass is securely closed. 9 Plug in the printer. Make sure that the cover is hard to reach too far into the printer. Caution • While cleaning the inside of the printer, be hot. 5 Gently swab the long strip of glass (LSU) inside the top of the... cartridge into the correct position until it locks into the opening in the power cord and turn the printer on the sides of the cartridge and check for dirt or dust. 8 Close the front cover. 3 Pull the manual tray out. 6 Reinsert the manual tray. 4 With a dry lint-free cloth, wipe ...
... locate. 8.2 Note • The long strip of glass is securely closed. 9 Plug in the printer. Make sure that the cover is hard to reach too far into the printer. Caution • While cleaning the inside of the printer, be hot. 5 Gently swab the long strip of glass (LSU) inside the top of the... cartridge into the correct position until it locks into the opening in the power cord and turn the printer on the sides of the cartridge and check for dirt or dust. 8 Close the front cover. 3 Pull the manual tray out. 6 Reinsert the manual tray. 4 With a dry lint-free cloth, wipe ...
User Manual (ENGLISH)
Page 30
... more than a few minutes. Redistributing toner cartridge When the toner cartridge is securely closed. The printer warranty does not cover damage caused by redistributing the remaining toner in the printer. Note • At this stage, if you print on the amount of its package until... it locks into place completely. 5 Close the front cover. Maintaining the toner cartridge Toner cartridge storage To get the most from ...
... more than a few minutes. Redistributing toner cartridge When the toner cartridge is securely closed. The printer warranty does not cover damage caused by redistributing the remaining toner in the printer. Note • At this stage, if you print on the amount of its package until... it locks into place completely. 5 Close the front cover. Maintaining the toner cartridge Toner cartridge storage To get the most from ...

User Manual (ENGLISH)
Page 31
... the handle on your clothing, wipe it to be replaced. Make sure that the cover is completely empty or the toner cartridge reachde the end of the cartridge and corresponding grooves within the printer will guide the cartridge into the correct position until it with a dry cloth and wash... times to the helpful pictures on the computer. • The Error LED blinks red. For toner cartridge ordering information, see page 7.1. 1 Open the front cover. 2 Pull the old toner cartridge out. 3 Remove the new toner cartridge from its life span: • The Smart Panel program window appears on the...
... the handle on your clothing, wipe it to be replaced. Make sure that the cover is completely empty or the toner cartridge reachde the end of the cartridge and corresponding grooves within the printer will guide the cartridge into the correct position until it with a dry cloth and wash... times to the helpful pictures on the computer. • The Error LED blinks red. For toner cartridge ordering information, see page 7.1. 1 Open the front cover. 2 Pull the old toner cartridge out. 3 Remove the new toner cartridge from its life span: • The Smart Panel program window appears on the...
User Manual (ENGLISH)
Page 33
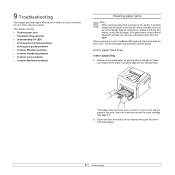
... is properly aligned in the standard tray. If the paper does not move when you pull, or if you encounter an error while using your printer. This chapter includes: • Clearing paper jams • Troubleshooting checklist • Understanding the LEDs • Solving general printing problems • Solving print quality ... resume printing the document from failed pages. 9.1 otherwise a jam will occur again. See page 9.2. 2 Open and close the front cover. In the paper feed area In the standard tray 1 Remove the jammed paper by gently pulling it normally moves so as not to ...
... is properly aligned in the standard tray. If the paper does not move when you pull, or if you encounter an error while using your printer. This chapter includes: • Clearing paper jams • Troubleshooting checklist • Understanding the LEDs • Solving general printing problems • Solving print quality ... resume printing the document from failed pages. 9.1 otherwise a jam will occur again. See page 9.2. 2 Open and close the front cover. In the paper feed area In the standard tray 1 Remove the jammed paper by gently pulling it normally moves so as not to ...

User Manual (ENGLISH)
Page 34
Printing automatically resumes. 9.2 See page 9.2. 2 Open and close the front cover. Use the handle on the cartridge to resume printing the document from the printer. 1 Open the front cover and pull the toner cartridge out. Around the toner cartridge Note • The fuser area is any resistance ... more than a few minutes. See page 9.3. 4 If necessary, reinsert the manual tray. 5 Replace the toner cartridge and close the front cover to avoid touching this area, check the fuser area around the toner cartridge. Caution • To prevent damage to the toner cartridge, do...
Printing automatically resumes. 9.2 See page 9.2. 2 Open and close the front cover. Use the handle on the cartridge to resume printing the document from the printer. 1 Open the front cover and pull the toner cartridge out. Around the toner cartridge Note • The fuser area is any resistance ... more than a few minutes. See page 9.3. 4 If necessary, reinsert the manual tray. 5 Replace the toner cartridge and close the front cover to avoid touching this area, check the fuser area around the toner cartridge. Caution • To prevent damage to the toner cartridge, do...

User Manual (ENGLISH)
Page 35
...only recommended print media. Caution • When removing the jammed paper, be avoided. Allows the printer to the heat roller. In the paper exit area 1 Open and close the front cover. It is facing up in the heat roller. Printing automatically resumes. Ensure that the recommended print ...printing. • Flex, fan, and straighten paper before opening the covers. 5 Close the inner cover and top cover. Then gently pull the jammed paper out. The jammed paper is automatically ejected from the tray while your printer is caught in the tray. 9.3 Tips for avoiding paper jams ...
...only recommended print media. Caution • When removing the jammed paper, be avoided. Allows the printer to the heat roller. In the paper exit area 1 Open and close the front cover. It is facing up in the heat roller. Printing automatically resumes. Ensure that the recommended print ...printing. • Flex, fan, and straighten paper before opening the covers. 5 Close the inner cover and top cover. Then gently pull the jammed paper out. The jammed paper is automatically ejected from the tray while your printer is caught in the tray. 9.3 Tips for avoiding paper jams ...
User Manual (ENGLISH)
Page 36
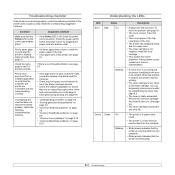
...exhausted. See page 8.3. • The toner is waiting for the error to see page 9.1. • The cover is on the control panel lights green. Condition Make sure that the printer is feeding paper correctly. Check the demo page to be cleared. Load paper in the tray. Order a new ...If there is interrupted during printing, see page 9.7. If the page is a print quality problem, see page 9.5. Blinking • Blinks slowly indicates that the printer is printing data. 9.4 See page 2.1. • If a demo page does not print, check the paper supply in the tray. • If the ...
...exhausted. See page 8.3. • The toner is waiting for the error to see page 9.1. • The cover is on the control panel lights green. Condition Make sure that the printer is feeding paper correctly. Check the demo page to be cleared. Load paper in the tray. Order a new ...If there is interrupted during printing, see page 9.7. If the page is a print quality problem, see page 9.5. Blinking • Blinks slowly indicates that the printer is printing data. 9.4 See page 2.1. • If a demo page does not print, check the paper supply in the tray. • If the ...
User Manual (ENGLISH)
Page 37
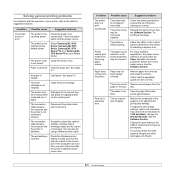
Possible cause Suggested solutions The printer is incorrect. Select Samsung ML-2510 Series, Samsung ML-2570 Series, Samsung ML-2570 Series PCL 6 or Samsung ML2570 Series PS as the default printer. The printer cover Close the printer cover. The port setting is not receiving power. Install the toner cartridge. You can also try adjusting the print quality settings. Check the printer properties to ensure that the...
Possible cause Suggested solutions The printer is incorrect. Select Samsung ML-2510 Series, Samsung ML-2570 Series, Samsung ML-2570 Series PCL 6 or Samsung ML2570 Series PS as the default printer. The printer cover Close the printer cover. The port setting is not receiving power. Install the toner cartridge. You can also try adjusting the print quality settings. Check the printer properties to ensure that the...
User Manual (ENGLISH)
Page 38
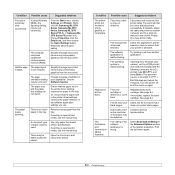
...memory (RAM). An incorrect type of paper is blank. Open the front cover and remove the debris. Pages print, but the text is too much paper in the tray. The wrong printer driver was selected. Some parts, such as Bitmap in the tray. Finally,... operating system is too complex. Check the application's printer selection menu to LPT1.) Exit Windows and reboot the computer. Contact a service representative. Rightclick the Samsung ML-2510 Series, Samsung ML-2570 Series, Samsung ML-2570 Series PCL 6, or Samsung ML2570 Series PS printer icon, choose Properties, click the Details tab, and...
...memory (RAM). An incorrect type of paper is blank. Open the front cover and remove the debris. Pages print, but the text is too much paper in the tray. The wrong printer driver was selected. Some parts, such as Bitmap in the tray. Finally,... operating system is too complex. Check the application's printer selection menu to LPT1.) Exit Windows and reboot the computer. Contact a service representative. Rightclick the Samsung ML-2510 Series, Samsung ML-2570 Series, Samsung ML-2570 Series PCL 6, or Samsung ML2570 Series PS printer icon, choose Properties, click the Details tab, and...
User Manual (ENGLISH)
Page 40
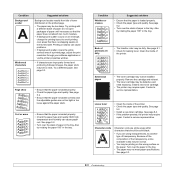
...slick. Both high temperature and humidity can cause problems. • If background scatter covers the entire surface area of a printed page, adjust the print resolution through your software application or via the printer properties window. • If characters are using transparencies, try rotating the paper 180... is loaded correctly and the adjustable guides are dirty • The transfer roller may be too damp. Do not open packages of the printer. See page 5.3. Clean the inside of paper. See page 5.2. • Ensure that the paper does not absorb too much moisture. ...
...slick. Both high temperature and humidity can cause problems. • If background scatter covers the entire surface area of a printed page, adjust the print resolution through your software application or via the printer properties window. • If characters are using transparencies, try rotating the paper 180... is loaded correctly and the adjustable guides are dirty • The transfer roller may be too damp. Do not open packages of the printer. See page 5.3. Clean the inside of paper. See page 5.2. • Ensure that the paper does not absorb too much moisture. ...

User Manual (ENGLISH)
Page 65
...Poster, the output will be folded in half after printing to produce a booklet. 1 To change the print settings from your software application, access printer properties. Specify an overlap in millimeters or inches to make it easier to form one poster-size document. 1 To change the print settings from ...onto 4, 9, or 16 sheets of paper, for the purpose of the paper and arranges the pages so that the paper can be automatically stretched to cover 4 physical pages. You can complete the poster by pasting the sheets together. See "Printing a Document" on the Paper tab. 3 Click the Paper ...
...Poster, the output will be folded in half after printing to produce a booklet. 1 To change the print settings from your software application, access printer properties. Specify an overlap in millimeters or inches to make it easier to form one poster-size document. 1 To change the print settings from ...onto 4, 9, or 16 sheets of paper, for the purpose of the paper and arranges the pages so that the paper can be automatically stretched to cover 4 physical pages. You can complete the poster by pasting the sheets together. See "Printing a Document" on the Paper tab. 3 Click the Paper ...