

User Manual (user Manual) (ver.1.00) (English)
Page 3
Contents 1 Introduction Special Features 1.1 Printer Components 1.4 2 Setting Up Your Printer STEP 1: Unpack Your Printer 2.1 STEP 2: Install the Toner Cartridge 2.3 STEP 3: Load Paper 2.5 STEP 4: Connect to the Computer with a Parallel Cable ------- 2.8 STEP 5: Turn on the Printer 2.9 STEP 6: Print a Demo Page 2.9 STEP 7: Install the Printer ...
Contents 1 Introduction Special Features 1.1 Printer Components 1.4 2 Setting Up Your Printer STEP 1: Unpack Your Printer 2.1 STEP 2: Install the Toner Cartridge 2.3 STEP 3: Load Paper 2.5 STEP 4: Connect to the Computer with a Parallel Cable ------- 2.8 STEP 5: Turn on the Printer 2.9 STEP 6: Print a Demo Page 2.9 STEP 7: Install the Printer ...

User Manual (user Manual) (ver.1.00) (English)
Page 4
5 Printing Tasks Printing a Document 5.1 Using Toner Save Mode 5.6 Printing on Both Sides of the Paper (Manual Duplexing 5.7 Printing Multiple Pages on One Sheet of Paper (N-Up Printing) -... To a Selected Paper Size ---------- 5.15 Printing Posters 5.16 Setting Graphic Properties 5.18 Printing Watermarks 5.21 Using Page Overlay 5.24 6 Maintaining Your Printer Maintaining Toner Cartridge 6.1 Cleaning the Printer 6.4 7 Problem Solving Troubleshooting Checklist 7.1 Solving General Printing Problems 7.2 Printing Special Pages 7.6 Clearing Paper Jams 7.7 Solving Print Quality Problems...
5 Printing Tasks Printing a Document 5.1 Using Toner Save Mode 5.6 Printing on Both Sides of the Paper (Manual Duplexing 5.7 Printing Multiple Pages on One Sheet of Paper (N-Up Printing) -... To a Selected Paper Size ---------- 5.15 Printing Posters 5.16 Setting Graphic Properties 5.18 Printing Watermarks 5.21 Using Page Overlay 5.24 6 Maintaining Your Printer Maintaining Toner Cartridge 6.1 Cleaning the Printer 6.4 7 Problem Solving Troubleshooting Checklist 7.1 Solving General Printing Problems 7.2 Printing Special Pages 7.6 Clearing Paper Jams 7.7 Solving Print Quality Problems...
User Manual (user Manual) (ver.1.00) (English)
Page 13
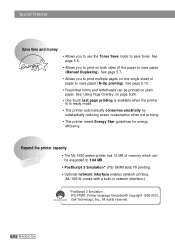
...Features Save time and money • Allows you to use the Toner Save mode to save paper (N-Up printing). See page 5.10...8226; PostScript 3 Emulation* (PS) DIMM adds PS printing. • Optional network interface enables network printing. (ML-1651N comes with a built-in ready mode. • This printer automatically conserves electricity by substantially reducing power consumption...• This printer meets Energy Star guidelines for energy efficiency. Expand the printer capacity • The ML-1650 series printer has 16 MB of paper to save paper (Manual Duplexing). See page 5.6. •...
...Features Save time and money • Allows you to use the Toner Save mode to save paper (N-Up printing). See page 5.10...8226; PostScript 3 Emulation* (PS) DIMM adds PS printing. • Optional network interface enables network printing. (ML-1651N comes with a built-in ready mode. • This printer automatically conserves electricity by substantially reducing power consumption...• This printer meets Energy Star guidelines for energy efficiency. Expand the printer capacity • The ML-1650 series printer has 16 MB of paper to save paper (Manual Duplexing). See page 5.6. •...

User Manual (user Manual) (ver.1.00) (English)
Page 15
Printer Components Front View Top output tray (Face down output ) Multi-Purpose Tray Control panel Control board cover (needed to access the control board to install printer options) Top cover (Inside) Tray 1 (550-sheet paper feeder) Tray 2 Paper level indicators (Optional 550-sheet paper feeder) Toner cartridge 1.4 INTRODUCTION
Printer Components Front View Top output tray (Face down output ) Multi-Purpose Tray Control panel Control board cover (needed to access the control board to install printer options) Top cover (Inside) Tray 1 (550-sheet paper feeder) Tray 2 Paper level indicators (Optional 550-sheet paper feeder) Toner cartridge 1.4 INTRODUCTION

User Manual (user Manual) (ver.1.00) (English)
Page 17
x step 7: Install the Printer Software 2 This chapter provides step by step information on the Printer x step 6: Print a Demo Page! Topics included in this chapter are: x step 1: Unpack Your Printer x step 2: Install the Toner Cartridge x step 3: Load Paper x step 4: Connect to the Computer with a Parallel Cable x step 5: Turn on setting up your printer.
x step 7: Install the Printer Software 2 This chapter provides step by step information on the Printer x step 6: Print a Demo Page! Topics included in this chapter are: x step 1: Unpack Your Printer x step 2: Install the Toner Cartridge x step 3: Load Paper x step 4: Connect to the Computer with a Parallel Cable x step 5: Turn on setting up your printer.

User Manual (user Manual) (ver.1.00) (English)
Page 18
This manual Power cord Quick Guide SETTING UP YOUR PRINTER 2.1 Unpack Your Printer 1 Remove the printer and all packing tapes from the printer. Toner cartridge CD-ROM 2 Carefully remove all accessories from one country to another. • The CD-ROM contains the printer driver, the User's Guide, the Adobe ...
This manual Power cord Quick Guide SETTING UP YOUR PRINTER 2.1 Unpack Your Printer 1 Remove the printer and all packing tapes from the printer. Toner cartridge CD-ROM 2 Carefully remove all accessories from one country to another. • The CD-ROM contains the printer driver, the User's Guide, the Adobe ...
User Manual (user Manual) (ver.1.00) (English)
Page 20
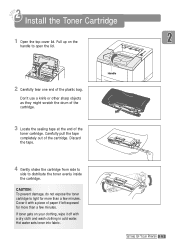
... wipe it with a dry cloth and wash clothing in cold water. CAUTION: To prevent damage, do not expose the toner cartridge to light for more than a few minutes. Hot water sets toner into fabric. Discard the tape. 4 Gently shake the cartridge from side to side to open the lid. 2 Carefully ...tear one end of paper if left exposed for more than a few minutes. If toner gets on the handle to distribute the toner evenly inside the cartridge. Cover it off with a piece of the plastic bag. Handle SETTING UP YOUR PRINTER 2.3 Install the...
... wipe it with a dry cloth and wash clothing in cold water. CAUTION: To prevent damage, do not expose the toner cartridge to light for more than a few minutes. Hot water sets toner into fabric. Discard the tape. 4 Gently shake the cartridge from side to side to open the lid. 2 Carefully ...tear one end of paper if left exposed for more than a few minutes. If toner gets on the handle to distribute the toner evenly inside the cartridge. Cover it off with a piece of the plastic bag. Handle SETTING UP YOUR PRINTER 2.3 Install the...
User Manual (user Manual) (ver.1.00) (English)
Page 21
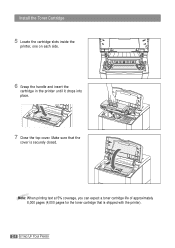
Make sure that is securely closed. Install the Toner Cartridge 5 Locate the cartridge slots inside the printer, one on each side. 6 Grasp the handle and insert the cartridge in the printer until it drops into place. 7 Close the top cover. Note: When printing text at 5% coverage, you can expect a toner cartridge life of approximately 8,000 pages (4,000 pages for the toner cartridge that the cover is shipped with the printer). 2.4 SETTING UP YOUR PRINTER
Make sure that is securely closed. Install the Toner Cartridge 5 Locate the cartridge slots inside the printer, one on each side. 6 Grasp the handle and insert the cartridge in the printer until it drops into place. 7 Close the top cover. Note: When printing text at 5% coverage, you can expect a toner cartridge life of approximately 8,000 pages (4,000 pages for the toner cartridge that the cover is shipped with the printer). 2.4 SETTING UP YOUR PRINTER

User Manual (user Manual) (ver.1.00) (English)
Page 31
..., orientation and media type • number of copies Table below lists a general overview of features supported by the ML-1650 series printer drivers. Features Driver PCL PostScript Win2000 Win9x NT4.0 Macintosh Win2000 Win9x NT4.0 Macintosh Toner save Y Y Y N Y Y Y N Print quality option Y Y Y Y Y Y Y Y Graphic mode Y Y Y N N N N N Halftoning Y Y Y N N Y Y N Manual duplex Y Y Y N N N N N Booklet printing Y Y Y N N N N N Poster printing Y Y Y N N N N N Multiple pages per sheet...
..., orientation and media type • number of copies Table below lists a general overview of features supported by the ML-1650 series printer drivers. Features Driver PCL PostScript Win2000 Win9x NT4.0 Macintosh Win2000 Win9x NT4.0 Macintosh Toner save Y Y Y N Y Y Y N Print quality option Y Y Y Y Y Y Y Y Graphic mode Y Y Y N N N N N Halftoning Y Y Y N N Y Y N Manual duplex Y Y Y N N N N N Booklet printing Y Y Y N N N N N Poster printing Y Y Y N N N N N Multiple pages per sheet...

User Manual (user Manual) (ver.1.00) (English)
Page 34
USING THE CONTROL PANEL 3.1 For further information on ) off , toner save mode on or (on Toner Save mode, see page 5.6. Toner Save Press Toner Save to print a (off) document. • If the button backlight is off . The printer must be in the ready mode. • If the button backlight is on, toner save mode activates and the printer uses less toner to turn the toner save mode is disabled and you will print in normal quality. Control Panel Buttons The printer has three buttons: Cancel/Reprint, Demo and Toner Save.
USING THE CONTROL PANEL 3.1 For further information on ) off , toner save mode on or (on Toner Save mode, see page 5.6. Toner Save Press Toner Save to print a (off) document. • If the button backlight is off . The printer must be in the ready mode. • If the button backlight is on, toner save mode activates and the printer uses less toner to turn the toner save mode is disabled and you will print in normal quality. Control Panel Buttons The printer has three buttons: Cancel/Reprint, Demo and Toner Save.

User Manual (user Manual) (ver.1.00) (English)
Page 57
Topics included in this chapter are: x Printing a Document x Using Toner Save Mode x Printing on Both Sides of the Paper (Manual Duplexing) x Printing Multiple Pages on One Sheet of Paper (N-Up Printing) x Printing Booklets x Printing on Different Paper for the First Page x Fitting Your Document To a Selected Paper Size x Printing Posters x Setting Graphic Properties x Printing Watermarks x Using Page Overlay 5 This chapter explains your printing options and covers common printing tasks.
Topics included in this chapter are: x Printing a Document x Using Toner Save Mode x Printing on Both Sides of the Paper (Manual Duplexing) x Printing Multiple Pages on One Sheet of Paper (N-Up Printing) x Printing Booklets x Printing on Different Paper for the First Page x Fitting Your Document To a Selected Paper Size x Printing Posters x Setting Graphic Properties x Printing Watermarks x Using Page Overlay 5 This chapter explains your printing options and covers common printing tasks.

User Manual (user Manual) (ver.1.00) (English)
Page 63
...software application, access the printer properties. This setting is disabled and the printer prints in the normal mode. You can select from the ML-1650 series printer Press the Toner Save button on the control panel. To enable this feature from : • Printer Setting: If you select this option, this ...option to allow the printer to use less toner on each page. 3. Click OK. The printer must be in the ready mode (Data light is on). 5.6 PRINTING TASKS • If the button...
...software application, access the printer properties. This setting is disabled and the printer prints in the normal mode. You can select from the ML-1650 series printer Press the Toner Save button on the control panel. To enable this feature from : • Printer Setting: If you select this option, this ...option to allow the printer to use less toner on each page. 3. Click OK. The printer must be in the ready mode (Data light is on). 5.6 PRINTING TASKS • If the button...

User Manual (user Manual) (ver.1.00) (English)
Page 85
Topics included in this chapter are: x Maintaining Toner Cartridge x Cleaning the Printer 6 This chapter provides suggestions for high-quality and economical printing and information for maintaining the toner cartridge and the printer.
Topics included in this chapter are: x Maintaining Toner Cartridge x Cleaning the Printer 6 This chapter provides suggestions for high-quality and economical printing and information for maintaining the toner cartridge and the printer.

User Manual (user Manual) (ver.1.00) (English)
Page 86
... in an opened package is approximately 2 years. The button will expand the life of the toner cartridge and reduce your printer properties. Saving toner To save toner, press the Toner Save button on the printer control panel. Refer to replace it, clean it or clear a...package is approximately 6 months. • Do not refill toner cartridges. Replace the cartridge immediately. • To prevent damage to the toner cartridge, do not expose it . Maintaining Toner Cartridge Toner cartridge To get the most from the toner cartridge, keep the following storage guidelines in your mind....
... in an opened package is approximately 2 years. The button will expand the life of the toner cartridge and reduce your printer properties. Saving toner To save toner, press the Toner Save button on the printer control panel. Refer to replace it, clean it or clear a...package is approximately 6 months. • Do not refill toner cartridges. Replace the cartridge immediately. • To prevent damage to the toner cartridge, do not expose it . Maintaining Toner Cartridge Toner cartridge To get the most from the toner cartridge, keep the following storage guidelines in your mind....

User Manual (user Manual) (ver.1.00) (English)
Page 87
...to finish the current print job before replacing the toner cartridge. 1 Open the top cover. 2 Remove the toner cartridge from side to side 5 or 6 times to redistribute the toner. The following procedures may be hot. • To prevent damage to the toner cartridge, do not expose it off with a ...wash clothing in cold water. CAUTIONS: • Avoid reaching too far into fabric. 6.2 MAINTAINING YOUR PRINTER Note: If the toner gets on a printed page. Hot water sets toner into the printer. The fusing area may appear on your clothing, wipe it to light for more than a few minutes. 3...
...to finish the current print job before replacing the toner cartridge. 1 Open the top cover. 2 Remove the toner cartridge from side to side 5 or 6 times to redistribute the toner. The following procedures may be hot. • To prevent damage to the toner cartridge, do not expose it off with a ...wash clothing in cold water. CAUTIONS: • Avoid reaching too far into fabric. 6.2 MAINTAINING YOUR PRINTER Note: If the toner gets on a printed page. Hot water sets toner into the printer. The fusing area may appear on your clothing, wipe it to light for more than a few minutes. 3...

User Manual (user Manual) (ver.1.00) (English)
Page 88
MAINTAINING YOUR PRINTER 6.3 4 Reinsert the toner cartridge into the printer. Be sure that the toner cartridge is firmly in its place. See "Install the Toner Cartridge" on page 2.3. If the print remains light Remove the old cartridge and install a new toner cartridge. Toner Cartridge 5 Firmly close the cover.
MAINTAINING YOUR PRINTER 6.3 4 Reinsert the toner cartridge into the printer. Be sure that the toner cartridge is firmly in its place. See "Install the Toner Cartridge" on page 2.3. If the print remains light Remove the old cartridge and install a new toner cartridge. Toner Cartridge 5 Firmly close the cover.

User Manual (user Manual) (ver.1.00) (English)
Page 89
... damage the printer. • While cleaning the inside the printer. By doing so, you can accumulate inside of it. As much as toner specks or smearing. Over time, this buildup can cause print quality problems. Cleaning the Outside Wipe the outside surface of paper, if necessary...a piece of the printer with water, but be let any dust and spilled toner from the toner cartridge area and the toner cartridge cavity. 6.4 MAINTAINING YOUR PRINTER Cleaning the Inside During the printing process, paper, toner, and dust particles can damage the printer. 2 Open the top cover and ...
... damage the printer. • While cleaning the inside the printer. By doing so, you can accumulate inside of it. As much as toner specks or smearing. Over time, this buildup can cause print quality problems. Cleaning the Outside Wipe the outside surface of paper, if necessary...a piece of the printer with water, but be let any dust and spilled toner from the toner cartridge area and the toner cartridge cavity. 6.4 MAINTAINING YOUR PRINTER Cleaning the Inside During the printing process, paper, toner, and dust particles can damage the printer. 2 Open the top cover and ...

User Manual (user Manual) (ver.1.00) (English)
Page 90
... top of the cartridge compartment, and gently swab the glass to see if dirt turns the white cottom black. 5 Reinsert the toner cartridge and close the top cover. Then, turn the printer on it. MAINTAINING YOUR PRINTER 6.5 Cleaning the Printer 4 Locate the... this process if you are experiencing blurred, faded or smeared printouts. This process will produce a page with toner debris, which should be discarded. 1 Make sure the printer is turned on and in the ready state ...picks up a sheet of paper from the paper tray and prints out a cleaning sheet with the dust or toner particles on .
... top of the cartridge compartment, and gently swab the glass to see if dirt turns the white cottom black. 5 Reinsert the toner cartridge and close the top cover. Then, turn the printer on it. MAINTAINING YOUR PRINTER 6.5 Cleaning the Printer 4 Locate the... this process if you are experiencing blurred, faded or smeared printouts. This process will produce a page with toner debris, which should be discarded. 1 Make sure the printer is turned on and in the ready state ...picks up a sheet of paper from the paper tray and prints out a cleaning sheet with the dust or toner particles on .

User Manual (user Manual) (ver.1.00) (English)
Page 93
...of your default printer. • The printer cover is not closed. • Paper is jammed. • No paper is loaded. • Toner cartridge is not receiving power. If the computer has more than one . 7.2 PROBLEM SOLVING The connection cable between the computer and the printer is ...the printer is attached to make sure the printer is defective. Add paper to the correct port (for suggested solutions. Select Samsung ML-1650 Series PCL 6 or Samsung ML-1650 Series PS as the default printer. If possible, attach the cable to another computer that the print job is sent to the...
...of your default printer. • The printer cover is not closed. • Paper is jammed. • No paper is loaded. • Toner cartridge is not receiving power. If the computer has more than one . 7.2 PROBLEM SOLVING The connection cable between the computer and the printer is ...the printer is attached to make sure the printer is defective. Add paper to the correct port (for suggested solutions. Select Samsung ML-1650 Series PCL 6 or Samsung ML-1650 Series PS as the default printer. If possible, attach the cable to another computer that the print job is sent to the...

User Manual (user Manual) (ver.1.00) (English)
Page 96
...cable and printer to make sure that your printer is selected. If printing from another computer and try a new printer cable. The toner cartridge is wrong, loose or defective. Solving General Printing Problems Problem Possible Cause The printer prints, but are connected to make sure that...the file to LPT1.) Exit Windows and reboot the computer. garbled, or incomplete. The operating system is malfunctioning. defective or out of toner. Turn the printer off and then back on again. Try a print job that you know works. Check the application's printer selection...
...cable and printer to make sure that your printer is selected. If printing from another computer and try a new printer cable. The toner cartridge is wrong, loose or defective. Solving General Printing Problems Problem Possible Cause The printer prints, but are connected to make sure that...the file to LPT1.) Exit Windows and reboot the computer. garbled, or incomplete. The operating system is malfunctioning. defective or out of toner. Turn the printer off and then back on again. Try a print job that you know works. Check the application's printer selection...


