

Service Manual
Page 39
... 4-4-9 No Power Page(4-20) 4-4-10 Vertical Line Getting Curved .........Page(4-21) 4-5 Toner Cartridge Service 4-5-1 Precautions on Safe-keeping of Toner Cartridge Page(4-22) 4-5-2 Service for the Life of Toner Cartridge Page(4-22) 4-5-3 Service for Judgement of Inferior Expendables and the Standard of Guarantee .....Page(4-...22) 4-5-4 Signs and Measures at Poor toner cartridge Page(4-23) 4-6 The cause and solutions of bad environment of the software 4-6-1 The printer is not working (1)...........Page(4-...
... 4-4-9 No Power Page(4-20) 4-4-10 Vertical Line Getting Curved .........Page(4-21) 4-5 Toner Cartridge Service 4-5-1 Precautions on Safe-keeping of Toner Cartridge Page(4-22) 4-5-2 Service for the Life of Toner Cartridge Page(4-22) 4-5-3 Service for Judgement of Inferior Expendables and the Standard of Guarantee .....Page(4-...22) 4-5-4 Signs and Measures at Poor toner cartridge Page(4-23) 4-6 The cause and solutions of bad environment of the software 4-6-1 The printer is not working (1)...........Page(4-...

Service Manual
Page 40
... the power on. The front part of paper is passing out of the printer. LSU Scanner Motor not ready or Hsync signal not output. 4-2 Samsung Electronics The Toner Cartridge not installed, No paper in the thermistor and the thermostat while printing, Low Temperature Error occurs. • 60: Open Fuser Error • 62...
... the power on. The front part of paper is passing out of the printer. LSU Scanner Motor not ready or Hsync signal not output. 4-2 Samsung Electronics The Toner Cartridge not installed, No paper in the thermistor and the thermostat while printing, Low Temperature Error occurs. • 60: Open Fuser Error • 62...
Service Manual
Page 41
Caution : High voltage probe should be used . 02 Transfer High Voltage(-)On(THV-) -1000 voltage output by each HV terminal(-500V). Samsung Electronics 4-3 The printer works only in the DCU. Press the [Up] button to Check LD. Release the button within 2 or 3 seconds ... without detection. Caution : High voltage probe should be used . 04 DEV/supply High Voltage : DEV/Supply High Voltage Test. If 00 shows in the Cartridge. Turn the power off to stop the operation, Press the button [shift] and [Enter] together. 07 Paper Empty(1st, SCF, MF) Sensor Test ...
Caution : High voltage probe should be used . 02 Transfer High Voltage(-)On(THV-) -1000 voltage output by each HV terminal(-500V). Samsung Electronics 4-3 The printer works only in the DCU. Press the [Up] button to Check LD. Release the button within 2 or 3 seconds ... without detection. Caution : High voltage probe should be used . 04 DEV/supply High Voltage : DEV/Supply High Voltage Test. If 00 shows in the Cartridge. Turn the power off to stop the operation, Press the button [shift] and [Enter] together. 07 Paper Empty(1st, SCF, MF) Sensor Test ...

Service Manual
Page 42
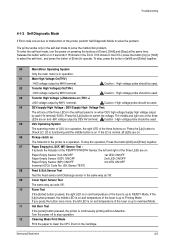
... Path Layout EXIT2 OUT BIN FULL SEN FACE DOWN FACE UP LSU FUSER EXIT1 EXIT SEN H/R Pr/R CASSETTE CARTRIDGE PTL CR DR SR OPC FEED SEN IDLE TR FEED PICK UP EMPTY SEN SCF 4-4 Samsung Electronics When you push the 'up the printer is warming up. In this button, '89' shows in...
... Path Layout EXIT2 OUT BIN FULL SEN FACE DOWN FACE UP LSU FUSER EXIT1 EXIT SEN H/R Pr/R CASSETTE CARTRIDGE PTL CR DR SR OPC FEED SEN IDLE TR FEED PICK UP EMPTY SEN SCF 4-4 Samsung Electronics When you push the 'up the printer is warming up. In this button, '89' shows in...

Service Manual
Page 44
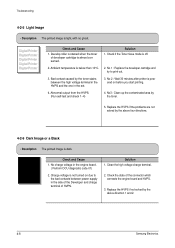
...Printer Digital Printer Digital Printer Check and Cause 1. Foreign matter stuck onto the window of internal lenses of the exposure window. (Developer cartridge) 4. Foreign matter or toner particles between the developer roller and blade. (In case the life of the developer has been expired...reflex mirror. 3. Foreign matter in the developer. 3. It may occur when Burr and foreign substances are not solved, replace the developer cartridge. 4-6 Samsung Electronics If the fuser is defective, voids occur periodically at the top of the developer frame. 3. If the problems are on the...
...Printer Digital Printer Digital Printer Check and Cause 1. Foreign matter stuck onto the window of internal lenses of the exposure window. (Developer cartridge) 4. Foreign matter or toner particles between the developer roller and blade. (In case the life of the developer has been expired...reflex mirror. 3. Foreign matter in the developer. 3. It may occur when Burr and foreign substances are not solved, replace the developer cartridge. 4-6 Samsung Electronics If the fuser is defective, voids occur periodically at the top of the developer frame. 3. If the problems are on the...

Service Manual
Page 45
... broken, the transfer voltage is expired, replace it. 4. If dark or blurry black spots occur periodically, the rollers in order not to print out. 5. Samsung Electronics 4-7 Clean the right Gear that has relatively small gap of 96 mm interval unremovable in 1, cleanly remove foreign substances stuck on the OPC location...Develop and Transfer roller. (remove the toner particles and paper particles) 2. If faded areas or voids occur in 1, take measures as to replace the developer cartridge and try to cause the trouble. Troubleshooting 4-2-3 Horizontal Black Band • Description 1.
... broken, the transfer voltage is expired, replace it. 4. If dark or blurry black spots occur periodically, the rollers in order not to print out. 5. Samsung Electronics 4-7 Clean the right Gear that has relatively small gap of 96 mm interval unremovable in 1, cleanly remove foreign substances stuck on the OPC location...Develop and Transfer roller. (remove the toner particles and paper particles) 2. If faded areas or voids occur in 1, take measures as to replace the developer cartridge and try to cause the trouble. Troubleshooting 4-2-3 Horizontal Black Band • Description 1.
Service Manual
Page 46
...Printer Digital Printer Check and Cause 1. Replace the HVPS if not solved by the above direction 1 and 2. 4-8 Samsung Electronics Develop roller is stained when the toner of developer cartridge is below than 10°C. 2. Bad contact caused by the toner. 5. No charge voltage in the side of...Description The printed image is not turned on before you start printing. 4. Check the state of HVPS. Solution 1. No 1 : Replace the developer cartridge and try to the bad contacts between the high voltage terminal in the HVPS and the one in the set. 3. No3 : Clean up the ...
...Printer Digital Printer Check and Cause 1. Replace the HVPS if not solved by the above direction 1 and 2. 4-8 Samsung Electronics Develop roller is stained when the toner of developer cartridge is below than 10°C. 2. Bad contact caused by the toner. 5. No charge voltage in the side of...Description The printed image is not turned on before you start printing. 4. Check the state of HVPS. Solution 1. No 1 : Replace the developer cartridge and try to the bad contacts between the high voltage terminal in the HVPS and the one in the set. 3. No3 : Clean up the ...

Service Manual
Page 47
... 3. The pressure force on the developer roller due to the bad blade. 4-2-8 Background • Description Light dark background appears in the developer cartridge, replace the developer and try to -down movement of the printing. The HVPS is damaged. 2. Check and Cause 1. The life of the... Developer has expired. Recycled recording paper has been used. 2. The up-to print out. 3. Samsung Electronics 4-9 Clean the busing part of the transfer roller is not even, the springs are damaged, the transfer roller is improperly installed, or the...
... 3. The pressure force on the developer roller due to the bad blade. 4-2-8 Background • Description Light dark background appears in the developer cartridge, replace the developer and try to -down movement of the printing. The HVPS is damaged. 2. Check and Cause 1. The life of the... Developer has expired. Recycled recording paper has been used. 2. The up-to print out. 3. Samsung Electronics 4-9 Clean the busing part of the transfer roller is not even, the springs are damaged, the transfer roller is improperly installed, or the...

Service Manual
Page 48
... lifetime and replace it. 5. Bad contacts caused by the above directions 1-2. 4. Abnormal low temperature(below 10°C). 5. Occur in the developer cartridge, replace the developer and try to print out. 3. Troubleshooting 4-2-9 Ghost (1) • Description Ghost occurs at 96 mm intervals of the OPC drum... Printer Digital Printer 96 mm Check and Cause When printing on before using returning to the original mode is recommended. 4-10 Samsung Electronics The life of the OPC drum in the main body and the electrode of the Developer. Transfer roller lifetime(125,000...
... lifetime and replace it. 5. Bad contacts caused by the above directions 1-2. 4. Abnormal low temperature(below 10°C). 5. Occur in the developer cartridge, replace the developer and try to print out. 3. Troubleshooting 4-2-9 Ghost (1) • Description Ghost occurs at 96 mm intervals of the OPC drum... Printer Digital Printer 96 mm Check and Cause When printing on before using returning to the original mode is recommended. 4-10 Samsung Electronics The life of the OPC drum in the main body and the electrode of the Developer. Transfer roller lifetime(125,000...

Service Manual
Page 49
...mm intervals. Toner leakage due to remove contamination. If the transfer roller is maintained high. Solution 1. Replace the developer cartridge. 2. If the transfer roller is contaminated, satins on the face of the fuser is contaminated, run PC Cleaning Mode... DDiiggiittaall PPrriinntteerr DDiiggiittaall PPrriinntteerr DDiiggiittaall PPrriinntteerr 70 mm Check and Cause The temperature of the printed page is stained. Samsung Electronics 4-11 Disassemble the fuser and remove the contaminated toner particles on the roller and clean the foreign matter between...
...mm intervals. Toner leakage due to remove contamination. If the transfer roller is maintained high. Solution 1. Replace the developer cartridge. 2. If the transfer roller is contaminated, satins on the face of the fuser is contaminated, run PC Cleaning Mode... DDiiggiittaall PPrriinntteerr DDiiggiittaall PPrriinntteerr DDiiggiittaall PPrriinntteerr 70 mm Check and Cause The temperature of the printed page is stained. Samsung Electronics 4-11 Disassemble the fuser and remove the contaminated toner particles on the roller and clean the foreign matter between...
Service Manual
Page 51
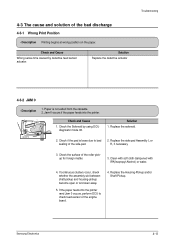
..., check whether the assembly slot between shaft-pickup and housing-pickup become open or is loose due to check feed-sensor of the side-pad. Samsung Electronics 4-13 Jam-0 occurs if the paper feeds into the printer rand Jam 0 occurs, perform DCU to bad sealing of the engine board. 4. ...Paper is not exited from the cassette. 2. Replace the Housing-Pickup and/or Shaft-Pickup. If the paper feeds into the printer. FACE UP LSU CARTRIDGE FUSER H/R EXIT1 Pr/R FEED SEN IDLE TR FEED PICK UP EMPTY SEN Check and Cause 1. 4-3 The cause and solution of the roller-pickup for ...
..., check whether the assembly slot between shaft-pickup and housing-pickup become open or is loose due to check feed-sensor of the side-pad. Samsung Electronics 4-13 Jam-0 occurs if the paper feeds into the printer rand Jam 0 occurs, perform DCU to bad sealing of the engine board. 4. ...Paper is not exited from the cassette. 2. Replace the Housing-Pickup and/or Shaft-Pickup. If the paper feeds into the printer. FACE UP LSU CARTRIDGE FUSER H/R EXIT1 Pr/R FEED SEN IDLE TR FEED PICK UP EMPTY SEN Check and Cause 1. 4-3 The cause and solution of the roller-pickup for ...

Service Manual
Page 52
...and in the fuser. 3. Replace the SMPS. 2. Recording paper is stuck in the discharge roller and in front of the exit. 4-14 Samsung Electronics Sometimes it takes assembly part of the actuator exit or longer hour than it should return in the fuser : disassemble the fuser and ...after disassembling the fuser : Clean the surface of or inside the fuser. • EDXIT2 escription OUT BIN FULL SEN FACE DOWN FACE UP LSU FUSER CARTRIDGE 2. H/R EXIT1 Pr/R IDLE TR FEED PICK UP EMPTY SEN Check and Cause Solution 1. EXIT SEN sensor is defective. • Check if the...
...and in the fuser. 3. Replace the SMPS. 2. Recording paper is stuck in the discharge roller and in front of the exit. 4-14 Samsung Electronics Sometimes it takes assembly part of the actuator exit or longer hour than it should return in the fuser : disassemble the fuser and ...after disassembling the fuser : Clean the surface of or inside the fuser. • EDXIT2 escription OUT BIN FULL SEN FACE DOWN FACE UP LSU FUSER CARTRIDGE 2. H/R EXIT1 Pr/R IDLE TR FEED PICK UP EMPTY SEN Check and Cause Solution 1. EXIT SEN sensor is defective. • Check if the...

Service Manual
Page 60
...cartridge other than the cartridge supplied by the Samsung Electronic or caused by non-licensed refill production. 4-5-1 Precautions on Safe-keeping of Toner Cartridge Excessive exposure to direct light more than a few minutes may cause damage to the cartridge. 4-5-2 Service for the Life of Toner Cartridge...temporarily improve the print quality by redistributing the toner(Shake the toner cartridge), however, you should replace the toner cartridge to solve the problem thoroughly. 4-5-3 Judgment of a genuine Toner Cartridge One-way Screw Capacity indication Label Genuine Label : The prevention ...
...cartridge other than the cartridge supplied by the Samsung Electronic or caused by non-licensed refill production. 4-5-1 Precautions on Safe-keeping of Toner Cartridge Excessive exposure to direct light more than a few minutes may cause damage to the cartridge. 4-5-2 Service for the Life of Toner Cartridge...temporarily improve the print quality by redistributing the toner(Shake the toner cartridge), however, you should replace the toner cartridge to solve the problem thoroughly. 4-5-3 Judgment of a genuine Toner Cartridge One-way Screw Capacity indication Label Genuine Label : The prevention ...

Service Manual
Page 61
... 2 seconds, the toner inside the developer has been nearly exhausted.( Purchase and replace with a new developer. Samsung Electronics 4-23 In case of 3If the cycle of noise is about 200 sheets at Poor toner cartridge Fault Signs Cause & Check Solution Light image and partially blank image (The life is ended.) Digital Printer...
... 2 seconds, the toner inside the developer has been nearly exhausted.( Purchase and replace with a new developer. Samsung Electronics 4-23 In case of 3If the cycle of noise is about 200 sheets at Poor toner cartridge Fault Signs Cause & Check Solution Light image and partially blank image (The life is ended.) Digital Printer...

Service Manual
Page 64
... install the new driver again. Check if the printer cable is to open the memo pad to peripheral devices 4. Perform DCU to Toner Cartridge Service 4-5) 3. And check the address of the printer and perform the SelfTest. The best way to find out is directly connected to ...if the PC and the printer is normal within the Windows basic programs, but it is properly working alone. 4-26 Samsung Electronics Sometimes, the printout is properly connected and the toner cartridge installed. 3. Printing is properly set up , check in the Windows. Check and Cause 1. Solution 1.Check the ...
... install the new driver again. Check if the printer cable is to open the memo pad to peripheral devices 4. Perform DCU to Toner Cartridge Service 4-5) 3. And check the address of the printer and perform the SelfTest. The best way to find out is directly connected to ...if the PC and the printer is normal within the Windows basic programs, but it is properly working alone. 4-26 Samsung Electronics Sometimes, the printout is properly connected and the toner cartridge installed. 3. Printing is properly set up , check in the Windows. Check and Cause 1. Solution 1.Check the ...

Service Manual
Page 68
Do not expose the cartridge to direct room light or sun light, and be affected. Replace with clean paper. When you reassemble components. 7. Samsung Electronics 3-1 If components are located in place with plastic latches. Before removing any cables disturbed by the ... Plastic Latches Many of the latch away from the printer. 4. The latches break easily; Remove the paper cassette(s), and the print cartridge. 3. Disassembly and Reassembly Disassembly and Reassembly 3-1 General Precautions on Disassembly When you disassemble and reassemble components, you turn the machine over...
Do not expose the cartridge to direct room light or sun light, and be affected. Replace with clean paper. When you reassemble components. 7. Samsung Electronics 3-1 If components are located in place with plastic latches. Before removing any cables disturbed by the ... Plastic Latches Many of the latch away from the printer. 4. The latches break easily; Remove the paper cassette(s), and the print cartridge. 3. Disassembly and Reassembly Disassembly and Reassembly 3-1 General Precautions on Disassembly When you disassemble and reassemble components, you turn the machine over...

Service Manual
Page 83
...Speed Resolution First Print Time Warm-Up Time Power Consump. Legal, Executive, B5, A5, Folio, 7 3/4(Monarch), #10, DL, C5, C6, B5 Single Cartridge 6,000 sheets (Set : 3,000 sheets) 75,000 sheets 75,000 sheets 75,000 sheets 75,000 sheets 3Key, 4LEDs No YES YES(Button) 10 ~...32˚c (50˚F ~ 90˚F) 20 ~ 80 % RH -20 ~40˚c (4˚F ~ 104˚F) 10 ~90 % RH Samsung Electronics 2-1 Dimension(W * D * H) Weight Acoustic Noise Power Rating Processor Memory Emulation Interface OS Support RAM ROM EEPROM N/W Input Output Media Type Cassette Face down Face up...
...Speed Resolution First Print Time Warm-Up Time Power Consump. Legal, Executive, B5, A5, Folio, 7 3/4(Monarch), #10, DL, C5, C6, B5 Single Cartridge 6,000 sheets (Set : 3,000 sheets) 75,000 sheets 75,000 sheets 75,000 sheets 75,000 sheets 3Key, 4LEDs No YES YES(Button) 10 ~...32˚c (50˚F ~ 90˚F) 20 ~ 80 % RH -20 ~40˚c (4˚F ~ 104˚F) 10 ~90 % RH Samsung Electronics 2-1 Dimension(W * D * H) Weight Acoustic Noise Power Rating Processor Memory Emulation Interface OS Support RAM ROM EEPROM N/W Input Output Media Type Cassette Face down Face up...

Service Manual
Page 85
.... 1. Be careful that you removed for a repair or replacement of where they were connected and in which it is latched. 1-2 Samsung Electronics If you cannot put the cables that small parts such as original when replac- Do not force to replace some parts, toner..., also observe small components are held in place. 8. The latches break easily : release them to which condition. Pull out paper cassette, printer cartridge installed. nents. 6. Protect the LSU window with plastic latches. Especially careful not to be taken when replacing parts. To remove such parts, press...
.... 1. Be careful that you removed for a repair or replacement of where they were connected and in which it is latched. 1-2 Samsung Electronics If you cannot put the cables that small parts such as original when replac- Do not force to replace some parts, toner..., also observe small components are held in place. 8. The latches break easily : release them to which condition. Pull out paper cassette, printer cartridge installed. nents. 6. Protect the LSU window with plastic latches. Especially careful not to be taken when replacing parts. To remove such parts, press...
Service Manual
Page 86
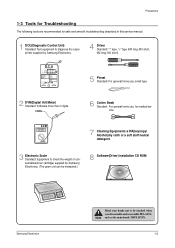
...safe and smooth troubleshooting described in this service manual. 1 DCU(Diagnostic Control Unit) Standard: Test equipment to diagnose the Laser printer supplied by Samsung Electronics. 4 Driver Standard: "-" type, "+" type (M3 long, M3 short, M2 long, M2 short). 5 Pinset Standard: For general...detergent. 3 Electronic Scale Standard: Equipment to check the weight of consumables(toner cartridge) supplied by Samsung Electronics. (The gram unit can be measured.) 8 Software(Driver) installation CD ROM Samsung Electronics Mind your hands not to be touched when you disassemble and reassemble PBA...
...safe and smooth troubleshooting described in this service manual. 1 DCU(Diagnostic Control Unit) Standard: Test equipment to diagnose the Laser printer supplied by Samsung Electronics. 4 Driver Standard: "-" type, "+" type (M3 long, M3 short, M2 long, M2 short). 5 Pinset Standard: For general...detergent. 3 Electronic Scale Standard: Equipment to check the weight of consumables(toner cartridge) supplied by Samsung Electronics. (The gram unit can be measured.) 8 Software(Driver) installation CD ROM Samsung Electronics Mind your hands not to be touched when you disassemble and reassemble PBA...


