
Open Source Guide (ENGLISH)
Page 2
You can redistribute and change. It is safest to attach them to the start of each file should have at least the "copyright" line and a pointer to most effectively convey the exclusion of the ordinary General Public License). IN NO EVENT UNLESS REQUIRED BY APPLICABLE LAW OR AGREED TO IN WRITING WILL ANY COPYRIGHT HOLDER, OR ANY OTHER PARTY WHO MAY MODIFY AND/OR REDISTRIBUTE THE LIBRARY AS PERMITTED ABOVE, BE LIABLE TO YOU FOR DAMAGES, INCLUDING ANY GENERAL, SPECIAL, INCIDENTAL OR CONSEQUENTIAL DAMAGES ARISING OUT OF THE USE OR INABILITY TO USE THE LIBRARY (INCLUDING BUT NOT ...
You can redistribute and change. It is safest to attach them to the start of each file should have at least the "copyright" line and a pointer to most effectively convey the exclusion of the ordinary General Public License). IN NO EVENT UNLESS REQUIRED BY APPLICABLE LAW OR AGREED TO IN WRITING WILL ANY COPYRIGHT HOLDER, OR ANY OTHER PARTY WHO MAY MODIFY AND/OR REDISTRIBUTE THE LIBRARY AS PERMITTED ABOVE, BE LIABLE TO YOU FOR DAMAGES, INCLUDING ANY GENERAL, SPECIAL, INCIDENTAL OR CONSEQUENTIAL DAMAGES ARISING OUT OF THE USE OR INABILITY TO USE THE LIBRARY (INCLUDING BUT NOT ...
Quick Guide (ENGLISH)
Page 6
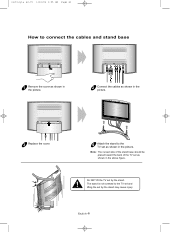
Note : The curved side of the stand base should be placed toward the back of the TV set as shown in the above figure. English-6 The stand is not screwed to the TV set as shown in the picture. victoryia 62-70 1/10/04 1:05 AM Page 61 How to connect the cables and stand base 1 Remove the cover as shown in the picture. 2 Connect the cables as shown in the picture. 3 Replace the cover. 4 Attach the stand to the TV set and lifting the set by the stand may cause injury. Do NOT lift the TV set by the stand.
Note : The curved side of the stand base should be placed toward the back of the TV set as shown in the above figure. English-6 The stand is not screwed to the TV set as shown in the picture. victoryia 62-70 1/10/04 1:05 AM Page 61 How to connect the cables and stand base 1 Remove the cover as shown in the picture. 2 Connect the cables as shown in the picture. 3 Replace the cover. 4 Attach the stand to the TV set and lifting the set by the stand may cause injury. Do NOT lift the TV set by the stand.
User Manual (ENGLISH)
Page 9
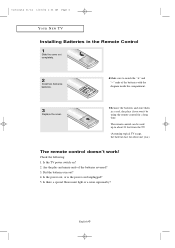
... a special fluorescent light or a neon sign nearby? Are the plus and minus ends of the batteries with the diagram inside the compartment. 3 Replace the cover. Remove the batteries and store them in the Remote Control 1 Slide the cover out completely. 2 Install two AAA size batteries. Is the... power out, or is the power cord unplugged? 5. Make sure to about 23 feet from the TV. (Assuming typical TV usage, the batteries last for a long time. victoryia 01-14 1/10/04 1:03 AM Page 6 YOUR NEW TV Installing Batteries in a cool, dry place if you won't be used up to match the...
... a special fluorescent light or a neon sign nearby? Are the plus and minus ends of the batteries with the diagram inside the compartment. 3 Replace the cover. Remove the batteries and store them in the Remote Control 1 Slide the cover out completely. 2 Install two AAA size batteries. Is the... power out, or is the power cord unplugged? 5. Make sure to about 23 feet from the TV. (Assuming typical TV usage, the batteries last for a long time. victoryia 01-14 1/10/04 1:03 AM Page 6 YOUR NEW TV Installing Batteries in a cool, dry place if you won't be used up to match the...

User Manual (ENGLISH)
Page 54
If the noise is to remove or reduce picture noise. After the noise has been reduced, re-adjust the picture so that it is aligned on the remote control to select ... buttons to select "Coarse or Fine", then press the ENTER button. Press the PC button on the center of the picture quality adjustment is not removed by fine tuning alone, then do the frequency adjustments to the utmost and fine tune again. Press the LEFT/RIGHT buttons to adjust the screen...
If the noise is to remove or reduce picture noise. After the noise has been reduced, re-adjust the picture so that it is aligned on the remote control to select ... buttons to select "Coarse or Fine", then press the ENTER button. Press the PC button on the center of the picture quality adjustment is not removed by fine tuning alone, then do the frequency adjustments to the utmost and fine tune again. Press the LEFT/RIGHT buttons to adjust the screen...

User Manual (ENGLISH)
Page 64
Note : The curved side of the stand base should be placed toward the back of the TV set as shown in the above figure. English-61 The stand is not screwed to the TV set as shown in the picture. Do NOT lift the TV set by the stand may cause injury. victoryia 62-70 1/10/04 1:05 AM Page 61 APPENDIX How to connect the cables and stand base 1 Remove the cover as shown in the picture. 2 Connect the cables as shown in the picture. 3 Replace the cover. 4 Attach the stand to the TV set and lifting the set by the stand.
Note : The curved side of the stand base should be placed toward the back of the TV set as shown in the above figure. English-61 The stand is not screwed to the TV set as shown in the picture. Do NOT lift the TV set by the stand may cause injury. victoryia 62-70 1/10/04 1:05 AM Page 61 APPENDIX How to connect the cables and stand base 1 Remove the cover as shown in the picture. 2 Connect the cables as shown in the picture. 3 Replace the cover. 4 Attach the stand to the TV set and lifting the set by the stand.

User Manual (ENGLISH)
Page 9
...batteries run out? 4. English-6 Remove the batteries and store them in the Remote Control 1 Slide the cover out completely. 2 Install two AAA size batteries. Is the power out, or is the power cord unplugged? 5. Make sure to about 23 feet from the TV. (Assuming typical TV usage, the batteries last for a... minus ends of the batteries with the diagram inside the compartment. 3 Replace the cover. victoryia 01-14 1/10/04 1:03 AM Page 6 YOUR NEW TV Installing Batteries in a cool, dry place if you won't be used up to match the "+" and "-" ends of the batteries reversed? 3. The remote...
...batteries run out? 4. English-6 Remove the batteries and store them in the Remote Control 1 Slide the cover out completely. 2 Install two AAA size batteries. Is the power out, or is the power cord unplugged? 5. Make sure to about 23 feet from the TV. (Assuming typical TV usage, the batteries last for a... minus ends of the batteries with the diagram inside the compartment. 3 Replace the cover. victoryia 01-14 1/10/04 1:03 AM Page 6 YOUR NEW TV Installing Batteries in a cool, dry place if you won't be used up to match the "+" and "-" ends of the batteries reversed? 3. The remote...

User Manual (ENGLISH)
Page 54
... to select "PC Setup", then press the ENTER button. English-51 Press the PC button on the center of the picture quality adjustment is not removed by fine tuning alone, then do the frequency adjustments to the utmost and fine tune again. victoryia 50-59 1/10/04 1:04 AM Page 51... PC DISPLAY Adjusting the Screen Quality The purpose of screen. If the noise is to remove or reduce picture noise. Press the ENTER button to select "Image Lock", then press the ENTER button. 3 Press the UP/DOWN buttons to display the...
... to select "PC Setup", then press the ENTER button. English-51 Press the PC button on the center of the picture quality adjustment is not removed by fine tuning alone, then do the frequency adjustments to the utmost and fine tune again. victoryia 50-59 1/10/04 1:04 AM Page 51... PC DISPLAY Adjusting the Screen Quality The purpose of screen. If the noise is to remove or reduce picture noise. Press the ENTER button to select "Image Lock", then press the ENTER button. 3 Press the UP/DOWN buttons to display the...

User Manual (ENGLISH)
Page 64
Note : The curved side of the stand base should be placed toward the back of the TV set as shown in the picture. victoryia 62-70 1/10/04 1:05 AM Page 61 APPENDIX How to connect the cables and stand base 1 Remove the cover as shown in the picture. 2 Connect the cables as shown in the picture. 3 Replace the cover. 4 Attach the stand to the TV set and lifting the set by the stand may cause injury. The stand is not screwed to the TV set as shown in the above figure. English-61 Do NOT lift the TV set by the stand.
Note : The curved side of the stand base should be placed toward the back of the TV set as shown in the picture. victoryia 62-70 1/10/04 1:05 AM Page 61 APPENDIX How to connect the cables and stand base 1 Remove the cover as shown in the picture. 2 Connect the cables as shown in the picture. 3 Replace the cover. 4 Attach the stand to the TV set and lifting the set by the stand may cause injury. The stand is not screwed to the TV set as shown in the above figure. English-61 Do NOT lift the TV set by the stand.
