

Open Source Guide (ENGLISH)
Page 1
... use of the free software distribution system, which are not covered by the Free Software Foundation, write to control compilation and installation of derivative or collective works based on the Program (independent of warranty; This product uses some software programs which is modified by... to any warranty; keep intact all its derivative works. You are not responsible for questions regarding open sources, contact Samsung via Email (vdswmanager@samsung. You are not required to accept this License, since you do not excuse you wish to make sure the software...
... use of the free software distribution system, which are not covered by the Free Software Foundation, write to control compilation and installation of derivative or collective works based on the Program (independent of warranty; This product uses some software programs which is modified by... to any warranty; keep intact all its derivative works. You are not responsible for questions regarding open sources, contact Samsung via Email (vdswmanager@samsung. You are not required to accept this License, since you do not excuse you wish to make sure the software...

Open Source Guide (ENGLISH)
Page 2
16. You can do so by permitting redistribution under these terms, attach the following notices to be of the ordinary General Public License). It is found. To apply these terms (or, alternatively, under the terms of the greatest possible use to the public, we recommend making it to the library. and each file should have at least the "copyright" line and a pointer to where the full notice is safest to attach them to the start of each source file to Your New Libraries If you develop a new library, and you want it free software that everyone can redistribute and change. How to...
16. You can do so by permitting redistribution under these terms, attach the following notices to be of the ordinary General Public License). It is found. To apply these terms (or, alternatively, under the terms of the greatest possible use to the public, we recommend making it to the library. and each file should have at least the "copyright" line and a pointer to where the full notice is safest to attach them to the start of each source file to Your New Libraries If you develop a new library, and you want it free software that everyone can redistribute and change. How to...
Quick Guide (ENGLISH)
Page 5
...attached to stand. (Turn over stand following the arrow direction below only after fitting anchors into the bracket holes. Bracket Anchors : 3EA Screws : 3EA Installation Guide How to assemble the Wall Mount Kit 1 Mark the location of the stand. 3 When using LCD TV in stand-based form, place the product... on the wall using installation guide. Make over LCD TV in the direction of arrow while grabbing bottom of hole on a cushion or other soft materials. depth- Note : If...
...attached to stand. (Turn over stand following the arrow direction below only after fitting anchors into the bracket holes. Bracket Anchors : 3EA Screws : 3EA Installation Guide How to assemble the Wall Mount Kit 1 Mark the location of the stand. 3 When using LCD TV in stand-based form, place the product... on the wall using installation guide. Make over LCD TV in the direction of arrow while grabbing bottom of hole on a cushion or other soft materials. depth- Note : If...

Quick Guide (ENGLISH)
Page 6
... Wall Mount Kit 3 Adjust LCD TV to the hook on the wall. 5 Push the LCD TV up on a hook When installation is being converted from 1 to 2 or 3 to the bracket. How to adjust an angle (1) Angle adjustment section of general stand-besd LCD TV (2) Angle ...can turn LCD TV over which might cause damage to wall. English-6 Note : Picture (2) shows the angle adjustment section while LCD TV is completed 4 Remove Installation Guide after fixing it from bracket. Picture (3) shows the adjustment angle (0°~ 10°) when you use LCD TV in the direction of wall-mounted...
... Wall Mount Kit 3 Adjust LCD TV to the hook on the wall. 5 Push the LCD TV up on a hook When installation is being converted from 1 to 2 or 3 to the bracket. How to adjust an angle (1) Angle adjustment section of general stand-besd LCD TV (2) Angle ...can turn LCD TV over which might cause damage to wall. English-6 Note : Picture (2) shows the angle adjustment section while LCD TV is completed 4 Remove Installation Guide after fixing it from bracket. Picture (3) shows the adjustment angle (0°~ 10°) when you use LCD TV in the direction of wall-mounted...

Quick Guide (ENGLISH)
Page 7
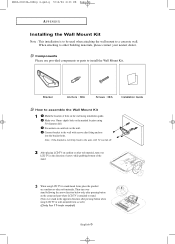
... form, place the product on a cushion or other building materials, please contact your nearest dealer. Bracket Anchors : 4EA Screws : 4EA Installation Guide How to install the Wall Mount Kit. Make over as well.) English-7 Fix anchors on each hole on the wall using 5.0-diameter drill. Components Please ...use LCD TV right after fitting anchors into the bracket holes. hole on the marked location using installation guide. Note : If the bracket is not firmly fixed to the wall, LCD TV can fall off. 2 You may use provided ...
... form, place the product on a cushion or other building materials, please contact your nearest dealer. Bracket Anchors : 4EA Screws : 4EA Installation Guide How to install the Wall Mount Kit. Make over as well.) English-7 Fix anchors on each hole on the wall using 5.0-diameter drill. Components Please ...use LCD TV right after fitting anchors into the bracket holes. hole on the marked location using installation guide. Note : If the bracket is not firmly fixed to the wall, LCD TV can fall off. 2 You may use provided ...

Quick Guide (ENGLISH)
Page 8
... stand-based LCD TV into wall-mounted one to disconnect LCD TV with ease. BN68-00633A-06Eng 4.qxd.q 5/12/04 6:34 PM Page 59 APPENDIX Installing the Wall Mount Kit 4 Adjust LCD TV to the hook on the wall. 6 Push the LCD TV up on a hook When...
... stand-based LCD TV into wall-mounted one to disconnect LCD TV with ease. BN68-00633A-06Eng 4.qxd.q 5/12/04 6:34 PM Page 59 APPENDIX Installing the Wall Mount Kit 4 Adjust LCD TV to the hook on the wall. 6 Push the LCD TV up on a hook When...
User Manual (ENGLISH)
Page 2
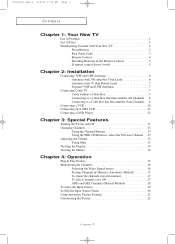
... List of Features 1 List of Parts 1 Familiarizing Yourself with Your New TV 2 Front Buttons 2 Rear Panel Jacks 3 Remote Control 4 Installing Batteries in the Remote Control 5 If remote control doesn't work 5 Chapter 2: Installation Connecting VHF and UHF Antennas 6 Antennas with 300-ohm Flat Twin Leads 6 Antennas with 75-ohm Round Leads 7 Separate VHF...
... List of Features 1 List of Parts 1 Familiarizing Yourself with Your New TV 2 Front Buttons 2 Rear Panel Jacks 3 Remote Control 4 Installing Batteries in the Remote Control 5 If remote control doesn't work 5 Chapter 2: Installation Connecting VHF and UHF Antennas 6 Antennas with 300-ohm Flat Twin Leads 6 Antennas with 75-ohm Round Leads 7 Separate VHF...
User Manual (ENGLISH)
Page 3
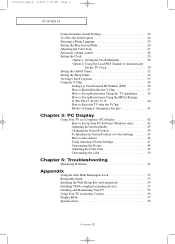
... 49 Customizing the color 50 Chapter 6: Troubleshooting Identifying Problems 51 Appendix Using the Anti-Theft Kensington Lock 53 Retractable Stand 53 Installing the Wall Mount Kit (sold separately 54 Installing VESA compliant mounting devices 55 Cleaning and Maintaining Your TV 56 Using Your TV in Another Country 56 Display Mode 57 Specifications...
... 49 Customizing the color 50 Chapter 6: Troubleshooting Identifying Problems 51 Appendix Using the Anti-Theft Kensington Lock 53 Retractable Stand 53 Installing the Wall Mount Kit (sold separately 54 Installing VESA compliant mounting devices 55 Cleaning and Maintaining Your TV 56 Using Your TV in Another Country 56 Display Mode 57 Specifications...

User Manual (ENGLISH)
Page 8
... (Assuming typical TV usage, the batteries last for a long time. Remove the batteries and store them in the Remote Control 1 Slide the cover out completely. 2 Install two AAA size batteries. Did the batteries run out? 4. The remote control can be using the remote control for about one year.) If remote control...compartment. 3 Replace the cover. Is the power out, or is the power cord unplugged? 5. BN68-00633A-00Eng 1.qxd.q 4/8/04 4:45 AM Page 5 YOUR NEW TV Installing Batteries in a cool, dry place if you won't be used up to match the "+" and "-" ends of the batteries reversed? 3.
... (Assuming typical TV usage, the batteries last for a long time. Remove the batteries and store them in the Remote Control 1 Slide the cover out completely. 2 Install two AAA size batteries. Did the batteries run out? 4. The remote control can be using the remote control for about one year.) If remote control...compartment. 3 Replace the cover. Is the power out, or is the power cord unplugged? 5. BN68-00633A-00Eng 1.qxd.q 4/8/04 4:45 AM Page 5 YOUR NEW TV Installing Batteries in a cool, dry place if you won't be used up to match the "+" and "-" ends of the batteries reversed? 3.
User Manual (ENGLISH)
Page 57
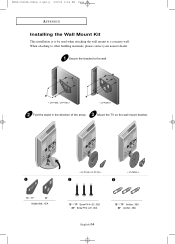
..." Anchor : 3EA 20" Anchor : 4EA BN68-00633A-00Eng 4.qxd.q 4/8/04 4:46 AM Page 54 APPENDIX Installing the Wall Mount Kit This installation is to be used when attaching the wall mount to the wall. < LT-P1545 / LT-P1745 > < LT-P2045 > 2 3 Fold the stand in the direction of the arrow. When attaching to other building materials, please...
..." Anchor : 3EA 20" Anchor : 4EA BN68-00633A-00Eng 4.qxd.q 4/8/04 4:46 AM Page 54 APPENDIX Installing the Wall Mount Kit This installation is to be used when attaching the wall mount to the wall. < LT-P1545 / LT-P1745 > < LT-P2045 > 2 3 Fold the stand in the direction of the arrow. When attaching to other building materials, please...
User Manual (ENGLISH)
Page 58
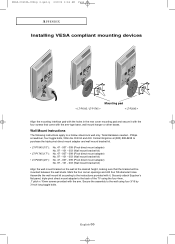
BN68-00633A-00Eng 4.qxd.q 4/8/04 4:46 AM Page 55 APPENDIX Installing VESA compliant mounting devices < LT-P1545 / LT-P1745 > Mounting pad < LT-P2045 > Align the mounting interface pad with the holes in the rear cover mounting pad and secure it . Wall Mount Instructions The following... a hollow sheet-rock wall only. Secure the assembly to purchase the triple pivot direct mount adapter and wall mount bracket kit. • LT-P1545 (15") : • LT-P1745 (17") : • LT-P2045 (20") : No. 47 - 007 - 099 (Pivot direct mount adapter) No. 97 - 101 - 003 (Wall mount bracket kit) No. 47 - ...
BN68-00633A-00Eng 4.qxd.q 4/8/04 4:46 AM Page 55 APPENDIX Installing VESA compliant mounting devices < LT-P1545 / LT-P1745 > Mounting pad < LT-P2045 > Align the mounting interface pad with the holes in the rear cover mounting pad and secure it . Wall Mount Instructions The following... a hollow sheet-rock wall only. Secure the assembly to purchase the triple pivot direct mount adapter and wall mount bracket kit. • LT-P1545 (15") : • LT-P1745 (17") : • LT-P2045 (20") : No. 47 - 007 - 099 (Pivot direct mount adapter) No. 97 - 101 - 003 (Wall mount bracket kit) No. 47 - ...


