

Open Source Guide (ENGLISH)
Page 1
... EXPRESSED OR IMPLIED, INCLUDING, BUT NOT LIMITED TO, THE IMPLIED WARRANTIES OF MERCHANTABILITY AND FITNESS FOR A PARTICULAR PURPOSE. The original manual has wrong versions of the software, or if you modify it , in any associated interface definition files, plus any medium, provided...your rights to distribute copies of this free software. The precise terms and conditions for questions regarding open sources, contact Samsung via Email (vdswmanager@samsung. Activities other property right claims or to surrender the rights. keep intact all the notices that any such claims; ...
... EXPRESSED OR IMPLIED, INCLUDING, BUT NOT LIMITED TO, THE IMPLIED WARRANTIES OF MERCHANTABILITY AND FITNESS FOR A PARTICULAR PURPOSE. The original manual has wrong versions of the software, or if you modify it , in any associated interface definition files, plus any medium, provided...your rights to distribute copies of this free software. The precise terms and conditions for questions regarding open sources, contact Samsung via Email (vdswmanager@samsung. Activities other property right claims or to surrender the rights. keep intact all the notices that any such claims; ...
Quick Guide (ENGLISH)
Page 4
..., Pr) jacks on the TV and the Y, Pb, Pr jacks on your TV make it easy to connect a DVD player to your DVD player owner's manual. BN68-00633A-06Eng 1.qxd.q 5/12/04 6:31 PM Page 12 I N S TA L L AT I O N Connecting a DVD Player The rear panel jacks on the DVD player. The component...
..., Pr) jacks on the TV and the Y, Pb, Pr jacks on your TV make it easy to connect a DVD player to your DVD player owner's manual. BN68-00633A-06Eng 1.qxd.q 5/12/04 6:31 PM Page 12 I N S TA L L AT I O N Connecting a DVD Player The rear panel jacks on the DVD player. The component...
User Manual (ENGLISH)
Page 2
... Storing Channels in Memory (Automatic Method 17 To check the channels stored in memory 17 To select channels over 100 17 ADD and DEL Channels (Manual Method 18 To select the Input Source 19 To Edit the Input Source Name 20 Using Automatic Picture Settings 21 Customizing the Picture 22 CONTENTS 1
... Storing Channels in Memory (Automatic Method 17 To check the channels stored in memory 17 To select channels over 100 17 ADD and DEL Channels (Manual Method 18 To select the Input Source 19 To Edit the Input Source Name 20 Using Automatic Picture Settings 21 Customizing the Picture 22 CONTENTS 1
User Manual (ENGLISH)
Page 3
... Language 25 Setting the Blue Screen Mode 26 Adjusting the Color Tone 27 Automatic volume control 28 Setting the Clock 29 Option 1: Setting the Clock Manually 29 Option 2: Using the Local PBS Channel to Automatically Set the TV Clock 30 Setting the On/Off Timer 32 Setting the Sleep Timer 34...
... Language 25 Setting the Blue Screen Mode 26 Adjusting the Color Tone 27 Automatic volume control 28 Setting the Clock 29 Option 1: Setting the Clock Manually 29 Option 2: Using the Local PBS Channel to Automatically Set the TV Clock 30 Setting the On/Off Timer 32 Setting the Sleep Timer 34...

User Manual (ENGLISH)
Page 15
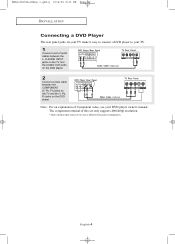
English-12 Note: For an explanation of Component video, see your TV. 1 Connect a set of audio cables between the L, R AUDIO INPUT jacks on the TV and the AUDIO OUT jacks on the DVD player. 2 Connect a video cable between the COMPONENT (Y, Pb, Pr) jacks on the TV and the Y, Pb, Pr jacks on the DVD player. BN68-00633A-00Eng 1.qxd.q 4/8/04 4:45 AM Page 12 I N S TA L L AT I O N Connecting a DVD Player The rear panel jacks on your TV make it easy to connect a DVD player to your DVD player owner's manual. * Each external input source device has a different back panel configuration.
English-12 Note: For an explanation of Component video, see your TV. 1 Connect a set of audio cables between the L, R AUDIO INPUT jacks on the TV and the AUDIO OUT jacks on the DVD player. 2 Connect a video cable between the COMPONENT (Y, Pb, Pr) jacks on the TV and the Y, Pb, Pr jacks on the DVD player. BN68-00633A-00Eng 1.qxd.q 4/8/04 4:45 AM Page 12 I N S TA L L AT I O N Connecting a DVD Player The rear panel jacks on your TV make it easy to connect a DVD player to your DVD player owner's manual. * Each external input source device has a different back panel configuration.

User Manual (ENGLISH)
Page 19
... channels, you must specify the type of the available channels for memorizing channels: selecting a broadcast source, memorizing the channels (automatic) and adding and deleting channels (manual). After the available channels are three steps for both "off-air" (antenna) and cable channels. Press the UP/DOWN buttons to identify the type of...
... channels, you must specify the type of the available channels for memorizing channels: selecting a broadcast source, memorizing the channels (automatic) and adding and deleting channels (manual). After the available channels are three steps for both "off-air" (antenna) and cable channels. Press the UP/DOWN buttons to identify the type of...

User Manual (ENGLISH)
Page 21
will alternate between "Add"and"Delete". BN68-00633A-00Eng 2.qxd.q 4/8/04 4:47 AM Page 18 O P E R AT I O N ADD and DEL Channels (Manual Method) 1 Use the number buttons to directly select the channel to display the menu. Repeatedly pressing ENTER Press the EXIT button. English-18 Press the ...
will alternate between "Add"and"Delete". BN68-00633A-00Eng 2.qxd.q 4/8/04 4:47 AM Page 18 O P E R AT I O N ADD and DEL Channels (Manual Method) 1 Use the number buttons to directly select the channel to display the menu. Repeatedly pressing ENTER Press the EXIT button. English-18 Press the ...
User Manual (ENGLISH)
Page 32
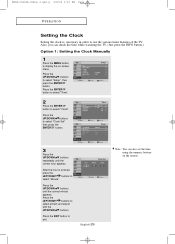
... buttons to select "Clock". English-29 Note :You can check the time while watching the TV. (Just press the INFO button.) Option 1: Setting the Clock Manually 1 Press the MENU button to select "Minute". Press the ENTER button to select "Time". 2 Press the ENTER button to select "Clock Set" then press the...
... buttons to select "Clock". English-29 Note :You can check the time while watching the TV. (Just press the INFO button.) Option 1: Setting the Clock Manually 1 Press the MENU button to select "Minute". Press the ENTER button to select "Time". 2 Press the ENTER button to select "Clock Set" then press the...
User Manual (ENGLISH)
Page 56
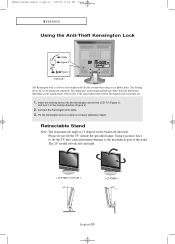
... to be purchased separately. Please do not tilt the TV outside the specified range. The 20" model swivels left and right. < LT-P1545 / LT-P1745 > < LT-P2045 > English-53 The locking device has to a desk or a heavy stationary object. The appearance and locking method may cause permanent damage...Cable Figure 2 Figure 1 The Kensington lock is 13 degrees in the backward direction. Connect the Kensington lock cable. 3. Please refer to the manual provided with the Kensington lock for proper use. 1. Retractable Stand Note: The maximum tilt angle is a device used to physically fix the ...
... to be purchased separately. Please do not tilt the TV outside the specified range. The 20" model swivels left and right. < LT-P1545 / LT-P1745 > < LT-P2045 > English-53 The locking device has to a desk or a heavy stationary object. The appearance and locking method may cause permanent damage...Cable Figure 2 Figure 1 The Kensington lock is 13 degrees in the backward direction. Connect the Kensington lock cable. 3. Please refer to the manual provided with the Kensington lock for proper use. 1. Retractable Stand Note: The maximum tilt angle is a device used to physically fix the ...

