User Manual (ENGLISH)
Page 3
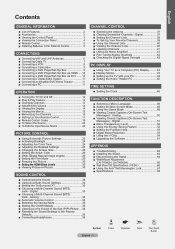
...Control Panel 3 Viewing the Connection Panel 4 Remote Control 5 Installing Batteries in the Remote Control 6 Connections Connecting VHF and UHF Antennas 6 Connecting Cable TV 7 Connecting a VCR 8 Connecting a Camcorder 9 Connecting a DVD Player/Set-Top Box 9 Connecting a DVD Player/Set-Top Box via HDMI.........Natural Image engine 29 Setting the Film Mode 29 Freezing the Picture 30 Setting the HDMI Black Levele 30 Viewing Picture-in-Picture 30 Sound Control Customizing the Sound 32 Using Automatic Sound Settings 32 Setting the TruSurround XT 33 Choosing a Multi-Channel Sound (MTS...
...Control Panel 3 Viewing the Connection Panel 4 Remote Control 5 Installing Batteries in the Remote Control 6 Connections Connecting VHF and UHF Antennas 6 Connecting Cable TV 7 Connecting a VCR 8 Connecting a Camcorder 9 Connecting a DVD Player/Set-Top Box 9 Connecting a DVD Player/Set-Top Box via HDMI.........Natural Image engine 29 Setting the Film Mode 29 Freezing the Picture 30 Setting the HDMI Black Levele 30 Viewing Picture-in-Picture 30 Sound Control Customizing the Sound 32 Using Automatic Sound Settings 32 Setting the TruSurround XT 33 Choosing a Multi-Channel Sound (MTS...
User Manual (ENGLISH)
Page 4
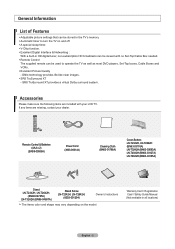
... Adjustable picture settings that can be stored in the TV's memory. Automatic timer to turn the TV on the model. DNIe technology provides life-like clear images. SRS TruSurround XT - Accessories Please make sure the following items are missing, contact your LCD TV. SRS TruSurround XT...Cable Box needed. Remote Control The supplied remote can be used to operate the TV as well as most DVD players, Set-Top boxes, Cable Boxes and VCRs. Excellent Picture Quality - Warranty Card / Registration Card / Safety Guide Manual (Not available in HD digital...
... Adjustable picture settings that can be stored in the TV's memory. Automatic timer to turn the TV on the model. DNIe technology provides life-like clear images. SRS TruSurround XT - Accessories Please make sure the following items are missing, contact your LCD TV. SRS TruSurround XT...Cable Box needed. Remote Control The supplied remote can be used to operate the TV as well as most DVD players, Set-Top boxes, Cable Boxes and VCRs. Excellent Picture Quality - Warranty Card / Registration Card / Safety Guide Manual (Not available in HD digital...
User Manual (ENGLISH)
Page 7
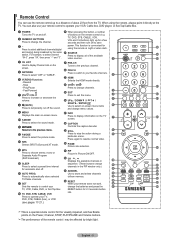
...sequence. (These buttons change channels in Picture ON/OFF. You can use the remote control up for a few seconds and then turn off to display information on the TV screen. Press to automatically store selected TV/Cable channels. & SET Sets the remote to control your TV, DVD, STB, CABLE (box), or... your remote control to operate your VCR, Cable box, DVD player, or Set-Top/Cable Box. 1 POWER Turns the TV on and off. 2 NUMERIC BUTTONS Press to /from the TV. j P.SIZE Picture size selection. Fast/Forward 7 VOL / VOL Press to increase or decrease the volume. 8 (MUTE) Press to temporarily...
...sequence. (These buttons change channels in Picture ON/OFF. You can use the remote control up for a few seconds and then turn off to display information on the TV screen. Press to automatically store selected TV/Cable channels. & SET Sets the remote to control your TV, DVD, STB, CABLE (box), or... your remote control to operate your VCR, Cable box, DVD player, or Set-Top/Cable Box. 1 POWER Turns the TV on and off. 2 NUMERIC BUTTONS Press to /from the TV. j P.SIZE Picture size selection. Fast/Forward 7 VOL / VOL Press to increase or decrease the volume. 8 (MUTE) Press to temporarily...
User Manual (ENGLISH)
Page 10
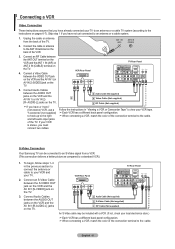
... yet connected to an antenna or a cable system. 1. Unplug the cable or antenna from a VCR. (This connection delivers a better picture as compared to a standard VCR.) 1. VCR Rear Panel TV Rear Panel 3 Audio Cable (Not supplied) 2 S-Video Cable (Not supplied) 1 RF Cable (Not supplied) An S-Video cable may... two cables. Connect an RF Cable between the S-VIDEO OUT jack on the VCR and the AV IN1 [S-VIDEO] jack on the TV. 4. S-Video Connection Your Samsung TV can be included with a VCR. (If not, check your VCR tape. AUDIO-L] jacks on pages 6-7). and left audio input jacks...
... yet connected to an antenna or a cable system. 1. Unplug the cable or antenna from a VCR. (This connection delivers a better picture as compared to a standard VCR.) 1. VCR Rear Panel TV Rear Panel 3 Audio Cable (Not supplied) 2 S-Video Cable (Not supplied) 1 RF Cable (Not supplied) An S-Video cable may... two cables. Connect an RF Cable between the S-VIDEO OUT jack on the VCR and the AV IN1 [S-VIDEO] jack on the TV. 4. S-Video Connection Your Samsung TV can be included with a VCR. (If not, check your VCR tape. AUDIO-L] jacks on pages 6-7). and left audio input jacks...
User Manual (ENGLISH)
Page 14
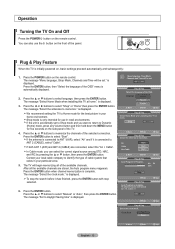
...Play Feature When the TV is only intended for the best picture in retail environments. Press the ENTER button, then "Select the language of the OSD" menu is displayed. is automatically displayed. Shop Home 4. Press the ENTER button to memorize the channels of the TV. If the antenna is...complete. 16 Channels were memorized. After all of the panel. Press the ENTER button. The message "Select Home Mode when installing this TV at home." Shop mode is initially powered on the front of the available channels. Press the ▲ or ▼ buttons to select...
...Play Feature When the TV is only intended for the best picture in retail environments. Press the ENTER button, then "Select the language of the OSD" menu is displayed. is automatically displayed. Shop Home 4. Press the ENTER button to memorize the channels of the TV. If the antenna is...complete. 16 Channels were memorized. After all of the panel. Press the ENTER button. The message "Select Home Mode when installing this TV at home." Shop mode is initially powered on the front of the available channels. Press the ▲ or ▼ buttons to select...
User Manual (ENGLISH)
Page 16
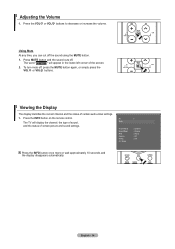
Adjusting the Volume 1. English - 14 The TV will appear in the lower-left corner of certain picture and sound settings. Press MUTE button and the sound cuts off , press the MUTE button again, or simply press the VOL or VOL buttons. Air 7 Mono Picture Mode Sound Mode MTS Caption V-Chip 05 : 54 pm : Dynamic...
Adjusting the Volume 1. English - 14 The TV will appear in the lower-left corner of certain picture and sound settings. Press MUTE button and the sound cuts off , press the MUTE button again, or simply press the VOL or VOL buttons. Air 7 Mono Picture Mode Sound Mode MTS Caption V-Chip 05 : 54 pm : Dynamic...
User Manual (ENGLISH)
Page 17
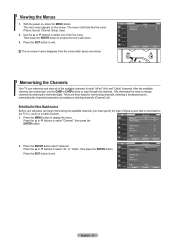
... then press the ENTER button. Press the ▲ or ▼ buttons to display the menu. The menu' s left side has five icons: Picture, Sound, Channel, Setup, Input. 2. Then press the ENTER button to change channels by entering the channels digits. The on , press the MENU button...button. There are memorized, use the CH or CH buttons to select one minute. Press the ▲ or ▼ buttons to exit. TV Channel Antenna : AAirir Auto Program Cable Clear Scrambled Channel Channel List Name Fine Tune Signal Strength LNA : Off Move Enter ► Return ...
... then press the ENTER button. Press the ▲ or ▼ buttons to display the menu. The menu' s left side has five icons: Picture, Sound, Channel, Setup, Input. 2. Then press the ENTER button to change channels by entering the channels digits. The on , press the MENU button...button. There are memorized, use the CH or CH buttons to select one minute. Press the ▲ or ▼ buttons to exit. TV Channel Antenna : AAirir Auto Program Cable Clear Scrambled Channel Channel List Name Fine Tune Signal Strength LNA : Off Move Enter ► Return ...
User Manual (ENGLISH)
Page 25
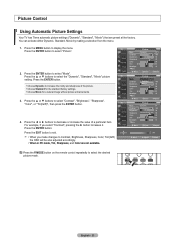
...select "Contrast", pressing the ► button increases it. Press the MENU button to select "Picture". 2. English - 23 Press the ▲ or ▼ buttons to select the desired picture mode. TV Picture Mode : Dynamic ► Contrast 100 Brightness 50 Sharpness 85 Color 55 Tint G 50 R... S tandard 100 Brightness Mo vie 50 Sharpness 85 Color 55 Tint G 50 R 50 Backlight 10 ▼More Move Enter Return TV Picture Mode : Dynamic ► Contrast 100 Brightness 50 Sharpness 85 Color 55 Tint G 50 R 50 Backlight 10 ▼More Move ...
...select "Contrast", pressing the ► button increases it. Press the MENU button to select "Picture". 2. English - 23 Press the ▲ or ▼ buttons to select the desired picture mode. TV Picture Mode : Dynamic ► Contrast 100 Brightness 50 Sharpness 85 Color 55 Tint G 50 R... S tandard 100 Brightness Mo vie 50 Sharpness 85 Color 55 Tint G 50 R 50 Backlight 10 ▼More Move Enter Return TV Picture Mode : Dynamic ► Contrast 100 Brightness 50 Sharpness 85 Color 55 Tint G 50 R 50 Backlight 10 ▼More Move ...
User Manual (ENGLISH)
Page 26
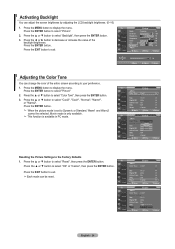
...the ENTER button. 3. Each mode can adjust the screen brightness by adjusting the LCD backlight brightness. (0~10) 1. Press the ▲ or ▼ button to select "Picture" 2. This function is only available. Press the MENU button to display the ...: 9 ► Digital NR : Auto ► Active Color : On ► DNIe : Off ► Reset : Cancel ► Move Enter Return TV Picture ▲More Color Tone : Cool1Cool2 Detailed settings Cool1 Size : 16 : 9Normal Digital NR Active Color : : AOuntoWWaarrmm12 DNIe : Off Reset : Cancel Move ...
...the ENTER button. 3. Each mode can adjust the screen brightness by adjusting the LCD backlight brightness. (0~10) 1. Press the ▲ or ▼ button to select "Picture" 2. This function is only available. Press the MENU button to display the ...: 9 ► Digital NR : Auto ► Active Color : On ► DNIe : Off ► Reset : Cancel ► Move Enter Return TV Picture ▲More Color Tone : Cool1Cool2 Detailed settings Cool1 Size : 16 : 9Normal Digital NR Active Color : : AOuntoWWaarrmm12 DNIe : Off Reset : Cancel Move ...
User Manual (ENGLISH)
Page 27
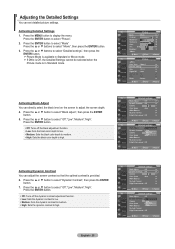
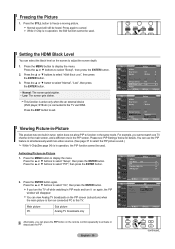
..."Movie", then press the ENTER button. 3. Press the ▲ or ▼ button to high. Move Enter Return TV Picture Mode : Movie ► Contrast 100 Brightness 50 Sharpness 85 Color 55 Tint G 50 R 50 Backlight : 10 ▼More Move Enter ... the optimal contrast is provided. 6. Press the ENTER button to select "Off","Low","Medium","High". Press the ▲ or ▼ button to select "Picture". 2. TV Detailed Settings Black Adjust : Off ► Dynamic Contrast : Off ► Gamma 0 Color Space : Auto ► White Balance ► My Color ...
..."Movie", then press the ENTER button. 3. Press the ▲ or ▼ button to high. Move Enter Return TV Picture Mode : Movie ► Contrast 100 Brightness 50 Sharpness 85 Color 55 Tint G 50 R 50 Backlight : 10 ▼More Move Enter ... the optimal contrast is provided. 6. Press the ENTER button to select "Off","Low","Medium","High". Press the ▲ or ▼ button to select "Picture". 2. TV Detailed Settings Black Adjust : Off ► Dynamic Contrast : Off ► Gamma 0 Color Space : Auto ► White Balance ► My Color ...
User Manual (ENGLISH)
Page 28
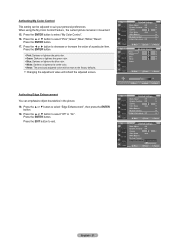
...; Gamma 0 Color Space : Auto ► White Balance ► My Color Control ► Edge Enhancement : Off ► Move Enter Return TV Detailed Settings Black Adjust : Off Dynamic Contrast : Off Gamma 0 Color Space : AAutuoto White Balance Wide My Color Control Edge Enhancement : Off Move...; button to select "White Balance", then press the ENTER button. 13. Activating Gamma You can adjust the color temperature for more natural picture colors. 12. Press the ▲ or ▼ button to select "Color Space", then press the ENTER button. 11. Press the...
...; Gamma 0 Color Space : Auto ► White Balance ► My Color Control ► Edge Enhancement : Off ► Move Enter Return TV Detailed Settings Black Adjust : Off Dynamic Contrast : Off Gamma 0 Color Space : AAutuoto White Balance Wide My Color Control Edge Enhancement : Off Move...; button to select "White Balance", then press the ENTER button. 13. Activating Gamma You can adjust the color temperature for more natural picture colors. 12. Press the ▲ or ▼ button to select "Color Space", then press the ENTER button. 11. Press the...
User Manual (ENGLISH)
Page 29
.... Press the ◄ or ► button to suit your personal preferences. When using the My Color Control Feature, the current picture remains in the picture. 18. Press the ▲ or ▼ button to exit. Press the ENTER button. Press the EXIT button to select "...Pink","Green","Blue","White","Reset". TV Detailed Settings Black Adjust : Off ► Dynamic Contrast : Off ► Gamma 0 Color Space : Auto ► White Balance &#...
.... Press the ◄ or ► button to suit your personal preferences. When using the My Color Control Feature, the current picture remains in the picture. 18. Press the ▲ or ▼ button to exit. Press the ENTER button. Press the EXIT button to select "...Pink","Green","Blue","White","Reset". TV Detailed Settings Black Adjust : Off ► Dynamic Contrast : Off ► Gamma 0 Color Space : Auto ► White Balance &#...
User Manual (ENGLISH)
Page 30
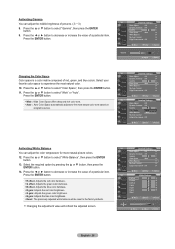
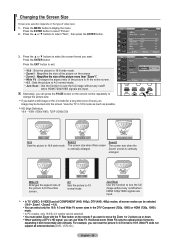
... "Size", then press the ENTER button. 3. If you want to move the Zoom 1or 2 picture up or down. • When watching a DTV's HD signal, you can reset the picture in 4:3 format to 16:9. View the TV in the DTV Component (720p, 1080i) or HDMI (720p, 1080i) mode. • In ... vertically enlarged. Size button on the screen. • Zoom2 : Magnifies the size of the picture more than "Zoom1". • Wide Fit : Enlarges the aspect ratio of the picture on the remote if you want . TV Press the ENTER button. Alternately, you can use Wide Fit. Horizontal zoom (Wide Fit) sets...
... "Size", then press the ENTER button. 3. If you want to move the Zoom 1or 2 picture up or down. • When watching a DTV's HD signal, you can reset the picture in 4:3 format to 16:9. View the TV in the DTV Component (720p, 1080i) or HDMI (720p, 1080i) mode. • In ... vertically enlarged. Size button on the screen. • Zoom2 : Magnifies the size of the picture more than "Zoom1". • Wide Fit : Enlarges the aspect ratio of the picture on the remote if you want . TV Press the ENTER button. Alternately, you can use Wide Fit. Horizontal zoom (Wide Fit) sets...
User Manual (ENGLISH)
Page 31
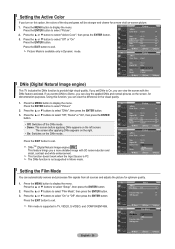
...: 16 : 9 ► Digital NR : Auto ► Active Color : On ► DNIe : Off ► Reset : Cancel ► Move Enter Return TV Picture ▲More Color Tone : Cool1 Detailed settings Size : 16 : 9 Digital NR : Auto Active Color : OOn ff DNIe : ODffemo Reset On Move Enter Return ...or ▼ buttons to provide high visual quality. Setting the Active Color If you a more vivid on the DNIe mode.. TV Picture ▲More Color Tone : Cool1 Detailed settings Size : 16 : 9 Digital NR : Auto Active Color : On DNIe : Off Reset :...
...: 16 : 9 ► Digital NR : Auto ► Active Color : On ► DNIe : Off ► Reset : Cancel ► Move Enter Return TV Picture ▲More Color Tone : Cool1 Detailed settings Size : 16 : 9 Digital NR : Auto Active Color : OOn ff DNIe : ODffemo Reset On Move Enter Return ...or ▼ buttons to provide high visual quality. Setting the Active Color If you a more vivid on the DNIe mode.. TV Picture ▲More Color Tone : Cool1 Detailed settings Size : 16 : 9 Digital NR : Auto Active Color : On DNIe : Off Reset :...
User Manual (ENGLISH)
Page 32
...in the PIP screen. Press the ENTER button again. Press the ▲ or ▼ buttons to display the menu. Main picture PC Sub picture Analog TV broadcasts only Move Enter Return TV PIP PIP Position Channel : Off : On : Cable 3 Move Enter Return Alternately, you can use the PIP feature to ...press the ENTER button. 3. This function is active only when the an external device (DVD player, STB etc.) is in -Picture 1. For example, you turn the TV off while watching in operation, the Still function cannot be heard. If you cannot watch two video sources. (See page 37 to...
...in the PIP screen. Press the ENTER button again. Press the ▲ or ▼ buttons to display the menu. Main picture PC Sub picture Analog TV broadcasts only Move Enter Return TV PIP PIP Position Channel : Off : On : Cable 3 Move Enter Return Alternately, you can use the PIP feature to ...press the ENTER button. 3. This function is active only when the an external device (DVD player, STB etc.) is in -Picture 1. For example, you turn the TV off while watching in operation, the Still function cannot be heard. If you cannot watch two video sources. (See page 37 to...
User Manual (ENGLISH)
Page 33
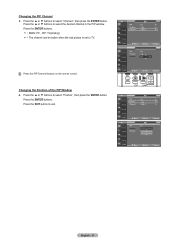
...Changing the PIP Channel 3. Press the ▲ or ▼ buttons to exit. Press the ENTER buttons. • MAIN: PC, PIP: TV(Analog) • The channel can be active when the sub picture is set to select the desired channel in the PIP window. Press the ENTER buttons. Press the ▲ or ▼...; buttons to TV. Press the PIP Channel buttons on the remote control. Press the ▲ or ▼ buttons to select "Position...
...Changing the PIP Channel 3. Press the ▲ or ▼ buttons to exit. Press the ENTER buttons. • MAIN: PC, PIP: TV(Analog) • The channel can be active when the sub picture is set to select the desired channel in the PIP window. Press the ENTER buttons. Press the ▲ or ▼...; buttons to TV. Press the PIP Channel buttons on the remote control. Press the ▲ or ▼ buttons to select "Position...
User Manual (ENGLISH)
Page 38
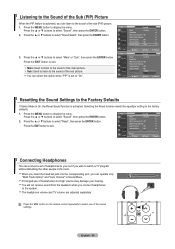
...select "Main" or "Sub", then press the ENTER button. The headphone volume and TV volume are adjusted separately. SRS TruSurround XT : Off Multi-Track Options • Main: Used to listen to the sound of the main picture.. • Sub: Used to listen to the sound of headphones at a high ...head set jack into the corresponding port, you can connect a set if you wish to watch a TV program without disturbing the other people in Sound Menu. 10 Prolonged use of the sub picture. Press the VOL button on the remote control repeatedly to select one of headphones to your hearing....
...select "Main" or "Sub", then press the ENTER button. The headphone volume and TV volume are adjusted separately. SRS TruSurround XT : Off Multi-Track Options • Main: Used to listen to the sound of the main picture.. • Sub: Used to listen to the sound of headphones at a high ...head set jack into the corresponding port, you can connect a set if you wish to watch a TV program without disturbing the other people in Sound Menu. 10 Prolonged use of the sub picture. Press the VOL button on the remote control repeatedly to select one of headphones to your hearing....
User Manual (ENGLISH)
Page 46
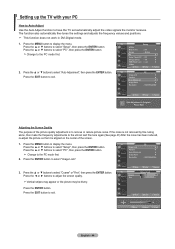
... Return Auto Adjustment in DVI-Digital mode. 1. Please Wait Adjusting the Screen Quality The purpose of the picture quality adjustment is aligned on the center of the screen. 1. TV PC Image Lock ► Position ► Auto Adjustment ► Image Reset ► Resolution :1360X768... @60Hz 3. Vertical stripes may appear or the picture may be blurry. Setting up the TV with your PC How to Auto Adjust Use the Auto Adjust function to select "PC", then press the ENTER button...
... Return Auto Adjustment in DVI-Digital mode. 1. Please Wait Adjusting the Screen Quality The purpose of the picture quality adjustment is aligned on the center of the screen. 1. TV PC Image Lock ► Position ► Auto Adjustment ► Image Reset ► Resolution :1360X768... @60Hz 3. Vertical stripes may appear or the picture may be blurry. Setting up the TV with your PC How to Auto Adjust Use the Auto Adjust function to select "PC", then press the ENTER button...

User Manual (ENGLISH)
Page 47
...Setup", then press the ENTER button. Press the ▲ or ▼ buttons to select "On" or "Off", then press the ENTER button. TV PC Image Lock ► Position ► Auto Adjustment ► Image Reset ► Resolution :1360X768 @60Hz Move Return Setting the Home Theater PC...Move Enter Return Image Reset is displayed on the settings for screen-related functions in PC input mode to view higher quality pictures while in the regular TV mode. Press the ▲ or ▼ buttons to display the menu. Press the MENU button to select "PC",...
...Setup", then press the ENTER button. Press the ▲ or ▼ buttons to select "On" or "Off", then press the ENTER button. TV PC Image Lock ► Position ► Auto Adjustment ► Image Reset ► Resolution :1360X768 @60Hz Move Return Setting the Home Theater PC...Move Enter Return Image Reset is displayed on the settings for screen-related functions in PC input mode to view higher quality pictures while in the regular TV mode. Press the ▲ or ▼ buttons to display the menu. Press the MENU button to select "PC",...

User Manual (ENGLISH)
Page 51
...shakes slightly. If you wish to "Off" 1. If you display the TV menu in the Setup menu. Game Mode is very weak, a blue screen automatically replaces the noisy picture background. TV Setup Plug & Play Language : English Time Game Mode : OOff ff... V-Chip On Caption Menu Transparency : Medium ▼More Move Enter Return English - 49 TV Setup ▲More Blue Screen : Off ► ...
...shakes slightly. If you wish to "Off" 1. If you display the TV menu in the Setup menu. Game Mode is very weak, a blue screen automatically replaces the noisy picture background. TV Setup Plug & Play Language : English Time Game Mode : OOff ff... V-Chip On Caption Menu Transparency : Medium ▼More Move Enter Return English - 49 TV Setup ▲More Blue Screen : Off ► ...


