User Manual (ENGLISH)
Page 3
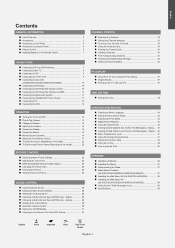
... 48 Using the V-Chip 48 How to the Sound of Features 2 Accessories 2 Viewing the Control Panel 3 Viewing the Connection Panel 4 Remote Control 6 Installing Batteries in the Remote Control 7 CONNECTIONS Connecting VHF and UHF Antennas 7 Connecting Cable TV 8 Connecting a VCR 9 Connecting an S-VHS VCR 9 Connecting a Camcorder... Changing Channels 14 Adjusting the Volume 15 Viewing the Display 15 Viewing the Menus 15 Memorizing the Channels 16 Setting Up Your Remote Control 17 To Select the Source (depending on the model 22 To Edit the Input Source Name (depending on the model ...
... 48 Using the V-Chip 48 How to the Sound of Features 2 Accessories 2 Viewing the Control Panel 3 Viewing the Connection Panel 4 Remote Control 6 Installing Batteries in the Remote Control 7 CONNECTIONS Connecting VHF and UHF Antennas 7 Connecting Cable TV 8 Connecting a VCR 9 Connecting an S-VHS VCR 9 Connecting a Camcorder... Changing Channels 14 Adjusting the Volume 15 Viewing the Display 15 Viewing the Menus 15 Memorizing the Channels 16 Setting Up Your Remote Control 17 To Select the Source (depending on the model 22 To Edit the Input Source Name (depending on the model ...
User Manual (ENGLISH)
Page 4
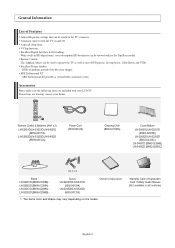
...Features Adjustable picture settings that can be used to turn the TV on the model. V-Chip function. Excellent Picture Quality - Remote Control The supplied remote can be viewed with your dealer. Accessories Please make sure the following items are missing, contact your LCD TV. Excellent Digital... If any items are included with no Set-Top Box needed. SRS TruSurround XT - SRS TruSurround XT provides a virtual Dolby surround system. Remote Control & Batteries (AAA x 2) LN-S2651D/LN-S3251D/LN-S4051D (BN59-00511A) LN-S2652D/LN-S3252D/LN-S4052D (BN59-00512A) Power...
...Features Adjustable picture settings that can be used to turn the TV on the model. V-Chip function. Excellent Picture Quality - Remote Control The supplied remote can be viewed with your dealer. Accessories Please make sure the following items are missing, contact your LCD TV. Excellent Digital... If any items are included with no Set-Top Box needed. SRS TruSurround XT - SRS TruSurround XT provides a virtual Dolby surround system. Remote Control & Batteries (AAA x 2) LN-S2651D/LN-S3251D/LN-S4051D (BN59-00511A) LN-S2652D/LN-S3252D/LN-S4052D (BN59-00512A) Power...
User Manual (ENGLISH)
Page 5
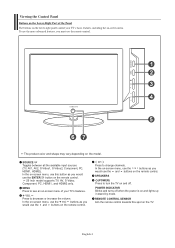
...the TV. In the on-screen menu, use the buttons as you must use the and buttons on the remote control. SPEAKERS (POWER) Press to see an on-screen menu of the Panel The buttons on the lower... model. To use the more advanced features, you would use the and buttons on the remote control. MENU Press to turn the TV on and off when the power is on and lights up in...to change channels. In the on-screen menu, use the buttons as you would use the ENTER button on the remote control. 26 inch model supports TV, AV, S-Video, Component, PC, HDMI1, and HDMI2 only. Viewing the Control...
...the TV. In the on-screen menu, use the buttons as you must use the and buttons on the remote control. SPEAKERS (POWER) Press to see an on-screen menu of the Panel The buttons on the lower... model. To use the more advanced features, you would use the and buttons on the remote control. MENU Press to turn the TV on and off when the power is on and lights up in...to change channels. In the on-screen menu, use the buttons as you would use the ENTER button on the remote control. 26 inch model supports TV, AV, S-Video, Component, PC, HDMI1, and HDMI2 only. Viewing the Control...

User Manual (ENGLISH)
Page 8
...and analog) being broadcast by the same station. CH Displays the available channels in sequence. (These buttons change menu values. SET Sets the remote to display information on -screen menu. Press to resume normal video. PIP Picture-in the PIP window only.) CAPTION Controls the caption decoder.... "-" and "3". Fast/Forward VOL / VOL Press to increase or decrease the volume. (MUTE) Press to change the channel. - When using the remote, always point it directly at the TV. POWER Turns the TV on the Power, Channel and Volume buttons. For example, to automatically store selected TV...
...and analog) being broadcast by the same station. CH Displays the available channels in sequence. (These buttons change menu values. SET Sets the remote to display information on -screen menu. Press to resume normal video. PIP Picture-in the PIP window only.) CAPTION Controls the caption decoder.... "-" and "3". Fast/Forward VOL / VOL Press to increase or decrease the volume. (MUTE) Press to change the channel. - When using the remote, always point it directly at the TV. POWER Turns the TV on the Power, Channel and Volume buttons. For example, to automatically store selected TV...
User Manual (ENGLISH)
Page 9
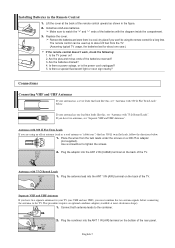
...the antennas to the TV. Use a screwdriver to the combiner. This procedure requires an optional combiner-adaptor (available at the back of the remote control upward as a roof antenna or "rabbit ears") that look like this , see "Separate VHF and UHF Antennas". Plug the combiner into...the batteries reversed? 3. Connect both antenna leads to tighten the screws. Install two AAA size batteries. Remove the batteries and store them in the Remote Control 1. English-7 Is there a special fluorescent light or neon sign nearby? Is there a power outage, or is the power cord unplugged?...
...the antennas to the TV. Use a screwdriver to the combiner. This procedure requires an optional combiner-adaptor (available at the back of the remote control upward as a roof antenna or "rabbit ears") that look like this , see "Separate VHF and UHF Antennas". Plug the combiner into...the batteries reversed? 3. Connect both antenna leads to tighten the screws. Install two AAA size batteries. Remove the batteries and store them in the Remote Control 1. English-7 Is there a special fluorescent light or neon sign nearby? Is there a power outage, or is the power cord unplugged?...

User Manual (ENGLISH)
Page 15
... the ENTER button. Press the or buttons to select "Manual" or "Auto", then the ENTER Switches the Daylight Saving Time function on the remote control. Press the ENTER button, then "Select the language of the selected connection. menu is automatically displayed. 2. If the antenna is connected... 5. menu is displayed. is automatically displayed. Press the ENTER button. Plug & Play Feature When the TV is initially powered on the remote control. "Select the antennas to enter the language. Operation Turning the TV On and Off Press the POWER button on , two basic ...
... the ENTER button. Press the or buttons to select "Manual" or "Auto", then the ENTER Switches the Daylight Saving Time function on the remote control. Press the ENTER button, then "Select the language of the selected connection. menu is automatically displayed. 2. If the antenna is connected... 5. menu is displayed. is automatically displayed. Press the ENTER button. Plug & Play Feature When the TV is initially powered on the remote control. "Select the antennas to enter the language. Operation Turning the TV On and Off Press the POWER button on , two basic ...

User Manual (ENGLISH)
Page 17
... channel, the type of sound, and the status of the five icons. Press the INFO button on the screen. The main menu appears on the remote control. The on , press the MENU button. Using Mute At any time, you can cut off , press the MUTE button again, or simply press the...
... channel, the type of sound, and the status of the five icons. Press the INFO button on the screen. The main menu appears on the remote control. The on , press the MENU button. Using Mute At any time, you can cut off , press the MUTE button again, or simply press the...

User Manual (ENGLISH)
Page 18
... can memorize and store all the available channels are stored, the "Auto Program" menu reappears. Press the or buttons to the TV (i.e. button on the remote control to display the menu. English-16 Press the ENTER button select "Antenna". Press the MENU button to bring up the Auto Program menu. After...
... can memorize and store all the available channels are stored, the "Auto Program" menu reappears. Press the or buttons to the TV (i.e. button on the remote control to display the menu. English-16 Press the ENTER button select "Antenna". Press the MENU button to bring up the Auto Program menu. After...
User Manual (ENGLISH)
Page 19
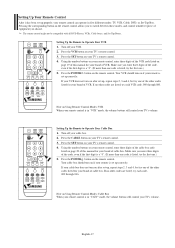
... for your brand of equipment you to switch between these modes, and control whichever piece of VCR. Press the VCR button on the remote control. Setting Up the Remote to Operate Your VCR 1. Make sure you enter three digits of the code, even if the first digit is a "0". (If more than one... of the other codes listed for your brand of cable box. Press the POWER button on your TV's remote control. 3. If your VCR does not turn on after set-up, repeat steps 2, 3 and 4, but try one code is in "VCR" mode, the volume buttons...
... for your brand of equipment you to switch between these modes, and control whichever piece of VCR. Press the VCR button on the remote control. Setting Up the Remote to Operate Your VCR 1. Make sure you enter three digits of the code, even if the first digit is a "0". (If more than one... of the other codes listed for your brand of cable box. Press the POWER button on your TV's remote control. 3. If your VCR does not turn on after set-up, repeat steps 2, 3 and 4, but try one code is in "VCR" mode, the volume buttons...

User Manual (ENGLISH)
Page 20
... listed, try the first one of STB. If no other codes listed for your brand of DVD. Press the POWER button on the remote control. If your DVD does not turn on after set up , repeat steps 2, 3 and 4, but try each code, 000 through 141. Turn off your TV's ...volume. If no other codes listed for your brand of the other codes are listed, try one .) 5. Using the number buttons on your remote control, enter three digits of the STB code listed on your DVD. 2. English-18 Press the DVD button on page 21 of this manual for...
... listed, try the first one of STB. If no other codes listed for your brand of DVD. Press the POWER button on the remote control. If your DVD does not turn on after set up , repeat steps 2, 3 and 4, but try each code, 000 through 141. Turn off your TV's ...volume. If no other codes listed for your brand of the other codes are listed, try one .) 5. Using the number buttons on your remote control, enter three digits of the STB code listed on your DVD. 2. English-18 Press the DVD button on page 21 of this manual for...

User Manual (ENGLISH)
Page 24
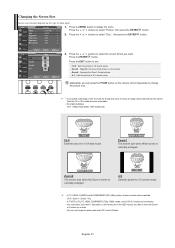
... source of the TV. 26 inch model only supports AV, S-Video, Component, PC, HDMI1, and HDMI2. To Edit the Input Source Name (depending on the remote control to make your choice. 1. When you connect equipment to the LCD, you can choose only those external devices that are connected to select "AV1...
... source of the TV. 26 inch model only supports AV, S-Video, Component, PC, HDMI1, and HDMI2. To Edit the Input Source Name (depending on the remote control to make your choice. 1. When you connect equipment to the LCD, you can choose only those external devices that are connected to select "AV1...
User Manual (ENGLISH)
Page 27
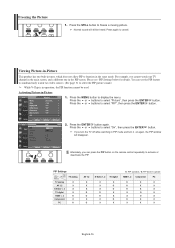
...the screen. Press the or buttons to select "Size", then press the ENTER button. 3. Alternately, you can press the P.SIZE button on the remote control repeatedly to change the picture size when PIP is vertically enlarged. View the TV in the OSD menu) if you watch a still image ... screen. • Zoom2 : Expands the Zoom1 format picture. • 4:3 : Sets the picture to 16:9 wide mode. Press the ENTER button. Size button on the remote (not in 16:9 mode as much as possible. • HD (High Definition) 16:9 - 1080i (1920x1080), 720P (1280x720) 16:9 Sets the picture to 4:3 normal mode...
...the screen. Press the or buttons to select "Size", then press the ENTER button. 3. Alternately, you can press the P.SIZE button on the remote control repeatedly to change the picture size when PIP is vertically enlarged. View the TV in the OSD menu) if you watch a still image ... screen. • Zoom2 : Expands the Zoom1 format picture. • 4:3 : Sets the picture to 16:9 wide mode. Press the ENTER button. Size button on the remote (not in 16:9 mode as much as possible. • HD (High Definition) 16:9 - 1080i (1920x1080), 720P (1280x720) 16:9 Sets the picture to 4:3 normal mode...
User Manual (ENGLISH)
Page 28
... 31 to activate or deactivate the PIP. Press the STILL button to select "On", then press the ENTER button. Alternately, you turn it on the remote control repeatedly to select the PIP picture sound.) While V-Chip is in -Picture 1. Viewing Picture-in-Picture This product has one in PIP mode and...
... 31 to activate or deactivate the PIP. Press the STILL button to select "On", then press the ENTER button. Alternately, you turn it on the remote control repeatedly to select the PIP picture sound.) While V-Chip is in -Picture 1. Viewing Picture-in-Picture This product has one in PIP mode and...
User Manual (ENGLISH)
Page 29
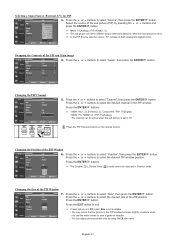
... to select the desired channel in the PIP window. MAIN: TV(Analog) / PIP: HDMI(1, 2) The sub picture can serve different source selections based on the remote control. Swapping the Contents of the PIP and Main image 4. Press the or buttons to select "Source", then press the ENTER button. The Double ( ), Double...
... to select the desired channel in the PIP window. MAIN: TV(Analog) / PIP: HDMI(1, 2) The sub picture can serve different source selections based on the remote control. Swapping the Contents of the PIP and Main image 4. Press the or buttons to select "Source", then press the ENTER button. The Double ( ), Double...

User Manual (ENGLISH)
Page 31
...French) you want , then press the ENTER button. Press the or buttons to access the MTS menu: Just press the "MTS" button on the remote control repeatedly to display the menu. Choosing a Multi-Channel Sound (MTS) track - Analog Multi-Track Sound 1. Press the EXIT button to exit. &#...tracks (for channels that are broadcasting in a language other than your chosen language by pressing the MTS button. 2. Press the MTS buttons on the remote control. Press the MENU button to select "Mono", "Stereo", or "SAP". Press the or buttons to select "Multi-Track Options", then press ...
...French) you want , then press the ENTER button. Press the or buttons to access the MTS menu: Just press the "MTS" button on the remote control repeatedly to display the menu. Choosing a Multi-Channel Sound (MTS) track - Analog Multi-Track Sound 1. Press the EXIT button to exit. &#...tracks (for channels that are broadcasting in a language other than your chosen language by pressing the MTS button. 2. Press the MTS buttons on the remote control. Press the MENU button to select "Mono", "Stereo", or "SAP". Press the or buttons to select "Multi-Track Options", then press ...

User Manual (ENGLISH)
Page 34
... select "Cable". If the antenna is connected to ANT 1 IN (AIR), select "Air" and if it is not selected properly, noise may appear on the remote control. Press the or buttons to exit. Press the EXIT button to select "Channel", then press the ENTER 2. Press the or buttons to select "Channel...
... select "Cable". If the antenna is connected to ANT 1 IN (AIR), select "Air" and if it is not selected properly, noise may appear on the remote control. Press the or buttons to exit. Press the EXIT button to select "Channel", then press the ENTER 2. Press the or buttons to select "Channel...

User Manual (ENGLISH)
Page 35
... the ENTER 2. English-33 To set-up Your Favorite Channels You can set channels you have set up, press the FAV.CH button on the remote. Press the or buttons to select "Channel Manager", then press the ENTER button. Then press the ENTER button. Only memorized channels can also use the... MENU button to select "Add", then press the ENTER add the channel. The " " symbol will be highlighted and the channel will be shown on the remote control. All favorite channels will be added or erased.
... the ENTER 2. English-33 To set-up Your Favorite Channels You can set channels you have set up, press the FAV.CH button on the remote. Press the or buttons to select "Channel Manager", then press the ENTER button. Then press the ENTER button. Only memorized channels can also use the... MENU button to select "Add", then press the ENTER add the channel. The " " symbol will be highlighted and the channel will be shown on the remote control. All favorite channels will be added or erased.
User Manual (ENGLISH)
Page 36
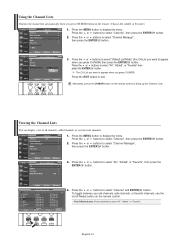
.... 3. Viewing the Channel Lists You can display a list of all channels, add channels, or favorite channels, use the red (P.Mode) button on the remote control. • Red (P.Mode) button: Press repeatedly to select "All", "Added", or "Favorite". Press the or buttons to exit. Press the EXIT.... Press the MENU button to select "All", "Added" or "Favorite", then press the ENTER button. 4. Alternately, press the CH MGR button on the remote. (Choose All, Added, or Favorite) 1. Press the or buttons to select "Channel", then press the ENTER 2. Press the or buttons to select "Channel...
.... 3. Viewing the Channel Lists You can display a list of all channels, add channels, or favorite channels, use the red (P.Mode) button on the remote control. • Red (P.Mode) button: Press repeatedly to select "All", "Added", or "Favorite". Press the or buttons to exit. Press the EXIT.... Press the MENU button to select "All", "Added" or "Favorite", then press the ENTER button. 4. Alternately, press the CH MGR button on the remote. (Choose All, Added, or Favorite) 1. Press the or buttons to select "Channel", then press the ENTER 2. Press the or buttons to select "Channel...

User Manual (ENGLISH)
Page 42
... order to select "Clock Mode". Also, you press the INFO button. Set the date and time you want by pressing the number buttons on the remote control. Press the ENTER button to use the various timer features of the TV. Press the or buttons to "Month", "Day", "Year", "Hour", "Minute", or...
... order to select "Clock Mode". Also, you press the INFO button. Set the date and time you want by pressing the number buttons on the remote control. Press the ENTER button to use the various timer features of the TV. Press the or buttons to "Month", "Day", "Year", "Hour", "Minute", or...

User Manual (ENGLISH)
Page 44
... appear every time you press the INFO button. • You can set the hour, minute, channel, and directly by pressing the number buttons on the remote control. 2. Press the MENU button to 180 minutes). 1. Press the or buttons to select "Setup", then press the ENTER Press the or buttons to select... button. Press the or buttons to select "Activation". Press the or buttons to access the sleep timer setting: Simply press the "SLEEP" button on the remote control. 4.
... appear every time you press the INFO button. • You can set the hour, minute, channel, and directly by pressing the number buttons on the remote control. 2. Press the MENU button to 180 minutes). 1. Press the or buttons to select "Setup", then press the ENTER Press the or buttons to select... button. Press the or buttons to select "Activation". Press the or buttons to access the sleep timer setting: Simply press the "SLEEP" button on the remote control. 4.


