User Manual (ENGLISH)
Page 3
... Plug & Play Feature 13 Changing Channels 14 Adjusting the Volume 15 Viewing the Display 15 Viewing the Menus 15 Memorizing the Channels 16 Setting Up Your Remote Control 17 To Select the Source (depending on the model 22 To Edit the Input Source Name (depending on the model 22 PICTURE CONTROL Using Automatic Picture Settings 23 Adjusting the Color Tone 24 DNIe Demo(Digital Natural Image engine 24 Changing the Screen Size 25 Freezing the Picture 26 Viewing Picture-in-Picture 26 SOUND CONTROL Customizing the Sound...
... Plug & Play Feature 13 Changing Channels 14 Adjusting the Volume 15 Viewing the Display 15 Viewing the Menus 15 Memorizing the Channels 16 Setting Up Your Remote Control 17 To Select the Source (depending on the model 22 To Edit the Input Source Name (depending on the model 22 PICTURE CONTROL Using Automatic Picture Settings 23 Adjusting the Color Tone 24 DNIe Demo(Digital Natural Image engine 24 Changing the Screen Size 25 Freezing the Picture 26 Viewing Picture-in-Picture 26 SOUND CONTROL Customizing the Sound...
User Manual (ENGLISH)
Page 4
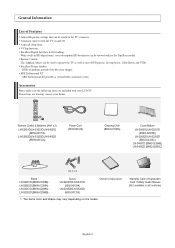
... used to turn the TV on the model. Excellent Picture Quality - V-Chip function. Remote Control The supplied remote can be viewed with your dealer. SRS TruSurround XT provides a virtual Dolby surround system. Warranty Card / Registration Card / Safety Guide Manual (Not available in the TV's memory. Automatic timer to operate the TV as well as most DVD players, Set-top boxes, Cable Boxes and VCRs. A special sleep timer. SRS TruSurround XT - Excellent Digital Interface & Networking...
... used to turn the TV on the model. Excellent Picture Quality - V-Chip function. Remote Control The supplied remote can be viewed with your dealer. SRS TruSurround XT provides a virtual Dolby surround system. Warranty Card / Registration Card / Safety Guide Manual (Not available in the TV's memory. Automatic timer to operate the TV as well as most DVD players, Set-top boxes, Cable Boxes and VCRs. A special sleep timer. SRS TruSurround XT - Excellent Digital Interface & Networking...
User Manual (ENGLISH)
Page 5
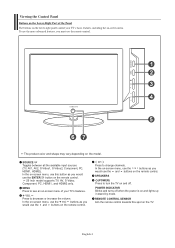
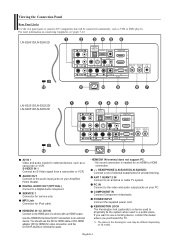
... remote control. REMOTE CONTROL SENSOR Aim the remote control towards this button as you would use the ENTER button on the remote control. 26 inch model supports TV, AV, S-Video, Component, PC, HDMI1, and HDMI2 only. MENU Press to change channels. English-3 POWER INDICATOR Blinks and turns off . SOURCE Toggles between all the available input sources (TV, AV1, AV2, S-Video1, S-Video2, Component, PC, HDMI1, HDMI2). In the on-screen menu, use the buttons as you would use the and buttons on the remote control. Viewing the Control Panel Buttons...
... remote control. REMOTE CONTROL SENSOR Aim the remote control towards this button as you would use the ENTER button on the remote control. 26 inch model supports TV, AV, S-Video, Component, PC, HDMI1, and HDMI2 only. MENU Press to change channels. English-3 POWER INDICATOR Blinks and turns off . SOURCE Toggles between all the available input sources (TV, AV1, AV2, S-Video1, S-Video2, Component, PC, HDMI1, HDMI2). In the on-screen menu, use the buttons as you would use the and buttons on the remote control. Viewing the Control Panel Buttons...
User Manual (ENGLISH)
Page 6
... (OPTICAL) Connect to an external device. HEADPHONE (LN-S2651D/LN-S2652D) Connect a set of external headphones for external devices, such as VCR or DVD players. COMPONENT IN Connect Component video/audio. POWER INPUT Connect the supplied power cord. English-4 S-VIDEO IN 1 Connect an S-Video signal from a camcorder or VCR. Use the HDMI/DVI terminal for DVI connection to a Digital Audio component. No sound connection is a device used to physically fix the system when used in a public place. The place of a device with an HDMI output. You should use a locking...
... (OPTICAL) Connect to an external device. HEADPHONE (LN-S2651D/LN-S2652D) Connect a set of external headphones for external devices, such as VCR or DVD players. COMPONENT IN Connect Component video/audio. POWER INPUT Connect the supplied power cord. English-4 S-VIDEO IN 1 Connect an S-Video signal from a camcorder or VCR. Use the HDMI/DVI terminal for DVI connection to a Digital Audio component. No sound connection is a device used to physically fix the system when used in a public place. The place of a device with an HDMI output. You should use a locking...

User Manual (ENGLISH)
Page 8
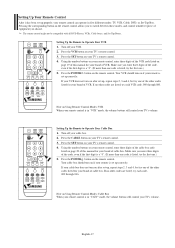
.../Cable channels. POWER Turns the TV on -screen menu. Rewind - AUTO PROG. RESET When your remote does not work, change channels in Picture ON/OFF. CH MGR Used to stop the action during a particular scene. SRS Selects SRS TruSurround XT mode. STILL Press to display Channel Lists on the screen. SWAP Switches the main and sub (PIP) picture. ADD/DEL Use to store and delete channels to operate your VCR, Cable box, DVD player, or Set-Top Box. You can use the remote control...
.../Cable channels. POWER Turns the TV on -screen menu. Rewind - AUTO PROG. RESET When your remote does not work, change channels in Picture ON/OFF. CH MGR Used to stop the action during a particular scene. SRS Selects SRS TruSurround XT mode. STILL Press to display Channel Lists on the screen. SWAP Switches the main and sub (PIP) picture. ADD/DEL Use to store and delete channels to operate your VCR, Cable box, DVD player, or Set-Top Box. You can use the remote control...
User Manual (ENGLISH)
Page 9
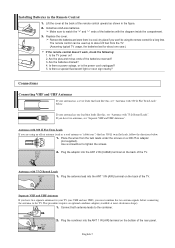
...; adapter (not supplied). If you must combine the two antenna signals before connecting the antennas to the TV. Use a screwdriver to the combiner. Is there a power outage, or is the power cord unplugged? 5. If your antenna has one lead that look like this , see "Separate VHF and UHF Antennas". Plug the adaptor into the ANT 1 IN (AIR) terminal on the back of the rear panel. Plug...
...; adapter (not supplied). If you must combine the two antenna signals before connecting the antennas to the TV. Use a screwdriver to the combiner. Is there a power outage, or is the power cord unplugged? 5. If your antenna has one lead that look like this , see "Separate VHF and UHF Antennas". Plug the adaptor into the ANT 1 IN (AIR) terminal on the back of the rear panel. Plug...

User Manual (ENGLISH)
Page 10
... IN ANT OUT 1. After you will need a cable box to the ANT OUT terminal on your cable box descrambles only some channels (such as premium channels), follow the instructions below . Connecting to a Cable Box that is connected to view unscrambled cable channels. Because this cable to the ANT IN terminal on your TV to the cable box's output channel, which is cable-ready, you do not need a two-way splitter, an RF...
... IN ANT OUT 1. After you will need a cable box to the ANT OUT terminal on your cable box descrambles only some channels (such as premium channels), follow the instructions below . Connecting to a Cable Box that is connected to view unscrambled cable channels. Because this cable to the ANT IN terminal on your TV to the cable box's output channel, which is cable-ready, you do not need a two-way splitter, an RF...

User Manual (ENGLISH)
Page 11
... Samsung TV can be connected to the cable. Connect an S-Video Cable between the AUDIO OUT jacks on the VCR and the AV IN 1 [R-AUDIO-L] jacks on pages 7-8). Unplug the cable or antenna from an S-VHS VCR. (This connection delivers a better picture as compared to your VCR and your VCR tape. English-9 VCR Rear Panel ANT 1 IN ANT 2 IN (AIR) (CABLE) TV Rear Panel 5 Audio Cable (Not supplied) 2 4 Video Cable (Not supplied) 3 RF Cable...
... Samsung TV can be connected to the cable. Connect an S-Video Cable between the AUDIO OUT jacks on the VCR and the AV IN 1 [R-AUDIO-L] jacks on pages 7-8). Unplug the cable or antenna from an S-VHS VCR. (This connection delivers a better picture as compared to your VCR and your VCR tape. English-9 VCR Rear Panel ANT 1 IN ANT 2 IN (AIR) (CABLE) TV Rear Panel 5 Audio Cable (Not supplied) 2 4 Video Cable (Not supplied) 3 RF Cable...
User Manual (ENGLISH)
Page 12
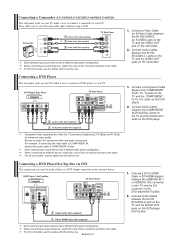
... connecting an external device, match the color of the connection terminal to HDMI Cable (Not supplied) Each external input source device has a different back panel configuration. For 40 inch model, use the cables with the ferrite core. Connecting a DVD Player/Set-Top Box via DVI This connection can only be made if there is a DVI Output connector on the camcorder. 1. For example, if connecting the video cable to COMPONENT IN, connect the audio cable to COMPONENT IN also. For 40 inch model, use...
... connecting an external device, match the color of the connection terminal to HDMI Cable (Not supplied) Each external input source device has a different back panel configuration. For 40 inch model, use the cables with the ferrite core. Connecting a DVD Player/Set-Top Box via DVI This connection can only be made if there is a DVI Output connector on the camcorder. 1. For example, if connecting the video cable to COMPONENT IN, connect the audio cable to COMPONENT IN also. For 40 inch model, use...

User Manual (ENGLISH)
Page 13
... color of the connection terminal to the cable. Connecting a Digital Audio System The rear panel jacks on your TV. For 40 inch model, use the cables with the Amplifier's volume control. The difference between the HDMI/DVI 1 or HDMI/DVI 2 connector on the TV and the HDMI connector on the external device. Digital Audio System TV Rear Panel Optical Cable (Not supplied) 5.1CH audio is possible when the TV is an HDMI Output connector on the DVD player/Set-Top Box. Connect an HDMI Cable...
... color of the connection terminal to the cable. Connecting a Digital Audio System The rear panel jacks on your TV. For 40 inch model, use the cables with the Amplifier's volume control. The difference between the HDMI/DVI 1 or HDMI/DVI 2 connector on the TV and the HDMI connector on the external device. Digital Audio System TV Rear Panel Optical Cable (Not supplied) 5.1CH audio is possible when the TV is an HDMI Output connector on the DVD player/Set-Top Box. Connect an HDMI Cable...
User Manual (ENGLISH)
Page 14
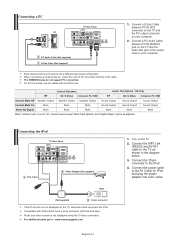
... external input source device has a different back panel configuration. Internal Speakers Audio Out (Optical, L/R Out) RF AV, S-Video Component, PC, HDMI RF AV, S-Video Component, PC, HDMI Internal Mute Off Speaker Output Speaker Output Speaker Output Sound Output Sound Output Sound Output Internal Mute On Mute Mute Mute Sound Output Sound Output Sound Output Video No Signal Mute Mute Mute Mute Mute Mute When "Internal mute" is not displayed using the S-Video connection. Connect the 30-pin connector to : www.samsungparts.com English-12 1. Connect a PC Audio Cable...
... external input source device has a different back panel configuration. Internal Speakers Audio Out (Optical, L/R Out) RF AV, S-Video Component, PC, HDMI RF AV, S-Video Component, PC, HDMI Internal Mute Off Speaker Output Speaker Output Speaker Output Sound Output Sound Output Sound Output Internal Mute On Mute Mute Mute Sound Output Sound Output Sound Output Video No Signal Mute Mute Mute Mute Mute Mute When "Internal mute" is not displayed using the S-Video connection. Connect the 30-pin connector to : www.samsungparts.com English-12 1. Connect a PC Audio Cable...

User Manual (ENGLISH)
Page 15
... button, then press the ENTER button. Press the ENTER button, then "Select the language of the panel. "Select the antennas to select language, then the ENTER button. If both ANT 1 (AIR) and ANT 2 (CABLE) are stored, the Auto program menu reappears. In Cable mode, you can also use the POWER button on the front of the OSD" menu is automatically displayed. 2. Press the ENTER button when channel memorization is connected...
... button, then press the ENTER button. Press the ENTER button, then "Select the language of the panel. "Select the antennas to select language, then the ENTER button. If both ANT 1 (AIR) and ANT 2 (CABLE) are stored, the Auto program menu reappears. In Cable mode, you can also use the POWER button on the front of the OSD" menu is automatically displayed. 2. Press the ENTER button when channel memorization is connected...

User Manual (ENGLISH)
Page 17
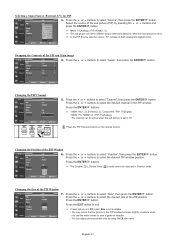
... certain audio-video settings. 1. The on , press the MENU button. To turn mute off, press the MUTE button again, or simply press the VOL or VOL buttons. Press the INFO button on the screen. The main menu appears on the remote control. Use the or buttons to access the icon's sub-menu. 3. English-15 The TV will appear in the lower-left side has five icons: Input, Picture, Sound, Channel, Setup. 2. The...
... certain audio-video settings. 1. The on , press the MENU button. To turn mute off, press the MUTE button again, or simply press the VOL or VOL buttons. Press the INFO button on the screen. The main menu appears on the remote control. Use the or buttons to access the icon's sub-menu. 3. English-15 The TV will appear in the lower-left side has five icons: Input, Picture, Sound, Channel, Setup. 2. The...
User Manual (ENGLISH)
Page 19
.... 2. Using the number buttons on your remote control, enter three digits of the cable box code listed on your TV's remote control. 4. If your cable box does not turn on after set-up properly, your remote control can operate in "VCR" mode, the volume buttons still control your TV's volume. The remote control might not be compatible with all DVD Players, VCRs, Cable boxes, and Set-Top Boxes. Press the POWER button on your TV's remote control. 4. Press the SET button on the remote control. Press the POWER button on your TV's remote control. 3. Make...
.... 2. Using the number buttons on your remote control, enter three digits of the cable box code listed on your TV's remote control. 4. If your cable box does not turn on after set-up properly, your remote control can operate in "VCR" mode, the volume buttons still control your TV's volume. The remote control might not be compatible with all DVD Players, VCRs, Cable boxes, and Set-Top Boxes. Press the POWER button on your TV's remote control. 4. Press the SET button on the remote control. Press the POWER button on your TV's remote control. 3. Make...

User Manual (ENGLISH)
Page 20
...'s remote control. 3. Press the SET button on page 21 of this manual for your brand of the DVD code listed on your TV's remote control. 4. Using the number buttons on your remote control, enter three digits of STB. Your STB should turn on Using Remote Control Modes: DVD When your remote control is set up correctly. English-18 Note on if your remote is in "STB" mode, the volume buttons still control your DVD. 2. Turn off your TV's volume. Your DVD should turn on Using Remote Control Modes: STB...
...'s remote control. 3. Press the SET button on page 21 of this manual for your brand of the DVD code listed on your TV's remote control. 4. Using the number buttons on your remote control, enter three digits of STB. Your STB should turn on Using Remote Control Modes: DVD When your remote control is set up correctly. English-18 Note on if your remote is in "STB" mode, the volume buttons still control your DVD. 2. Turn off your TV's volume. Your DVD should turn on Using Remote Control Modes: STB...

User Manual (ENGLISH)
Page 24
... button. Press the or buttons to display the menu. Press the ENTER button to the TV. You can choose between the following sets of jacks: TV, AV1, AV2, S-Video1, S-Video2, Component, PC, HDMI1, or HDMI2 on the remote control to select the input source of the TV. 26 inch model only supports AV, S-Video, Component, PC, HDMI1, and HDMI2. Use to view an external signal source. Press the SOURCE button on the TV's rear panel...
... button. Press the or buttons to display the menu. Press the ENTER button to the TV. You can choose between the following sets of jacks: TV, AV1, AV2, S-Video1, S-Video2, Component, PC, HDMI1, or HDMI2 on the remote control to select the input source of the TV. 26 inch model only supports AV, S-Video, Component, PC, HDMI1, and HDMI2. Use to view an external signal source. Press the SOURCE button on the TV's rear panel...
User Manual (ENGLISH)
Page 29
... PIP Window 6. Press the ENTER buttons. • MAIN: AV(1, 2), S-Video(1, 2), Component / PIP: TV(Digital) • MAIN: PC, HDMI(1,2) / PIP: TV(Analog) • The channel can serve different source selections based on the remote control. Changing the Position of the PIP and Main image 4. The Double ( ), Double Wide ( ) mode cannot be active when the sub picture is not available. • You may notice that the picture in PC mode, Size is set to view a game...
... PIP Window 6. Press the ENTER buttons. • MAIN: AV(1, 2), S-Video(1, 2), Component / PIP: TV(Digital) • MAIN: PC, HDMI(1,2) / PIP: TV(Analog) • The channel can serve different source selections based on the remote control. Changing the Position of the PIP and Main image 4. The Double ( ), Double Wide ( ) mode cannot be active when the sub picture is not available. • You may notice that the picture in PC mode, Size is set to view a game...

User Manual (ENGLISH)
Page 50
Press the MENU button to select "Setup", then press the ENTER button. 2. Press the or buttons to display the menu. Using the V-Chip The V-Chip feature automatically locks out programs that are set is activated, the PIP features do not function. Press the MENU button to select "Change PIN", then press the ENTER button. Press the or buttons to display the menu. Press the or buttons to select "On", then press...
Press the MENU button to select "Setup", then press the ENTER button. 2. Press the or buttons to display the menu. Using the V-Chip The V-Chip feature automatically locks out programs that are set is activated, the PIP features do not function. Press the MENU button to select "Change PIN", then press the ENTER button. Press the or buttons to display the menu. Press the or buttons to select "On", then press...
User Manual (ENGLISH)
Page 58
... seconds, then try this list of these values with a digital signal. The TV operates erratically. Digital broadcasting screen problem. Try another channel. Then, adjust the TV volume accordingly. Make sure the wall outlet is black and power indicator light blinks steadily. Compare these troubleshooting tips apply, call your computer check: Power, Signal Cable. Adjust the Coarse tuning and then adjust the Fine tuning. Your TV supports multiscan display functions within the following frequency...
... seconds, then try this list of these values with a digital signal. The TV operates erratically. Digital broadcasting screen problem. Try another channel. Then, adjust the TV volume accordingly. Make sure the wall outlet is black and power indicator light blinks steadily. Compare these troubleshooting tips apply, call your computer check: Power, Signal Cable. Adjust the Coarse tuning and then adjust the Fine tuning. Your TV supports multiscan display functions within the following frequency...
User Manual (ENGLISH)
Page 60
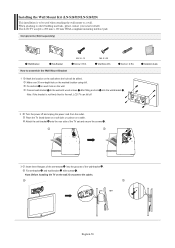
... cables. Connect wall-bracket to the wall with screws . When attaching to a wall. Components (Sold separately) Wall-Bracket Set-Bracket How to assemble the Wall Mount Bracket M4 X L15 Screw: 8 EA M4 X L20 Wood Screw: 4 EA Anchor: 4 EA 1 Mark the location on the wall where the hole will be used when attaching the wall mount to other building materials, please contact your nearest dealer. Fix set -bracket into the wall-bracket . Installation Guide 2 Turn the power off . Note: Before installing the TV on a table...
... cables. Connect wall-bracket to the wall with screws . When attaching to a wall. Components (Sold separately) Wall-Bracket Set-Bracket How to assemble the Wall Mount Bracket M4 X L15 Screw: 8 EA M4 X L20 Wood Screw: 4 EA Anchor: 4 EA 1 Mark the location on the wall where the hole will be used when attaching the wall mount to other building materials, please contact your nearest dealer. Fix set -bracket into the wall-bracket . Installation Guide 2 Turn the power off . Note: Before installing the TV on a table...


