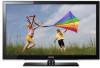
Samsung LN46C530F1F Research
View Results Below
Free Samsung LN46C530F1F manuals!
Problems with Samsung LN46C530F1F?
Ask a Question
Free Samsung LN46C530F1F manuals!
Problems with Samsung LN46C530F1F?
Ask a Question
Related Manual Pages


Similar Questions

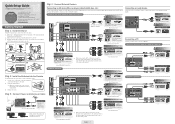
Manual Please. How To Set Up Directv On This?
just got this tv and dont know how to hook it up to directv and my blue-ray.
just got this tv and dont know how to hook it up to directv and my blue-ray.
(Posted by whittlegirls 6 years ago)

How Do I Remove The Base So I Can Mount The Tv On The Wall
(Posted by scottraugh 8 years ago)

I Have The Samsung Ln46c530f1fza And The Tv Won't Turn On.
The power light blinks 5 times then turns off. I replaced the power supply board and that didn't hel...
The power light blinks 5 times then turns off. I replaced the power supply board and that didn't hel...
(Posted by rahall1984 11 years ago)

What Size Is Screw 4ea For Bracket Mount To Connect Tv Ln46c 530 To Mount?
(Posted by bodelisa 11 years ago)

Where Do You Find The Input Button To Watch Dvd's
(Posted by Anonymous-54670 12 years ago)
Related Terms
The following terms were also used when searching for Samsung LN46C530F1F Research:- ln46c530f1f review
- ln46c530f1f reviews
- ln46c530f1f specs
- samsung ln46c530f1f parts
- samsung ln46c530f1f sale
- samsung ln46c530f1f reviews
- samsung ln46c530f1f review
- samsung ln46c530f1f response time
- samsung ln46c530f1f repairs
- samsung ln46c530f1f remote control
- samsung ln46c530f1f problems
- samsung ln46c530f1f prices
- samsung ln46c530f1f price
- ln46c530f1f wont turn on
- samsung ln46c530f1f manual
- samsung ln46c530f1f lcd tv
- samsung ln46c530f1f lcd replacement
- samsung ln46c530f1f for sale
- samsung ln46c530f1f firmware
- samsung ln46c530f1f features
- samsung ln46c530f1f broke
- samsung ln46c530f1f amazon
- model ln46c530f1f
- ln46c530f1f white screen
- samsung ln46c530f1f user manual
- tv model ln46c530f1f
- tv ln46c530f1f
- samsung tv model ln46c530f1f
- samsung tv ln46c530f1f
- samsung model ln46c530f1f
- samsung ln46c530f1f wont turn on
- samsung ln46c530f1f wifi
- samsung ln46c530f1f white screen
- samsung ln46c530f1f wall mount
- samsung ln46c530f1f voltage
- samsung ln46c530f1f screen
- samsung ln46c530f1f used
- samsung ln46c530f1f update
- samsung ln46c530f1f tv stand
- samsung ln46c530f1f tv
- samsung ln46c530f1f stand
- samsung ln46c530f1f specs
- samsung ln46c530f1f specifications
- samsung ln46c530f1f software upgrade
- samsung ln46c530f1f software update
- samsung ln46c530f1f settings
- ln46c530f1f for sale
- ln46c530f1f repairs
- ln46c530f1f remote control
- ln46c530f1f problems
- ln46c530f1f prices
- ln46c530f1f price
- ln46c530f1f parts
- ln46c530f1f manual
- ln46c530f1f main board
- ln46c530f1f lcd tv
- ln46c530f1f lcd replacement
- ln46c530f1f replacement screen
- ln46c530f1f firmware
- ln46c530f1f features
- ln46c530f1f control board
- ln46c530f1f contrast ratio
- ln46c530f1f cnet
- ln46c530f1f calibration
- ln46c530f1f broke
- ln46c530f1f amazon
- 46 samsung ln46c530f1f
- ln46c530f1f software upgrade
- 46 ln46c530f1f
- ln46c530f1f wall mount
- ln46c530f1f voltage
- ln46c530f1f user manual
- ln46c530f1f used
- ln46c530f1f update
- ln46c530f1f tv stand
- ln46c530f1f tv
- ln46c530f1f stand
- ln46c530f1f specifications
- ln46c530f1f wifi
- ln46c530f1f software update
- ln46c530f1f settings
- ln46c530f1f screen
- ln46c530f1f samsung tv will not turn on
- ln46c530f1f samsung tv /power cord
- ln46c530f1f samsung tv
- ln46c530f1f samsung review
- ln46c530f1f sale
- ln46c530f1f response time