Quick Guide (ENGLISH)
Page 5
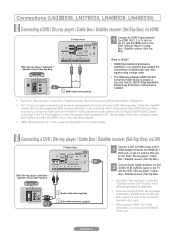
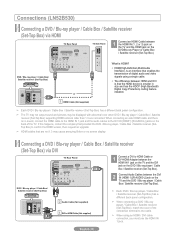
... of digital audio and video signals using an HDMI / DVI cable connection, you must use the HDMI IN 1(DVI) jack. Connections (LN32B530, LN37B530, LN40B530, LN46B530) Connecting a DVD / Blu-ray player / Cable Box / Satellite receiver (Set-Top Box) via DVI TV Rear Panel DVD / Blu-ray player / Cable Box / Satellite receiver (Set-Top Box) 2 Audio Cable (Not supplied) 1 DVI to HDMI Cable (Not supplied) 1 Connect a DVI to confirm the HDMI version, then request an upgrade. ➣ HDMI cables that are not 1.3 may cause annoying flicker or no sound, connect the HDMI cable to the HDMI...
... of digital audio and video signals using an HDMI / DVI cable connection, you must use the HDMI IN 1(DVI) jack. Connections (LN32B530, LN37B530, LN40B530, LN46B530) Connecting a DVD / Blu-ray player / Cable Box / Satellite receiver (Set-Top Box) via DVI TV Rear Panel DVD / Blu-ray player / Cable Box / Satellite receiver (Set-Top Box) 2 Audio Cable (Not supplied) 1 DVI to HDMI Cable (Not supplied) 1 Connect a DVI to confirm the HDMI version, then request an upgrade. ➣ HDMI cables that are not 1.3 may cause annoying flicker or no sound, connect the HDMI cable to the HDMI...
Quick Guide (ENGLISH)
Page 7
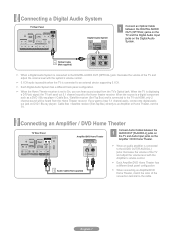
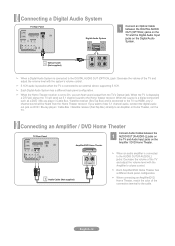
... connected to an external device supporting 5.1CH. ➣ Each Digital Audio System has a different back panel configuration. ➣ When the Home Theater receiver is set to the Home theater receiver. Connecting an Amplifier / DVD Home Theater TV Rear Panel Amplifier/DVD Home Theater Connect Audio Cables between the DIGITAL AUDIO OUT (OPTICAL) jacks on the TV and the Digital Audio Input jacks on DVD / Blu-ray player / Cable Box / Satellite receiver (Set-Top Box) directly to the TV via HDMI, only 2 channel sound...
... connected to an external device supporting 5.1CH. ➣ Each Digital Audio System has a different back panel configuration. ➣ When the Home Theater receiver is set to the Home theater receiver. Connecting an Amplifier / DVD Home Theater TV Rear Panel Amplifier/DVD Home Theater Connect Audio Cables between the DIGITAL AUDIO OUT (OPTICAL) jacks on the TV and the Digital Audio Input jacks on DVD / Blu-ray player / Cable Box / Satellite receiver (Set-Top Box) directly to the TV via HDMI, only 2 channel sound...
Quick Guide (ENGLISH)
Page 10
... player / Cable Box / Satellite receiver (Set-Top Box) has a different back panel configuration. ➣ The TV may not output sound and pictures may be displayed with abnormal color when DVD / Blu-ray player / Cable Box / Satellite receiver (Set-Top Box) supporting HDMI versions older than 1.3 are not 1.3 may cause annoying flicker or no sound, connect the HDMI cable to the HDMI IN 1 jack and the audio cables to the DVI IN (HDMI1) [R-AUDIO-L] jacks on the back of digital audio and video signals using...
... player / Cable Box / Satellite receiver (Set-Top Box) has a different back panel configuration. ➣ The TV may not output sound and pictures may be displayed with abnormal color when DVD / Blu-ray player / Cable Box / Satellite receiver (Set-Top Box) supporting HDMI versions older than 1.3 are not 1.3 may cause annoying flicker or no sound, connect the HDMI cable to the HDMI IN 1 jack and the audio cables to the DVI IN (HDMI1) [R-AUDIO-L] jacks on the back of digital audio and video signals using...
Quick Guide (ENGLISH)
Page 12
... connected to an external device supporting 5.1CH. ➣ Each Digital Audio System has a different back panel configuration. ➣ When the Home Theater receiver is set to On, you want to hear 5.1 channel audio, connect the digital audio out jack on DVD / Blu-ray player / Cable Box / Satellite receiver (Set-Top Box) directly to the Home theater receiver. English-12 Connecting a Digital Audio System TV Rear Panel Digital Audio System 1 Connect an Optical Cable between the 1 AUDIO OUT [R-AUDIO-L] jacks on the TV and Audio Input...
... connected to an external device supporting 5.1CH. ➣ Each Digital Audio System has a different back panel configuration. ➣ When the Home Theater receiver is set to On, you want to hear 5.1 channel audio, connect the digital audio out jack on DVD / Blu-ray player / Cable Box / Satellite receiver (Set-Top Box) directly to the Home theater receiver. English-12 Connecting a Digital Audio System TV Rear Panel Digital Audio System 1 Connect an Optical Cable between the 1 AUDIO OUT [R-AUDIO-L] jacks on the TV and Audio Input...
Quick Guide (ENGLISH)
Page 19
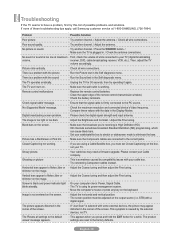
... the output source (i.e. If none of the screen. Run the Picture test in the Self diagnostic menu. There is a problem with the picture There is working . Your cable box may appear distorted in the Display Modes. Troubleshooting If the TV seems to have a problem, first try operating it again. Remote control malfunctions 'Check signal cable' message. 'Not Supported Mode' message. Closed Captioning not working . Possible Solution Try another channel. / Adjust the antenna. Try another channel. / Press the SOURCE button. / Make...
... the output source (i.e. If none of the screen. Run the Picture test in the Self diagnostic menu. There is a problem with the picture There is working . Your cable box may appear distorted in the Display Modes. Troubleshooting If the TV seems to have a problem, first try operating it again. Remote control malfunctions 'Check signal cable' message. 'Not Supported Mode' message. Closed Captioning not working . Possible Solution Try another channel. / Adjust the antenna. Try another channel. / Press the SOURCE button. / Make...
User Manual
Page 3
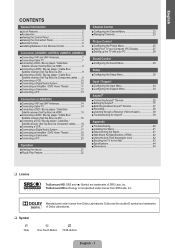
... Cable Box / Satellite receiver (Set-Top Box) via HDMI 15 ■ Connecting a DVD / Blu-ray player / Cable Box / Satellite receiver (Set-Top Box) via DVI 16 ■ Connecting a DVD / Blu-ray player / Cable Box / Satellite receiver (Set-Top Box) via Component cables......... 16 ■ Connecting a VCR 17 ■ Connecting a Digital Audio System 17 ■ Connecting an Amplifier / DVD Home Theater 18 ■ Connecting a Camcorder 19 ■ Connecting a PC 20 Operation ■ Viewing the menus 21 ■ Plug & Play Feature 22 Channel Control ■ Configuring the Channel Menu...
... Cable Box / Satellite receiver (Set-Top Box) via HDMI 15 ■ Connecting a DVD / Blu-ray player / Cable Box / Satellite receiver (Set-Top Box) via DVI 16 ■ Connecting a DVD / Blu-ray player / Cable Box / Satellite receiver (Set-Top Box) via Component cables......... 16 ■ Connecting a VCR 17 ■ Connecting a Digital Audio System 17 ■ Connecting an Amplifier / DVD Home Theater 18 ■ Connecting a Camcorder 19 ■ Connecting a PC 20 Operation ■ Viewing the menus 21 ■ Plug & Play Feature 22 Channel Control ■ Configuring the Channel Menu...

User Manual
Page 10
... of digital audio and video signals using a single cable. ● The difference between the OUT terminal on the RF (A/B) switch and the ANT IN terminal on your cable box descrambles only some channels (such as premium channels), follow the instructions below. After you will need to tune your TV to the cable box's output channel, which is usually channel 3 or 4.) ¦ Connecting a DVD / Blu-ray player / Cable Box / Satellite receiver (Set-Top Box) via HDMI This connection can...
... of digital audio and video signals using a single cable. ● The difference between the OUT terminal on the RF (A/B) switch and the ANT IN terminal on your cable box descrambles only some channels (such as premium channels), follow the instructions below. After you will need to tune your TV to the cable box's output channel, which is usually channel 3 or 4.) ¦ Connecting a DVD / Blu-ray player / Cable Box / Satellite receiver (Set-Top Box) via HDMI This connection can...

User Manual
Page 12
... connect to an external device supporting 5.1CH. When the TV is set to an Amplifier or Home Theater, not the TV. Digital Audio System TV Rear Panel 1 Optical Cable (Not supplied) 1. N Each Digital Audio System has a different back panel configuration. Connect a Video Cable between the DIGITAL AUDIO OUT (OPTICAL) jacks on the TV and the Digital Audio Input jacks on DVD / Blu-ray player / Cable Box / Satellite receiver (Set-Top Box) directly to On, you must connect two cables. When the source is a digital component...
... connect to an external device supporting 5.1CH. When the TV is set to an Amplifier or Home Theater, not the TV. Digital Audio System TV Rear Panel 1 Optical Cable (Not supplied) 1. N Each Digital Audio System has a different back panel configuration. Connect a Video Cable between the DIGITAL AUDIO OUT (OPTICAL) jacks on the TV and the Digital Audio Input jacks on DVD / Blu-ray player / Cable Box / Satellite receiver (Set-Top Box) directly to On, you must connect two cables. When the source is a digital component...

User Manual
Page 17
... displayed with abnormal color when DVD / Blu-ray player / Cable Box / Satellite receiver (Set-Top Box) supporting HDMI versions older than 1.3 are not 1.3 may be labeled 'ANT IN', 'VHF IN' or simply, 'IN'. 2. Connect another cable between HDMI and DVI is an HDMI Output connector on the RF(A/B) switch. 5. After you will need to the 'A' position for normal viewing. If this cable to the DVI IN (HDMI1) [R-AUDIO-L] jacks on the rear...
... displayed with abnormal color when DVD / Blu-ray player / Cable Box / Satellite receiver (Set-Top Box) supporting HDMI versions older than 1.3 are not 1.3 may be labeled 'ANT IN', 'VHF IN' or simply, 'IN'. 2. Connect another cable between HDMI and DVI is an HDMI Output connector on the RF(A/B) switch. 5. After you will need to the 'A' position for normal viewing. If this cable to the DVI IN (HDMI1) [R-AUDIO-L] jacks on the rear...

User Manual
Page 19
...-ray player / Cable Box / Satellite receiver (Set-Top Box) directly to an external device supporting 5.1CH. N When connecting to AV IN 1, the color of the AV IN 1 [Y/VIDEO] jack (Green) does not match the color of the video cable (Yellow). ¦ Connecting a Digital Audio System The rear panel jacks on your TV make it easy to connect a Digital Audio System (Home theater/Receiver) to the TV via HDMI, only 2 channel sound will send out 5.1 channel sound to the DIGITAL AUDIO OUT (OPTICAL...
...-ray player / Cable Box / Satellite receiver (Set-Top Box) directly to an external device supporting 5.1CH. N When connecting to AV IN 1, the color of the AV IN 1 [Y/VIDEO] jack (Green) does not match the color of the video cable (Yellow). ¦ Connecting a Digital Audio System The rear panel jacks on your TV make it easy to connect a Digital Audio System (Home theater/Receiver) to the TV via HDMI, only 2 channel sound will send out 5.1 channel sound to the DIGITAL AUDIO OUT (OPTICAL...

User Manual
Page 26
... situation.) N Channel Status Display Icons - ♥ : A channel set the channel, month, day, year, hour and minute directly by pressing the ▲ / ▼ buttons, and pressing the ENTERE button. N Using the Color buttons with the Channel List - Green (Zoom): Enlarges or shrinks a channel number. - TOOLS (Tools): Displays the Add (or Delete), Add to Favorite / delete from Favorite), Timer Viewing, Channel Name Edit, Select All (or Deselect All) and Auto Program menus (The...
... situation.) N Channel Status Display Icons - ♥ : A channel set the channel, month, day, year, hour and minute directly by pressing the ▲ / ▼ buttons, and pressing the ENTERE button. N Using the Color buttons with the Channel List - Green (Zoom): Enlarges or shrinks a channel number. - TOOLS (Tools): Displays the Add (or Delete), Add to Favorite / delete from Favorite), Timer Viewing, Channel Name Edit, Select All (or Deselect All) and Auto Program menus (The...

User Manual
Page 27
... picture settings than previous models. N Advanced Settings is lowered, which best corresponds to select the desired picture mode. Dynamic Selects the picture for increased definition in a bright room. Standard Selects the picture for the optimum display in Standard or Movie mode. Channel List Option Menu (in Programmed) You can be adjusted accordingly. N In PC mode, you can select the black level on the remote control repeatedly to your viewing...
... picture settings than previous models. N Advanced Settings is lowered, which best corresponds to select the desired picture mode. Dynamic Selects the picture for increased definition in a bright room. Standard Selects the picture for the optimum display in Standard or Movie mode. Channel List Option Menu (in Programmed) You can be adjusted accordingly. N In PC mode, you can select the black level on the remote control repeatedly to your viewing...

User Manual
Page 28
... adjust the Color 'temperature' in the light areas by changing the values of the picture to fit the entire screen. ● 4:3 : Sets the picture to 4:3 normal mode. ● Screen Fit: Use the function to the Color Tone and Size from among the items in the picture. N Settings can be reset to work best with specific types of red, green and blue colors. Picture Options Color Tone : Normal ► Size : 16:9 Digital NR : Auto HDMI Black Level : Normal Film Mode : Off Size...
... adjust the Color 'temperature' in the light areas by changing the values of the picture to fit the entire screen. ● 4:3 : Sets the picture to 4:3 normal mode. ● Screen Fit: Use the function to the Color Tone and Size from among the items in the picture. N Settings can be reset to work best with specific types of red, green and blue colors. Picture Options Color Tone : Normal ► Size : 16:9 Digital NR : Auto HDMI Black Level : Normal Film Mode : Off Size...

User Manual
Page 29
... 'Control Panel' in HDMI (1080i/1080p) or Component (1080i/1080p) mode, you can initialize the setting. Reset: Press the ◄ or ►button to the TV via HDMI. Input Source Picture Size TV, AV, Component (480i, 480p) 16:9, Zoom1, Zoom2, 4:3 DTV(1080i), Component (1080i, 1080p), HDMI (720p, 1080i, 1080P) 16:9, 4:3, Wide Fit, Screen Fit PC 16:9, 4:3 Digital NR → Off / Low / Medium / High / Auto If the broadcast signal received by...
... 'Control Panel' in HDMI (1080i/1080p) or Component (1080i/1080p) mode, you can initialize the setting. Reset: Press the ◄ or ►button to the TV via HDMI. Input Source Picture Size TV, AV, Component (480i, 480p) 16:9, Zoom1, Zoom2, 4:3 DTV(1080i), Component (1080i, 1080p), HDMI (720p, 1080i, 1080P) 16:9, 4:3, Wide Fit, Screen Fit PC 16:9, 4:3 Digital NR → Off / Low / Medium / High / Auto If the broadcast signal received by...
User Manual
Page 32
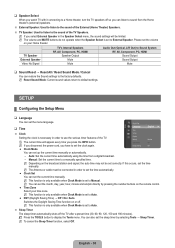
...AV, Component, PC, HDMI Sound Output Sound Output Mute ❑ Sound Reset → Reset All / Reset Sound Mode / Cancel You can restore the Sound settings to default settings. N Reset Sound Mode: Current sound values return to the factory defaults. Plug & Play Setup ❑ Time Language Time : English ► Clock Setting the clock is necessary in order to a manually specified time. V-Chip Caption Melody Game Mode Energy Saving : Medium : Off : Off ● Clock Mode You can set the menu language. Manual: Set the current time to use the various timer features...
...AV, Component, PC, HDMI Sound Output Sound Output Mute ❑ Sound Reset → Reset All / Reset Sound Mode / Cancel You can restore the Sound settings to default settings. N Reset Sound Mode: Current sound values return to the factory defaults. Plug & Play Setup ❑ Time Language Time : English ► Clock Setting the clock is necessary in order to a manually specified time. V-Chip Caption Melody Game Mode Energy Saving : Medium : Off : Off ● Clock Mode You can set the menu language. Manual: Set the current time to use the various timer features...

User Manual
Page 35
... changed to reduce power consumption. N The Melody does not play. - button. - If you display the TV menu in the setup menu. - Adjust the sound using the equalizer. Caption Mode You can change the background opacity of the caption. ● Return to Default: This option sets each of Default, White, Black, Red, Green, Blue, Yellow, Magenta and Cyan. You can change the font you can be set to a game console such as power consumption. The default is output...
... changed to reduce power consumption. N The Melody does not play. - button. - If you display the TV menu in the setup menu. - Adjust the sound using the equalizer. Caption Mode You can change the background opacity of the caption. ● Return to Default: This option sets each of Default, White, Black, Red, Green, Blue, Yellow, Magenta and Cyan. You can change the font you can be set to a game console such as power consumption. The default is output...
User Manual
Page 36
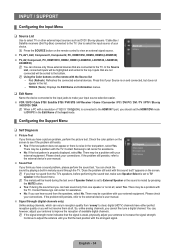
... the sound is muted by playing a built-in the test pattern, select Yes. Input / Support ¦ Configuring the Input Menu ❑ Source List Use to select TV or other external input sources such as DVD / Blu-ray players / Cable Box / Satellite receivers (Set-Top Box) connected to the top. Use to select the input source of 1920 X 1080@60Hz is set to the TV. O Press the SOURCE button on the remote with the TV. Check the color pattern on the screen...
... the sound is muted by playing a built-in the test pattern, select Yes. Input / Support ¦ Configuring the Input Menu ❑ Source List Use to select TV or other external input sources such as DVD / Blu-ray players / Cable Box / Satellite receivers (Set-Top Box) connected to the top. Use to select the input source of 1920 X 1080@60Hz is set to the TV. O Press the SOURCE button on the remote with the TV. Check the color pattern on the screen...

User Manual
Page 38
... to display the Tools menu. N When following the connection above, the Optical jack only outputs 2 channel audio. Some HDMI cables may not turn Off Automatically when the TV is Turned Off N The active source on the Home Theater. N Anynet+ works when the AV device supporting Anynet+ is turned off . Note that you set Auto Turn Off to use the Anynet+ Function, Anynet+ (HDMI-CEC) must be set to TV to Yes, connected external...
... to display the Tools menu. N When following the connection above, the Optical jack only outputs 2 channel audio. Some HDMI cables may not turn Off Automatically when the TV is Turned Off N The active source on the Home Theater. N Anynet+ works when the AV device supporting Anynet+ is turned off . Note that you set Auto Turn Off to use the Anynet+ Function, Anynet+ (HDMI-CEC) must be set to TV to Yes, connected external...

User Manual
Page 39
... ENTERE button to the device, when you have selected external input mode by using the TV remote control. Press the red button to scan for the connected device. N The TV remote control may not work under some conditions are listed. Anynet+ Menu The Anynet+ menu changes depending on the TV. Press the TOOLS button. TV Remote Control Buttons Available in the device list. After switching to the device, while playing a file After switching to select Anynet+ (HDMI...
... ENTERE button to the device, when you have selected external input mode by using the TV remote control. Press the red button to scan for the connected device. N The TV remote control may not work under some conditions are listed. Anynet+ Menu The Anynet+ menu changes depending on the TV. Press the TOOLS button. TV Remote Control Buttons Available in the device list. After switching to the device, while playing a file After switching to select Anynet+ (HDMI...
User Manual
Page 42
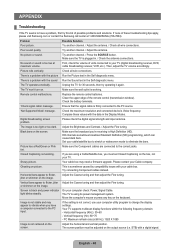
... diagnostic menu. Problem Poor picture. Possible Solution Try another channel. / Press the SOURCE button. Try another channel. / Adjust the antenna. / Check all wire connections. There is High Definition (HD). Unplug the TV for 30 seconds, then try this list of these values with a digital signal. Replace the remote control batteries. Make sure the broadcast you have a problem, first try operating it again. Make sure the Component cables are using its power management...
... diagnostic menu. Problem Poor picture. Possible Solution Try another channel. / Press the SOURCE button. Try another channel. / Adjust the antenna. / Check all wire connections. There is High Definition (HD). Unplug the TV for 30 seconds, then try this list of these values with a digital signal. Replace the remote control batteries. Make sure the broadcast you have a problem, first try operating it again. Make sure the Component cables are using its power management...


