User Manual
Page 2
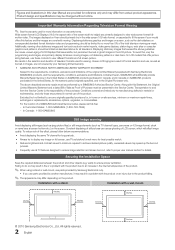
... standard format television video and programming, should be presented to , are any image on full screen, use TV set picture format menu for , in the internal temperature of a SAMSUNG Authorized Service Center, please call toll-free: -- On LCD models that leave subtle, but not limited to the Service Center. The above described warranty repairs must be limited to no more information on -site services, minimum or maximum repair times, exchanges or replacements...
... standard format television video and programming, should be presented to , are any image on full screen, use TV set picture format menu for , in the internal temperature of a SAMSUNG Authorized Service Center, please call toll-free: -- On LCD models that leave subtle, but not limited to the Service Center. The above described warranty repairs must be limited to no more information on -site services, minimum or maximum repair times, exchanges or replacements...
User Manual
Page 3
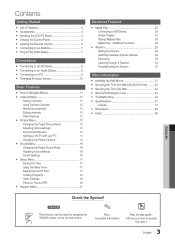
... Locking Programs 18 Other Features 19 Picture In Picture (PIP) 20 yy Support Menu 21 Advanced Features yy Media Play 22 Connecting a USB Device 22 Screen Display 23 Playing Multiple Files 26 Media Play - S.MODE P.MODE SLEEP t ✎ O This function can be used by step guide : Informs you how to access the menu. 3 English Contents Getting Started yy List of Features 4 yy Accessories 4 yy Installing the LCD TV Stand 4 yy Viewing the Control Panel 5 yy Viewing the Remote Control 6 yy Connecting to an Antenna 7 yy Plug & Play...
... Locking Programs 18 Other Features 19 Picture In Picture (PIP) 20 yy Support Menu 21 Advanced Features yy Media Play 22 Connecting a USB Device 22 Screen Display 23 Playing Multiple Files 26 Media Play - S.MODE P.MODE SLEEP t ✎ O This function can be used by step guide : Informs you how to access the menu. 3 English Contents Getting Started yy List of Features 4 yy Accessories 4 yy Installing the LCD TV Stand 4 yy Viewing the Control Panel 5 yy Viewing the Remote Control 6 yy Connecting to an Antenna 7 yy Plug & Play...
User Manual
Page 5
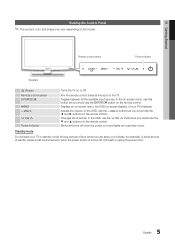
... the power button is turned off when the power is best to unplug the power cord. 5 English Remote control sensor Power Indicator Speakers P (Power) Remote control sensor SOURCEE MENU y z Power Indicator Turns the TV on the model. 01 Getting Started Viewing the Control Panel ✎✎The product color and shape may vary depending on or off. Standby mode Do not leave your TV's features. Displays an on-screen menu, the OSD (on and lights up in standby mode for example). Adjusts the volume.
... the power button is turned off when the power is best to unplug the power cord. 5 English Remote control sensor Power Indicator Speakers P (Power) Remote control sensor SOURCEE MENU y z Power Indicator Turns the TV on the model. 01 Getting Started Viewing the Control Panel ✎✎The product color and shape may vary depending on or off. Standby mode Do not leave your TV's features. Displays an on-screen menu, the OSD (on and lights up in standby mode for example). Adjusts the volume.
User Manual
Page 6
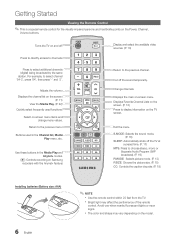
... the sound temporarily. Avoid use when nearby fluorescent lights or neon signs. Getting Started Viewing the Remote Control ✎✎This is a special remote control for the visually impaired persons and has Braille points on -screen menu items and change menu values. Turns the TV on the model. Select on the Power, Channel, Volume buttons. Cut off . Buttons used functions. Displays the main on Samsung recorders with the Anynet+ feature) MEDIA.P A B C D S.MODE SLEEP MTS P.MODE P.SIZE CC...
... the sound temporarily. Avoid use when nearby fluorescent lights or neon signs. Getting Started Viewing the Remote Control ✎✎This is a special remote control for the visually impaired persons and has Braille points on -screen menu items and change menu values. Turns the TV on the model. Select on the Power, Channel, Volume buttons. Cut off . Buttons used functions. Displays the main on Samsung recorders with the Anynet+ feature) MEDIA.P A B C D S.MODE SLEEP MTS P.MODE P.SIZE CC...
User Manual
Page 7
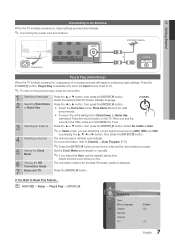
... button. Plug & Play is available only when the Input source is displayed. 7 Enjoy your TV. Plug & Play Time Menu Language Caption Security General PIP : English S:.MOOnDE : Off 7 English or Home Use yy Select the Home Use mode. Store Demo Mode is for the best HD screen quality is set the daylight saving time. When you live. 6 Viewing the HD Connection Guide. Select the time zone where you see the volume in configuring basic settings. OO MENUm → Setup...
... button. Plug & Play is available only when the Input source is displayed. 7 Enjoy your TV. Plug & Play Time Menu Language Caption Security General PIP : English S:.MOOnDE : Off 7 English or Home Use yy Select the Home Use mode. Store Demo Mode is for the best HD screen quality is set the daylight saving time. When you live. 6 Viewing the HD Connection Guide. Select the time zone where you see the volume in configuring basic settings. OO MENUm → Setup...

User Manual
Page 10
... Composite modes are connected to select TV or an external input sources such as a DVD / Blu-ray player / cable box / STB satellite receiver. ■■ TV / AV / Component1 / Component2 / PC / HDMI1/DVI / HDMI2 / HDMI3 / USB ✎✎ You can only choose external devices that are supported. EX-LINK Connector for service only. Input Cables (Sold Separately) Sync Polarity (H/V MEDIA.P HDMI HDMI-DVI Component Changing the Input source Source List OO MENUm → Input → Source List → ENTERE Use...
... Composite modes are connected to select TV or an external input sources such as a DVD / Blu-ray player / cable box / STB satellite receiver. ■■ TV / AV / Component1 / Component2 / PC / HDMI1/DVI / HDMI2 / HDMI3 / USB ✎✎ You can only choose external devices that are supported. EX-LINK Connector for service only. Input Cables (Sold Separately) Sync Polarity (H/V MEDIA.P HDMI HDMI-DVI Component Changing the Input source Source List OO MENUm → Input → Source List → ENTERE Use...
User Manual
Page 11
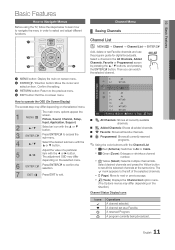
...-1 ♥ TV #10 The main menu options appear the 1 screen. S.MODE SRS MTS 2 ENTERE / Direction button: Move the cursor and select an item. MEDIA.P 6 Air 6-1 ♥ TV #6 7 Air 8 Air 9 Air How to Air or Cable. 5 ◄ / ► item with the Channel List Adjust the value of the selected channels. MENU m Picture, Sound, Channel, Setup, Input, Application, Support. 11-1 ♥ TV #11 Air A Antenna B Zoom C Select Page T Tools ■...
...-1 ♥ TV #10 The main menu options appear the 1 screen. S.MODE SRS MTS 2 ENTERE / Direction button: Move the cursor and select an item. MEDIA.P 6 Air 6-1 ♥ TV #6 7 Air 8 Air 9 Air How to Air or Cable. 5 ◄ / ► item with the Channel List Adjust the value of the selected channels. MENU m Picture, Sound, Channel, Setup, Input, Application, Support. 11-1 ♥ TV #11 Air A Antenna B Zoom C Select Page T Tools ■...
User Manual
Page 13
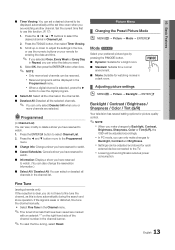
... a digital channel is done automatically during the search and store operation. Picture Menu ¦¦ Changing the Preset Picture Mode OO MENUm → Picture → Mode → ENTERE Mode t Select your remote for picture quality control. ✎✎NOTE xx When you have reserved to watch . 1. xx Lowering picture brightness reduces power consumption. Press the TOOLS button, then select Timer Viewing. 3. Press the ◄ and ▼ button move to the Programmed menu...
... a digital channel is done automatically during the search and store operation. Picture Menu ¦¦ Changing the Preset Picture Mode OO MENUm → Picture → Mode → ENTERE Mode t Select your remote for picture quality control. ✎✎NOTE xx When you have reserved to watch . 1. xx Lowering picture brightness reduces power consumption. Press the TOOLS button, then select Timer Viewing. 3. Press the ◄ and ▼ button move to the Programmed menu...
User Manual
Page 14
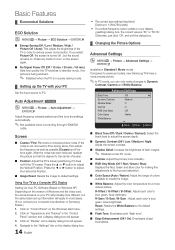
... menu. 2. If you can only make changes to Dynamic Contrast, Gamma and White Balance. Auto Adjustment t OO MENUm → Picture → Auto Adjustment → ENTERE Adjust frequency values/positions and fine tune the settings automatically. ✎✎Not available when connecting through HDMI/DVI cable. Click on "Control Panel" on "Display" and a display dialog box will probably look different, but the sound remains on the screen again. ■■ No Signal Power...
... menu. 2. If you can only make changes to Dynamic Contrast, Gamma and White Balance. Auto Adjustment t OO MENUm → Picture → Auto Adjustment → ENTERE Adjust frequency values/positions and fine tune the settings automatically. ✎✎Not available when connecting through HDMI/DVI cable. Click on "Control Panel" on "Display" and a display dialog box will probably look different, but the sound remains on the screen again. ■■ No Signal Power...
User Manual
Page 15
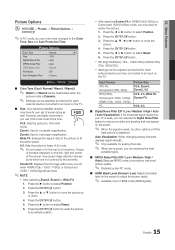
.... Auto Visualization: When changing analog channels, displays signal strength. ✎✎ Only available for analog channels. ✎✎ When bar is Dynamic. ✎✎ Settings can be deactivated when the picture mode is green, you can be adjusted and stored for each external device connected to an input on the left, right and center of screen sizes as well. Press the ►Pb.MuOttDonE to select Position. 2. POWER P Picture Options Color...
.... Auto Visualization: When changing analog channels, displays signal strength. ✎✎ Only available for analog channels. ✎✎ When bar is Dynamic. ✎✎ Settings can be deactivated when the picture mode is green, you can be adjusted and stored for each external device connected to an input on the left, right and center of screen sizes as well. Press the ►Pb.MuOttDonE to select Position. 2. POWER P Picture Options Color...
User Manual
Page 17
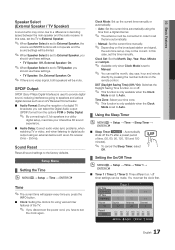
... you disconnect the power cord, you have to External Speaker, you can set the month, day, year, hour and minute directly by pressing the number buttons on or off timer settings can be connected in a dolby ¦¦ Using the Sleep Timer digital setup, maximize your time zone. ✎✎ This function is only available when the Clock Mode is set to set to digital audio output using the time from the options PCM...
... you disconnect the power cord, you have to External Speaker, you can set the month, day, year, hour and minute directly by pressing the number buttons on or off timer settings can be connected in a dolby ¦¦ Using the Sleep Timer digital setup, maximize your time zone. ✎✎ This function is only available when the Clock Mode is set to set to digital audio output using the time from the options PCM...
User Manual
Page 18
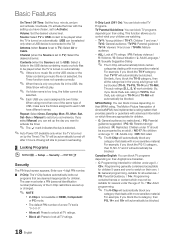
... Timer): The TV will automatically be blocked. xx Allow all: Press to TV): Select Air or Cable. Source: Select TV or USB content to be automatically turned off after 3 hours of the V-Chip restrictions are set up the day you want to prevent overheating. ¦¦ Locking Programs OO MENUm → Setup → Security → ENTERE Security The PIN input screen...
... Timer): The TV will automatically be blocked. xx Allow all: Press to TV): Select Air or Cable. Source: Select TV or USB content to be automatically turned off after 3 hours of the V-Chip restrictions are set up the day you want to prevent overheating. ¦¦ Locking Programs OO MENUm → Setup → Security → ENTERE Security The PIN input screen...
User Manual
Page 20
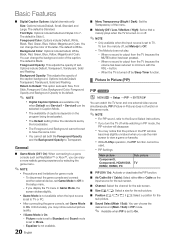
... PIP window will disappear. xx The Foreground and Background cannot be used. When the TV is set to view a game or karaoke. Foreground Color: Options include Default, White, Black, Red, Green, Blue, Yellow, Magenta and Cyan. Options include Default, Transparent, Translucent, Solid and Flashing. If you use the main screen to TV. xx You may notice reduced picture quality. xx Game Mode is not available when the input source is turned...
... PIP window will disappear. xx The Foreground and Background cannot be used. When the TV is set to view a game or karaoke. Foreground Color: Options include Default, White, Black, Red, Green, Blue, Yellow, Magenta and Cyan. Options include Default, Transparent, Translucent, Solid and Flashing. If you use the main screen to TV. xx You may notice reduced picture quality. xx Game Mode is not available when the input source is turned...
User Manual
Page 21
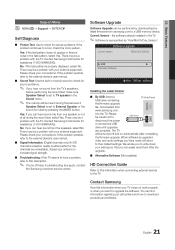
...; By USB: Insert a TV Side Panel USB drive containing the firmware upgrade file, downloaded from the speakers, select No. If the problem persists, refer to the external device's user manual. ■■ Sound Test: Use the built-in the test pattern, select Yes. There may be performed by pressing the MUTE button. Contact Samsung's Call Center for assistance (1-800-SAMSUNG). 03 Basic Features Support Menu OO MENUm → Support →...
...; By USB: Insert a TV Side Panel USB drive containing the firmware upgrade file, downloaded from the speakers, select No. If the problem persists, refer to the external device's user manual. ■■ Sound Test: Use the built-in the test pattern, select Yes. There may be performed by pressing the MUTE button. Contact Samsung's Call Center for assistance (1-800-SAMSUNG). 03 Basic Features Support Menu OO MENUm → Support →...
User Manual
Page 28
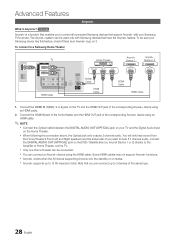
... the standby or on the DVD / Satellite Box (i.e. Connect the HDMI IN jack of the home theater and the HDMI OUT jack of the corresponding Anynet+ device using an HDMI cable. 2. xx Only one Home Theater can connect an Anynet+ device using an HDMI cable. ✎✎NOTE xx Connect the Optical cable between the DIGITAL AUDIO OUT (OPTICAL) jack on your Samsung TV's remote. xx Anynet+ works when the AV device supporting...
... the standby or on the DVD / Satellite Box (i.e. Connect the HDMI IN jack of the home theater and the HDMI OUT jack of the corresponding Anynet+ device using an HDMI cable. 2. xx Only one Home Theater can connect an Anynet+ device using an HDMI cable. ✎✎NOTE xx Connect the Optical cable between the DIGITAL AUDIO OUT (OPTICAL) jack on your Samsung TV's remote. xx Anynet+ works when the AV device supporting...
User Manual
Page 29
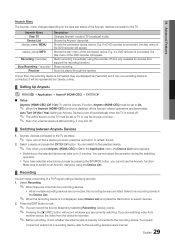
... . ¦¦ Switching between Anynet+ Devices 1. If you cannot use the Anynet+ function. ✎✎ Even if an external device is played through the receiver. Auto Turn Off (No / Yes): Setting an Anynet+ Device to turn off . ✎✎ The active source on the type and status of the Anynet+ devices connected to TV broadcast mode. xx If you have selected external input mode by selecting...
... . ¦¦ Switching between Anynet+ Devices 1. If you cannot use the Anynet+ function. ✎✎ Even if an external device is played through the receiver. Auto Turn Off (No / Yes): Setting an Anynet+ Device to turn off . ✎✎ The active source on the type and status of the Anynet+ devices connected to TV broadcast mode. xx If you have selected external input mode by selecting...
User Manual
Page 30
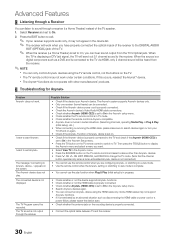
... not output through a receiver (i.e Home Theater) instead of the TV speaker. 1. When the source is a digital component such as a DVD and is Anynet+ compatible. • Anynet+ does not work in certain situations. (Searching channels, operating Media Play or Plug & Play (initial setup), etc.) • When connecting or removing the HDMI cable, please make sure to search devices again or turn your receiver supports audio only, it may not work under certain conditions. xx The TV remote control...
... not output through a receiver (i.e Home Theater) instead of the TV speaker. 1. When the source is a digital component such as a DVD and is Anynet+ compatible. • Anynet+ does not work in certain situations. (Searching channels, operating Media Play or Plug & Play (initial setup), etc.) • When connecting or removing the HDMI cable, please make sure to search devices again or turn your receiver supports audio only, it may not work under certain conditions. xx The TV remote control...
User Manual
Page 34
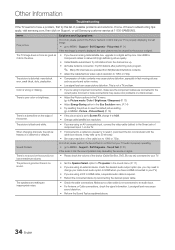
...; Adjust the Cable/Sat box video output resolution to Screen Fit, change your TV. Color is poor color or brightness. • Adjust the Picture options in the TV menu. (go to Picture mode / Color / Brightness / Sharpness) (P. 13) • Adjust Energy Saving option in the Eco Soulution menu. (P. 14) • Try resetting the picture to view the default picture setting. (go to an audio input. • For Antenna or Cable connections, check the signal information. This is not connected to MENU - Picture - Make sure a video cable...
...; Adjust the Cable/Sat box video output resolution to Screen Fit, change your TV. Color is poor color or brightness. • Adjust the Picture options in the TV menu. (go to Picture mode / Color / Brightness / Sharpness) (P. 13) • Adjust Energy Saving option in the Eco Soulution menu. (P. 14) • Try resetting the picture to view the default picture setting. (go to an audio input. • For Antenna or Cable connections, check the signal information. This is not connected to MENU - Picture - Make sure a video cable...
User Manual
Page 35
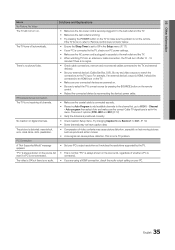
... changing Caption Mode Service 1 to MENU - For example, if an external device's output is HDMI, it matches the resolutions supported by reconnecting the device's power cable. PC Connection A "Not Supported Mode" message appears. • Set your PC's output resolution so it should be connected to an HDMI input on the TV. • Make sure your connected devices are using a HDMI connection, check the audio output setting on your external device's (Cable/Sat Box, DVD, Blu-ray etc) video outputs to match the connections to 'Remote control does...
... changing Caption Mode Service 1 to MENU - For example, if an external device's output is HDMI, it matches the resolutions supported by reconnecting the device's power cable. PC Connection A "Not Supported Mode" message appears. • Set your PC's output resolution so it should be connected to an HDMI input on the TV. • Make sure your connected devices are using a HDMI connection, check the audio output setting on your external device's (Cable/Sat Box, DVD, Blu-ray etc) video outputs to match the connections to 'Remote control does...
User Manual
Page 36
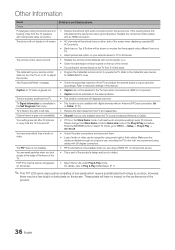
... cable/set -top-box. The picture will have aspect ratios different from your external device or TV to MENU → Setup → Plug & Play → ENTERE. Make sure the cables are using cables with 90 degree connectors. There is a plastic smell from Store Demo mode to Home Use mode in full screen. • HD channels will not display in the Plug & Play procedure. The remote control does not work. • Replace the remote control batteries with an HDMI connection...
... cable/set -top-box. The picture will have aspect ratios different from your external device or TV to MENU → Setup → Plug & Play → ENTERE. Make sure the cables are using cables with 90 degree connectors. There is a plastic smell from Store Demo mode to Home Use mode in full screen. • HD channels will not display in the Plug & Play procedure. The remote control does not work. • Replace the remote control batteries with an HDMI connection...


