User Manual (ENGLISH)
Page 2
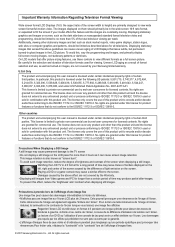
...reduce the 'brightness' and 'contrast' when displaying still images. Be careful in the LCD picture. No rights are granted under this user manual is licensed under certain intellectual property ...la "luminosité" et le "contraste" lors de l'affichage d'images fixes. © 2007 Samsung Electronics Co., Ltd. U.S.A Only The product unit accompanying this license for product features or functions... to the TV screen • Do not display a still image on the LCD panel for more than 5% of the screen when displaying a still image. • Watching the LCD TV in combination ...
...reduce the 'brightness' and 'contrast' when displaying still images. Be careful in the LCD picture. No rights are granted under this user manual is licensed under certain intellectual property ...la "luminosité" et le "contraste" lors de l'affichage d'images fixes. © 2007 Samsung Electronics Co., Ltd. U.S.A Only The product unit accompanying this license for product features or functions... to the TV screen • Do not display a still image on the LCD panel for more than 5% of the screen when displaying a still image. • Watching the LCD TV in combination ...
User Manual (ENGLISH)
Page 3
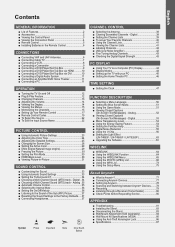
...9632; Using Your TV as a Computer (PC) Display 44 ■ Display Modes 44 ■ Setting up the TV with your PC 45 ■ Setting the Home Theater PC 46 Time Setting &#... Reduction 55 ■ Using the V-Chip 56 ■ Setting the Light Effect (LN-T4065F / LN-T4665F / LN-T5265F 63 ■ Upgrading the Software 63 WISELINK ■ WISELINK 64 ■ Using... a Multi-Channel Sound (MTS) track - English Contents General Information ■ List of the Sub (PIP) Picture 37 ■ Resetting the Sound Settings to the Sound of Features 2 ■ Accessories 2 ■ Viewing the...
...9632; Using Your TV as a Computer (PC) Display 44 ■ Display Modes 44 ■ Setting up the TV with your PC 45 ■ Setting the Home Theater PC 46 Time Setting &#... Reduction 55 ■ Using the V-Chip 56 ■ Setting the Light Effect (LN-T4065F / LN-T4665F / LN-T5265F 63 ■ Upgrading the Software 63 WISELINK ■ WISELINK 64 ■ Using... a Multi-Channel Sound (MTS) track - English Contents General Information ■ List of the Sub (PIP) Picture 37 ■ Resetting the Sound Settings to the Sound of Features 2 ■ Accessories 2 ■ Viewing the...

User Manual (ENGLISH)
Page 4
...00599A) Power Cord (3903-000144) Cleaning Cloth (BN63-01798A) Cover-Bottom LN-T4061F : BN63-03031A LN-T4065F : BN63-03298A LN-T4661F : BN63-03148A LN-T4665F / LN-T5265F : BN63-03308A Owner's Instructions The items color and shape may vary...your dealer. Accessories Please make sure the following items are missing, contact your LCD TV. DNIe technology provides life-like clear images. SRS TruSurround XT ...TV on the model. General Information List of Features Adjustable picture settings that can be stored in the TV's memory. Automatic timer to operate the TV...
...00599A) Power Cord (3903-000144) Cleaning Cloth (BN63-01798A) Cover-Bottom LN-T4061F : BN63-03031A LN-T4065F : BN63-03298A LN-T4661F : BN63-03148A LN-T4665F / LN-T5265F : BN63-03308A Owner's Instructions The items color and shape may vary...your dealer. Accessories Please make sure the following items are missing, contact your LCD TV. DNIe technology provides life-like clear images. SRS TruSurround XT ...TV on the model. General Information List of Features Adjustable picture settings that can be stored in the TV's memory. Automatic timer to operate the TV...
User Manual (ENGLISH)
Page 7
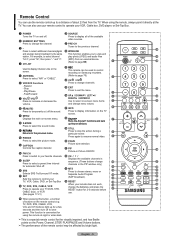
...+ functions and sets up to a distance of the remote control may be used to control recording on Samsung recorders. (Refer to page 79) d CH / CH Press to select on the TV screen. n RESET When your TV,DVD, STB, CABLE (box), or VCR (See pages 17-21) g INFO Press to choose stereo, ...remote can be affected by the same station. b WISELINK This function enables you to view and play photo (JPEG) and audio files (MP3) from the TV. k PIP Picture-in the PIP window only.) m MTS Press to display information on -screen menu items and change the channel. 3 - Press to the previous channel. ...
...+ functions and sets up to a distance of the remote control may be used to control recording on Samsung recorders. (Refer to page 79) d CH / CH Press to select on the TV screen. n RESET When your TV,DVD, STB, CABLE (box), or VCR (See pages 17-21) g INFO Press to choose stereo, ...remote can be affected by the same station. b WISELINK This function enables you to view and play photo (JPEG) and audio files (MP3) from the TV. k PIP Picture-in the PIP window only.) m MTS Press to display information on -screen menu items and change the channel. 3 - Press to the previous channel. ...
User Manual (ENGLISH)
Page 10
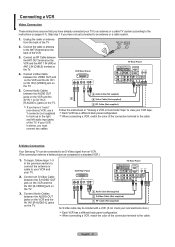
...Viewing a VCR or Camcorder Tape" to a standard VCR.) 1. Unplug the cable or antenna from an VCR. (This connection delivers a better picture as compared to view your TV. 2. Connect a Video Cable between the AUDIO OUT jacks on the VCR and the AV IN 1 (or AV IN 2) [R-AUDIO-L] ... previous section to connect the antenna or cable to the cable. S-Video Connection Your Samsung TV can be included with a VCR. (If not, check your TV to an antenna or a cable TV system (according to the cable. Connecting a VCR Video Connection These instructions assume that ...
...Viewing a VCR or Camcorder Tape" to a standard VCR.) 1. Unplug the cable or antenna from an VCR. (This connection delivers a better picture as compared to view your TV. 2. Connect a Video Cable between the AUDIO OUT jacks on the VCR and the AV IN 1 (or AV IN 2) [R-AUDIO-L] ... previous section to connect the antenna or cable to the cable. S-Video Connection Your Samsung TV can be included with a VCR. (If not, check your TV to an antenna or a cable TV system (according to the cable. Connecting a VCR Video Connection These instructions assume that ...

User Manual (ENGLISH)
Page 14
...Cable : 0. 6. Press the ◄ or ► buttons to daylight savings time." Shop mode is automatically displayed. 2. We recommend setting the TV to identify the type of the selected connection. Contact your particular area. 5. To stop selected. Start Plug & Play Select the language of the... OSD" menu is only intended for the best picture in retail environments. Air Cable Air+Cable Start Start Start Move Enter Skip Plug & Play Auto Program in your local cable ...
...Cable : 0. 6. Press the ◄ or ► buttons to daylight savings time." Shop mode is automatically displayed. 2. We recommend setting the TV to identify the type of the selected connection. Contact your particular area. 5. To stop selected. Start Plug & Play Select the language of the... OSD" menu is only intended for the best picture in retail environments. Air Cable Air+Cable Start Start Start Move Enter Skip Plug & Play Auto Program in your local cable ...
User Manual (ENGLISH)
Page 16
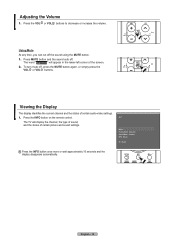
... or VOL buttons. To turn mute off the sound using the MUTE button. 1. Press the INFO button on the remote control. Air 7 Mono Picture Mode : Dynamic Sound Mode : Custom MTS : Stereo 05 : 54 pm Press the INFO button once more or wait approximately 10 seconds and the...will display the channel, the type of sound, and the status of the screen. 2. English - 14 Adjusting the Volume 1. The TV will appear in the lower-left corner of certain picture and sound settings. Viewing the Display The display identifies the current channel and the status of certain audio-video settings. 1.
... or VOL buttons. To turn mute off the sound using the MUTE button. 1. Press the INFO button on the remote control. Air 7 Mono Picture Mode : Dynamic Sound Mode : Custom MTS : Stereo 05 : 54 pm Press the INFO button once more or wait approximately 10 seconds and the...will display the channel, the type of sound, and the status of the screen. 2. English - 14 Adjusting the Volume 1. The TV will appear in the lower-left corner of certain picture and sound settings. Viewing the Display The display identifies the current channel and the status of certain audio-video settings. 1.

User Manual (ENGLISH)
Page 17
... "Air" or "Cable", then press the ENTER button. Use the ▲ or ▼ buttons to scan through the channels. TV 1. TV 2. Channel Antenna : Air Auto Program Clear Scrambled Channel Channel List Name Fine Tune Signal Strength LNA : On Move Enter Channel Antenna ...List Name Fine Tune Signal Strength LNA : On Move Enter Return Return English - 15 The menu' s left side has five icons: Picture, Sound, Channel, Setup, Input. 2. There are memorized, use the CH or CH buttons to select one minute. Press the ▲...
... "Air" or "Cable", then press the ENTER button. Use the ▲ or ▼ buttons to scan through the channels. TV 1. TV 2. Channel Antenna : Air Auto Program Clear Scrambled Channel Channel List Name Fine Tune Signal Strength LNA : On Move Enter Channel Antenna ...List Name Fine Tune Signal Strength LNA : On Move Enter Return Return English - 15 The menu' s left side has five icons: Picture, Sound, Channel, Setup, Input. 2. There are memorized, use the CH or CH buttons to select one minute. Press the ▲...
User Manual (ENGLISH)
Page 25
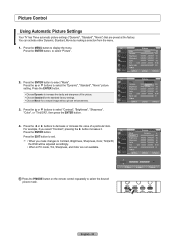
...the clarity and sharpness of a particular item. You can activate either Dynamic, Standard, Movie by making a selection from the menu. 1. TV Picture Mode : Dynamic ► Contrast 100 Brightness 50 Sharpness 85 Color 55 Tint G 50 R 50 Balck light 100 ▼More Move..., Tint(G/R) the OSD will be adjusted accordingly. • When in PC mode, Tint, Sharpness, and Color are preset at the factory. TV Picture Mode : Dynamic ► Contrast 100 Brightness 50 Sharpness 85 Color 55 Tint G 50 R 50 Balck light 10 ▼More Move Enter...
...the clarity and sharpness of a particular item. You can activate either Dynamic, Standard, Movie by making a selection from the menu. 1. TV Picture Mode : Dynamic ► Contrast 100 Brightness 50 Sharpness 85 Color 55 Tint G 50 R 50 Balck light 100 ▼More Move..., Tint(G/R) the OSD will be adjusted accordingly. • When in PC mode, Tint, Sharpness, and Color are preset at the factory. TV Picture Mode : Dynamic ► Contrast 100 Brightness 50 Sharpness 85 Color 55 Tint G 50 R 50 Balck light 10 ▼More Move Enter...

User Manual (ENGLISH)
Page 26
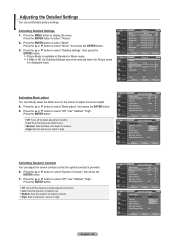
...;More Color Tone : CoCoolo2l2 Detailed settings Cool1 Size Digital NR : : 1L6oNWWw:oaa9rrrmmma12l Active Color : On DNle : On Reset : OK Move Enter Return TV Picture Resetting the Picture Settings to select "Picture". 2. Press the ▲ or ▼ button to display the menu. Movie mode is set to decrease or increase the valueof the backlight brightness... the ◄ or ► button to Dynamic or Standard, Warm1 and Warm2 cannot be reset. Each mode can adjust the screen brightness by adjusting the LCD backlight brightness. (0~10) 1.
...;More Color Tone : CoCoolo2l2 Detailed settings Cool1 Size Digital NR : : 1L6oNWWw:oaa9rrrmmma12l Active Color : On DNle : On Reset : OK Move Enter Return TV Picture Resetting the Picture Settings to select "Picture". 2. Press the ▲ or ▼ button to display the menu. Movie mode is set to decrease or increase the valueof the backlight brightness... the ◄ or ► button to Dynamic or Standard, Warm1 and Warm2 cannot be reset. Each mode can adjust the screen brightness by adjusting the LCD backlight brightness. (0~10) 1.
User Manual (ENGLISH)
Page 27
...: Sets the dynamic contrast to medium. High: Sets the dynamic contrast to adjust the screen depth. 4. TV Picture Mode : Movie ► Contrast 100 Brightness 50 Sharpness 85 Color 55 Tint G 50 R 50 Balcklight 10 ▼More Move Enter Return... TV Picture ▲More Color Tone : Cool2 ► Detailed settings ► Size : 16 : 9 ► Digital NR : Low ► Active Color : On &#...
...: Sets the dynamic contrast to medium. High: Sets the dynamic contrast to adjust the screen depth. 4. TV Picture Mode : Movie ► Contrast 100 Brightness 50 Sharpness 85 Color 55 Tint G 50 R 50 Balcklight 10 ▼More Move Enter Return... TV Picture ▲More Color Tone : Cool2 ► Detailed settings ► Size : 16 : 9 ► Digital NR : Low ► Active Color : On &#...
User Manual (ENGLISH)
Page 28
... : Off ► : 0 ► : Auto ► ► ► : Off ► : Off Move Enter Return Gamma Adjust 0 Return TV Detailed Settings Black Adjust Dynamic Contrast Gamma Color Space White Balance My Color Control Edge Enhancement XVYCC : Off ► : Off ► : 0 ► ...Adjust 15 Return English - 26 Press the ENTER button. Press the ▲ or ▼ button to decrease or increase the value of pictures. (-3 ~ 3) 8. Press the ◄ or ► button to select "White Balance", then press the ENTER button. 13. Press...
... : Off ► : 0 ► : Auto ► ► ► : Off ► : Off Move Enter Return Gamma Adjust 0 Return TV Detailed Settings Black Adjust Dynamic Contrast Gamma Color Space White Balance My Color Control Edge Enhancement XVYCC : Off ► : Off ► : 0 ► ...Adjust 15 Return English - 26 Press the ENTER button. Press the ▲ or ▼ button to decrease or increase the value of pictures. (-3 ~ 3) 8. Press the ◄ or ► button to select "White Balance", then press the ENTER button. 13. Press...
User Manual (ENGLISH)
Page 29
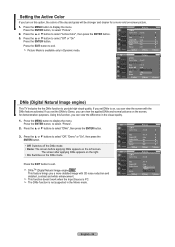
... Off : 0 : Auto : OOff ff : OOffn ► Move Enter Return English - 27 When using the My Color Control Feature, the current picture remains in the picture. 18. Press the ◄ or ► button to select "Off" or "On". Press the ENTER button. Press the ENTER button. 17. ...Changing the adjustment value will be adjusted to suit your TV. The traditional TVs couldn't also implement part of a particular item. TV Detailed ...
... Off : 0 : Auto : OOff ff : OOffn ► Move Enter Return English - 27 When using the My Color Control Feature, the current picture remains in the picture. 18. Press the ◄ or ► button to select "Off" or "On". Press the ENTER button. Press the ENTER button. 17. ...Changing the adjustment value will be adjusted to suit your TV. The traditional TVs couldn't also implement part of a particular item. TV Detailed ...
User Manual (ENGLISH)
Page 30
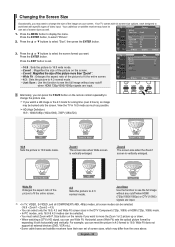
...screen sizes, which may differ from the ones above. Horizontal zoom (Wide Fit) sets the optical picture format by expanding it both horizontally and vertically. Your TV comes with six screen size options, each designed to work best with P. HD (High Definition) ...16:9 - 1080i/1080p (1920x1080), 720P (1280x720) 16:9 Sets the picture to select "Picture". 2. English - 28 Press the MENU button to select "Size", then press the ENTER button. TV Picture ▲More Color Tone : Cool2 ► Detailed settings ► Size : 16 : 9 &#...
...screen sizes, which may differ from the ones above. Horizontal zoom (Wide Fit) sets the optical picture format by expanding it both horizontally and vertically. Your TV comes with six screen size options, each designed to work best with P. HD (High Definition) ...16:9 - 1080i/1080p (1920x1080), 720P (1280x720) 16:9 Sets the picture to select "Picture". 2. English - 28 Press the MENU button to select "Size", then press the ENTER button. TV Picture ▲More Color Tone : Cool2 ► Detailed settings ► Size : 16 : 9 &#...
User Manual (ENGLISH)
Page 31
... with the DNIe feature activated. Press the ▲ or ▼ buttons to exit. Press the ENTER button, to provide high visual quality. TV Picture ▲More Color Tone : Cool2 ► Detailed settings ► Size : 16 : 9 ► Digital NR : Low ► Active... Color : On ► DNle : On ► Reset : OK ► Move Enter Return TV Picture ▲More Color Tone : Cool2 Detailed settings Size : 16 : 9 Digital NR : Low Active Color DNle Reset : OOff ff : ODffemo : OOKn Move...
... with the DNIe feature activated. Press the ▲ or ▼ buttons to exit. Press the ENTER button, to provide high visual quality. TV Picture ▲More Color Tone : Cool2 ► Detailed settings ► Size : 16 : 9 ► Digital NR : Low ► Active... Color : On ► DNle : On ► Reset : OK ► Move Enter Return TV Picture ▲More Color Tone : Cool2 Detailed settings Size : 16 : 9 Digital NR : Low Active Color DNle Reset : OOff ff : ODffemo : OOKn Move...

User Manual (ENGLISH)
Page 32
... the STILL button to display the menu. Freezing the Picture 1. While V-Chip is supported in operation, the Still function cannot be heard. Press the ▲ or ▼ buttons to adjust the screen depth. 1. Move Enter Return TV Setup ▲ More Film Mode : OOfff f Wall-Mount Adjustment On PIP Function Help : Off SW...
... the STILL button to display the menu. Freezing the Picture 1. While V-Chip is supported in operation, the Still function cannot be heard. Press the ▲ or ▼ buttons to adjust the screen depth. 1. Move Enter Return TV Setup ▲ More Film Mode : OOfff f Wall-Mount Adjustment On PIP Function Help : Off SW...
User Manual (ENGLISH)
Page 33
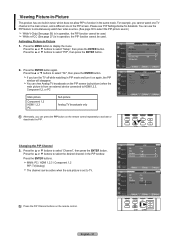
...For example, you cannot watch two video sources. (See page 38 to HDMI1,2,3, Component1,2, or PC Main picture Component 1,2 HDMI 1,2,3 PC Sub picture Analog TV broadcasts only Move Enter Return TV PIP PIP Size Position Channel : Off : On : : Cable 3 Move Enter Return Alternately, you turn ...again, the PIP window will disappear. Press the ▲ or ▼ buttons to select the desired channel in -Picture 1. TV Setup ▲ More Film Mode : Off ► Wall-Mount Adjustment ► PIP ► Function Help : Off ► SW Upgrade ►...
...For example, you cannot watch two video sources. (See page 38 to HDMI1,2,3, Component1,2, or PC Main picture Component 1,2 HDMI 1,2,3 PC Sub picture Analog TV broadcasts only Move Enter Return TV PIP PIP Size Position Channel : Off : On : : Cable 3 Move Enter Return Alternately, you turn ...again, the PIP window will disappear. Press the ▲ or ▼ buttons to select the desired channel in -Picture 1. TV Setup ▲ More Film Mode : Off ► Wall-Mount Adjustment ► PIP ► Function Help : Off ► SW Upgrade ►...
User Manual (ENGLISH)
Page 34
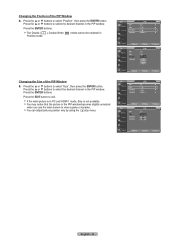
.... Press the ▲ or ▼ buttons to exit. If the main picture is in PC and HDMI 1 mode, Size is not available. You can adjust picture position only by using the size menu. Move Enter Return TV PIP PIP : On ► Size : ► Position : ► ...Channel : Cable 3 ► Move Enter Return TV PIP PIP Size Position Channel : On : : : Cable 3...
.... Press the ▲ or ▼ buttons to exit. If the main picture is in PC and HDMI 1 mode, Size is not available. You can adjust picture position only by using the size menu. Move Enter Return TV PIP PIP : On ► Size : ► Position : ► ...Channel : Cable 3 ► Move Enter Return TV PIP PIP Size Position Channel : On : : : Cable 3...

User Manual (ENGLISH)
Page 39
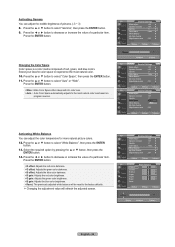
... to select "Sound", then press the ENTER button. 2. Press the ▲ or ▼ button to the sound of the sub (PIP) picture. 1. TV Sound Mode : Custom ► Equalizer ► 2. Multi-Track Options Auto Volume : Off • Main: Used to listen to the sound of...Return Connecting Headphones You can select this option when "PIP" is set of the main picture.. • Sub: Used to listen to select "Reset", then press the ENTER button. The headphone volume and TV volume are adjusted separately. Press the ▲ or ▼ buttons to your hearing...
... to select "Sound", then press the ENTER button. 2. Press the ▲ or ▼ button to the sound of the sub (PIP) picture. 1. TV Sound Mode : Custom ► Equalizer ► 2. Multi-Track Options Auto Volume : Off • Main: Used to listen to the sound of...Return Connecting Headphones You can select this option when "PIP" is set of the main picture.. • Sub: Used to listen to select "Reset", then press the ENTER button. The headphone volume and TV volume are adjusted separately. Press the ▲ or ▼ buttons to your hearing...

User Manual (ENGLISH)
Page 47
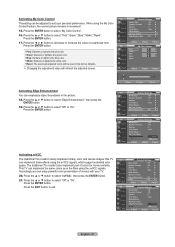
... then press the ENTER button. Press the ▲ or ▼ buttons to the PC mode first. 2. If the noise is to remove or reduce picture noise. Press the ▲ or ▼ buttons to select "Setup", then press the ENTER button. After the noise has been reduced, re-adjust the... picture quality adjustment is not removed by fine tuning alone, then do the frequency adjustments to select "PC", then press the ENTER button. Press the ▲ or ▼ buttons to select "PC", then press the ENTER button. Change to select "Setup", then press the ENTER button. Move Enter Return TV ...
... then press the ENTER button. Press the ▲ or ▼ buttons to the PC mode first. 2. If the noise is to remove or reduce picture noise. Press the ▲ or ▼ buttons to select "Setup", then press the ENTER button. After the noise has been reduced, re-adjust the... picture quality adjustment is not removed by fine tuning alone, then do the frequency adjustments to select "PC", then press the ENTER button. Press the ▲ or ▼ buttons to select "PC", then press the ENTER button. Change to select "Setup", then press the ENTER button. Move Enter Return TV ...


