
User Manual (ENGLISH)
Page 3
... 36 Labeling the Channels 37 Fine Tuning Analog Channels Analog 38 Checking the Digital-Signal Strength Digital 39 LNA (Low Noise Amplifier 39 PICTURE CONTROL Picture Control 40 Customizing the Picture Settings 41 Changing the Picture Size 43 Using the Color Weakness Enhancement Feature 44 Digital Noise Reduction 45 DNIe (Digital Natural Image engine 46...
... 36 Labeling the Channels 37 Fine Tuning Analog Channels Analog 38 Checking the Digital-Signal Strength Digital 39 LNA (Low Noise Amplifier 39 PICTURE CONTROL Picture Control 40 Customizing the Picture Settings 41 Changing the Picture Size 43 Using the Color Weakness Enhancement Feature 44 Digital Noise Reduction 45 DNIe (Digital Natural Image engine 46...
User Manual (ENGLISH)
Page 4
... (PC Mode 115 Viewing the Current Resolution 116 Initializing the Picture Settings 117 APPENDIX Identifying Problems 118 Installing the Stand 119 Disconnecting the Stand 119 Stand Swivel Function 119 Installing the Wall Mount Kit (LN-S4096D 120 Installing the Wall Mount Kit (LN-S4696D 121 Using the Anti-Theft Kensington Lock 123 Specifications 123 Dimensions...
... (PC Mode 115 Viewing the Current Resolution 116 Initializing the Picture Settings 117 APPENDIX Identifying Problems 118 Installing the Stand 119 Disconnecting the Stand 119 Stand Swivel Function 119 Installing the Wall Mount Kit (LN-S4096D 120 Installing the Wall Mount Kit (LN-S4696D 121 Using the Anti-Theft Kensington Lock 123 Specifications 123 Dimensions...
User Manual (ENGLISH)
Page 5
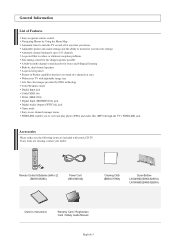
... time you choose Adjustable picture and sound settings and the ability to memorize your favorite settings Automatic channel tuning for up to 181 channels A special filter to reduce or eliminate reception problems Fine tuning control for the sharpest picture possible A built-in multi.... Remote Control & Batteries (AAA x 2) (BN59-00529A) Power Cord (3903-000144) Cleaning Cloth (BN63-01798A) Cover-Bottom LN-S4096D (BN63-02491A) LN-S4696D (BN63-02624A) Owner's Instructions Warranty Card / Registration Card / Safety Guide Manual English-3 General Information List of Features Easy-to-operate...
... time you choose Adjustable picture and sound settings and the ability to memorize your favorite settings Automatic channel tuning for up to 181 channels A special filter to reduce or eliminate reception problems Fine tuning control for the sharpest picture possible A built-in multi.... Remote Control & Batteries (AAA x 2) (BN59-00529A) Power Cord (3903-000144) Cleaning Cloth (BN63-01798A) Cover-Bottom LN-S4096D (BN63-02491A) LN-S4696D (BN63-02624A) Owner's Instructions Warranty Card / Registration Card / Safety Guide Manual English-3 General Information List of Features Easy-to-operate...
User Manual (ENGLISH)
Page 9
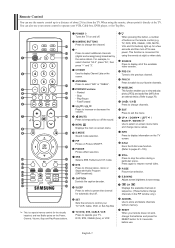
...or decrease the volume. (MUTE) Press to save energy. P.MODE Picture effect selection. FAV.CH Press to switch to select "AIR" or "CABLE". POWER Turns the TV on the remote control (e.g. SET Sets the remote to control your TV, VCR, Cable, DVD, or Set-Top Box TV, DVD, STB, CABLE, VCR Press to display...to your favorite channels. TV, DVD, STB, CABLE, VCR, MUTE, VOL and CH buttons) light up to operate your VCR, Cable box, DVD player, or Set-Top Box. INFO Press to /from the TV. SRS Selects SRS TruSurround XT mode. SOURCE Press to operate your TV, DVD, STB, CABLE (box), or...
...or decrease the volume. (MUTE) Press to save energy. P.MODE Picture effect selection. FAV.CH Press to switch to select "AIR" or "CABLE". POWER Turns the TV on the remote control (e.g. SET Sets the remote to control your TV, VCR, Cable, DVD, or Set-Top Box TV, DVD, STB, CABLE, VCR Press to display...to your favorite channels. TV, DVD, STB, CABLE, VCR, MUTE, VOL and CH buttons) light up to operate your VCR, Cable box, DVD player, or Set-Top Box. INFO Press to /from the TV. SRS Selects SRS TruSurround XT mode. SOURCE Press to operate your TV, DVD, STB, CABLE (box), or...

User Manual (ENGLISH)
Page 17
...channels of cable system that exists in your particular area. We recommend setting the TV to identify the type of the selected connection. Contact your local cable company to Home mode for the best picture in your home environment. The message "Menu language, Channels and ...Time will be set to ANT 2 (CABLE), select "Cable". "Select the antennas to memorize" menu is automatically displayed....
...channels of cable system that exists in your particular area. We recommend setting the TV to identify the type of the selected connection. Contact your local cable company to Home mode for the best picture in your home environment. The message "Menu language, Channels and ...Time will be set to ANT 2 (CABLE), select "Cable". "Select the antennas to memorize" menu is automatically displayed....
User Manual (ENGLISH)
Page 19
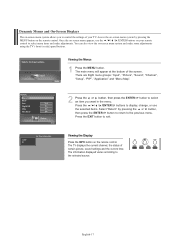
..."Return" by pressing the MENU button on -screen menu system and make adjustments. The main menu will appear at the bottom of certain picture, sound settings and the current time. Viewing the Display Press the INFO button on your TV. Access the on-screen menu system by pressing the or... according to the previous menu. There are Eight menu groups: "Input", "Picture", "Sound", "Channel", "Setup", "PIP", "Application" and "Menu Map". 2 Press the or button, then press the ENTER an item you to control the settings of your remote control to exit. You can also view the on the ...
..."Return" by pressing the MENU button on -screen menu system and make adjustments. The main menu will appear at the bottom of certain picture, sound settings and the current time. Viewing the Display Press the INFO button on your TV. Access the on-screen menu system by pressing the or... according to the previous menu. There are Eight menu groups: "Input", "Picture", "Sound", "Channel", "Setup", "PIP", "Application" and "Menu Map". 2 Press the or button, then press the ENTER an item you to control the settings of your remote control to exit. You can also view the on the ...

User Manual (ENGLISH)
Page 41
...antenna until you cannot fine tune a digital channel. Press the EXIT button to select "Signal Strength", then press the ENTER button. The LNA setting must be made separately for each channel. or button to select "Channel", 2 Press the or button to exit. Press the then press the...ENTER button. So, unlike analog channels, you find the best position with the LNA set to the previous menu. LNA (Low Noise Amplifier) If the TV is noisy with the strongest signal. If the picture is operating in reception quality from "snowy" to increase the signal strength. Select "...
...antenna until you cannot fine tune a digital channel. Press the EXIT button to select "Signal Strength", then press the ENTER button. The LNA setting must be made separately for each channel. or button to select "Channel", 2 Press the or button to exit. Press the then press the...ENTER button. So, unlike analog channels, you find the best position with the LNA set to the previous menu. LNA (Low Noise Amplifier) If the TV is noisy with the strongest signal. If the picture is operating in reception quality from "snowy" to increase the signal strength. Select "...

User Manual (ENGLISH)
Page 42
...button. or button to select "Picture", 2 Press the Press the or or button to select "Mode", then press the ENTER button again to personal preference (see "Customizing the Picture Settings", page 41). Press the EXIT button to select the desired picture mode (Dynamic, Standard, Movie,... Custom), then press the ENTER button. Changing the Picture Standard 1 Press the MENU button. button. 3 Press the or ...
...button. or button to select "Picture", 2 Press the Press the or or button to select "Mode", then press the ENTER button again to personal preference (see "Customizing the Picture Settings", page 41). Press the EXIT button to select the desired picture mode (Dynamic, Standard, Movie,... Custom), then press the ENTER button. Changing the Picture Standard 1 Press the MENU button. button. 3 Press the or ...

User Manual (ENGLISH)
Page 43
... press the ENTER button. In PC mode, only the Contrast and Brightness can select "Standard" which automatically recalls your personalized picture settings. 1 Press the MENU button. You can be selected. Press the then press the ENTER button. Press the or button...and "Color Tone" according to personal preference. or button to select "Picture", 2 Press the or button to select a particular option (Contrast, Brightness, Sharpness, Color, or Tint), then press the ENTER button. Customizing the Picture Settings You can also select another option (Contrast, Brightness, Sharpness, Color,...
... press the ENTER button. In PC mode, only the Contrast and Brightness can select "Standard" which automatically recalls your personalized picture settings. 1 Press the MENU button. You can be selected. Press the then press the ENTER button. Press the or button...and "Color Tone" according to personal preference. or button to select "Picture", 2 Press the or button to select a particular option (Contrast, Brightness, Sharpness, Color, or Tint), then press the ENTER button. Customizing the Picture Settings You can also select another option (Contrast, Brightness, Sharpness, Color,...

User Manual (ENGLISH)
Page 44
Resetting the Picture Settings to select "OK" or "Cancel", then press the ENTER button. English-42 or button. Press the or button to the Factory Defaults 7 To return the ... option (Cool2, Cool1, Normal, Warm1, or Warm2), then press the ENTER button. Press the EXIT button to exit. • If you set "Reset" to "OK", the previously adjusted settings will be set separately for each mode (Dynamic, Standard, Movie, or Custom). Select "Return" by pressing the Press the ENTER button. Press the or...
Resetting the Picture Settings to select "OK" or "Cancel", then press the ENTER button. English-42 or button. Press the or button to the Factory Defaults 7 To return the ... option (Cool2, Cool1, Normal, Warm1, or Warm2), then press the ENTER button. Press the EXIT button to exit. • If you set "Reset" to "OK", the previously adjusted settings will be set separately for each mode (Dynamic, Standard, Movie, or Custom). Select "Return" by pressing the Press the ENTER button. Press the or...

User Manual (ENGLISH)
Page 45
...then press the ENTER button. Alternate method Press the P.SIZE button on the remote control repeatedly to select one of the picture to fit the entire screen. • 4:3 : Sets the picture to your viewing requirements. 1 Press the MENU button. Wide Fit English-43 For example, you can reset the... picture in 4:3 format to the previous menu. Horizontal zoom (Wide Fit) sets the optical picture format by pressing the or button, then press the ENTER button to return to 16:9. To maintain...
...then press the ENTER button. Alternate method Press the P.SIZE button on the remote control repeatedly to select one of the picture to fit the entire screen. • 4:3 : Sets the picture to your viewing requirements. 1 Press the MENU button. Wide Fit English-43 For example, you can reset the... picture in 4:3 format to the previous menu. Horizontal zoom (Wide Fit) sets the optical picture format by pressing the or button, then press the ENTER button to return to 16:9. To maintain...

User Manual (ENGLISH)
Page 48
...quality. 1 Press the MENU button. Select "Return" by pressing the or button,then press the ENTER button to return to exit. or button to select "Picture", 2 Press the or button to select "DNIe", then press the ENTER button. 3 Press the or button to on, you can view the applied DNIe and... normal pictures on the DNIe mode. If you set the DNIe to provide a high visual quality. Using this function, you a more detailed image with the DNIe feature activated. Press the then...
...quality. 1 Press the MENU button. Select "Return" by pressing the or button,then press the ENTER button to return to exit. or button to select "Picture", 2 Press the or button to select "DNIe", then press the ENTER button. 3 Press the or button to on, you can view the applied DNIe and... normal pictures on the DNIe mode. If you set the DNIe to provide a high visual quality. Using this function, you a more detailed image with the DNIe feature activated. Press the then...

User Manual (ENGLISH)
Page 49
..." by pressing the or button, then press the ENTER button to return to select "Off" or "On", then press the ENTER button. Setting the Film Mode You can only be set when viewing an analog signal in AV modes (AV or S-Video) that support SD (Standard Definition) signals (480i). Press the EXIT... button to exit. The Film Mode can automatically sense and process film signals from all sources and adjust the picture for optimum quality. 1 Press the...
..." by pressing the or button, then press the ENTER button to return to select "Off" or "On", then press the ENTER button. Setting the Film Mode You can only be set when viewing an analog signal in AV modes (AV or S-Video) that support SD (Standard Definition) signals (480i). Press the EXIT... button to exit. The Film Mode can automatically sense and process film signals from all sources and adjust the picture for optimum quality. 1 Press the...

User Manual (ENGLISH)
Page 51
.... or button to select "PIP", 2 Press the Press the or or button to exit. PIP Settings O : PIP operates X : PIP doesn't operate Sub Main Picture Analog Digital (ATSC, CATV) AV1 AV2 S-Video Component1 Component2 HDMI1 HDMI2 PC WISELINK/ D-Net Picture Analog X X O O O O O O O O X Digital (ATSC, CATV) X X O O O O O O X O X AV/Component/ HDMI/PC X X X X X X X X X X X Changing the Location of the Sub...
.... or button to select "PIP", 2 Press the Press the or or button to exit. PIP Settings O : PIP operates X : PIP doesn't operate Sub Main Picture Analog Digital (ATSC, CATV) AV1 AV2 S-Video Component1 Component2 HDMI1 HDMI2 PC WISELINK/ D-Net Picture Analog X X O O O O O O O O X Digital (ATSC, CATV) X X O O O O O O X O X AV/Component/ HDMI/PC X X X X X X X X X X X Changing the Location of the Sub...

User Manual (ENGLISH)
Page 52
Select "Return" by pressing the or button, then press the ENTER button to return to exit. Changing the Channel of the Sub (PIP) Picture After you set the signal source (antenna or cable) of the remote control to select "Channel", then press the ENTER button. Press the then press the ...ENTER button. Selecting a Signal Source (Air or Cable) for the PIP picture from the main picture. 1 Press the MENU button. Press the then press the ENTER...
Select "Return" by pressing the or button, then press the ENTER button to return to exit. Changing the Channel of the Sub (PIP) Picture After you set the signal source (antenna or cable) of the remote control to select "Channel", then press the ENTER button. Press the then press the ...ENTER button. Selecting a Signal Source (Air or Cable) for the PIP picture from the main picture. 1 Press the MENU button. Press the then press the ENTER...
User Manual (ENGLISH)
Page 53
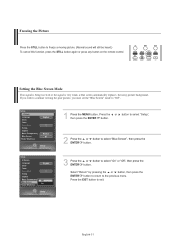
Setting the Blue Screen Mode If no signal is being received or the signal is very weak, a blue screen automatically replaces the noisy picture background. Select "Return" by pressing the or button, then press the ENTER button to return to exit. Press the then press the ENTER button. ... the STILL button to "Off". 1 Press the MENU button. If you wish to continue viewing the poor picture, you must set the "Blue Screen" mode to freeze a moving picture. (Normal sound will still be heard.) To cancel this function, press the STILL button again or press any button on the remote control....
Setting the Blue Screen Mode If no signal is being received or the signal is very weak, a blue screen automatically replaces the noisy picture background. Select "Return" by pressing the or button, then press the ENTER button to return to exit. Press the then press the ENTER button. ... the STILL button to "Off". 1 Press the MENU button. If you wish to continue viewing the poor picture, you must set the "Blue Screen" mode to freeze a moving picture. (Normal sound will still be heard.) To cancel this function, press the STILL button again or press any button on the remote control....

User Manual (ENGLISH)
Page 61
You can select this option when the "PIP" is set to the previous menu. Select "Return" by pressing the or button, then press the ENTER button to return to "On". (See page 48) English-59 ... select "Main", then press the ENTER button. Selecting the Sound Select Sound Select enables you to hear sound from either the Main or Sub(PIP) picture in PIP mode. 1 Press the MENU button.
You can select this option when the "PIP" is set to the previous menu. Select "Return" by pressing the or button, then press the ENTER button to return to "On". (See page 48) English-59 ... select "Main", then press the ENTER button. Selecting the Sound Select Sound Select enables you to hear sound from either the Main or Sub(PIP) picture in PIP mode. 1 Press the MENU button.

User Manual (ENGLISH)
Page 65
If Game Mode is not available in TV mode. Game Mode is On • Picture and Sound Modes are automatically changed to Custom. You cannot select other modes. English-63... Press the or button to exit. Restrictions on . 1 Press the MENU button. Select "Return" by setting the Game Mode to on Game mode (Caution) • To disconnect the game console and connect another external device..., set Game to Off in the setup menu. • If you can enjoy a more realistic gaming ...
If Game Mode is not available in TV mode. Game Mode is On • Picture and Sound Modes are automatically changed to Custom. You cannot select other modes. English-63... Press the or button to exit. Restrictions on . 1 Press the MENU button. Select "Return" by setting the Game Mode to on Game mode (Caution) • To disconnect the game console and connect another external device..., set Game to Off in the setup menu. • If you can enjoy a more realistic gaming ...

User Manual (ENGLISH)
Page 69
..."MPAA Rating", then press the ENTER button. 4 Press the or button to select a appropriate restriction. When the rating control is for a new TV set is "0000".) The "V-Chip" menu is indicated. Press the ENTER button to select "V-Chip", then press the ENTER button. 2 Press the button. ... or button to select "Setup", Press the or button to activate the restriction selected. How to Set up Restrictions Using "MPAA Rating" The Movie rating system uses the "MPAA" (Motion Picture Association of America) system, and its main application is on, the TV will automatically block any programs...
..."MPAA Rating", then press the ENTER button. 4 Press the or button to select a appropriate restriction. When the rating control is for a new TV set is "0000".) The "V-Chip" menu is indicated. Press the ENTER button to select "V-Chip", then press the ENTER button. 2 Press the button. ... or button to select "Setup", Press the or button to activate the restriction selected. How to Set up Restrictions Using "MPAA Rating" The Movie rating system uses the "MPAA" (Motion Picture Association of America) system, and its main application is on, the TV will automatically block any programs...

User Manual (ENGLISH)
Page 119
... button. or button to select "Setup", 3 Press the or button to select "PC", then press the ENTER button. 4 Press the or button to exit. The picture settings are replaced with the factory default values. 1 Press the SOURCE button to the previous menu. Select "Return" by pressing the or button, then press the...
... button. or button to select "Setup", 3 Press the or button to select "PC", then press the ENTER button. 4 Press the or button to exit. The picture settings are replaced with the factory default values. 1 Press the SOURCE button to the previous menu. Select "Return" by pressing the or button, then press the...


