
Quick Guide (easy Manual) (ver.1.0) (English)
Page 39
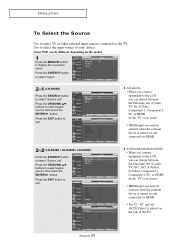
... then press the ENTER button. Press the UP/DOWN buttons to select "Source List". Press the EXIT button to exit. (LN-R329D/LN-R409D/LN-R469D) • When you connect equipment to the LCD, you can choose between the following sets of jacks: TV, AV1, AV2, S-Video1, S-Video2, Component 1, Component 2, ...) • When you connect equipment to display the on and connected via HDMI. • For 32", 40" and 46", AV2/S-Video2 is turned on and connected via HDMI. 2-2 (LN-R329D / LN-R409D / LN-R469D) Press the ENTER button to select the input source of the TV. O P E R AT I O N To Select ...
... then press the ENTER button. Press the UP/DOWN buttons to select "Source List". Press the EXIT button to exit. (LN-R329D/LN-R409D/LN-R469D) • When you connect equipment to the LCD, you can choose between the following sets of jacks: TV, AV1, AV2, S-Video1, S-Video2, Component 1, Component 2, ...) • When you connect equipment to display the on and connected via HDMI. • For 32", 40" and 46", AV2/S-Video2 is turned on and connected via HDMI. 2-2 (LN-R329D / LN-R409D / LN-R469D) Press the ENTER button to select the input source of the TV. O P E R AT I O N To Select ...
Quick Guide (easy Manual) (ver.1.0) (English)
Page 124
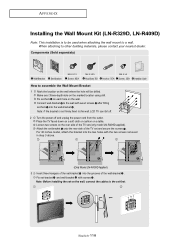
.... Connect wall-bracket to the wall with the two screws removed in step 3 above. (Only Model LN-R409D Applied) 3 Insert three Hangers of the TV set -bracket and wall-bracket with screws . For 40 inches model, attach the bracket into the two holes with wood screws after fitting anchors into the grooves... Mark the location on the wall. Note: If the bracket is to be drilled. English-118 APPENDIX Installing the Wall Mount Kit (LN-R329D, LN-R409D) Note: This installation is not firmly fixed to the wall, LCD TV can fall off. 2 Turn the power off and unplug the power cord from the outlet.
.... Connect wall-bracket to the wall with the two screws removed in step 3 above. (Only Model LN-R409D Applied) 3 Insert three Hangers of the TV set -bracket and wall-bracket with screws . For 40 inches model, attach the bracket into the two holes with wood screws after fitting anchors into the grooves... Mark the location on the wall. Note: If the bracket is to be drilled. English-118 APPENDIX Installing the Wall Mount Kit (LN-R329D, LN-R409D) Note: This installation is not firmly fixed to the wall, LCD TV can fall off. 2 Turn the power off and unplug the power cord from the outlet.


