

Open Source Guide (ENGLISH)
Page 1
... Section 1 above .) The source code for a work for most of this License; This section is allowed only for software interchange; If the distribution and/or use to the public, the best way to achieve this License. SHOULD THE PROGRAM PROVE DEFECTIVE, YOU ASSUME THE COST OF ALL NECESSARY SERVICING, REPAIR OR CORRECTION. 12. The original manual has wrong versions of...
... Section 1 above .) The source code for a work for most of this License; This section is allowed only for software interchange; If the distribution and/or use to the public, the best way to achieve this License. SHOULD THE PROGRAM PROVE DEFECTIVE, YOU ASSUME THE COST OF ALL NECESSARY SERVICING, REPAIR OR CORRECTION. 12. The original manual has wrong versions of...

Open Source Guide (ENGLISH)
Page 2
...source file to where the full notice is found. It is safest to attach them to the start of each file should have at least the "copyright" line and a pointer to most effectively convey the exclusion of warranty...USE OR INABILITY TO USE THE LIBRARY (INCLUDING BUT NOT LIMITED TO LOSS OF DATA OR DATA BEING RENDERED INACCURATE OR LOSSES SUSTAINED BY YOU OR THIRD PARTIES OR A FAILURE OF THE LIBRARY TO OPERATE WITH ANY OTHER SOFTWARE... you want it free software that everyone can do so by permitting redistribution under the terms of the greatest possible use to the library. You can redistribute...
...source file to where the full notice is found. It is safest to attach them to the start of each file should have at least the "copyright" line and a pointer to most effectively convey the exclusion of warranty...USE OR INABILITY TO USE THE LIBRARY (INCLUDING BUT NOT LIMITED TO LOSS OF DATA OR DATA BEING RENDERED INACCURATE OR LOSSES SUSTAINED BY YOU OR THIRD PARTIES OR A FAILURE OF THE LIBRARY TO OPERATE WITH ANY OTHER SOFTWARE... you want it free software that everyone can do so by permitting redistribution under the terms of the greatest possible use to the library. You can redistribute...

Quick Guide (easy Manual) (ver.1.0) (English)
Page 4
... 16 Connecting a DVD Player/Set-Top Box via HDMI 16 Connecting a Digital Audio System 17 Connecting an Amplifier/DVD Home Theater 17 Connecting a PC 17 Connecting CableCARD (LN-R409D, LN-R469D 18 Chapter 3: Operation Turning the TV On and Off 19 Changing Channels 19 Using the Channel Buttons 19 Using the PRE-CH Button to select the Previous Channel . . . . 19 Adjusting the Volume 19 Using Mute 19 Viewing the Display 20 Viewing the Menus 20 Plug & Play Feature 21 If you want to reset this...
... 16 Connecting a DVD Player/Set-Top Box via HDMI 16 Connecting a Digital Audio System 17 Connecting an Amplifier/DVD Home Theater 17 Connecting a PC 17 Connecting CableCARD (LN-R409D, LN-R469D 18 Chapter 3: Operation Turning the TV On and Off 19 Changing Channels 19 Using the Channel Buttons 19 Using the PRE-CH Button to select the Previous Channel . . . . 19 Adjusting the Volume 19 Using Mute 19 Viewing the Display 20 Viewing the Menus 20 Plug & Play Feature 21 If you want to reset this...
Quick Guide (easy Manual) (ver.1.0) (English)
Page 5
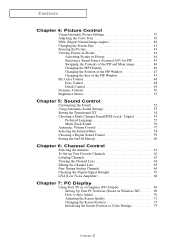
... (PC) Display 69 Setting Up Your PC Software (Based on Windows XP 69 How to Auto Adjust 70 Adjusting the Screen Quality 71 Changing the Screen Position 73 Initializing the Screen Position or Color Settings 75 Contents-2 CONTENTS Chapter 4: Picture Control Using Automatic Picture Settings 37 Adjusting the Color Tone 39 DNle (Digital Natural Image engine 40 Changing the Screen Size 41 Freezing the Picture 43 Viewing Picture-in-Picture 44 Activating Picture-in-Picture 44 Selecting a Signal Source (External A/V) for PIP 45 Swapping...
... (PC) Display 69 Setting Up Your PC Software (Based on Windows XP 69 How to Auto Adjust 70 Adjusting the Screen Quality 71 Changing the Screen Position 73 Initializing the Screen Position or Color Settings 75 Contents-2 CONTENTS Chapter 4: Picture Control Using Automatic Picture Settings 37 Adjusting the Color Tone 39 DNle (Digital Natural Image engine 40 Changing the Screen Size 41 Freezing the Picture 43 Viewing Picture-in-Picture 44 Activating Picture-in-Picture 44 Selecting a Signal Source (External A/V) for PIP 45 Swapping...
Quick Guide (easy Manual) (ver.1.0) (English)
Page 6
... (LN-R409D, LN-R469D) . . . . 112 CableCARD Reset 112 Channel List Reorganization 113 Chapter 10: Appendix Identifying Problems 114 Installing the Stand (LN-R269D, LN-R329D 116 Disconnecting the Stand 116 Installing the Wall Mount Kit (LN-R269D 117 Installing the Wall Mount Kit (LN-R329D, LN-R409D 118 Wall Installation Instructions (LN-R469D 119 How to assemble the Stand-Base (LN-R469D 123 Using the Anti-Theft Kensington Lock 124 Using Your TV in Another Country 124 CableCARD and Digital Cable Ready TVs 125 Specifications 126 Display Modes...
... (LN-R409D, LN-R469D) . . . . 112 CableCARD Reset 112 Channel List Reorganization 113 Chapter 10: Appendix Identifying Problems 114 Installing the Stand (LN-R269D, LN-R329D 116 Disconnecting the Stand 116 Installing the Wall Mount Kit (LN-R269D 117 Installing the Wall Mount Kit (LN-R329D, LN-R409D 118 Wall Installation Instructions (LN-R469D 119 How to assemble the Stand-Base (LN-R469D 123 Using the Anti-Theft Kensington Lock 124 Using Your TV in Another Country 124 CableCARD and Digital Cable Ready TVs 125 Specifications 126 Display Modes...
Quick Guide (easy Manual) (ver.1.0) (English)
Page 7
... clear images. - SRS TruSurround XT - The Anynet system enables you to implement perfect digital sound and picture quality. - If any items are included with a single remote control. The TV utilizes the HDMI system to easily control Samsung audio-video (AV) devices from this TV supports HD broadcasts with no Set-Top Box needed, and provides simple access with your preference by adjusting Red, Green, Blue, Yellow, Pink, and...
... clear images. - SRS TruSurround XT - The Anynet system enables you to implement perfect digital sound and picture quality. - If any items are included with a single remote control. The TV utilizes the HDMI system to easily control Samsung audio-video (AV) devices from this TV supports HD broadcasts with no Set-Top Box needed, and provides simple access with your preference by adjusting Red, Green, Blue, Yellow, Pink, and...
Quick Guide (easy Manual) (ver.1.0) (English)
Page 8
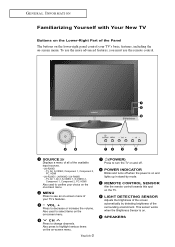
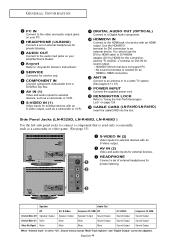
... on -screen menu. Also press to change channels. TV, AV, S-VIDEO, Component 1, Component 2, PC, HDMI • LN-R329D / LN-R409D / LN-R469D - CH Press to highlight various items on the on -screen menu. English-2 (POWER) Press to turn the TV on and off when the power is on the TV. LIGHT DETECTING SENSOR Adjusts the brightness of the available input sources. • LN-R269D - SPEAKERS SOURCE Displays a menu of all of the screen automatically by mode. REMOTE CONTROL SENSOR Aim the remote control towards...
... on -screen menu. Also press to change channels. TV, AV, S-VIDEO, Component 1, Component 2, PC, HDMI • LN-R329D / LN-R409D / LN-R469D - CH Press to highlight various items on the on -screen menu. English-2 (POWER) Press to turn the TV on and off when the power is on the TV. LIGHT DETECTING SENSOR Adjusts the brightness of the available input sources. • LN-R269D - SPEAKERS SOURCE Displays a menu of all of the screen automatically by mode. REMOTE CONTROL SENSOR Aim the remote control towards...
Quick Guide (easy Manual) (ver.1.0) (English)
Page 10
... support PC. - Side Panel Jacks (LN-R329D, LN-R409D, LN-R469D ) Use the left side panel jacks to connect a component that is set to "On", Sound menus except "Multi-Track Options" and "Digital Output" cannot be adjusted. AV IN (2) Video and audio inputs for service only. You should use the DVI to HDMI cable or DVI-HDMI adapter (DVI to HDMI) for the connection, and the 'R -AUDIO -L' terminal on DVI-IN for an HDMI to HDMI connection. Speaker Audio Out RF AV, S-Video Component...
... support PC. - Side Panel Jacks (LN-R329D, LN-R409D, LN-R469D ) Use the left side panel jacks to connect a component that is set to "On", Sound menus except "Multi-Track Options" and "Digital Output" cannot be adjusted. AV IN (2) Video and audio inputs for service only. You should use the DVI to HDMI cable or DVI-HDMI adapter (DVI to HDMI) for the connection, and the 'R -AUDIO -L' terminal on DVI-IN for an HDMI to HDMI connection. Speaker Audio Out RF AV, S-Video Component...
Quick Guide (easy Manual) (ver.1.0) (English)
Page 11
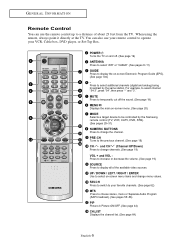
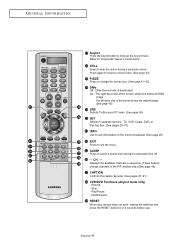
... VCR, Cable box, DVD player, or Set-Top Box. G E N E R A L I N F O R M AT I O N Remote Control You can also use the remote control up to a distance of the available video sources. You can use your remote control to operate your favorite channels. (See page 62) MTS Press to choose stereo, mono or Separate Audio Program (SAP broadcast). (See pages 55~56) PIP Picture-in Picture ON/OFF. (See page 44) CH.LIST Displays the channel list. (See page 64) English-5 POWER Turns the...
... VCR, Cable box, DVD player, or Set-Top Box. G E N E R A L I N F O R M AT I O N Remote Control You can also use the remote control up to a distance of the available video sources. You can use your remote control to operate your favorite channels. (See page 62) MTS Press to choose stereo, mono or Separate Audio Program (SAP broadcast). (See pages 55~56) PIP Picture-in Picture ON/OFF. (See page 44) CH.LIST Displays the channel list. (See page 64) English-5 POWER Turns the...
Quick Guide (easy Manual) (ver.1.0) (English)
Page 12
... TruSurround XT mode. (See page 54) SET Adjusts 5 separate devices - Stop - Fast/Forward RESET When your remote does not work, change the batteries and press the RESET button for automatic shut off. The left-hand side of the screen shows the improved DNIe image. STILL Press to bring up the Anynet menu. SLEEP Press to exit the menu. TV, VCR, Cable, DVD, or Set-Top Box. (See...
... TruSurround XT mode. (See page 54) SET Adjusts 5 separate devices - Stop - Fast/Forward RESET When your remote does not work, change the batteries and press the RESET button for automatic shut off. The left-hand side of the screen shows the improved DNIe image. STILL Press to bring up the Anynet menu. SLEEP Press to exit the menu. TV, VCR, Cable, DVD, or Set-Top Box. (See...
Quick Guide (easy Manual) (ver.1.0) (English)
Page 22
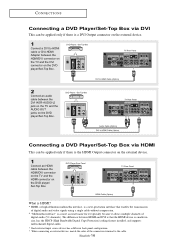
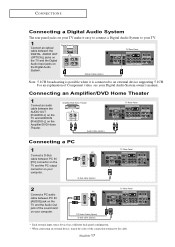
... connector on the DVD player/Set-Top Box. DVD Player Rear Panel TV Rear Panel HDMI Cable (Option) What is HDMI? • HDMI, or high-definition multimedia interface, is a next-generation interface that the HDMI device is smaller in size, has the HDCP (High Bandwidth Digital Copy Protection) coding feature installed, and supports multi-channel digital audio. * Each external input source device has a different back panel configuration. * When connecting an external device, match the color of digital audio (5.1 channels). CONNECTIONS Connecting a DVD Player/Set-Top Box via DVI This...
... connector on the DVD player/Set-Top Box. DVD Player Rear Panel TV Rear Panel HDMI Cable (Option) What is HDMI? • HDMI, or high-definition multimedia interface, is a next-generation interface that the HDMI device is smaller in size, has the HDCP (High Bandwidth Digital Copy Protection) coding feature installed, and supports multi-channel digital audio. * Each external input source device has a different back panel configuration. * When connecting an external device, match the color of digital audio (5.1 channels). CONNECTIONS Connecting a DVD Player/Set-Top Box via DVI This...
Quick Guide (easy Manual) (ver.1.0) (English)
Page 23
... TV. 1 Connect an optical cable between the DIGITAL AUDIO OUT (OPTICAL) jacks on the TV and the Digital Audio Input jacks on your computer. PC D-Sub cable (Option) TV Rear Panel 2 Connect a PC audio cable between the AUDIO OUT [R-AUDIO-L] on the TV and AUDIO IN [R-AUDIO-L] on your Digital Audio System owner's manual. PC PC Audio Cable (Option) D-Sub cable (Option) TV Rear Panel * Each external input source device has a different back panel configuration. * When connecting an external device, match the color of Component video, see...
... TV. 1 Connect an optical cable between the DIGITAL AUDIO OUT (OPTICAL) jacks on the TV and the Digital Audio Input jacks on your computer. PC D-Sub cable (Option) TV Rear Panel 2 Connect a PC audio cable between the AUDIO OUT [R-AUDIO-L] on the TV and AUDIO IN [R-AUDIO-L] on your Digital Audio System owner's manual. PC PC Audio Cable (Option) D-Sub cable (Option) TV Rear Panel * Each external input source device has a different back panel configuration. * When connecting an external device, match the color of Component video, see...
Quick Guide (easy Manual) (ver.1.0) (English)
Page 35
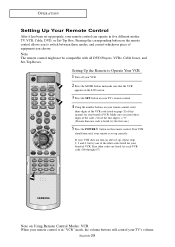
... the MODE button and make sure that the VCR appears on the LCD screen. 3 Press the SET button on your TV's remote control. 4 Using the number buttons on your remote control, enter three digits of the VCR code listed on the remote control allows you choose. Pressing the corresponding button on page 32 of this manual for your remote control can operate in "VCR" mode, the volume buttons still control your TV's volume. Your VCR should turn on after set...
... the MODE button and make sure that the VCR appears on the LCD screen. 3 Press the SET button on your TV's remote control. 4 Using the number buttons on your remote control, enter three digits of the VCR code listed on the remote control allows you choose. Pressing the corresponding button on page 32 of this manual for your remote control can operate in "VCR" mode, the volume buttons still control your TV's volume. Your VCR should turn on after set...
Quick Guide (easy Manual) (ver.1.0) (English)
Page 37
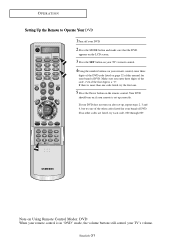
... not turn on page 32 of this manual for your brand of DVD. If no other codes are listed, try the first one of the other codes listed for your brand of DVD. O P E R AT I O N Setting Up the Remote to Operate Your .DVD 1Turn off your DVD. 2 Press the MODE button and make sure that the DVD appears on the LCD screen. 3 Press the SET button on your TV's remote control. 4Using the number buttons...
... not turn on page 32 of this manual for your brand of DVD. If no other codes are listed, try the first one of the other codes listed for your brand of DVD. O P E R AT I O N Setting Up the Remote to Operate Your .DVD 1Turn off your DVD. 2 Press the MODE button and make sure that the DVD appears on the LCD screen. 3 Press the SET button on your TV's remote control. 4Using the number buttons...
Quick Guide (easy Manual) (ver.1.0) (English)
Page 39
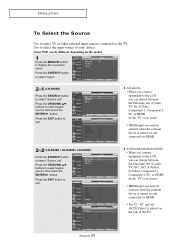
... ENTER button to select "Source List". Press the EXIT button to exit. (LN-R269D) • When you connect equipment to the LCD, you can choose between the following sets of jacks: TV, AV1, AV2, S-Video1, S-Video2, Component 1, Component 2, PC, or HDMI on the TV's rear panel. • HDMI input can only be different depending on the model. 1 Press the MENU button to display the on and connected via HDMI. 2-2 (LN-R329D / LN-R409D / LN-R469D...
... ENTER button to select "Source List". Press the EXIT button to exit. (LN-R269D) • When you connect equipment to the LCD, you can choose between the following sets of jacks: TV, AV1, AV2, S-Video1, S-Video2, Component 1, Component 2, PC, or HDMI on the TV's rear panel. • HDMI input can only be different depending on the model. 1 Press the MENU button to display the on and connected via HDMI. 2-2 (LN-R329D / LN-R409D / LN-R469D...
Quick Guide (easy Manual) (ver.1.0) (English)
Page 41
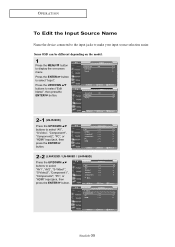
... button. 2-2 (LN-R329D / LN-R409D / LN-R469D) Press the UP/DOWN buttons to display the on-screen menu. Some OSD can be different depending on the model. 1 Press the MENU button to select "AV1", "AV2", "S-Video1", "S-Video2", "Component1", "Component2", "PC", or "HDMI" input jack, then press the ENTER button. O P E R AT I O N To Edit the Input Source Name Name the device connected to the input jacks to select "Input". Press the ENTER button...
... button. 2-2 (LN-R329D / LN-R409D / LN-R469D) Press the UP/DOWN buttons to display the on-screen menu. Some OSD can be different depending on the model. 1 Press the MENU button to select "AV1", "AV2", "S-Video1", "S-Video2", "Component1", "Component2", "PC", or "HDMI" input jack, then press the ENTER button. O P E R AT I O N To Edit the Input Source Name Name the device connected to the input jacks to select "Input". Press the ENTER button...
Quick Guide (easy Manual) (ver.1.0) (English)
Page 103
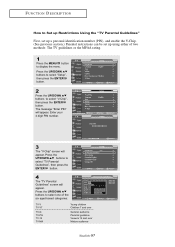
... set up using either of the six aged based categories: TV-Y TV-Y7 TV-G TV-PG TV-14 TV-MA Young children Children 7 and over General audience Parental guidance Viewers 14 and over Mature audience English-97 Enter your 4 digit PIN number. 3 The "V-Chip" screen will appear. The message "Enter PIN" will appear. Press the UP/DOWN buttons...
... set up using either of the six aged based categories: TV-Y TV-Y7 TV-G TV-PG TV-14 TV-MA Young children Children 7 and over General audience Parental guidance Viewers 14 and over Mature audience English-97 Enter your 4 digit PIN number. 3 The "V-Chip" screen will appear. The message "Enter PIN" will appear. Press the UP/DOWN buttons...
Quick Guide (easy Manual) (ver.1.0) (English)
Page 110
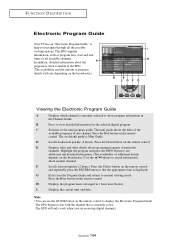
.... C Switches to help you are receiving digital channels. D Scrolls backwards quickly (2 hours). Press the Green button on the remote control. E Displays titles and other details about the A program is currently selected to normal viewing mode. The EPG will vary depending on the remote control. FUNCTION DESCRIPTION Electronic Program Guide Your TV has an "Electronic Program Guide" to the mini program guide. The EPG supplies information, such as program lists, start and end times of particular channels. G Exits...
.... C Switches to help you are receiving digital channels. D Scrolls backwards quickly (2 hours). Press the Green button on the remote control. E Displays titles and other details about the A program is currently selected to normal viewing mode. The EPG will vary depending on the remote control. FUNCTION DESCRIPTION Electronic Program Guide Your TV has an "Electronic Program Guide" to the mini program guide. The EPG supplies information, such as program lists, start and end times of particular channels. G Exits...
Quick Guide (easy Manual) (ver.1.0) (English)
Page 120
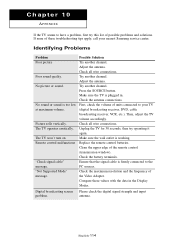
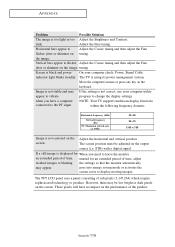
... picture or sound. Adjust the antenna. Compare these troubleshooting tips apply, call your TV (digital broadcasting receiver, DVD, cable broadcasting receiver, VCR, etc.). Remote control malfunctions "Check signal cable" message. Press the SOURCE button. Check the antenna connections. If none of these values with the data in . "Not Supported Mode" message. Then, adjust the TV volume accordingly. antenna. Chapter 10 APPENDIX If the TV seems to have a problem, first try operating it again. Try another channel...
... picture or sound. Adjust the antenna. Compare these troubleshooting tips apply, call your TV (digital broadcasting receiver, DVD, cable broadcasting receiver, VCR, etc.). Remote control malfunctions "Check signal cable" message. Press the SOURCE button. Check the antenna connections. If none of these values with the data in . "Not Supported Mode" message. Then, adjust the TV volume accordingly. antenna. Chapter 10 APPENDIX If the TV seems to have a problem, first try operating it again. Try another channel...
Quick Guide (easy Manual) (ver.1.0) (English)
Page 121
... is not correct, use your computer check: Power, Signal Cable. The TFT LCD panel uses a panel consisting of the product. However, there may be adjusted on the screen. indicator light blinks steadily. Image is not centered on the keyboard. when you need to change the display settings. The screen position must be few bright or dark pixels on the output source (i.e. These pixels will have a computer connected to produce. Horizontal...
... is not correct, use your computer check: Power, Signal Cable. The TFT LCD panel uses a panel consisting of the product. However, there may be adjusted on the screen. indicator light blinks steadily. Image is not centered on the keyboard. when you need to change the display settings. The screen position must be few bright or dark pixels on the output source (i.e. These pixels will have a computer connected to produce. Horizontal...


