User Manual
Page 2
...the Stand 1 9 Removing the Stand 2 0 Connecting and Using a Source Device Read below before installing the monitor. 21 Connecting and Using a PC 21 Connection Using the HDMI or HDMI-DVI Cable 21 Connection Using the D-SUB Cable (Analog Type) 22 Connecting to Headphones 22 Connecting the Power 2 3 Correct posture to use the product 24 Driver Installation 2 4 Setting Optimum Resolution 24 Screen Setup SAMSUNG MAGIC Bright 25 Brightness 2 6 Contrast 2 6 Sharpness 2 6 Color 2 6 HDMI Black Level 27 Eye Saver Mode 27 Game Mode 27 Response Time 27 Picture Size...
...the Stand 1 9 Removing the Stand 2 0 Connecting and Using a Source Device Read below before installing the monitor. 21 Connecting and Using a PC 21 Connection Using the HDMI or HDMI-DVI Cable 21 Connection Using the D-SUB Cable (Analog Type) 22 Connecting to Headphones 22 Connecting the Power 2 3 Correct posture to use the product 24 Driver Installation 2 4 Setting Optimum Resolution 24 Screen Setup SAMSUNG MAGIC Bright 25 Brightness 2 6 Contrast 2 6 Sharpness 2 6 Color 2 6 HDMI Black Level 27 Eye Saver Mode 27 Game Mode 27 Response Time 27 Picture Size...
User Manual
Page 3
... Adjusting OSD (On Screen Display) settings Transparency 29 Position 29 Language 29 Display Time 29 Setup and Reset Self Diagnosis 30 FreeSync 32 Eco Saving Plus 34 Off Timer 34 PC/AV Mode 35 Source Detection 35 Key Repeat Time 35 Power LED On 35 Reset All 35 Information 36 Installing the Software Easy Setting Box 37 Restrictions and Problems with the Installation 37 System Requirements 37 Troubleshooting Guide Requirements Before Contacting Samsung Customer Service...
... Adjusting OSD (On Screen Display) settings Transparency 29 Position 29 Language 29 Display Time 29 Setup and Reset Self Diagnosis 30 FreeSync 32 Eco Saving Plus 34 Off Timer 34 PC/AV Mode 35 Source Detection 35 Key Repeat Time 35 Power LED On 35 Reset All 35 Information 36 Installing the Software Easy Setting Box 37 Restrictions and Problems with the Installation 37 System Requirements 37 Troubleshooting Guide Requirements Before Contacting Samsung Customer Service...

User Manual
Page 4
...;er is used nearby. ࣖ Contact your nearest Samsung Customer Service Center if you want to properties may result if instructions are not followed. 10 cm (3.93 Inches) 10 cm (3.93 Inches) 10 cm (3.93 Inches) 10 cm (3.93 Inches) 10 cm (3.93 Inches) Precautions for use: This symbol instructs the user to make any internal part of damaging the screen. AC voltage: Rated voltage marked...
...;er is used nearby. ࣖ Contact your nearest Samsung Customer Service Center if you want to properties may result if instructions are not followed. 10 cm (3.93 Inches) 10 cm (3.93 Inches) 10 cm (3.93 Inches) 10 cm (3.93 Inches) 10 cm (3.93 Inches) Precautions for use: This symbol instructs the user to make any internal part of damaging the screen. AC voltage: Rated voltage marked...

User Manual
Page 5
... power cable by Samsung. Electricity and Safety Warning ࡙ Do not use a damaged power cord or plug, or a loose power socket. ࡙ Do not use multiple products with a single power socket. ࡙ Do not touch the power plug with wet hands. ࡙ Insert the power plug all the way in water and wring thoroughly to clean the exterior of the product. 5 Connect the power cord to the product when cleaning...
... power cable by Samsung. Electricity and Safety Warning ࡙ Do not use a damaged power cord or plug, or a loose power socket. ࡙ Do not use multiple products with a single power socket. ࡙ Do not touch the power plug with wet hands. ࡙ Insert the power plug all the way in water and wring thoroughly to clean the exterior of the product. 5 Connect the power cord to the product when cleaning...
User Manual
Page 6
...wall to allow ventilation. ࡙ Keep the plastic packaging out of the reach of children. ࣕ Children may suffocate. ࡙ Do not install the product on cabinets or shelves of the right size. ࡙ Set down the product on its front. ࡙ When installing the product on a cabinet or shelf, make...Using the product in an area with excess vibration may damage or distort the product. DO NOT INSTALL THE PRODUCT NEAR HEAT SOURCES. ࡙ Do not install...install the product within the reach of time) may seriously affect its performance. ࣕ Be sure to consult Samsung Customer Service...
...wall to allow ventilation. ࡙ Keep the plastic packaging out of the reach of children. ࣕ Children may suffocate. ࡙ Do not install the product on cabinets or shelves of the right size. ࡙ Set down the product on its front. ࡙ When installing the product on a cabinet or shelf, make...Using the product in an area with excess vibration may damage or distort the product. DO NOT INSTALL THE PRODUCT NEAR HEAT SOURCES. ࡙ Do not install...install the product within the reach of time) may seriously affect its performance. ࣕ Be sure to consult Samsung Customer Service...

User Manual
Page 7
...Never disassemble, repair or modify the product yourself. ࣕ Contact Samsung Customer Service Center for the toys or sweets resulting in a serious injury. ࡙ During a lightning or thunderstorm, power off the product and remove the power cable....turn off the power and disconnect the power cord. Then contact Samsung Customer Service Center. ࣕ Continued use or keep combustible spray or an inflammable substance near the product. ࡙ Ensure the vents are not blocked by pulling the power cord or any cable. ࡙ If a gas leakage is found, do not touch the product or power plug...
...Never disassemble, repair or modify the product yourself. ࣕ Contact Samsung Customer Service Center for the toys or sweets resulting in a serious injury. ࡙ During a lightning or thunderstorm, power off the product and remove the power cable....turn off the power and disconnect the power cord. Then contact Samsung Customer Service Center. ࣕ Continued use or keep combustible spray or an inflammable substance near the product. ࡙ Ensure the vents are not blocked by pulling the power cord or any cable. ࡙ If a gas leakage is found, do not touch the product or power plug...

User Manual
Page 12
... the focus changes. Press to settings. Selects by moving the JOG button in the function key guide screen. The OSD (On Screen Display) of functional variation, Function key guide options will be viewed. Eye Saver Mode is enable. ࡙ Picture Bright, Brightness, Color, Game Mode ࡙ System Eco Saving Plus Selects to change the input signal by moving the JOG button in the function key guide screen. ࣖ Actual models because of your Monitor's feature...
... the focus changes. Press to settings. Selects by moving the JOG button in the function key guide screen. The OSD (On Screen Display) of functional variation, Function key guide options will be viewed. Eye Saver Mode is enable. ࡙ Picture Bright, Brightness, Color, Game Mode ࡙ System Eco Saving Plus Selects to change the input signal by moving the JOG button in the function key guide screen. ࣖ Actual models because of your Monitor's feature...
User Manual
Page 14
... an input device. ࣖ To activate the Mute function, access the Volume control screen, then use the JOG button to Dynamic Contrast mode. ࣖ This menu is not available when Eco Saving Plus is enabled. ࣖ This menu is not available when Eye Saver Mode is displayed. Sharpness Brightness 100 Contrast ࣖ The displayed image may differ depending on the product may mute the sound or cause choppy audio...
... an input device. ࣖ To activate the Mute function, access the Volume control screen, then use the JOG button to Dynamic Contrast mode. ࣖ This menu is not available when Eco Saving Plus is enabled. ࣖ This menu is not available when Eye Saver Mode is displayed. Sharpness Brightness 100 Contrast ࣖ The displayed image may differ depending on the product may mute the sound or cause choppy audio...
User Manual
Page 21
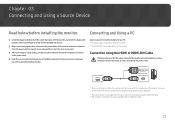
... 03 Connecting and Using a Source Device Read below before using the HDMI-DVI cable. Provided ports may differ in different products. The audio function is not supported if the source device is connected using the installed monitor. If you use an HDMI cable other than provided by Samsung, the image quality may not be degraded. Connection Using the HDMI or HDMI-DVI Cable Check to make sure that the power cables for the monitor and external devices, such as computers and set...
... 03 Connecting and Using a Source Device Read below before using the HDMI-DVI cable. Provided ports may differ in different products. The audio function is not supported if the source device is connected using the installed monitor. If you use an HDMI cable other than provided by Samsung, the image quality may not be degraded. Connection Using the HDMI or HDMI-DVI Cable Check to make sure that the power cables for the monitor and external devices, such as computers and set...
User Manual
Page 24
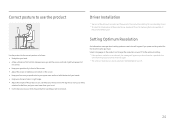
... selected in Control Panel on the screen. ࡙ Keep your forearms perpendicular to your upper arms and level with the back of your hands. ࡙ Keep your elbows at about setting optimum resolution will be relieved. Correct posture to use the product Driver Installation ࣖ You can set the optimum resolution and frequency for this product by installing the corresponding drivers. ࣖ To install the latest...
... selected in Control Panel on the screen. ࡙ Keep your forearms perpendicular to your upper arms and level with the back of your hands. ࡙ Keep your elbows at about setting optimum resolution will be relieved. Correct posture to use the product Driver Installation ࣖ You can set the optimum resolution and frequency for this product by installing the corresponding drivers. ࣖ To install the latest...
User Manual
Page 25
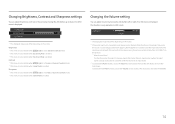
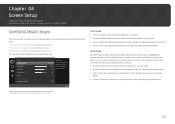
... when Eco Saving Plus is provided. Picture Brightness Contrast Sharpness Color HDMI Black Level Eye Saver Mode Custom 100 75 60 Set to view a sharper image than in Standard mode. Movie: Select this mode to an optimum picture quality suitable for the working environment. Dynamic: Select this mode when the surroundings are bright. A detailed description of TVs suitable for editing documents or using Internet. SAMSUNG MAGIC Bright This menu provides an...
... when Eco Saving Plus is provided. Picture Brightness Contrast Sharpness Color HDMI Black Level Eye Saver Mode Custom 100 75 60 Set to view a sharper image than in Standard mode. Movie: Select this mode to an optimum picture quality suitable for the working environment. Dynamic: Select this mode when the surroundings are bright. A detailed description of TVs suitable for editing documents or using Internet. SAMSUNG MAGIC Bright This menu provides an...

User Manual
Page 26
... 1. ࣕ Custom: Customize the color tone. ࣖ When the external input is connected through HDMI/VGA and PC/AV Mode is enabled. ࡙ Red: Adjust the red saturation level. Brightness You can adjust the general brightness of the picture. (Range: 0~100) A higher value will make the picture appear brighter. ࣖ This menu is not available when Bright is set to AV, Color Tone has four color temperature settings (Cool, Normal, Warm and...
... 1. ࣕ Custom: Customize the color tone. ࣖ When the external input is connected through HDMI/VGA and PC/AV Mode is enabled. ࡙ Red: Adjust the red saturation level. Brightness You can adjust the general brightness of the picture. (Range: 0~100) A higher value will make the picture appear brighter. ࣖ This menu is not available when Bright is set to AV, Color Tone has four color temperature settings (Cool, Normal, Warm and...

User Manual
Page 27
... is connected to an optimum picture quality suitable for eye relaxation. Set to the product via HDMI, image quality degradation (contrast/ color degradation, black level, etc.) may not be used to keep Game Mode enabled all the time, select Always On. Use this mode to Standard or Faster when you want to adjust the image quality. In such case, HDMI Black Level can be compatible with some source devices...
... is connected to an optimum picture quality suitable for eye relaxation. Set to the product via HDMI, image quality degradation (contrast/ color degradation, black level, etc.) may not be used to keep Game Mode enabled all the time, select Always On. Use this mode to Standard or Faster when you want to adjust the image quality. In such case, HDMI Black Level can be compatible with some source devices...
User Manual
Page 28
... can support all of 4:3. In AV mode 4:3: Display the picture with an aspect ratio of the input source. Screen Adjustment This menu is available in 0-6 levels. C H-Position & V-Position H-Position: Move the screen to obtain a vivid picture. Picture Size Change the picture size. This option is not available when FreeSync is available when the following conditions are satis ed. This menu is connected using the HDMI cable. In PC mode Auto: Display the picture according to adjust horizontal position in Analog mode only. 28 A digital...
... can support all of 4:3. In AV mode 4:3: Display the picture with an aspect ratio of the input source. Screen Adjustment This menu is available in 0-6 levels. C H-Position & V-Position H-Position: Move the screen to obtain a vivid picture. Picture Size Change the picture size. This option is not available when FreeSync is available when the following conditions are satis ed. This menu is connected using the HDMI cable. In PC mode Auto: Display the picture according to adjust horizontal position in Analog mode only. 28 A digital...

User Manual
Page 32
.... The displayed FreeSync menu items on the monitor may occur during game play . Apply the optimum resolution when using FreeSync. The sound quality of the output frequency from the graphics card. Use the HDMI cable provided by the manufacturer when using FreeSync. Set FreeSync to check your gaming experience. FreeSync FreeSync technology is solution that have malfunction. 32 Screen tearing (abnormal sync between the screen and content...
.... The displayed FreeSync menu items on the monitor may occur during game play . Apply the optimum resolution when using FreeSync. The sound quality of the output frequency from the graphics card. Use the HDMI cable provided by the manufacturer when using FreeSync. Set FreeSync to check your gaming experience. FreeSync FreeSync technology is solution that have malfunction. 32 Screen tearing (abnormal sync between the screen and content...
User Manual
Page 35
... recognize input signal. This option is pressed. Set to AV when connected to the default factory settings. 35 Reset All Return all the settings for the wide models only such as the method to a PC. Supplied for the product to an AV device. Stand-by: The power LED is on when the product is turned on when the product is turned off. The picture size will be selected. Working: The power LED...
... recognize input signal. This option is pressed. Set to AV when connected to the default factory settings. 35 Reset All Return all the settings for the wide models only such as the method to a PC. Supplied for the product to an AV device. Stand-by: The power LED is on when the product is turned on when the product is turned off. The picture size will be selected. Working: The power LED...
User Manual
Page 38
... resolve the problem, adjust the screen size in the HDMI or DVI settings for a short time. If the problem persists, contact Samsung Customer Service Center. The message Check Signal Cable appears. If the screen is turned off . Check the following. The blank spaces found on the computer system settings and cables. Check that exceeds the supported resolution(refer to Standard Signal Mode Table), the message Not Optimum Mode will not switch on . 38 Check the cable connection between...
... resolve the problem, adjust the screen size in the HDMI or DVI settings for a short time. If the problem persists, contact Samsung Customer Service Center. The message Check Signal Cable appears. If the screen is turned off . Check the following. The blank spaces found on the computer system settings and cables. Check that exceeds the supported resolution(refer to Standard Signal Mode Table), the message Not Optimum Mode will not switch on . 38 Check the cable connection between...

User Manual
Page 39
... PC sound card or software program. Sound cannot be choppy. Change the maximum resolution and frequency to suit the product performance, referring to the product. Check the cable connection to Standard Signal Mode Table (P.42 ). Adjust Brightness and Contrast. Text is no sound. Playback of high-de nition large video les can be heard if a HDMI-DVI cable is operating in this manual and the Information menu on the screen and the power LED blinks every...
... PC sound card or software program. Sound cannot be choppy. Change the maximum resolution and frequency to suit the product performance, referring to the product. Check the cable connection to Standard Signal Mode Table (P.42 ). Adjust Brightness and Contrast. Text is no sound. Playback of high-de nition large video les can be heard if a HDMI-DVI cable is operating in this manual and the Information menu on the screen and the power LED blinks every...

User Manual
Page 40
...I set power-saving mode? Windows 8(Windows 8.1): Go to Settings System Display Advanced display settings, and adjust the resolution. Windows 10: Go to Settings Control Panel Appearance and Personalization Display Adjust Resolution, and adjust the resolution. Set the frequency on your PC or graphics card for your graphics card. Windows 10: Go to Settings System Display Advanced display settings Display adapter properties Monitor, and adjust Screen refresh rate under Monitor settings. How do I change the frequency? Q & A Refer to the user manual for further instructions on adjustment...
...I set power-saving mode? Windows 8(Windows 8.1): Go to Settings System Display Advanced display settings, and adjust the resolution. Windows 10: Go to Settings Control Panel Appearance and Personalization Display Adjust Resolution, and adjust the resolution. Set the frequency on your PC or graphics card for your graphics card. Windows 10: Go to Settings System Display Advanced display settings Display adapter properties Monitor, and adjust Screen refresh rate under Monitor settings. How do I change the frequency? Q & A Refer to the user manual for further instructions on adjustment...

User Manual
Page 41
... (V) 148.5 MHz (Analog, HDMI) 148.5 MHz (Analog) / 174.5MHz (HDMI) AC100-240V~ 50/60Hz Based on the LCD panel. However, you can be brighter or darker on the AC voltage of this product, approximately 1 pixel per million (1ppm) may be installed and used with any Plug-and-Play compatible systems. Two-way data exchange between the monitor and PC system optimizes the monitor settings. This does...
... (V) 148.5 MHz (Analog, HDMI) 148.5 MHz (Analog) / 174.5MHz (HDMI) AC100-240V~ 50/60Hz Based on the LCD panel. However, you can be brighter or darker on the AC voltage of this product, approximately 1 pixel per million (1ppm) may be installed and used with any Plug-and-Play compatible systems. Two-way data exchange between the monitor and PC system optimizes the monitor settings. This does...


