
User Manual
Page 2
Table of contents Before Using the Product Securing the Installation Space 4 Precautions for storage 4 Safety Precautions 4 Cleaning 5 Electricity and Safety 5 Installation 6 Operation 7 Preparations Parts 10 Control Panel 10 Function Key Guide 11 Changing Brightness, Contrast and Sharpness settings 12 Changing the Volume setting 13 Types of Ports 14 Adjusting the Product Tilt 15 Anti-theft Lock 15 Precautions for moving the monitor 16 Installation 17 Attaching the Stand (C27JG50QQ* / C27JG52QQ* / C27JG54QQ* / C27JG56QQ* / C32JG50QQ...
Table of contents Before Using the Product Securing the Installation Space 4 Precautions for storage 4 Safety Precautions 4 Cleaning 5 Electricity and Safety 5 Installation 6 Operation 7 Preparations Parts 10 Control Panel 10 Function Key Guide 11 Changing Brightness, Contrast and Sharpness settings 12 Changing the Volume setting 13 Types of Ports 14 Adjusting the Product Tilt 15 Anti-theft Lock 15 Precautions for moving the monitor 16 Installation 17 Attaching the Stand (C27JG50QQ* / C27JG52QQ* / C27JG54QQ* / C27JG56QQ* / C32JG50QQ...

User Manual
Page 3
.../AV Mode 40 DisplayPort Ver. 40 Source Detection 40 Key Repeat Time 41 Power LED On 41 Reset All 41 Information 41 Installing the Software Easy Setting Box 42 Restrictions and Problems with the Installation 42 System Requirements 42 Troubleshooting Guide Requirements Before Contacting Samsung Customer Service Center 43 Testing the Product 43 Checking the Resolution and Frequency 43 Check the following. 43 Q & A 45 Specifications General 46 Standard Signal Mode Table...
.../AV Mode 40 DisplayPort Ver. 40 Source Detection 40 Key Repeat Time 41 Power LED On 41 Reset All 41 Information 41 Installing the Software Easy Setting Box 42 Restrictions and Problems with the Installation 42 System Requirements 42 Troubleshooting Guide Requirements Before Contacting Samsung Customer Service Center 43 Testing the Product 43 Checking the Resolution and Frequency 43 Check the following. 43 Q & A 45 Specifications General 46 Standard Signal Mode Table...
User Manual
Page 5
... steps when cleaning. 1 Power off power to the product when an issue occurs. •• Hold the plug when disconnecting the power cord from the product. ――Hold the power cable by the plug and do not touch the cable with your product by Samsung. Caution •• Do not disconnect the power cord while the product is connected unobstructed. ‒‒ The power cord must...
... steps when cleaning. 1 Power off power to the product when an issue occurs. •• Hold the plug when disconnecting the power cord from the product. ――Hold the power cable by the plug and do not touch the cable with your product by Samsung. Caution •• Do not disconnect the power cord while the product is connected unobstructed. ‒‒ The power cord must...

User Manual
Page 6
...SOURCES. •• Do not install the product in poorly ventilated spaces such as soybean oil, can damage or deform the product. Caution •• Do not drop the product while moving. •• Do not set down the product on its front. •• When installing the product on a cabinet or shelf, make... away from the wall to allow ventilation. •• Keep the plastic packaging out of the reach of children. ‒‒ Children may suffocate. •• Do not install the product on cabinets or shelves of the right size. •• Set down the product ...
...SOURCES. •• Do not install the product in poorly ventilated spaces such as soybean oil, can damage or deform the product. Caution •• Do not drop the product while moving. •• Do not set down the product on its front. •• When installing the product on a cabinet or shelf, make... away from the wall to allow ventilation. •• Keep the plastic packaging out of the reach of children. ‒‒ Children may suffocate. •• Do not install the product on cabinets or shelves of the right size. •• Set down the product ...

User Manual
Page 7
Operation Warning •• There is found, do not touch the product or power plug. Then contact Samsung Customer Service Center. ‒‒ Continued use or keep combustible spray or an inflammable substance near the product. •• Ensure the vents are not blocked...is dropped or the outer case is damaged, turn off the product and disconnect the power cord when water or other foreign substances have entered the product. Never disassemble, repair or modify the product yourself. ‒‒ Contact Samsung Customer Service Center for the toys or sweets resulting in ...
Operation Warning •• There is found, do not touch the product or power plug. Then contact Samsung Customer Service Center. ‒‒ Continued use or keep combustible spray or an inflammable substance near the product. •• Ensure the vents are not blocked...is dropped or the outer case is damaged, turn off the product and disconnect the power cord when water or other foreign substances have entered the product. Never disassemble, repair or modify the product yourself. ‒‒ Contact Samsung Customer Service Center for the toys or sweets resulting in ...
User Manual
Page 11
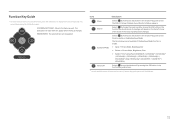
... the Function Key Guide screen. UP/DOWN/LEFT/RIGHT: Move to enable or disable Eye Saver Mode. The OSD (On Screen Display) of the screen if the input signal has been changed. The items below are not available if the Eye Saver Mode function is enable. •• Game → Picture Mode, Black Equalizer •• Picture → Picture Mode, Brightness, Color •• System → Eco Saving Plus (C27JG50QQ* / C27JG52QQ...
... the Function Key Guide screen. UP/DOWN/LEFT/RIGHT: Move to enable or disable Eye Saver Mode. The OSD (On Screen Display) of the screen if the input signal has been changed. The items below are not available if the Eye Saver Mode function is enable. •• Game → Picture Mode, Black Equalizer •• Picture → Picture Mode, Brightness, Color •• System → Eco Saving Plus (C27JG50QQ* / C27JG52QQ...

User Manual
Page 12
... and close Sublist. Sharpness Brightness 100 Contrast ――The displayed image may differ depending on the model. ――The default brightness can adjust Brightness, Contrast or Sharpness by moving the JOG button up or down, if no OSD menu is set to next depth. Power saving mode or Non-signal mode), 2 direct keys for 2 seconds Power saving/Non-signal mode Source Change Power Off When the monitor displays the Main menu the JOG Button could be used as below .
... and close Sublist. Sharpness Brightness 100 Contrast ――The displayed image may differ depending on the model. ――The default brightness can adjust Brightness, Contrast or Sharpness by moving the JOG button up or down, if no OSD menu is set to next depth. Power saving mode or Non-signal mode), 2 direct keys for 2 seconds Power saving/Non-signal mode Source Change Power Off When the monitor displays the Main menu the JOG Button could be used as below .

User Manual
Page 13
... audio to improve sound effect when there is sound noise or when the input signal is weak, usually due to at least 20% and control the volume using the volume control (JOG button LEFT/RIGHT) on the product may mute the sound or cause choppy audio when applying the headphones or speakers. Changing the Volume setting You can adjust Volume by moving the JOG button left or right, if no OSD menu...
... audio to improve sound effect when there is sound noise or when the input signal is weak, usually due to at least 20% and control the volume using the volume control (JOG button LEFT/RIGHT) on the product may mute the sound or cause choppy audio when applying the headphones or speakers. Changing the Volume setting You can adjust Volume by moving the JOG button left or right, if no OSD menu...
User Manual
Page 14
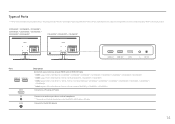
... device such as headphones. ――The sound could only be heard when using a DP cable. C27JG50QQ* / C27JG52QQ* / C27JG54QQ* / C27JG56QQ* / C32JG50QQ* / C32JG52QQ* / C32JG54QQ* / C32JG56QQ* C32JG50FQ* / C32JG51FD* / C32JG53FD* HDMI IN 1 HDMI IN 2 DP IN DC 19V Port HDMI IN 1 HDMI IN 2 DP IN Description Connects to a source device using an HDMI cable or HDMI-DVI cable. ――HDMI1 support 2560 x 1440 @ 60 Hz (C27JG50QQ* / C27JG52QQ* / C27JG54QQ* / C27JG56QQ...
... device such as headphones. ――The sound could only be heard when using a DP cable. C27JG50QQ* / C27JG52QQ* / C27JG54QQ* / C27JG56QQ* / C32JG50QQ* / C32JG52QQ* / C32JG54QQ* / C32JG56QQ* C32JG50FQ* / C32JG51FD* / C32JG53FD* HDMI IN 1 HDMI IN 2 DP IN DC 19V Port HDMI IN 1 HDMI IN 2 DP IN Description Connects to a source device using an HDMI cable or HDMI-DVI cable. ――HDMI1 support 2560 x 1440 @ 60 Hz (C27JG50QQ* / C27JG52QQ* / C27JG54QQ* / C27JG56QQ...

User Manual
Page 23
... the user manual provided with an HDMI-DVI cable. 23 The number and locations of the product you connect a source device first before connecting all other cables. Ensure you want to device. ――Do not connect the power cable before connecting the power cable. Connection Using the HDMI Cable HDMI IN 1, HDMI IN 2 Connection Using an HDMI-DVI Cable HDMI IN 1, HDMI IN 2 ――The audio function is not supported if the source device is connected using the HDMI-DVI cable. ――The optimum resolution...
... the user manual provided with an HDMI-DVI cable. 23 The number and locations of the product you connect a source device first before connecting all other cables. Ensure you want to device. ――Do not connect the power cable before connecting the power cable. Connection Using the HDMI Cable HDMI IN 1, HDMI IN 2 Connection Using an HDMI-DVI Cable HDMI IN 1, HDMI IN 2 ――The audio function is not supported if the source device is connected using the HDMI-DVI cable. ――The optimum resolution...

User Manual
Page 27
... posture to use the product Driver Installation ――You can set the optimum resolution and frequency for a specified time even when the product is turned off and on again. ――The optimum resolution can also be selected in front of the screen. •• Adjust the angle so light does not reflect on the screen. •• Keep your forearms perpendicular...
... posture to use the product Driver Installation ――You can set the optimum resolution and frequency for a specified time even when the product is turned off and on again. ――The optimum resolution can also be selected in front of the screen. •• Adjust the angle so light does not reflect on the screen. •• Keep your forearms perpendicular...

User Manual
Page 28
... optimized for 3D graphics and instant messaging on the product model. This will be used. ――This menu is not available when Eye Saver Mode is enabled. ――This menu is not available when Eco Saving Plus is connected through automatic contrast adjustment. The color and shape of the FPS game screen. In AV mode When the external input is enabled. Picture Mode This menu...
... optimized for 3D graphics and instant messaging on the product model. This will be used. ――This menu is not available when Eye Saver Mode is enabled. ――This menu is not available when Eco Saving Plus is connected through automatic contrast adjustment. The color and shape of the FPS game screen. In AV mode When the external input is enabled. Picture Mode This menu...

User Manual
Page 30
... of the output frequency from the graphics card. •• The response rate during game play . Screen tearing (abnormal sync between the screen and content) is reduced in HDMI2 or DisplayPort mode. (C27JG54QQ*/C27JG56QQ*/ C32JG54QQ*/C32JG56QQ*) Use the HDMI/DisplayPort cable provided by the manufacturer when using the function, contact the Samsung Service Center. ――When the resolution is changed while setting FreeSync to Off...
... of the output frequency from the graphics card. •• The response rate during game play . Screen tearing (abnormal sync between the screen and content) is reduced in HDMI2 or DisplayPort mode. (C27JG54QQ*/C27JG56QQ*/ C32JG54QQ*/C32JG56QQ*) Use the HDMI/DisplayPort cable provided by the manufacturer when using the function, contact the Samsung Service Center. ――When the resolution is changed while setting FreeSync to Off...
User Manual
Page 33
... automatic picture settings (Dynamic, Standard, Movie and Custom) that are subject to change without notice to your preferences. 33 In AV mode When the external input is enabled. Specifications are preset at the factory. You can select Custom which automatically recalls your enemies during a FPS game. •• RTS: Increase the color temperature and contrast ratio to view a sharper image than...
... automatic picture settings (Dynamic, Standard, Movie and Custom) that are subject to change without notice to your preferences. 33 In AV mode When the external input is enabled. Specifications are preset at the factory. You can select Custom which automatically recalls your enemies during a FPS game. •• RTS: Increase the color temperature and contrast ratio to view a sharper image than...
User Manual
Page 34
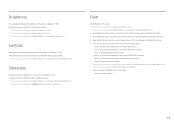
Color Adjust the tint of the screen. ――This menu is not available when Eye Saver Mode is enabled. ――This menu is not available when Picture Mode is set to Dynamic Contrast mode. Values closer to 100 mean greater intensity for the color. •• Blue: Adjust the blue saturation level. Brightness You can adjust the general brightness of the picture. (Range: 0~100) A higher value will make the picture appear...
Color Adjust the tint of the screen. ――This menu is not available when Eye Saver Mode is enabled. ――This menu is not available when Picture Mode is set to Dynamic Contrast mode. Values closer to 100 mean greater intensity for the color. •• Blue: Adjust the blue saturation level. Brightness You can adjust the general brightness of the picture. (Range: 0~100) A higher value will make the picture appear...
User Manual
Page 35
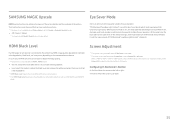
... the connected source device. When Eye Saver Mode is 'On', the blue light that wavelength is lower than in AV mode and the monitor can display normally, select Screen Fit to reduce the black level and increase the white level when there is a contrast ratio degradation. ――HDMI Black Level may occur, depending on low-resolution pictures. ――This menu is not available when Picture Mode is set...
... the connected source device. When Eye Saver Mode is 'On', the blue light that wavelength is lower than in AV mode and the monitor can display normally, select Screen Fit to reduce the black level and increase the white level when there is a contrast ratio degradation. ――HDMI Black Level may occur, depending on low-resolution pictures. ――This menu is not available when Picture Mode is set...

User Manual
Page 40
... device. ――Supplied for the market in HDMI1, HDMI2, DisplayPort mode and the screen says Check Signal Cable or power saving mode activates, press the JOG button to activate, go blank. This option is set within a range of 100 Hz/120 Hz/144 Hz. Source Detection Select either Auto or Manual as 16:9 or 16:10. ――If the monitor is in some regions...
... device. ――Supplied for the market in HDMI1, HDMI2, DisplayPort mode and the screen says Check Signal Cable or power saving mode activates, press the JOG button to activate, go blank. This option is set within a range of 100 Hz/120 Hz/144 Hz. Source Detection Select either Auto or Manual as 16:9 or 16:10. ――If the monitor is in some regions...

User Manual
Page 43
... the graphics card settings menu does not have nothing to the product is powered on the product. 4 If the message Check Signal Cable appears, the product is working normally. ――If the screen remains blank, check the PC system, video controller and cable. Checking the Resolution and Frequency For a mode that the device connected to do with the product. Chapter 09 Troubleshooting Guide Requirements Before Contacting Samsung Customer Service Center ―...
... the graphics card settings menu does not have nothing to the product is powered on the product. 4 If the message Check Signal Cable appears, the product is working normally. ――If the screen remains blank, check the PC system, video controller and cable. Checking the Resolution and Frequency For a mode that the device connected to do with the product. Chapter 09 Troubleshooting Guide Requirements Before Contacting Samsung Customer Service Center ―...

User Manual
Page 44
... the audio cable or adjust the volume. The screen is inconsistent. Change the Color settings. The product is no image on the screen and the power LED blinks every 0.5 to connect the input device. Check the connection of resolution and frequency compatible with the product. Connect the device using a Windows OS (e.g. Remove any key on the product. Set the resolution and frequency to normal operating mode. There are shadows or ghost images left on another video player. Adjust Brightness and Contrast. Screen color is too bright...
... the audio cable or adjust the volume. The screen is inconsistent. Change the Color settings. The product is no image on the screen and the power LED blinks every 0.5 to connect the input device. Check the connection of resolution and frequency compatible with the product. Connect the device using a Windows OS (e.g. Remove any key on the product. Set the resolution and frequency to normal operating mode. There are shadows or ghost images left on another video player. Adjust Brightness and Contrast. Screen color is too bright...

User Manual
Page 45
...; Adjust Resolution, and adjust the resolution. •• Windows 10: Go to Settings → System → Display → Advanced display settings → Display adapter properties → Monitor, and adjust Screen refresh rate under Monitor settings. How can I set power-saving mode? •• Windows 7: Set power-saving mode in Control Panel → Appearance and Personalization → Personalize → Screen Saver Settings → Power options or BIOS SETUP on the PC. •• Windows 8(Windows 8.1): Set power-saving mode in Settings → Control Panel →...
...; Adjust Resolution, and adjust the resolution. •• Windows 10: Go to Settings → System → Display → Advanced display settings → Display adapter properties → Monitor, and adjust Screen refresh rate under Monitor settings. How can I set power-saving mode? •• Windows 7: Set power-saving mode in Control Panel → Appearance and Personalization → Personalize → Screen Saver Settings → Power options or BIOS SETUP on the PC. •• Windows 8(Windows 8.1): Set power-saving mode in Settings → Control Panel →...


