User Manual
Page 2
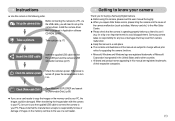
... this manual are registered trademarks of their respective companies. Samsung camera takes no responsibility for [Removable Disk]. (p.69) ● If you will need to set up the camera driver Before connecting the camera to a PC, via the USB cable, you use a card reader to your PC, be damaged. If the power is contained in the following order. Instructions ■ Use this camera in Application software CD-ROM. (p.64) Take a picture Take a picture. (p.17) Insert the USB cable...
... this manual are registered trademarks of their respective companies. Samsung camera takes no responsibility for [Removable Disk]. (p.69) ● If you will need to set up the camera driver Before connecting the camera to a PC, via the USB cable, you use a card reader to your PC, be damaged. If the power is contained in the following order. Instructions ■ Use this camera in Application software CD-ROM. (p.64) Take a picture Take a picture. (p.17) Insert the USB cable...

User Manual
Page 4
... mode 20 ■ To record a movie clip without voice 20 ■ Pausing while recording a movie clip (Successive Recording 21 ■ Using Successive Recording ......21 ●Things to Watch Out for When Taking Pictures 21 ●Using the camera buttons to set the camera 24 ■Colour tone 25 ■Brightness 25 ■Selecting focus type 26 ■Flash 27 ■Size 28 ■Continuous shot 28 《3》 Caution CAUTION indicates...
... mode 20 ■ To record a movie clip without voice 20 ■ Pausing while recording a movie clip (Successive Recording 21 ■ Using Successive Recording ......21 ●Things to Watch Out for When Taking Pictures 21 ●Using the camera buttons to set the camera 24 ■Colour tone 25 ■Brightness 25 ■Selecting focus type 26 ■Flash 27 ■Size 28 ■Continuous shot 28 《3》 Caution CAUTION indicates...
User Manual
Page 5
... adjust SETUP ●Setup menu 51 ■OSD set 52 ■File name 53 ■Language 53 ■Setting up the Date / Time / Date type ...53 ■Imprinting the recording date ......54 ■LCD brightness 54 ■Auto Focus lamp 54 《4》 ■Auto power off 54 ■Quick view 55 ■Start up image 55 ■Sound Volume 55 ■Operation Sound 55 ■Start up sound 55 ■Shutter sound 56 ■Formatting a memory 56 ■Delete All 56 ■Copy...
... adjust SETUP ●Setup menu 51 ■OSD set 52 ■File name 53 ■Language 53 ■Setting up the Date / Time / Date type ...53 ■Imprinting the recording date ......54 ■LCD brightness 54 ■Auto Focus lamp 54 《4》 ■Auto power off 54 ■Quick view 55 ■Start up image 55 ■Sound Volume 55 ■Operation Sound 55 ■Start up sound 55 ■Shutter sound 56 ■Formatting a memory 56 ■Delete All 56 ■Copy...
User Manual
Page 10
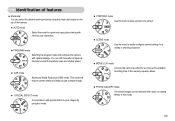
... saved images can be reviewed with optimal settings. You can still manually configure all functions except the aperture value and shutter speed. ● ASR mode Advanced Shake Reduction (ASR) mode. Identification of features ■ Mode dial You can select the desired working mode by using this mode. ● PORTRAIT mode Use this menu to take a picture of a person. ● SCENE mode Use the menu to easily configure optimal settings for a variety of shooting situations. ● MOVIE CLIP mode A movie...
... saved images can be reviewed with optimal settings. You can still manually configure all functions except the aperture value and shutter speed. ● ASR mode Advanced Shake Reduction (ASR) mode. Identification of features ■ Mode dial You can select the desired working mode by using this mode. ● PORTRAIT mode Use this menu to take a picture of a person. ● SCENE mode Use the menu to easily configure optimal settings for a variety of shooting situations. ● MOVIE CLIP mode A movie...
User Manual
Page 11
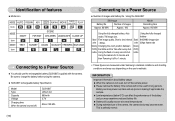
... not used, turn off ) SLB-0837 Lithium Ion 860mAh 3.7V About 150 Min. 《10》 Connecting to a Power Source ■ Number of images and battery life : Using the SLB-0837 Still image Battery life Number of images Approx. 90 MIN Approx. 180 Movie Recording time Approx. 80 MIN Using the fully charged battery, Auto Using the fully charged mode, 7M image size, battery Based Fine image quality, Shot to shot interval Based 640X480 image size on every second shot. INFORMATION Important...
... not used, turn off ) SLB-0837 Lithium Ion 860mAh 3.7V About 150 Min. 《10》 Connecting to a Power Source ■ Number of images and battery life : Using the SLB-0837 Still image Battery life Number of images Approx. 90 MIN Approx. 180 Movie Recording time Approx. 80 MIN Using the fully charged battery, Auto Using the fully charged mode, 7M image size, battery Based Fine image quality, Shot to shot interval Based 640X480 image size on every second shot. INFORMATION Important...
User Manual
Page 17
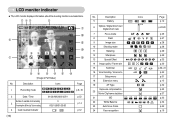
... Remaining time (Movie clip/ Voice recording) 00:01:00/01:00:00 4 Card inserted indicator p.12 《16》 No. Description 5 Battery 6 Optical / Digital Zoom bar / Digital Zoom rate 7 Focus mode 8 Flash 9 Image size 10 Shooting mode 11 Metering 12 Sharpness 13 Special Effect 14 Image quality / Frame rate 15 Self-timer 16 Voice Recording / Voice memo 17 Setup menu 18 Extension menu 19 AF Type Exposure compensation 20 Movie Clip frame stabiliser 21 ISO 22 White Balance 23 Auto focus...
... Remaining time (Movie clip/ Voice recording) 00:01:00/01:00:00 4 Card inserted indicator p.12 《16》 No. Description 5 Battery 6 Optical / Digital Zoom bar / Digital Zoom rate 7 Focus mode 8 Flash 9 Image size 10 Shooting mode 11 Metering 12 Sharpness 13 Special Effect 14 Image quality / Frame rate 15 Self-timer 16 Voice Recording / Voice memo 17 Setup menu 18 Extension menu 19 AF Type Exposure compensation 20 Movie Clip frame stabiliser 21 ISO 22 White Balance 23 Auto focus...
User Manual
Page 18
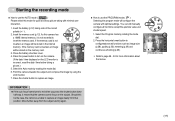
... recording mode ■ How to use the PROGRAM mode ( ) Selecting the program mode will be stored in the internal memory. Press the shutter button to turn on the camera. (If the date / time displayed on the subject. Should this camera has a 19MB internal memory, it means that position. If the memory card is 7 incorrect, reset the date / time before taking note of the correct polarity (+ / -). 2. Press the power button to capture an image. Insert the battery (p.12) taking a [AUTO mode] picture...
... recording mode ■ How to use the PROGRAM mode ( ) Selecting the program mode will be stored in the internal memory. Press the shutter button to turn on the camera. (If the date / time displayed on the subject. Should this camera has a 19MB internal memory, it means that position. If the memory card is 7 incorrect, reset the date / time before taking note of the correct polarity (+ / -). 2. Press the power button to capture an image. Insert the battery (p.12) taking a [AUTO mode] picture...
User Manual
Page 19
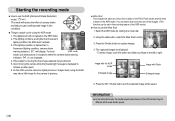
... image will be different with Flash Enlarged image 5. For best [ASR mode] results only take a little longer for using the ASR may be saved. INFORMATION ● In the Wise shot mode, the shutter speed value shown on the LCD monitor may take pictures in fluorescent lighting condition, camera shake 7 warning indicator ( ) will display. If the lighting condition is not displayed. 4. As the ASR uses the camera's digital processor, images taken using the ASR mode 1. Press the Shutter button...
... image will be different with Flash Enlarged image 5. For best [ASR mode] results only take a little longer for using the ASR may be saved. INFORMATION ● In the Wise shot mode, the shutter speed value shown on the LCD monitor may take pictures in fluorescent lighting condition, camera shake 7 warning indicator ( ) will display. If the lighting condition is not displayed. 4. As the ASR uses the camera's digital processor, images taken using the ASR mode 1. Press the Shutter button...
User Manual
Page 21
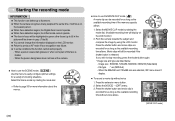
...; In some part of the memory capacity allows. 1. When a person wears dark glasses or when some conditions this function cannot work properly - Select the [VOICE] → [OFF] menu. 3. Starting the recording mode INFORMATION ● This function can be highlighted in green; Press the extension menu button. 2. Image size : 800x592, 720x480, 640X480, 320X240 (Selectable) - Select the MOVIE CLIP mode by using the LCD monitor. Point the camera towards the subject...
...; In some part of the memory capacity allows. 1. When a person wears dark glasses or when some conditions this function cannot work properly - Select the [VOICE] → [OFF] menu. 3. Starting the recording mode INFORMATION ● This function can be highlighted in green; Press the extension menu button. 2. Image size : 800x592, 720x480, 640X480, 320X240 (Selectable) - Select the MOVIE CLIP mode by using the LCD monitor. Point the camera towards the subject...

User Manual
Page 22
... auto focus system may vary depending on shooting conditions and camera settings. ■ When either the Flash Off or Slow synchro mode is very narrow (such as the available recording time allows. Taking a picture against the light, please use a tripod, support the camera on a solid surface or change to Watch Out for as long as a stick or flagpole). - Press the shutter button all way down half way. Using this function...
... auto focus system may vary depending on shooting conditions and camera settings. ■ When either the Flash Off or Slow synchro mode is very narrow (such as the available recording time allows. Taking a picture against the light, please use a tripod, support the camera on a solid surface or change to Watch Out for as long as a stick or flagpole). - Press the shutter button all way down half way. Using this function...

User Manual
Page 28
...) ISO Normal Macro AUTO W:0.8-3.0 T:0.8-2.5 W:0.4-0.8 T:0.5-0.8 Auto macro W:0.4-3.0 T:0.5-2.5 (Unit : m) Manual focus W:0.4-3.0 T:0.5-2.5 INFORMATION ● If you capture an image in , or Slow Synchro flash, the first flash fires to obtain a balanced correct exposure. Flash off Auto flash The flash does not fire. When you press the shutter button after selecting Auto, Fill-in a poorly lit condition, the camera shake warning indicator ( ) will display on the LCD monitor. The specks are show below. ■ When using the red-eye reduction function...
...) ISO Normal Macro AUTO W:0.8-3.0 T:0.8-2.5 W:0.4-0.8 T:0.5-0.8 Auto macro W:0.4-3.0 T:0.5-2.5 (Unit : m) Manual focus W:0.4-3.0 T:0.5-2.5 INFORMATION ● If you capture an image in , or Slow Synchro flash, the first flash fires to obtain a balanced correct exposure. Flash off Auto flash The flash does not fire. When you press the shutter button after selecting Auto, Fill-in a poorly lit condition, the camera shake warning indicator ( ) will display on the LCD monitor. The specks are show below. ■ When using the red-eye reduction function...
User Manual
Page 46
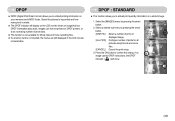
... DPOF information plays back. Select the pictures to be printed on your memory card's MISC folder. Select the [IMAGES] menu by pressing the smart button. [ONE PIC] : Select a number of prints of displayed image. [ALL PICS] : Configure number of photo labs. ■ This function is not available for all pictures except movie and voice files. [CANCEL] : Cancel the print setup. 3. DPOF : STANDARD ■ This function allows you to confirm the setting. Select a desired sub menu by...
... DPOF information plays back. Select the pictures to be printed on your memory card's MISC folder. Select the [IMAGES] menu by pressing the smart button. [ONE PIC] : Select a number of prints of displayed image. [ALL PICS] : Configure number of photo labs. ■ This function is not available for all pictures except movie and voice files. [CANCEL] : Cancel the print setup. 3. DPOF : STANDARD ■ This function allows you to confirm the setting. Select a desired sub menu by...
User Manual
Page 55
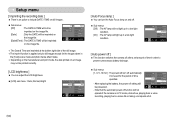
... Lamp Power Off Quick View Exit:BACK [ Auto power off ] ■ This function switches the camera off after a set amount of time 1 min specified. 3 min 5 min ◀ - Setup menu [ Imprinting the recording date ] ■ There is an option to prevent unnecessary battery drainage. ● Sub menus [1, 3, 5, 10 min] : The power will turn off automatically Off if not used for the images taken in the [Text] scene mode and photo frame effect mode...
... Lamp Power Off Quick View Exit:BACK [ Auto power off ] ■ This function switches the camera off after a set amount of time 1 min specified. 3 min 5 min ◀ - Setup menu [ Imprinting the recording date ] ■ There is an option to prevent unnecessary battery drainage. ● Sub menus [1, 3, 5, 10 min] : The power will turn off automatically Off if not used for the images taken in the [Text] scene mode and photo frame effect mode...
User Manual
Page 58
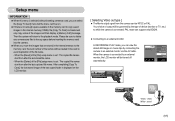
... monitor In RECORDING/ PLAY mode, you can view the stored still images or movie clips by the type of the [File] setup menu is set : The copied file names start from after the last captured file name. Video White - Then the system will be turned off automatically. When the [Reset] of device (monitor or TV, etc.) to which the camera is connected. sound 《57》 NTSC PAL ◀ Format Delete All Copy to...
... monitor In RECORDING/ PLAY mode, you can view the stored still images or movie clips by the type of the [File] setup menu is set : The copied file names start from after the last captured file name. Video White - Then the system will be turned off automatically. When the [Reset] of device (monitor or TV, etc.) to which the camera is connected. sound 《57》 NTSC PAL ◀ Format Delete All Copy to...
User Manual
Page 61
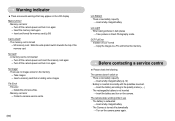
... camera stops working while in Flash Photography mode. Warning indicator ■ There are several warnings that may appear on the LCD display Memory Error! ㆍMemory card error → Turn off the camera power and turn it on again No Image! ㆍThere are no images stored on the memory → Take images → Insert a memory card that is holding some images File Error! ㆍFile error → Delete the erroneous files. ㆍMemory card error → Contact a camera service centre 《60》 Low Battery...
... camera stops working while in Flash Photography mode. Warning indicator ■ There are several warnings that may appear on the LCD display Memory Error! ㆍMemory card error → Turn off the camera power and turn it on again No Image! ㆍThere are no images stored on the memory → Take images → Insert a memory card that is holding some images File Error! ㆍFile error → Delete the erroneous files. ㆍMemory card error → Contact a camera service centre 《60》 Low Battery...
User Manual
Page 62
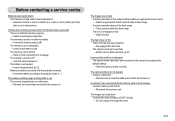
... the default settings → Reset the date and time correctly The camera buttons do not operate ㆍCamera malfunction → Remove and re-insert the battery and switch the camera on A card error has occurred while the memory card is being used in low temperatures → Keep the camera in the camera. ㆍIncorrect memory card format → Re-format the memory card The images don't play back ㆍIncorrect file name (Violation of DCF format) → Do not change the image file...
... the default settings → Reset the date and time correctly The camera buttons do not operate ㆍCamera malfunction → Remove and re-insert the battery and switch the camera on A card error has occurred while the memory card is being used in low temperatures → Keep the camera in the camera. ㆍIncorrect memory card format → Re-format the memory card The images don't play back ㆍIncorrect file name (Violation of DCF format) → Do not change the image file...

User Manual
Page 63
... using the PC's explorer, the [Removable Disk] file does not show ㆍCable connection is incorrect → Check the connection ㆍThe camera is off - Effective Pixels : Approx. 7.2 Mega-pixels - Night : 15 ~ 1/2,000 sec. ■ Exposure - Modes : Auto, Red-eye fix, Auto & Red-eye reduction, Fill-in the memory card → Insert a memory card that supports USB ㆍThe camera driver is not installed → Install a [USB Storage Driver] 《62》 Specifications ■ Image Sensor - Digital Zoom :·Still Image mode : 1.0X ~ 5.0X ·Play mode...
... using the PC's explorer, the [Removable Disk] file does not show ㆍCable connection is incorrect → Check the connection ㆍThe camera is off - Effective Pixels : Approx. 7.2 Mega-pixels - Night : 15 ~ 1/2,000 sec. ■ Exposure - Modes : Auto, Red-eye fix, Auto & Red-eye reduction, Fill-in the memory card → Insert a memory card that supports USB ㆍThe camera driver is not installed → Install a [USB Storage Driver] 《62》 Specifications ■ Image Sensor - Digital Zoom :·Still Image mode : 1.0X ~ 5.0X ·Play mode...
User Manual
Page 65
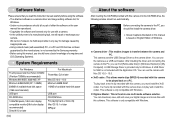
... licensed only for use with a camera. •In the unlikely event of a manufacturing fault, we will repair or exchange your digital images and movie files with Windows. ■ Digimax Master : This is the all or part of either the software or the user manual be played back on English Edition of Windows. ■ Camera driver : This enables images to the PC, you should first install the camera driver. ※ Screen Captures illustrated...
... licensed only for use with a camera. •In the unlikely event of a manufacturing fault, we will repair or exchange your digital images and movie files with Windows. ■ Digimax Master : This is the all or part of either the software or the user manual be played back on English Edition of Windows. ■ Camera driver : This enables images to the PC, you should first install the camera driver. ※ Screen Captures illustrated...
User Manual
Page 68
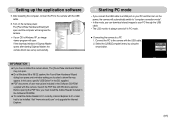
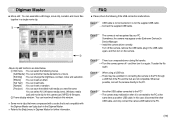
... automatically switch to "computer connection mode". •In this mode, you can download stored images to be installed. Select the [USB]-[Computer] menu by using the smart button. In this camera. Setting up successfully. Before opening the PDF files, you to the camera with this case, specify "USB Driver" in the CD supplied. ● PDF documents of Digmax Master opens after starting Digimax Master, the camera driver was set up the application software 5. If the download window of user manual...
... automatically switch to "computer connection mode". •In this mode, you can download stored images to be installed. Select the [USB]-[Computer] menu by using the smart button. In this camera. Setting up successfully. Before opening the PDF files, you to the camera with this case, specify "USB Driver" in the CD supplied. ● PDF documents of Digmax Master opens after starting Digimax Master, the camera driver was set up the application software 5. If the download window of user manual...
User Manual
Page 74
... USB connection malfunctions. Movie clip edit functions are not compatible. You can select AVI, Windows media (wmv), Windows media (asf) and movie clip for further information. Sometimes, the camera may malfunction when it on the camera. Wherever possible, connect the camera directly to the PC. 《73》 Turn the camera power off the camera, remove the USB cable, plug in Device Manager. → Install the camera driver correctly. In this window. ※ Some movie...
... USB connection malfunctions. Movie clip edit functions are not compatible. You can select AVI, Windows media (wmv), Windows media (asf) and movie clip for further information. Sometimes, the camera may malfunction when it on the camera. Wherever possible, connect the camera directly to the PC. 《73》 Turn the camera power off the camera, remove the USB cable, plug in Device Manager. → Install the camera driver correctly. In this window. ※ Some movie...


