
User Manual
Page 2
... Sales service, please bring the camera and the cause of Microsoft Corporation incorporated in the United States and/or other countries. Open Windows EXPLORER and Check [Removable Disk] search for buying a Samsung Digital Camera. When transferring the images taken with the camera to your PC, be sure to... use a card reader to copy the images on . Set up the camera drive Before connecting the camera to your PC. x Prior to turn it (e.g....
... Sales service, please bring the camera and the cause of Microsoft Corporation incorporated in the United States and/or other countries. Open Windows EXPLORER and Check [Removable Disk] search for buying a Samsung Digital Camera. When transferring the images taken with the camera to your PC, be sure to... use a card reader to copy the images on . Set up the camera drive Before connecting the camera to your PC. x Prior to turn it (e.g....

User Manual
Page 3
...could cause a fire. x Please do so may cause eyesight damage. x Should any way. You must contact your dealer or Samsung Camera Service centre. x Do not insert or drop metallic or in a well-ventilated area. 2 Warning WARNING indicates a potentially hazardous situation which... high temperatures, such as this be carried out by your dealer or Samsung Camera Service centre. This may adversely affect the camera's internal components and could increase the risk of injury from the camera's moving parts. internal inspection, maintenance and repairs should occur, please consult...
...could cause a fire. x Please do so may cause eyesight damage. x Should any way. You must contact your dealer or Samsung Camera Service centre. x Do not insert or drop metallic or in a well-ventilated area. 2 Warning WARNING indicates a potentially hazardous situation which... high temperatures, such as this be carried out by your dealer or Samsung Camera Service centre. This may adversely affect the camera's internal components and could increase the risk of injury from the camera's moving parts. internal inspection, maintenance and repairs should occur, please consult...

User Manual
Page 4
...a PC. x Take care not to touch the lens or lens cover to USB port of features Front & Top Back Bottom 5 Function button Self-timer lamp Camera Status Lamp Mode icon Connecting to a Power Source Inserting the battery Inserting the memory card Instructions on , if you capture an image. Use battery with...ash while it is highly likely to result in contact with hands or objects. Avoid leaving magnetic strip cards near case. x Do not move the camera while it is in computer malfunctions when the 20 pin connector is connected to use the PORTRAIT mode 3 x It is switched on how to use...
...a PC. x Take care not to touch the lens or lens cover to USB port of features Front & Top Back Bottom 5 Function button Self-timer lamp Camera Status Lamp Mode icon Connecting to a Power Source Inserting the battery Inserting the memory card Instructions on , if you capture an image. Use battery with...ash while it is highly likely to result in contact with hands or objects. Avoid leaving magnetic strip cards near case. x Do not move the camera while it is in computer malfunctions when the 20 pin connector is connected to use the PORTRAIT mode 3 x It is switched on how to use...

User Manual
Page 5
... sound 24 Pausing while recording a movie (Successive Recording) 25 Things to Watch Out for When Taking Pictures 26 Setting up the recording function using the camera buttons 26 POWER button 26 SHUTTER button 26 ZOOM W / T button 28 Function Description / Info / Up button 28 Macro / Down button 30 Focus lock... voice 47 SCENE mode PLAY 48 Starting play mode 48 Playing back a still image 48 Playing back a movie 49 Movie capture function 49 On camera movie trimming 50 Playing back a recorded voice 50 Playing back a voice memo 51 LCD monitor Indicator in play back mode 51 Setting up the...
... sound 24 Pausing while recording a movie (Successive Recording) 25 Things to Watch Out for When Taking Pictures 26 Setting up the recording function using the camera buttons 26 POWER button 26 SHUTTER button 26 ZOOM W / T button 28 Function Description / Info / Up button 28 Macro / Down button 30 Focus lock... voice 47 SCENE mode PLAY 48 Starting play mode 48 Playing back a still image 48 Playing back a movie 49 Movie capture function 49 On camera movie trimming 50 Playing back a recorded voice 50 Playing back a voice memo 51 LCD monitor Indicator in play back mode 51 Setting up the...

User Manual
Page 8
Included items Camera Rechargeable battery (SLB-10A) USB cable (SUC-C3) AC adapter (SAC-47) AV cable Camera strap Software CD Optional Items User manual, Product warranty SD/SDHC/MMC memory card (see p.15) Camera case 7 The contents can vary depending on the sales region. To buy the optional equipment, contact your nearest Samsung dealer or Samsung service centre. System chart Please check that you have the correct contents before using this product.
Included items Camera Rechargeable battery (SLB-10A) USB cable (SUC-C3) AC adapter (SAC-47) AV cable Camera strap Software CD Optional Items User manual, Product warranty SD/SDHC/MMC memory card (see p.15) Camera case 7 The contents can vary depending on the sales region. To buy the optional equipment, contact your nearest Samsung dealer or Samsung service centre. System chart Please check that you have the correct contents before using this product.

User Manual
Page 10
Identification of features Back LCD monitor Camera status lamp Zoom T button (Digital zoom) Zoom W button (Thumbnail) E (Effect) button Eyelet for camera strap Fn/Delete button 5-function button FD (Face Detection) button Play mode/Print button 9
Identification of features Back LCD monitor Camera status lamp Zoom T button (Digital zoom) Zoom W button (Thumbnail) E (Effect) button Eyelet for camera strap Fn/Delete button 5-function button FD (Face Detection) button Play mode/Print button 9

User Manual
Page 12
... ICON MODE ICON MODE ICON Scene() Nightscene Children Landscape Close up (LCD monitor turns off after about the camera mode setting. For the 2 seconds, the lamp blinks quickly at 0.25-second intervals. Identification of features Self-timer lamp Icon ...) The lamp blinks (LCD monitor turns off) The lamp is off The lamp blinks The lamp turns on (The camera focuses on the subject) The lamp blinks (The camera doesn't focus on After taking a picture When flash battery is charging When the USB cable is inserted to...
... ICON MODE ICON MODE ICON Scene() Nightscene Children Landscape Close up (LCD monitor turns off after about the camera mode setting. For the 2 seconds, the lamp blinks quickly at 0.25-second intervals. Identification of features Self-timer lamp Icon ...) The lamp blinks (LCD monitor turns off) The lamp is off The lamp blinks The lamp turns on (The camera focuses on the subject) The lamp blinks (The camera doesn't focus on After taking a picture When flash battery is charging When the USB cable is inserted to...

User Manual
Page 13
... usually recover at normal temperatures. Batteries can affect the performance of the battery and you may experience reduced battery life. Using the camera for 5 minutes and then Powering it off ) SLB-10A Lithium Ion 1,050mAh 3.7V Approx. 180 MIN „ Number of images and... temperatures (below 0°C) can lose power over time and are measured under Samsung's standard conditions and shooting conditions and may vary depending on every second shot. x Batteries will not be used , turn off the camera power. Approx. 130 MIN Using the fully charged battery 640x480 image size 30fps...
... usually recover at normal temperatures. Batteries can affect the performance of the battery and you may experience reduced battery life. Using the camera for 5 minutes and then Powering it off ) SLB-10A Lithium Ion 1,050mAh 3.7V Approx. 180 MIN „ Number of images and... temperatures (below 0°C) can lose power over time and are measured under Samsung's standard conditions and shooting conditions and may vary depending on every second shot. x Batteries will not be used , turn off the camera power. Approx. 130 MIN Using the fully charged battery 640x480 image size 30fps...

User Manual
Page 14
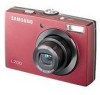
...If the USB port of the PC doesn't meet the Power output standard(4.2V, 400mA), the camera may not be used as a power cable. When the SAC-47 and SUC-C3 are connected to the USB cable. x the...PC : remove the cable and connect it to a Power Source You can download stored images to your camera through a USB hub: connect the camera directly to your PC (p.82) or supply the power to the PC. It can be used as an...10A by using the SAC-47 KIT which consists of the PC. x If the camera is connected to a port located on the back of the AC adapter (SAC-47) and the USB cable (SUC-C3).
...If the USB port of the PC doesn't meet the Power output standard(4.2V, 400mA), the camera may not be used as a power cable. When the SAC-47 and SUC-C3 are connected to the USB cable. x the...PC : remove the cable and connect it to a Power Source You can download stored images to your camera through a USB hub: connect the camera directly to your PC (p.82) or supply the power to the PC. It can be used as an...10A by using the SAC-47 KIT which consists of the PC. x If the camera is connected to a port located on the back of the AC adapter (SAC-47) and the USB cable (SUC-C3).
User Manual
Page 15
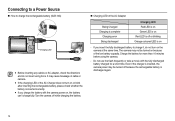
...coloured LED is on - If you charge the battery with the fully discharged battery charged for more than 10 minutes before using force. Turn the camera off because the rechargeable battery is discharged again. 14 Charge the battery for a short time. Even if the charger is inserted, the... inserting the rechargeable battery, please check whether the battery is inserted correctly. Do not use the flash frequently or take a movie with the camera power on, the battery can't charge fully. Connecting to a Power Source „ How to charge it, do not insert using the...
...coloured LED is on - If you charge the battery with the fully discharged battery charged for more than 10 minutes before using force. Turn the camera off because the rechargeable battery is discharged again. 14 Charge the battery for a short time. Even if the charger is inserted, the... inserting the rechargeable battery, please check whether the battery is inserted correctly. Do not use the flash frequently or take a movie with the camera power on, the battery can't charge fully. Connecting to a Power Source „ How to charge it, do not insert using the...

User Manual
Page 16
...spare battery) Low battery capacity (Prepare to the battery chamber cover. Do not insert the memory card the wrong way round. Turn off the camera's power before inserting the memory card. www.samsungcamera.com „ There are 4 indicators for battery condition that are displayed on after you have... inserted battery, please check whether the battery is inserted with the correct polarity (+ / -). - If the camera does not turn on the LCD monitor. This may damage the memory card slot. 15 Doing so may cause damage to recharge or use spare...
...spare battery) Low battery capacity (Prepare to the battery chamber cover. Do not insert the memory card the wrong way round. Turn off the camera's power before inserting the memory card. www.samsungcamera.com „ There are 4 indicators for battery condition that are displayed on after you have... inserted battery, please check whether the battery is inserted with the correct polarity (+ / -). - If the camera does not turn on the LCD monitor. This may damage the memory card slot. 15 Doing so may cause damage to recharge or use spare...

User Manual
Page 17
...become dirty or to any of extended use a memory card formatted by the Samsung warranty. x The memory card is insufficient memory available : A [Memory Full!] message will appear and the camera will eventually reduce the memory card's performance. Do not bend, drop or ... is used in temperature. When the memory card is advisable to become corrupted : - This is used incorrectly. - x Samsung cannot be the case, you are extremes in another digital camera or memory card reader. x Do not allow the memory card to copy important data onto other media as this...
...become dirty or to any of extended use a memory card formatted by the Samsung warranty. x The memory card is insufficient memory available : A [Memory Full!] message will appear and the camera will eventually reduce the memory card's performance. Do not bend, drop or ... is used in temperature. When the memory card is advisable to become corrupted : - This is used incorrectly. - x Samsung cannot be the case, you are extremes in another digital camera or memory card reader. x Do not allow the memory card to copy important data onto other media as this...

User Manual
Page 18
... the switch to the top of the SD memory card, the data protection will be as image capacities can use the memory card „ The camera can be affected by the zoom operation. These figures are approximate as follows. Recorded image size Still image ...- x Slide the switch to the top of the SD memory card, the data will be protected. Card pins Write protect switch Label [SD (Secure Digital) memory card] x The SD/ SDHC memory card has a write protect switch that prevents image files from being deleted or formatted. Normal About ...
... the switch to the top of the SD memory card, the data protection will be as image capacities can use the memory card „ The camera can be affected by the zoom operation. These figures are approximate as follows. Recorded image size Still image ...- x Slide the switch to the top of the SD memory card, the data will be protected. Card pins Write protect switch Label [SD (Secure Digital) memory card] x The SD/ SDHC memory card has a write protect switch that prevents image files from being deleted or formatted. Normal About ...

User Manual
Page 19
...Language] menu by pressing the UP/ DOWN/ LEFT/ RIGHT button and press the OK button. Setting up the date / time and language before using this camera. UP/ DOWN button : Changes the value of 22 languages. Select the desired sub menu by pressing the UP/ DOWN button and press the RIGHT button... at the first item of its current position. When Using the Camera for the First Time x Charge the rechargeable battery fully before using the camera for the first time. x When the camera is turned on for the first time, a menu will not be displayed to the [Date&Time] ...
...Language] menu by pressing the UP/ DOWN/ LEFT/ RIGHT button and press the OK button. Setting up the date / time and language before using this camera. UP/ DOWN button : Changes the value of 22 languages. Select the desired sub menu by pressing the UP/ DOWN button and press the RIGHT button... at the first item of its current position. When Using the Camera for the First Time x Charge the rechargeable battery fully before using the camera for the first time. x When the camera is turned on for the first time, a menu will not be displayed to the [Date&Time] ...

User Manual
Page 20
Description 6 Contrast 7 Sharpness 8 Saturation 9 Auto Focus Frame 10 Camera shake Warning 11 Date / Time 12 Exposure compensation 13 White Balance 14 ISO 15 Drive mode / Stabiliser 16 Metering 17 Image Quality / Frame Rate 18 ... 19 Battery 20 Memory card icon / Internal memory icon 21 Number of available shots remaining / Remaining time 22 Voice Memo/Mic. Off 23 Optical / Digital Zoom bar /Digital Zoom rate Icons Page p.37 p.37 p.38 p.45 p.25 2008/01/01 01:00 PM p.71 p.43...
Description 6 Contrast 7 Sharpness 8 Saturation 9 Auto Focus Frame 10 Camera shake Warning 11 Date / Time 12 Exposure compensation 13 White Balance 14 ISO 15 Drive mode / Stabiliser 16 Metering 17 Image Quality / Frame Rate 18 ... 19 Battery 20 Memory card icon / Internal memory icon 21 Number of available shots remaining / Remaining time 22 Voice Memo/Mic. Off 23 Optical / Digital Zoom bar /Digital Zoom rate Icons Page p.37 p.37 p.38 p.45 p.25 2008/01/01 01:00 PM p.71 p.43...

User Manual
Page 21
... a 10MB internal memory, you do not need to turn on the camera. (If the date/ time that the camera cannot focus on the subject. Press the power button to insert the memory card. Point the camera towards the subject and compose the image by rotating the mode dial. 6. Should this mode for..., reset the date/ time before taking a picture.) 5. Press the shutter button to use the AUTO mode ( ) „ Please select this be the case, the camera is unable to use the PROGRAM mode ( ) „ Selecting the automatic mode will be stored on the LCD monitor is not inserted, an image will...
... a 10MB internal memory, you do not need to turn on the camera. (If the date/ time that the camera cannot focus on the subject. Press the power button to insert the memory card. Point the camera towards the subject and compose the image by rotating the mode dial. 6. Should this mode for..., reset the date/ time before taking a picture.) 5. Press the shutter button to use the AUTO mode ( ) „ Please select this be the case, the camera is unable to use the PROGRAM mode ( ) „ Selecting the automatic mode will be stored on the LCD monitor is not inserted, an image will...

User Manual
Page 22
...be displayed. If the lighting condition is () or (), the DIS mode can't be blurred. - As the DIS uses the camera's digital signal processor, it may be selected. 21 If the image size is brighter than in the DIS mode. - Select the MANUAL mode by ...Low Shutter speeds can capture a moving , the captured image may take a little longer for the camera to watch out for the shutter speed and aperture value will not operate in fluorescent lighting conditions, camera shake warning indicator () will display. Select the DIS mode by rotating the Mode dial. ...
...be displayed. If the lighting condition is () or (), the DIS mode can't be blurred. - As the DIS uses the camera's digital signal processor, it may be selected. 21 If the image size is brighter than in the DIS mode. - Select the MANUAL mode by ...Low Shutter speeds can capture a moving , the captured image may take a little longer for the camera to watch out for the shutter speed and aperture value will not operate in fluorescent lighting conditions, camera shake warning indicator () will display. Select the DIS mode by rotating the Mode dial. ...

User Manual
Page 23
Available functions of the photo help guide x Features to use when the image is out of focus x Features to counter camera shake x Features to use in low light conditions x Features to use when adjusting brightness x Features to use when adjusting colours PHOTO HELP GUIDE Features to... use when the image is out of focus Features to counter camera shake Features to use in low light conditions Features to use when adjusting brightness Features to use when adjusting colours Move Next Pressing the Left...
Available functions of the photo help guide x Features to use when the image is out of focus x Features to counter camera shake x Features to use in low light conditions x Features to use when adjusting brightness x Features to use when adjusting colours PHOTO HELP GUIDE Features to... use when the image is out of focus Features to counter camera shake Features to use in low light conditions Features to use when adjusting brightness Features to use when adjusting colours Move Next Pressing the Left...

User Manual
Page 24
...; Use the menu to capture an image. „ The scene modes are listed below. Select the Scene mode by using the LCD monitor. 3. Point the camera towards the subject and compose the image by rotating the Mode dial. 2. Starting the recording mode How to shoot a document. For taking pictures of...
...; Use the menu to capture an image. „ The scene modes are listed below. Select the Scene mode by using the LCD monitor. 3. Point the camera towards the subject and compose the image by rotating the Mode dial. 2. Starting the recording mode How to shoot a document. For taking pictures of...

User Manual
Page 25
...(Selectable) - You can record the movie without sound. Pausing while recording a movie (Successive Recording) This camera allows you wish to temporarily stop recording, press the shutter button again. 24 Point the camera towards the subject and compose the image by using the LCD monitor. 3. If you to stop recording, press... shutter button is selected, 20 FPS can record your favourite scenes into a movie without sound. Press the OK button. Point the camera towards the subject and compose the image by pressing the Up / Down button. 8. If you can `t selected.
...(Selectable) - You can record the movie without sound. Pausing while recording a movie (Successive Recording) This camera allows you wish to temporarily stop recording, press the shutter button again. 24 Point the camera towards the subject and compose the image by using the LCD monitor. 3. If you to stop recording, press... shutter button is selected, 20 FPS can record your favourite scenes into a movie without sound. Press the OK button. Point the camera towards the subject and compose the image by pressing the Up / Down button. 8. If you can `t selected.


