
User Manual
Page 3
... sticker located on the product. • Do not use . This could damage the unit. 3. vases), and excess heat (e.g. Unplug the power cable from the apparatus. 11. Do not install near water. 6. Unplug this apparatus during the winter, wait approximately 2 hours until the unit has reached room temperature before using. Follow all...
... sticker located on the product. • Do not use . This could damage the unit. 3. vases), and excess heat (e.g. Unplug the power cable from the apparatus. 11. Do not install near water. 6. Unplug this apparatus during the winter, wait approximately 2 hours until the unit has reached room temperature before using. Follow all...
User Manual
Page 4
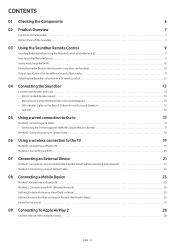
... Control 9 Active Voice Amplifier (AVA 10 Using the Hidden Buttons (Buttons with more than one function 10 Output specifications for the different sound effect modes 11 Adjusting the Soundbar volume with a TV remote control 12 04 Connecting the Soundbar 13 Connecting the power and units 13 ‒ Recommended Speaker Layout 14...
... Control 9 Active Voice Amplifier (AVA 10 Using the Hidden Buttons (Buttons with more than one function 10 Output specifications for the different sound effect modes 11 Adjusting the Soundbar volume with a TV remote control 12 04 Connecting the Soundbar 13 Connecting the power and units 13 ‒ Recommended Speaker Layout 14...
User Manual
Page 5
10 Installing the Wall Mount 29 Installation Precautions ...29 Wallmount Components ...29 Installing the Surround Speakers on a Wall 30 11 Installing the Soundbar above a TV Stand 30 Component ...30 12 Software Update 31 Auto Update ...31 USB Update...31 Initialization ...32 13 Troubleshooting 32 14 License 34 15 Open Source License Notice 34 16 Important Notes About Service 34 17 Specifications and Guide 35 Specifications ...35 ENG - 5
10 Installing the Wall Mount 29 Installation Precautions ...29 Wallmount Components ...29 Installing the Surround Speakers on a Wall 30 11 Installing the Soundbar above a TV Stand 30 Component ...30 12 Software Update 31 Auto Update ...31 USB Update...31 Initialization ...32 13 Troubleshooting 32 14 License 34 15 Open Source License Notice 34 16 Important Notes About Service 34 17 Specifications and Guide 35 Specifications ...35 ENG - 5

User Manual
Page 11
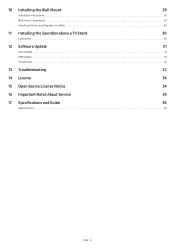
To enable sound for 2 channel output while STANDARD mode is in use. ENG - 11 Output specifications for the different sound effect modes Effect STANDARD SURROUND GAME PRO ADAPTIVE SOUND Input 2.0 ch 5.1 ch 7.1 ch Dolby Atmos®, DTS... 5.1 ch 7.1 ch Dolby Atmos®, DTS:X Output With Subwoofer & Surround Speaker 2.1 ch 5.1 ch / 7.1 ch (DTS) 7.1 ch 7.1.4 ch 11.1.4 ch 11.1.4 ch 11.1.4 ch 11.1.4 ch 11.1.4 ch 11.1.4 ch 11.1.4 ch 11.1.4 ch 11.1.4 ch 11.1.4 ch 11.1.4 ch 11.1.4 ch The Surround Speakers will not produce sounds for the Surround Speakers, change the effect mode to SURROUND.
To enable sound for 2 channel output while STANDARD mode is in use. ENG - 11 Output specifications for the different sound effect modes Effect STANDARD SURROUND GAME PRO ADAPTIVE SOUND Input 2.0 ch 5.1 ch 7.1 ch Dolby Atmos®, DTS... 5.1 ch 7.1 ch Dolby Atmos®, DTS:X Output With Subwoofer & Surround Speaker 2.1 ch 5.1 ch / 7.1 ch (DTS) 7.1 ch 7.1.4 ch 11.1.4 ch 11.1.4 ch 11.1.4 ch 11.1.4 ch 11.1.4 ch 11.1.4 ch 11.1.4 ch 11.1.4 ch 11.1.4 ch 11.1.4 ch 11.1.4 ch 11.1.4 ch The Surround Speakers will not produce sounds for the Surround Speakers, change the effect mode to SURROUND.
User Manual
Page 21
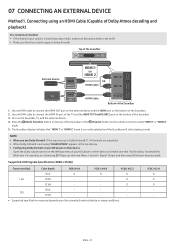
..." is selected for Bitstream. ENG - 21 Use an HDMI cable to connect the HDMI OUT port on the external device and the HDMI port on a Samsung BD Player, go to select "HDMI 1" or "HDMI 2" mode. 5. Turn on the settings menu of the TV and the HDMI TO TV (eARC/ARC) ...; Sound → Digital Output and then select Bitstream (unprocessed). NOTE • When you use Dolby Atmos®: If the input source is Dolby Atmos®, 11.1.4 channels are outputted. • When Dolby Atmos® is activated, "DOLBY ATMOS" appears in the top display. • Configuring Dolby Atmos® on your ...
..." is selected for Bitstream. ENG - 21 Use an HDMI cable to connect the HDMI OUT port on the external device and the HDMI port on a Samsung BD Player, go to select "HDMI 1" or "HDMI 2" mode. 5. Turn on the settings menu of the TV and the HDMI TO TV (eARC/ARC) ...; Sound → Digital Output and then select Bitstream (unprocessed). NOTE • When you use Dolby Atmos®: If the input source is Dolby Atmos®, 11.1.4 channels are outputted. • When Dolby Atmos® is activated, "DOLBY ATMOS" appears in the top display. • Configuring Dolby Atmos® on your ...

User Manual
Page 28
09 CONNECTING TO APPLE AIRPLAY 2 This feature may not be available in some countries. NOTE • Confirm that the Soundbar is connected to Wi-Fi. (Refer to Method 2. Connect and use with an Apple product • With AirPlay 2, you can control your home's audio system from your iPhone, iPad, HomePod, or Apple TV. • This Samsung Soundbar supports AirPlay 2 and requires iOS 11.4 or later. Connecting via Wi-Fi (Wireless Network)) ENG - 28
09 CONNECTING TO APPLE AIRPLAY 2 This feature may not be available in some countries. NOTE • Confirm that the Soundbar is connected to Wi-Fi. (Refer to Method 2. Connect and use with an Apple product • With AirPlay 2, you can control your home's audio system from your iPhone, iPad, HomePod, or Apple TV. • This Samsung Soundbar supports AirPlay 2 and requires iOS 11.4 or later. Connecting via Wi-Fi (Wireless Network)) ENG - 28

User Manual
Page 30
Slide the Soundbar down as shown below . Wall mounts aren't sold by hanging the Bracket-Wall Mounts on the Holder-Screws on the wall. 11 INSTALLING THE SOUNDBAR ABOVE A TV STAND Component 8. If the strength is not liable for Wall Mounting the Surround Speakers • Surround Speaker wall ...mounts must be able to install the speakers sideways or upside down so that the Bracket-Wall Mounts rest securely on the wall. • Samsung Electronics is insufficient, make sure to reinforce the wall before installing the Wall Mount Brackets and the speakers on the Holder-Screws. Refer to ...
Slide the Soundbar down as shown below . Wall mounts aren't sold by hanging the Bracket-Wall Mounts on the Holder-Screws on the wall. 11 INSTALLING THE SOUNDBAR ABOVE A TV STAND Component 8. If the strength is not liable for Wall Mounting the Surround Speakers • Surround Speaker wall ...mounts must be able to install the speakers sideways or upside down so that the Bracket-Wall Mounts rest securely on the wall. • Samsung Electronics is insufficient, make sure to reinforce the wall before installing the Wall Mount Brackets and the speakers on the Holder-Screws. Refer to ...
