User Manual
Page 2
... the floor/wall in a residential installation. Consult Instructions for use shielded cables and connectors for future reference. 1. U.S. Operation is not required. CALIFORNIA USA ONLY (Applicable for U.S.A): FCC Supplier's Declaration of the wall socket. Class II product : This symbol indicates that this equipment. • This product satisfies FCC regulations when shielded cables and connectors are designed to radio communications. NO USER-SERVICEABLE PARTS ARE INSIDE...
... the floor/wall in a residential installation. Consult Instructions for use shielded cables and connectors for future reference. 1. U.S. Operation is not required. CALIFORNIA USA ONLY (Applicable for U.S.A): FCC Supplier's Declaration of the wall socket. Class II product : This symbol indicates that this equipment. • This product satisfies FCC regulations when shielded cables and connectors are designed to radio communications. NO USER-SERVICEABLE PARTS ARE INSIDE...
User Manual
Page 4
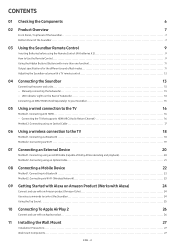
... 1. Connecting via Bluetooth 22 Method 2. Connecting using the Remote Control (AA batteries X 2 9 How to Use the Remote Control 9 Using the Hidden Buttons (Buttons with more than one function 11 Output specifications for the different sound effect modes 11 Adjusting the Soundbar volume with a TV remote control 12 04 Connecting the Soundbar 13 Connecting the power and units 13 ‒ Manually connecting the Subwoofer 13 ‒ LED Indicator Lights on Amazon Product (Works with Alexa) 24 Connect and use with HDMI 16 ‒ Connecting...
... 1. Connecting via Bluetooth 22 Method 2. Connecting using the Remote Control (AA batteries X 2 9 How to Use the Remote Control 9 Using the Hidden Buttons (Buttons with more than one function 11 Output specifications for the different sound effect modes 11 Adjusting the Soundbar volume with a TV remote control 12 04 Connecting the Soundbar 13 Connecting the power and units 13 ‒ Manually connecting the Subwoofer 13 ‒ LED Indicator Lights on Amazon Product (Works with Alexa) 24 Connect and use with HDMI 16 ‒ Connecting...
User Manual
Page 5
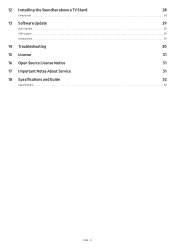
12 Installing the Soundbar above a TV Stand 28 Component ...28 13 Software Update 29 Auto Update ...29 USB Update...29 Initialization ...29 14 Troubleshooting 30 15 License 31 16 Open Source License Notice 31 17 Important Notes About Service 31 18 Specifications and Guide 32 Specifications ...32 ENG - 5
12 Installing the Soundbar above a TV Stand 28 Component ...28 13 Software Update 29 Auto Update ...29 USB Update...29 Initialization ...29 14 Troubleshooting 30 15 License 31 16 Open Source License Notice 31 17 Important Notes About Service 31 18 Specifications and Guide 32 Specifications ...32 ENG - 5
User Manual
Page 7
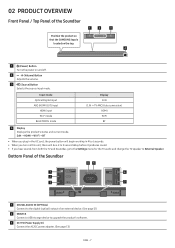
... the AC cord, the power button will begin working in 4 to 6 seconds. • When you turn on and off. 2 (Volume) Button Adjusts the volume. 3 (Source) Button Selects the source input mode. Bottom Panel of the Soundbar NETWORNKETWIODRSKET ID SET D(OIGPTITIACLAD(LAOI)UGPDTITIIACOLAILNA)UDIO IN SERVICESERVICE NETWORK ID SET DC D(1O9IGPVTITDIACCLA1LA9)UVDIO IN SERVICE DC 19V HDMI HDMI H(eDAMRCI T/AORH(TeHCDAVD)MRMCI T/IAORTCV) HDMI TO TV (eARC/ARC) 45 1 DIDGIIGTIATLALAUADUIDOIOININ (O(POTPITCIACLA)L) DIGITAL AUDIO IN (OPTICAL) HHDHNDNMDENMETMEITIWITWININWIONOROD(ROD...
... the AC cord, the power button will begin working in 4 to 6 seconds. • When you turn on and off. 2 (Volume) Button Adjusts the volume. 3 (Source) Button Selects the source input mode. Bottom Panel of the Soundbar NETWORNKETWIODRSKET ID SET D(OIGPTITIACLAD(LAOI)UGPDTITIIACOLAILNA)UDIO IN SERVICESERVICE NETWORK ID SET DC D(1O9IGPVTITDIACCLA1LA9)UVDIO IN SERVICE DC 19V HDMI HDMI H(eDAMRCI T/AORH(TeHCDAVD)MRMCI T/IAORTCV) HDMI TO TV (eARC/ARC) 45 1 DIDGIIGTIATLALAUADUIDOIOININ (O(POTPITCIACLA)L) DIGITAL AUDIO IN (OPTICAL) HHDHNDNMDENMETMEITIWITWININWIONOROD(ROD...
User Manual
Page 10
... are selectable using the Left/Right buttons and each speaker select CENTER LEVEL, or FRONT TOP LEVEL in sequence. Sound Control • To control the volume of the treble or bass sound, select TREBLE or BASS in Sound Control, and then set the audio delay between 0~300 milliseconds by using the Up/Down buttons. • If the video on the button to select or set the woofer (bass) volume level to 0 (Default), press the button. 10 VOLUME Push the button up or down to adjust the volume...
... are selectable using the Left/Right buttons and each speaker select CENTER LEVEL, or FRONT TOP LEVEL in sequence. Sound Control • To control the volume of the treble or bass sound, select TREBLE or BASS in Sound Control, and then set the audio delay between 0~300 milliseconds by using the Up/Down buttons. • If the video on the button to select or set the woofer (bass) volume level to 0 (Default), press the button. 10 VOLUME Push the button up or down to adjust the volume...
User Manual
Page 13
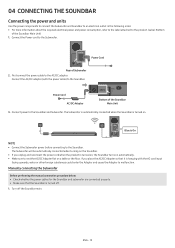
... SERVICE NETWORK ID SET HDMI OUT (TV-ARC) DC 19V Bottom of Subwoofer 2. Connect power to the AC/DC adapter. DIGITAL AUDIO IN (OPTICAL) HDNMETI WINORD(OKIGPTITIACIDLASLAE)UTDIO IN HDM NOTE • Connect the Subwoofer power before connecting to the Subwoofer. HDMI TO TV (eARC/ARC Manually connecting the Subwoofer Before performing the manual connection procedure below: • Check whether the power cables for the Soundbar and subwoofer are connected properly. • Make sure that it is turned...
... SERVICE NETWORK ID SET HDMI OUT (TV-ARC) DC 19V Bottom of Subwoofer 2. Connect power to the AC/DC adapter. DIGITAL AUDIO IN (OPTICAL) HDNMETI WINORD(OKIGPTITIACIDLASLAE)UTDIO IN HDM NOTE • Connect the Subwoofer power before connecting to the Subwoofer. HDMI TO TV (eARC/ARC Manually connecting the Subwoofer Before performing the manual connection procedure below: • Check whether the power cables for the Soundbar and subwoofer are connected properly. • Make sure that it is turned...
User Manual
Page 14
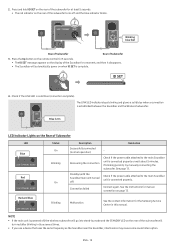
... some sound interruption. Red and blue Blinking Malfunction See the contact information for manual connection on the Rear of Subwoofer LED Blue Red Status On Blinking On Description Successfully connected (normal operation) Recovering the connection Standby (with the Soundbar main unit turned off and the blue indicator blinks. 5 Sec Blinking blue fast Rear of Subwoofer Rear of the sub-woofer will automatically power on when ID SET is On LED Indicator Lights on page 13. Check if the power cable...
... some sound interruption. Red and blue Blinking Malfunction See the contact information for manual connection on the Rear of Subwoofer LED Blue Red Status On Blinking On Description Successfully connected (normal operation) Recovering the connection Standby (with the Soundbar main unit turned off and the blue indicator blinks. 5 Sec Blinking blue fast Rear of Subwoofer Rear of the sub-woofer will automatically power on when ID SET is On LED Indicator Lights on page 13. Check if the power cable...
User Manual
Page 16
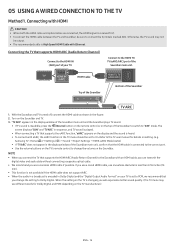
... you will experience better sound quality. (The TV menu may not be output. • The recommended cable is received first. • To connect the HDMI cable between the TV and Soundbar, be set to PCM, we recommend that supports the HDMI ARC (Audio Return Channel) to the TV user manual for Dolby Digital and PCM depending on the TV is changed, you use a cored HDMI cable, use a coreless HDMI cable if possible. HDMI Cable Top of the Soundbar...
... you will experience better sound quality. (The TV menu may not be output. • The recommended cable is received first. • To connect the HDMI cable between the TV and Soundbar, be set to PCM, we recommend that supports the HDMI ARC (Audio Return Channel) to the TV user manual for Dolby Digital and PCM depending on the TV is changed, you use a cored HDMI cable, use a coreless HDMI cable if possible. HDMI Cable Top of the Soundbar...
User Manual
Page 17
... the Samsung TVs. Connecting using an Optical Cable Pre-connection Checklist • When both the HDMI cable and optical cable are connected, the HDMI signal is output from the Soundbar. Turn on the top panel or remote control, and then select the "D.IN" mode. 4. Using the Spacefit sound Provides optimized sound quality by TV. • This function is supported only when the HDMI Cable or Optical Cable (not supplied) is connected. • This function is connected, the menu, "TV+Soundbar" appears under the Sound Output menu...
... the Samsung TVs. Connecting using an Optical Cable Pre-connection Checklist • When both the HDMI cable and optical cable are connected, the HDMI signal is output from the Soundbar. Turn on the top panel or remote control, and then select the "D.IN" mode. 4. Using the Spacefit sound Provides optimized sound quality by TV. • This function is supported only when the HDMI Cable or Optical Cable (not supplied) is connected. • This function is connected, the menu, "TV+Soundbar" appears under the Sound Output menu...
User Manual
Page 18
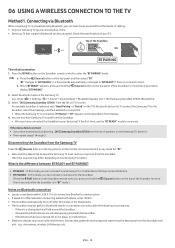
... panel and then select "BT". "BT" changes to "BT PAIRING" in place, or malfunctions. • Electronic devices may cause radio interference. Home ( ) → Settings ( ) → Sound → Sound Output → Bluetooth Speaker List → [AV] Samsung Soundbar Q700A (Bluetooth)) 3. Check the specifications of the Soundbar for more than 5 seconds while the Soundbar is in the Ready state. • The Soundbar may not perform Bluetooth search or connection...
... panel and then select "BT". "BT" changes to "BT PAIRING" in place, or malfunctions. • Electronic devices may cause radio interference. Home ( ) → Settings ( ) → Sound → Sound Output → Bluetooth Speaker List → [AV] Samsung Soundbar Q700A (Bluetooth)) 3. Check the specifications of the Soundbar for more than 5 seconds while the Soundbar is in the Ready state. • The Soundbar may not perform Bluetooth search or connection...
User Manual
Page 19
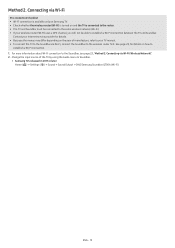
... about Wi-Fi connection to Soundbar. • Samsung TVs released in 2017 or later Home ( ) → Settings ( ) → Sound → Sound Output → [AV] Samsung Soundbar Q700A (Wi-Fi) ENG - 19 See page 23, for details. • Because the menus may differ depending on and the TV is turned on the year of the TV by using the Audio menu to the Soundbar...
... about Wi-Fi connection to Soundbar. • Samsung TVs released in 2017 or later Home ( ) → Settings ( ) → Sound → Sound Output → [AV] Samsung Soundbar Q700A (Wi-Fi) ENG - 19 See page 23, for details. • Because the menus may differ depending on and the TV is turned on the year of the TV by using the Audio menu to the Soundbar...

User Manual
Page 20
... HDMI External Device HDMI Cable HDMI Cable 1. ENG - 20 Use an HDMI cable to Off. • Make sure that "HDMI" mode is selected for Bitstream. NOTE • When you use Dolby Atmos®: If the input source is Dolby Atmos®, 3.1.2 channels are outputted. • When Dolby Atmos® is activated, "DOLBY ATMOS" appears in the front display. • Configuring Dolby Atmos® on your BD player or other device Open the audio output options on the settings menu...
... HDMI External Device HDMI Cable HDMI Cable 1. ENG - 20 Use an HDMI cable to Off. • Make sure that "HDMI" mode is selected for Bitstream. NOTE • When you use Dolby Atmos®: If the input source is Dolby Atmos®, 3.1.2 channels are outputted. • When Dolby Atmos® is activated, "DOLBY ATMOS" appears in the front display. • Configuring Dolby Atmos® on your BD player or other device Open the audio output options on the settings menu...
User Manual
Page 21
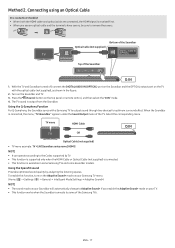
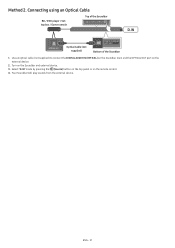
Use an optical cable (not supplied) to connect the DIGITAL AUDIO IN (OPTICAL) on the Soundbar main and the OPTICAL OUT port on the Soundbar and external device. 3. Your Soundbar will play sounds from the external device. ENG - 21 Connecting using an Optical Cable BD / DVD player / Settop box / Game console Top of the Soundbar D.IN Optical Cable (not supplied) Bottom of the Soundbar 1. Method 2. Turn on the external device. 2. Select "D.IN" mode by pressing the (Source) button on the top panel or on the remote control. 4.
Use an optical cable (not supplied) to connect the DIGITAL AUDIO IN (OPTICAL) on the Soundbar main and the OPTICAL OUT port on the Soundbar and external device. 3. Your Soundbar will play sounds from the external device. ENG - 21 Connecting using an Optical Cable BD / DVD player / Settop box / Game console Top of the Soundbar D.IN Optical Cable (not supplied) Bottom of the Soundbar 1. Method 2. Turn on the external device. 2. Select "D.IN" mode by pressing the (Source) button on the top panel or on the remote control. 4.

User Manual
Page 22
... mode, you have connected the Soundbar to your device, select "[AV] Samsung Soundbar Q700A" from the list that supports only the HF (Hands Free) function. • When connecting the Soundbar to a Bluetooth device, place them as close to display "BT PAIRING". 2. Press the (Source) button on the Mobile device, delete it. • Repeat steps 1 and 2. Press the PAIR button on . Play music files from the device connected...
... mode, you have connected the Soundbar to your device, select "[AV] Samsung Soundbar Q700A" from the list that supports only the HF (Hands Free) function. • When connecting the Soundbar to a Bluetooth device, place them as close to display "BT PAIRING". 2. Press the (Source) button on the Mobile device, delete it. • Repeat steps 1 and 2. Press the PAIR button on . Play music files from the device connected...
User Manual
Page 24
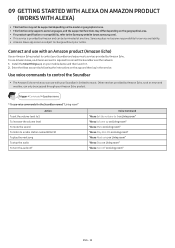
... volume level To mute the sound To listen to a radio station named KISS FM To play the next song To stop the audio To turn the audio off Voice Command "Alexa Set the volume to change without prior notice. Connect and use with an Amazon product (Amazon Echo) Use an Amazon Echo product to control your Soundbar is provided by Amazon Echo. Trigger + Command + Speaker name * To use...
... volume level To mute the sound To listen to a radio station named KISS FM To play the next song To stop the audio To turn the audio off Voice Command "Alexa Set the volume to change without prior notice. Connect and use with an Amazon product (Amazon Echo) Use an Amazon Echo product to control your Soundbar is provided by Amazon Echo. Trigger + Command + Speaker name * To use...
User Manual
Page 25
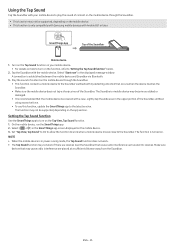
... SmartThings app screen displayed on the function, refer to "Setting the Tap Sound function" below. 2. Play the sound of the Soundbar. Select in power-saving mode, the Tap Sound function does not work. • The Tap Sound function may cause radio interference are placed at a sufficient distance away from the Soundbar. Set "Tap View, Tap Sound" to On to allow the function to the Soundbar via Bluetooth. 3. Turn on the Tap Sound function on your...
... SmartThings app screen displayed on the function, refer to "Setting the Tap Sound function" below. 2. Play the sound of the Soundbar. Select in power-saving mode, the Tap Sound function does not work. • The Tap Sound function may cause radio interference are placed at a sufficient distance away from the Soundbar. Set "Tap View, Tap Sound" to On to allow the function to the Soundbar via Bluetooth. 3. Turn on the Tap Sound function on your...
User Manual
Page 29
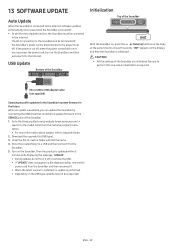
... display and then the Soundbar is cut off. Download the upgrade file (USB type). 3. The Wi-Fi connection to the Soundbar will be connected to the Internet. Samsung may not be supported. Turn on the USB type, update may offer updates for the Soundbar's system firmware in a USB and then connect it to the Internet. USB Update Bottom of the Soundbar NETWORK ID SET DIGITAL AUDIO IN (OPTICAL) SERVICE DC 19V HDMI DIGITAL AUDIO INHDMITOTV (eARC/ARC) (OPTICAL) HDMI IN SERVICE...
... display and then the Soundbar is cut off. Download the upgrade file (USB type). 3. The Wi-Fi connection to the Soundbar will be connected to the Internet. Samsung may not be supported. Turn on the USB type, update may offer updates for the Soundbar's system firmware in a USB and then connect it to the Internet. USB Update Bottom of the Soundbar NETWORK ID SET DIGITAL AUDIO IN (OPTICAL) SERVICE DC 19V HDMI DIGITAL AUDIO INHDMITOTV (eARC/ARC) (OPTICAL) HDMI IN SERVICE...
User Manual
Page 30
... the wireless signal is connected, adjust the volume of the external device. • For sound output of the TV, select Soundbar. (Samsung TV: Home ( ) → Settings ( ) → Sound → Sound Output → Select Soundbar) • The cable connection to play the input signal. Directly connect the Soundbar. • HDMI-CEC may be disabled. If you see OFF-TV CONNECT, press and hold the button on the Soundbar remote control for 5 seconds to switch the selection. • Remove and reconnect the power plug...
... the wireless signal is connected, adjust the volume of the external device. • For sound output of the TV, select Soundbar. (Samsung TV: Home ( ) → Settings ( ) → Sound → Sound Output → Select Soundbar) • The cable connection to play the input signal. Directly connect the Soundbar. • HDMI-CEC may be disabled. If you see OFF-TV CONNECT, press and hold the button on the Soundbar remote control for 5 seconds to switch the selection. • Remove and reconnect the power plug...
User Manual
Page 32
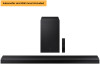
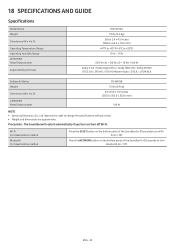
... SPECIFICATIONS AND GUIDE Specifications Model Name Weight Dimensions (W x H x D) Operating Temperature Range Operating Humidity Range AMPLIFIER Rated Output power Supported play formats HW-Q700A 7.9 lbs (3.6 kg) 38.6 x 2.4 x 4.5 inches (980.0 x 60.0 x 115.0 mm) +41°F to +95°F (+5°C to +35°C) 10 % ~ 75 % ((30 W x 4) + (20 W x 2) + 10 W) + 160 W Dolby 5.1ch / Dolby Digital Plus / Dolby TRUE HD / Dolby ATMOS DTS 5.1ch / DTS HD / DTS-HD Master Audio / DTS:X / LPCM 8Ch Subwoofer Name Weight Dimensions (W x H x D) AMPLIFIER Rated Output power...
... SPECIFICATIONS AND GUIDE Specifications Model Name Weight Dimensions (W x H x D) Operating Temperature Range Operating Humidity Range AMPLIFIER Rated Output power Supported play formats HW-Q700A 7.9 lbs (3.6 kg) 38.6 x 2.4 x 4.5 inches (980.0 x 60.0 x 115.0 mm) +41°F to +95°F (+5°C to +35°C) 10 % ~ 75 % ((30 W x 4) + (20 W x 2) + 10 W) + 160 W Dolby 5.1ch / Dolby Digital Plus / Dolby TRUE HD / Dolby ATMOS DTS 5.1ch / DTS HD / DTS-HD Master Audio / DTS:X / LPCM 8Ch Subwoofer Name Weight Dimensions (W x H x D) AMPLIFIER Rated Output power...
User Manual
Page 33
... of purchase to SAMSUNG or SAMSUNG's authorized service center. All replaced parts and products become the property of SAMSUNG and must be performed by SAMSUNG under the SAMSUNG brand name are set forth in the applicable end user license agreement. Non-SAMSUNG manufacturers, suppliers, publishers, and service providers may also have other signal transmission and delivery problems. SAMSUNG does not warrant uninterrupted or error-free operation of Samsung authorized retailers...
... of purchase to SAMSUNG or SAMSUNG's authorized service center. All replaced parts and products become the property of SAMSUNG and must be performed by SAMSUNG under the SAMSUNG brand name are set forth in the applicable end user license agreement. Non-SAMSUNG manufacturers, suppliers, publishers, and service providers may also have other signal transmission and delivery problems. SAMSUNG does not warrant uninterrupted or error-free operation of Samsung authorized retailers...


