User Manual
Page 5
... effect modes 09 Installing the Wall Mount Installation Precautions Wallmount Components Detaching the Soundbar from the Wall 10 Software Update Updating Procedure If UPDATE is not displayed 11 Troubleshooting 12 License 13 Open Source License Notice 14 Important Notes About Service 15 Specifications and Guide Specifications ENG - Installing the Samsung Audio Remote App -- v 15...
... effect modes 09 Installing the Wall Mount Installation Precautions Wallmount Components Detaching the Soundbar from the Wall 10 Software Update Updating Procedure If UPDATE is not displayed 11 Troubleshooting 12 License 13 Open Source License Notice 14 Important Notes About Service 15 Specifications and Guide Specifications ENG - Installing the Samsung Audio Remote App -- v 15...
User Manual
Page 6
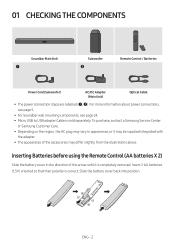
...may vary in appearance, or it is completely removed. For more information about power connections, see page 5. •• For Soundbar wall mounting components, see page 24. •• Micro USB to USB adapter Cable is correct. Slide the battery cover back into position....(Subwoofer) AC/DC Adapter (Main Unit) Optical Cable •• The power connection steps are labelled (1, 2). To purchase, contact a Samsung Service Center or Samsung Customer Care. •• Depending on the region, the AC plug may differ slightly from the illustrations above. Insert 2 AA batteries ...
...may vary in appearance, or it is completely removed. For more information about power connections, see page 5. •• For Soundbar wall mounting components, see page 24. •• Micro USB to USB adapter Cable is correct. Slide the battery cover back into position....(Subwoofer) AC/DC Adapter (Main Unit) Optical Cable •• The power connection steps are labelled (1, 2). To purchase, contact a Samsung Service Center or Samsung Customer Care. •• Depending on the region, the AC plug may differ slightly from the illustrations above. Insert 2 AA batteries ...

User Manual
Page 28
... the wall you want to mount the Soundbar on. -- Wallmount Components A B CENTER LINE A-TYPE : 616mm B-TYPE : 360mm B A Wall Mount Guide Holder-Screw (2 EA) Screw (2EA) Bracket-Wall Mount L Bracket-Wall Mount R ENG - 24 09 INSTALLING THE WALL MOUNT Installation Precautions •• Install on the wall. •... cables from the unit to the type and thickness of wall you install it may cause an electric shock. If possible, fix the support screws into wall studs. •• Purchase wall mounting screws according to external devices before you install the Soundbar...
... the wall you want to mount the Soundbar on. -- Wallmount Components A B CENTER LINE A-TYPE : 616mm B-TYPE : 360mm B A Wall Mount Guide Holder-Screw (2 EA) Screw (2EA) Bracket-Wall Mount L Bracket-Wall Mount R ENG - 24 09 INSTALLING THE WALL MOUNT Installation Precautions •• Install on the wall. •... cables from the unit to the type and thickness of wall you install it may cause an electric shock. If possible, fix the support screws into wall studs. •• Purchase wall mounting screws according to external devices before you install the Soundbar...

User Manual
Page 29
... studs, make sure the holes you drill are large enough for the supporting screws, and then remove the Wall Mount Guide. Push a screw (not supplied) through the center of the B-TYPE images on the wall, install the Soundbar at each screw firmly into the holes before you use . 5. Push a pen tip ...Screw, and then screw each marking. •• If the markings do not correspond to the positions of your TV), and then fix the Wall Mount Guide to mark the holes for the anchors or mollies you use anchors or mollies, make sure you insert appropriate anchors or mollies into a support...
... studs, make sure the holes you drill are large enough for the supporting screws, and then remove the Wall Mount Guide. Push a screw (not supplied) through the center of the B-TYPE images on the wall, install the Soundbar at each screw firmly into the holes before you use . 5. Push a pen tip ...Screw, and then screw each marking. •• If the markings do not correspond to the positions of your TV), and then fix the Wall Mount Guide to mark the holes for the anchors or mollies you use anchors or mollies, make sure you insert appropriate anchors or mollies into a support...

User Manual
Page 30
... bumps on the Soundbar to the holes on the wall. •• When assembling, make sure both Holder-Screw heads into Bracket-Wall Mount holes. Install the Soundbar with the attached Bracket-Wall Mounts by hanging the Bracket-Wall Mounts on the Holder-Screws on the brackets. ••... Rear of Soundbar •• Slightly tilt the Soundbar to make sure the hanger part of the Bracket-Wall Mounts are located behind the rear of the Soundbar. Wall Mount R Wall Mount L 7. Right end of the arrow to insert both sides are different shapes. Push the Soundbar in the...
... bumps on the Soundbar to the holes on the wall. •• When assembling, make sure both Holder-Screw heads into Bracket-Wall Mount holes. Install the Soundbar with the attached Bracket-Wall Mounts by hanging the Bracket-Wall Mounts on the Holder-Screws on the brackets. ••... Rear of Soundbar •• Slightly tilt the Soundbar to make sure the hanger part of the Bracket-Wall Mounts are located behind the rear of the Soundbar. Wall Mount R Wall Mount L 7. Right end of the arrow to insert both sides are different shapes. Push the Soundbar in the...
User Manual
Page 31
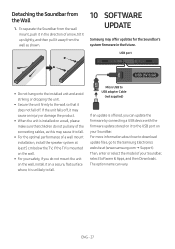
... the model of the connecting cables, as shown. 10 SOFTWARE UPDATE Samsung may offer updates for the Soundbar's system firmware in the direction of a wall mount installation, install the speaker system at (www.samsung.com Support). To separate the Soundbar from the wall mount, push it on your safety, if you can vary. For more...
... the model of the connecting cables, as shown. 10 SOFTWARE UPDATE Samsung may offer updates for the Soundbar's system firmware in the direction of a wall mount installation, install the speaker system at (www.samsung.com Support). To separate the Soundbar from the wall mount, push it on your safety, if you can vary. For more...


