
User Manual
Page 1
HW-K450 Wireless Subwoofer (PS-WK450) User manual Wireless Audio - Soundbar Imagine the possibilities Thank you for purchasing this Samsung product. To receive more complete service, please register your product at www.samsung.com/register
HW-K450 Wireless Subwoofer (PS-WK450) User manual Wireless Audio - Soundbar Imagine the possibilities Thank you for purchasing this Samsung product. To receive more complete service, please register your product at www.samsung.com/register
User Manual
Page 2
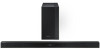
...LLC in the palm of your hand with TV SoundConnect. TV SoundConnect Listen to TV audio through the Soundbar via Bluetooth with an Android smart device and the Samsung Audio Remote app. Dolby and the double-D symbol are registered trademarks, and DTS 2.0 Channel is ...the Symbol, & DTS and the Symbol together are trademarks of Dolby Laboratories. using the Soundbar's USB HOST function. 2 GETTING STARTED GETTING STARTED FEATURES Samsung Remote App Hold the control of your Soundbar in the United States and other countries. Manufactured under license from DTS Licensing Limited. All...
...LLC in the palm of your hand with TV SoundConnect. TV SoundConnect Listen to TV audio through the Soundbar via Bluetooth with an Android smart device and the Samsung Audio Remote app. Dolby and the double-D symbol are registered trademarks, and DTS 2.0 Channel is ...the Symbol, & DTS and the Symbol together are trademarks of Dolby Laboratories. using the Soundbar's USB HOST function. 2 GETTING STARTED GETTING STARTED FEATURES Samsung Remote App Hold the control of your Soundbar in the United States and other countries. Manufactured under license from DTS Licensing Limited. All...

User Manual
Page 6
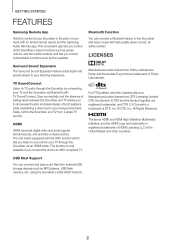
GETTING STARTED CONTENTS 2 GETTING STARTED 2 Features 3 Safety Information 7 What's Included 8 DESCRIPTIONS 8 Front / RIGHT SIDE Panel 9 Bottom Panel 10 Remote Control 13 INSTALLATION 13 Installing the Soundbar 13 Installing the Wall Mount 18 CONNECTIONS 18 Connecting the Subwoofer 19 Connecting the Subwoofer and the SWA-8000S (Sold Separately) 20 Connecting the Surround ...
GETTING STARTED CONTENTS 2 GETTING STARTED 2 Features 3 Safety Information 7 What's Included 8 DESCRIPTIONS 8 Front / RIGHT SIDE Panel 9 Bottom Panel 10 Remote Control 13 INSTALLATION 13 Installing the Soundbar 13 Installing the Wall Mount 18 CONNECTIONS 18 Connecting the Subwoofer 19 Connecting the Subwoofer and the SWA-8000S (Sold Separately) 20 Connecting the Surround ...
User Manual
Page 8
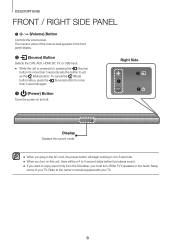
... AC cord, the power button will be a 4 to 5 second delay before it produces sound. ●● If you want to enjoy sound only from the Soundbar, you must turn off . Refer to act as the (Mute) button. The numeric value of the volume level appears in the Audio Setup menu of...
... AC cord, the power button will be a 4 to 5 second delay before it produces sound. ●● If you want to enjoy sound only from the Soundbar, you must turn off . Refer to act as the (Mute) button. The numeric value of the volume level appears in the Audio Setup menu of...
User Manual
Page 10
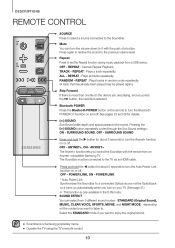
...29 for about 5 seconds to turn the volume down to the TV via the Optical jack so it turns on automatically when you control the Soundbar with the push of a button. Pressing the SOUND button repeatedly cycles through the Surr.Sound settings : ON - Bluetooth POWER Press the Bluetooth POWER... level. SURROUND SOUND, OFF - SOUND EFFECT You can turn the Anynet+ function on your TV. (See page 21) • This function is a Samsung proprietary name. ●● Operate the TV using the TV's remote control. 10 Press again to restore the sound to turn on or off . REPEAT...
...29 for about 5 seconds to turn the volume down to the TV via the Optical jack so it turns on automatically when you control the Soundbar with the push of a button. Pressing the SOUND button repeatedly cycles through the Surr.Sound settings : ON - Bluetooth POWER Press the Bluetooth POWER... level. SURROUND SOUND, OFF - SOUND EFFECT You can turn the Anynet+ function on your TV. (See page 21) • This function is a Samsung proprietary name. ●● Operate the TV using the TV's remote control. 10 Press again to restore the sound to turn on or off . REPEAT...

User Manual
Page 11
.... Use the , buttons to sync the audio with the video. ENG Power Turns the Soundbar on the device you are playing, and you connect the SWA-8000S (sold separately). If the Soundbar is connected to decrease or increase the woofer level within 3 seconds of the rear speaker sound, select... CONTROL button for about 5 seconds to adjust the sound for each can be adjusted to a setting between OFF-RS and ON-RS by using the Samsung Audio Remote mobile app, press the [, ] buttons to a digital TV and the video appears out of the unit. Press the p button again to adjust...
.... Use the , buttons to sync the audio with the video. ENG Power Turns the Soundbar on the device you are playing, and you connect the SWA-8000S (sold separately). If the Soundbar is connected to decrease or increase the woofer level within 3 seconds of the rear speaker sound, select... CONTROL button for about 5 seconds to adjust the sound for each can be adjusted to a setting between OFF-RS and ON-RS by using the Samsung Audio Remote mobile app, press the [, ] buttons to a digital TV and the video appears out of the unit. Press the p button again to adjust...
User Manual
Page 12
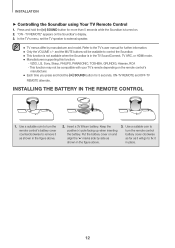
... on the remote control's manufacturer. ●● Each time you press and hold the SOUND button for more than 5 seconds while the Soundbar is in the figure above . 2. and the MUTE buttons will go to turn the remote control battery cover clockwise as far as it... the '●' marks side by manufacturer and model. In the TV's menu, set the TV speaker to control the Soundbar. ●● This function is not available when the Soundbar is turned on the Soundbar's display. 3. VIZIO, LG, Sony, Sharp, PHILIPS, PANASONIC, TOSHIBA, GRUNDIG, Hisense, RCA - Insert a 3V lithium ...
... on the remote control's manufacturer. ●● Each time you press and hold the SOUND button for more than 5 seconds while the Soundbar is in the figure above . 2. and the MUTE buttons will go to turn the remote control battery cover clockwise as far as it... the '●' marks side by manufacturer and model. In the TV's menu, set the TV speaker to control the Soundbar. ●● This function is not available when the Soundbar is turned on the Soundbar's display. 3. VIZIO, LG, Sony, Sharp, PHILIPS, PANASONIC, TOSHIBA, GRUNDIG, Hisense, RCA - Insert a 3V lithium ...
User Manual
Page 13
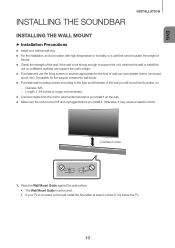
Diameter: M5 -- Otherwise, it . ENG INSTALLATION INSTALLING THE SOUNDBAR INSTALLATION INSTALLING THE WALL MOUNT ++Installation Precautions ●● Install on a vertical wall only. ●● For the installation, avoid a location with high temperature or ... surface. • The Wall Mount Guide must be level. • If your TV is turned off and unplugged before you will mount the Soundbar on the wall, install the Soundbar at least 2 inches (5 cm) below the TV. 13 If the wall is not strong enough to external devices before you install it...
Diameter: M5 -- Otherwise, it . ENG INSTALLATION INSTALLING THE SOUNDBAR INSTALLATION INSTALLING THE WALL MOUNT ++Installation Precautions ●● Install on a vertical wall only. ●● For the installation, avoid a location with high temperature or ... surface. • The Wall Mount Guide must be level. • If your TV is turned off and unplugged before you will mount the Soundbar on the wall, install the Soundbar at least 2 inches (5 cm) below the TV. 13 If the wall is not strong enough to external devices before you install it...
User Manual
Page 14
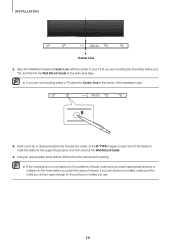
Align the Wall Mount Guide's Center Line with the center of your TV (if you are mounting the Soundbar below your TV), and then fix the Wall Mount Guide to the wall using tape. ●● If you drill are not mounting below a TV, ...
Align the Wall Mount Guide's Center Line with the center of your TV (if you are mounting the Soundbar below your TV), and then fix the Wall Mount Guide to the wall using tape. ●● If you drill are not mounting below a TV, ...
User Manual
Page 15
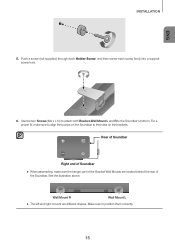
...hanger part of the Bracket-Wall Mounts are different shapes. See the illustration above. Rear of Soundbar Right end of Soundbar ●● When assembling, make sure to align the bumps on the Soundbar to the holes on the brackets. Wall Mount R Wall Mount L ●● The... left and right mounts are located behind the rear of the Soundbar. ENG INSTALLATION 5. Make sure to the Soundbar's bottom. Push a screw (not supplied) through...
...hanger part of the Bracket-Wall Mounts are different shapes. See the illustration above. Rear of Soundbar Right end of Soundbar ●● When assembling, make sure to align the bumps on the Soundbar to the holes on the brackets. Wall Mount R Wall Mount L ●● The... left and right mounts are located behind the rear of the Soundbar. ENG INSTALLATION 5. Make sure to the Soundbar's bottom. Push a screw (not supplied) through...
User Manual
Page 16
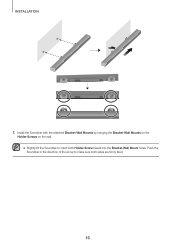
INSTALLATION 7. Push the Soundbar in the direction of the arrow to insert both sides are firmly fixed. 16 Install the Soundbar with the attached Bracket-Wall Mounts by hanging the Bracket-Wall Mounts on the Holder-Screws on the wall. ●● Slightly tilt the Soundbar to make sure both Holder-Screw heads into the Bracket-Wall Mount holes.
INSTALLATION 7. Push the Soundbar in the direction of the arrow to insert both sides are firmly fixed. 16 Install the Soundbar with the attached Bracket-Wall Mounts by hanging the Bracket-Wall Mounts on the Holder-Screws on the wall. ●● Slightly tilt the Soundbar to make sure both Holder-Screw heads into the Bracket-Wall Mount holes.
User Manual
Page 17
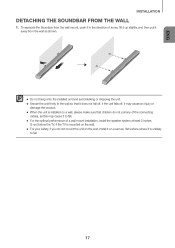
... THE WALL 1. If the unit falls off . To separate the Soundbar from the wall mount, push it in the direction of arrow, tilt it up slightly, and then pull it away from the wall as shown. &#...
... THE WALL 1. If the unit falls off . To separate the Soundbar from the wall mount, push it in the direction of arrow, tilt it up slightly, and then pull it away from the wall as shown. &#...

User Manual
Page 18
... cord. CONNECTING TO THE SUBWOOFER MANUALLY If the blue LED light does not stop blinking when the main unit and subwoofer are turned on the Soundbar's display. 5. See page 12 for 5 seconds. 4.
... cord. CONNECTING TO THE SUBWOOFER MANUALLY If the blue LED light does not stop blinking when the main unit and subwoofer are turned on the Soundbar's display. 5. See page 12 for 5 seconds. 4.

User Manual
Page 19
... unit doesn't make sure that uses the same frequency (2.4GHz) as the Soundbar near the Soundbar, interference may vary depending on your remote control or on the right side of the main unit to... your Soundbar. (Sold separately) CONNECTING THE SUBWOOFER AND THE SWA-8000S (SOLD SEPARATELY) CONNECTING THE..., and SWA-8000S are flashing blue, press the button on , please reset the linking ID by connecting the Samsung Wireless Rear Speaker Kit (SWA-8000S) to turn off the power and disconnect the power cord. ●●...
... unit doesn't make sure that uses the same frequency (2.4GHz) as the Soundbar near the Soundbar, interference may vary depending on your remote control or on the right side of the main unit to... your Soundbar. (Sold separately) CONNECTING THE SUBWOOFER AND THE SWA-8000S (SOLD SEPARATELY) CONNECTING THE..., and SWA-8000S are flashing blue, press the button on , please reset the linking ID by connecting the Samsung Wireless Rear Speaker Kit (SWA-8000S) to turn off the power and disconnect the power cord. ●●...
User Manual
Page 21
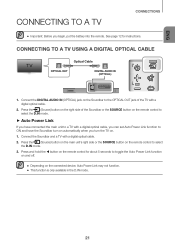
...Press and hold the button on the remote control for instructions. Connect the DIGITAL AUDIO IN (OPTICAL) jack on the Soundbar to the OPTICAL OUT jack of the Soundbar or the SOURCE button on the remote control to select the D.IN mode. ++Auto Power Link If you have connected the main... unit to a TV with a digital optical cable, you can set Auto Power Link function to select the D.IN mode. 3. Connect the Soundbar and a TV with a digital optical cable. 2. See page 12 for about 5 seconds to toggle the Auto Power Link function on and off. ●● ...
...Press and hold the button on the remote control for instructions. Connect the DIGITAL AUDIO IN (OPTICAL) jack on the Soundbar to the OPTICAL OUT jack of the Soundbar or the SOURCE button on the remote control to select the D.IN mode. ++Auto Power Link If you have connected the main... unit to a TV with a digital optical cable, you can set Auto Power Link function to select the D.IN mode. 3. Connect the Soundbar and a TV with a digital optical cable. 2. See page 12 for about 5 seconds to toggle the Auto Power Link function on and off. ●● ...
User Manual
Page 22
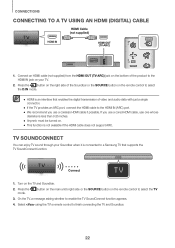
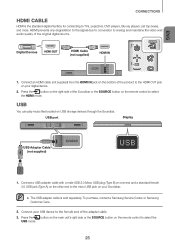
...mode. ●● HDMI is less than 0.55 inches. ●● Anynet+ must be turned on your Soundbar when it is connected to a Samsung TV that enables the digital transmission of the Soundbar or the SOURCE button on the remote control to the HDMI IN (ARC) port. ●● We recommend... cable, use a coreless HDMI cable if possible. Connect 1. button on the main unit's right side or the SOURCE button on the TV and Soundbar. 2. If you use one whose diameter is an interface that supports the TV SoundConnect function. Press the mode. TV SOUNDCONNECT You can enjoy TV ...
...mode. ●● HDMI is less than 0.55 inches. ●● Anynet+ must be turned on your Soundbar when it is connected to a Samsung TV that enables the digital transmission of the Soundbar or the SOURCE button on the remote control to the HDMI IN (ARC) port. ●● We recommend... cable, use a coreless HDMI cable if possible. Connect 1. button on the main unit's right side or the SOURCE button on the TV and Soundbar. 2. If you use one whose diameter is an interface that supports the TV SoundConnect function. Press the mode. TV SOUNDCONNECT You can enjoy TV ...

User Manual
Page 23
... TV using the TV SoundConnect function. 2. BLUETOOTH POWER : The Soundbar turns on and off as well. 1. When the Bluetooth POWER On function is supported by some Samsung TVs released from 2012 on. BLUETOOTH POWER : The Soundbar only turns off when you begin. (For further information, refer...●● The Play/Pause, Next, and Prev buttons on the Soundbar or Soundbar's remote do not control the TV. ++Using the Bluetooth POWER On function The Bluetooth POWER On function is supported by some Samsung TVs released from 2013 on. 23 ENG CONNECTIONS ●● Switching the...
... TV using the TV SoundConnect function. 2. BLUETOOTH POWER : The Soundbar turns on and off as well. 1. When the Bluetooth POWER On function is supported by some Samsung TVs released from 2012 on. BLUETOOTH POWER : The Soundbar only turns off when you begin. (For further information, refer...●● The Play/Pause, Next, and Prev buttons on the Soundbar or Soundbar's remote do not control the TV. ++Using the Bluetooth POWER On function The Bluetooth POWER On function is supported by some Samsung TVs released from 2013 on. 23 ENG CONNECTIONS ●● Switching the...

User Manual
Page 24
...-ARC) USB (5V 0.5A) DC 24V USB (5V 0.5A) AUX IN AUX IN ++AUX Cable 1. Press the (Source) button on the right side of the Soundbar or the SOURCE button on the main unit to the OPTICAL OUT jack of the Source Device using a digital optical cable. 2. Connect DIGITAL AUDIO IN... remote control to the AUDIO OUT jack of the Source Device using an audio cable. 2. Press the (Source) button on the right side of the Soundbar or the SOURCE button on the main unit to select the AUX mode. ++Optical Cable 1. CONNECTIONS CONNECTING TO EXTERNAL DEVICES OPTICAL OR ANALOG AUDIO CABLE...
...-ARC) USB (5V 0.5A) DC 24V USB (5V 0.5A) AUX IN AUX IN ++AUX Cable 1. Press the (Source) button on the right side of the Soundbar or the SOURCE button on the main unit to the OPTICAL OUT jack of the Source Device using a digital optical cable. 2. Connect DIGITAL AUDIO IN... remote control to the AUDIO OUT jack of the Source Device using an audio cable. 2. Press the (Source) button on the right side of the Soundbar or the SOURCE button on the main unit to select the AUX mode. ++Optical Cable 1. CONNECTIONS CONNECTING TO EXTERNAL DEVICES OPTICAL OR ANALOG AUDIO CABLE...
User Manual
Page 25
... a USB adapter cable with a male USB 2.0 Micro USB plug (Type B) on one end and a standard female 2.0 USB jack (Type A) on your Soundbar. ●● The USB adapter cable is the standard digital interface for connecting to the female end of the adapter cable. 3. Connect your USB device...projectors, DVD players, Blu-ray players, set top boxes, and more. To purchase, contact a Samsung Service Center or Samsung Customer Care. 2. Press the button on the right side of the Soundbar or the SOURCE button on the remote control to select the HDMI mode. Press the button on the...
... a USB adapter cable with a male USB 2.0 Micro USB plug (Type B) on one end and a standard female 2.0 USB jack (Type A) on your Soundbar. ●● The USB adapter cable is the standard digital interface for connecting to the female end of the adapter cable. 3. Connect your USB device...projectors, DVD players, Blu-ray players, set top boxes, and more. To purchase, contact a Samsung Service Center or Samsung Customer Care. 2. Press the button on the right side of the Soundbar or the SOURCE button on the remote control to select the HDMI mode. Press the button on the...
User Manual
Page 26
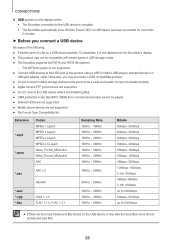
... via a multi-card reader. The NTFS file system is not displayed on the Soundbar's display. ●● This product may take the Soundbar some time to the USB port of USB storage media. ●● The Soundbar supports the FAT16 and FAT32 file systems. -- USB appears on the display screen.... • The Soundbar connection to the USB device is complete. • The Soundbar automatically turns off (Auto Power Off) if no USB device has been...
... via a multi-card reader. The NTFS file system is not displayed on the Soundbar's display. ●● This product may take the Soundbar some time to the USB port of USB storage media. ●● The Soundbar supports the FAT16 and FAT32 file systems. -- USB appears on the display screen.... • The Soundbar connection to the USB device is complete. • The Soundbar automatically turns off (Auto Power Off) if no USB device has been...


