
User Manual
Page 1
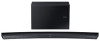
To receive more complete service, please register your product at www.samsung.com/register 'This Nanum Gothic Eco font is provided by NAVER' HW-J7500 HW-J7501 Wireless Subwoofer (PS-WJ7500 / PS-WJ7501) User manual Curved Soundbar Imagine the possibilities Thank you for purchasing this Samsung product.
To receive more complete service, please register your product at www.samsung.com/register 'This Nanum Gothic Eco font is provided by NAVER' HW-J7500 HW-J7501 Wireless Subwoofer (PS-WJ7500 / PS-WJ7501) User manual Curved Soundbar Imagine the possibilities Thank you for purchasing this Samsung product.

User Manual
Page 3
... the other equipment. Follow all servicing to qualified service personnel. Install in accordance with one or more of the following also applies to the Wireless Subwoofer (PS-WJ7500, PS-WJ7501). SAFETY INFORMATION GETTING STARTED ENG ●● The following measures: • Reorienting or relocating the receiving antenna. • Increasing the separation...
... the other equipment. Follow all servicing to qualified service personnel. Install in accordance with one or more of the following also applies to the Wireless Subwoofer (PS-WJ7500, PS-WJ7501). SAFETY INFORMATION GETTING STARTED ENG ●● The following measures: • Reorienting or relocating the receiving antenna. • Increasing the separation...
User Manual
Page 5
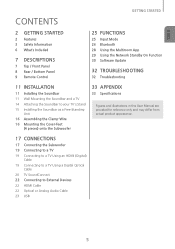
... 15 Installing the Soundbar as a Free-Standing Unit 16 Assembling the Clamp-Wire 16 Mounting the Cover-Feet (4 pieces) onto the Subwoofer 33 APPENDIX 33 Specifications Figures and illustrations in this User Manual are provided for reference only and may differ from actual product appearance. 17... CONNECTIONS 17 Connecting the Subwoofer 19 Connecting to a TV 19 Connecting to a TV Using an HDMI (Digital) Cable 19 Connecting to a TV Using a Digital Optical...
... 15 Installing the Soundbar as a Free-Standing Unit 16 Assembling the Clamp-Wire 16 Mounting the Cover-Feet (4 pieces) onto the Subwoofer 33 APPENDIX 33 Specifications Figures and illustrations in this User Manual are provided for reference only and may differ from actual product appearance. 17... CONNECTIONS 17 Connecting the Subwoofer 19 Connecting to a TV 19 Connecting to a TV Using an HDMI (Digital) Cable 19 Connecting to a TV Using a Digital Optical...

User Manual
Page 6
...-Mount (AH61-03952A) (AH61-03959A) Holder-Screw 1 : 4EA Holder-Screw 2 : 10EA Holder-Fix Mount Holder-Foot : 3EA (AH61-03939A) (6001-001961) (AH61-03960A) (AH61-03940A) Subwoofer Power Cord (3903-000599) Cover-Foot : 4EA (AH63-04078A) Screw-Taptite : 4EA (6003-000278) Foot Rubber : 4EA (AH61-04010A) ●● The appearance of the...
...-Mount (AH61-03952A) (AH61-03959A) Holder-Screw 1 : 4EA Holder-Screw 2 : 10EA Holder-Fix Mount Holder-Foot : 3EA (AH61-03939A) (6001-001961) (AH61-03960A) (AH61-03940A) Subwoofer Power Cord (3903-000599) Cover-Foot : 4EA (AH63-04078A) Screw-Taptite : 4EA (6003-000278) Foot Rubber : 4EA (AH61-04010A) ●● The appearance of the...
User Manual
Page 10
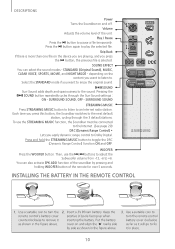
... p button to play the selected file. SOUND Surr.Sound adds depth and spaciousness to an Internet radio station. To use the [,] buttons to adjust the Subwoofer volume from -12, -6 to . You can select the sound modes - STANDARD (Original Sound), MUSIC, CLEAR VOICE, SPORTS, MOVIE, and NIGHT MODE - Pressing the SOUND button...
... p button to play the selected file. SOUND Surr.Sound adds depth and spaciousness to an Internet radio station. To use the [,] buttons to adjust the Subwoofer volume from -12, -6 to . You can select the sound modes - STANDARD (Original Sound), MUSIC, CLEAR VOICE, SPORTS, MOVIE, and NIGHT MODE - Pressing the SOUND button...

User Manual
Page 16
...-WIRE Clamp-Wire Attach the clamp-wire to the unit as shown in each Cover-Foot and tighten. 3. MOUNTING THE COVER-FEET (4 PIECES) ONTO THE SUBWOOFER POWER 1 2 3 1.
...-WIRE Clamp-Wire Attach the clamp-wire to the unit as shown in each Cover-Foot and tighten. 3. MOUNTING THE COVER-FEET (4 PIECES) ONTO THE SUBWOOFER POWER 1 2 3 1.

User Manual
Page 17
... STANDBY indicator is powered off and the LINK indicator (Blue LED) blinks quickly. 3. POWER 1P.OPWluEgR the power cords of the main unit and subwoofer into an AC wall outlet. 2. While the main unit is turned off (in STANDBY mode), press and hold the (Mute) on the remote control... ●● Before moving or installing this product, be sure to turn the main unit's power on while the subwoofer's Blue LED blinks. • The main unit and the subwoofer should now be glowing continuously and not blinking. • If the Link indicator is completely connected, the blue LED Link...
... STANDBY indicator is powered off and the LINK indicator (Blue LED) blinks quickly. 3. POWER 1P.OPWluEgR the power cords of the main unit and subwoofer into an AC wall outlet. 2. While the main unit is turned off (in STANDBY mode), press and hold the (Mute) on the remote control... ●● Before moving or installing this product, be sure to turn the main unit's power on while the subwoofer's Blue LED blinks. • The main unit and the subwoofer should now be glowing continuously and not blinking. • If the Link indicator is completely connected, the blue LED Link...
User Manual
Page 18
... previous page to turn off the power and disconnect the power cord. ●● If the main unit is powered off, the wireless subwoofer will be in standby mode and the STANDBY LED on the upper side will come on your operating environment. CONNECTIONS ●● Before moving... or installing the product, be sure to re-set the connection between the main unit and subwoofer is about 32.8 ft, but may cause some sound interruption. ●● The maximum transmission distance of the wireless signal between the main...
... previous page to turn off the power and disconnect the power cord. ●● If the main unit is powered off, the wireless subwoofer will be in standby mode and the STANDBY LED on the upper side will come on your operating environment. CONNECTIONS ●● Before moving... or installing the product, be sure to re-set the connection between the main unit and subwoofer is about 32.8 ft, but may cause some sound interruption. ●● The maximum transmission distance of the wireless signal between the main...

User Manual
Page 31
... supported. AUTO UPDATE If the Soundbar is cut off . ●● The Soundbar is not re-established automatically after the update. If connection to the subwoofer is configured to run Auto Update by default. ●● To use the Auto Update function, the Soundbar must be connected to the Internet. ●.... ●● Do not format the USB device in the NTFS format. We recommend you write down your settings so that updating firmware resets the subwoofer connection too.
... supported. AUTO UPDATE If the Soundbar is cut off . ●● The Soundbar is not re-established automatically after the update. If connection to the subwoofer is configured to run Auto Update by default. ●● To use the Auto Update function, the Soundbar must be connected to the Internet. ●.... ●● Do not format the USB device in the NTFS format. We recommend you write down your settings so that updating firmware resets the subwoofer connection too.

User Manual
Page 32
...Does your TV support TV SoundConnect? • Is your remote control to adjust the subwoofer's volume level (between the remote control and main unit too far? ¼¼Replace with the latest firmware. ¼¼Contact the Samsung Call Center. ¼¼Press and hold the p button for 5 seconds to ...188;¼Connect the power plug to the outlet. The remote control does not work when the button is not producing sound. • Your subwoofer may not be connected to the ¼¼Try to connect your TV with new batteries. ¼¼Move closer to reset the TV SoundConnect...
...Does your TV support TV SoundConnect? • Is your remote control to adjust the subwoofer's volume level (between the remote control and main unit too far? ¼¼Replace with the latest firmware. ¼¼Contact the Samsung Call Center. ¼¼Press and hold the p button for 5 seconds to ...188;¼Connect the power plug to the outlet. The remote control does not work when the button is not producing sound. • Your subwoofer may not be connected to the ¼¼Try to connect your TV with new batteries. ¼¼Move closer to reset the TV SoundConnect...

User Manual
Page 33
... with this manual, review the Troubleshooting section on measurements using AES (Audio Engineering Society) guidelines. * Nominal specification -- Samsung Electronics Co., Ltd reserves the right to change the specifications without notice. -- To find an answer before you read ...Support page for a repair. 33 APPENDIX SPECIFICATIONS APPENDIX ENG Model name HW-J7500 / HW-J7501 USB 5V / 0.5A Weight Main Unit 8.8 lbs Subwoofer (PS-WJ7500 / PS-WJ7501) 17.2 lbs GENERAL Dimensions (W x H x D) Main Unit 48.4 x 1.9 x 6.7 inches Subwoofer (PS-WJ7500 / PS-WJ7501) 19.7 X 13.1 X 6.3...
... with this manual, review the Troubleshooting section on measurements using AES (Audio Engineering Society) guidelines. * Nominal specification -- Samsung Electronics Co., Ltd reserves the right to change the specifications without notice. -- To find an answer before you read ...Support page for a repair. 33 APPENDIX SPECIFICATIONS APPENDIX ENG Model name HW-J7500 / HW-J7501 USB 5V / 0.5A Weight Main Unit 8.8 lbs Subwoofer (PS-WJ7500 / PS-WJ7501) 17.2 lbs GENERAL Dimensions (W x H x D) Main Unit 48.4 x 1.9 x 6.7 inches Subwoofer (PS-WJ7500 / PS-WJ7501) 19.7 X 13.1 X 6.3...


