
User Manual
Page 1
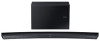
To receive more complete service, please register your product at www.samsung.com/register 'This Nanum Gothic Eco font is provided by NAVER' HW-J7500 HW-J7501 Wireless Subwoofer (PS-WJ7500 / PS-WJ7501) User manual Curved Soundbar Imagine the possibilities Thank you for purchasing this Samsung product.
To receive more complete service, please register your product at www.samsung.com/register 'This Nanum Gothic Eco font is provided by NAVER' HW-J7500 HW-J7501 Wireless Subwoofer (PS-WJ7500 / PS-WJ7501) User manual Curved Soundbar Imagine the possibilities Thank you for purchasing this Samsung product.

User Manual
Page 2
... DTS and the Symbol together are trademarks or registered trademarks of DTS, Inc. © DTS, Inc. Simply access the Samsung Multiroom App to sound from your TV, Soundbar, Home Entertainment System and Blu-ray Disc Player. TV SoundConnect Listen to TV audio through the...-D symbol are trademarks of the internet's subscription streaming music services. GETTING STARTED GETTING STARTED FEATURES Streaming Music Services The Curved Soundbar makes diving into all without wires! Surround Sound Expansion The Surround Sound Expansion feature adds depth and spaciousness to your favorite ...
... DTS and the Symbol together are trademarks or registered trademarks of DTS, Inc. © DTS, Inc. Simply access the Samsung Multiroom App to sound from your TV, Soundbar, Home Entertainment System and Blu-ray Disc Player. TV SoundConnect Listen to TV audio through the...-D symbol are trademarks of the internet's subscription streaming music services. GETTING STARTED GETTING STARTED FEATURES Streaming Music Services The Curved Soundbar makes diving into all without wires! Surround Sound Expansion The Surround Sound Expansion feature adds depth and spaciousness to your favorite ...
User Manual
Page 5
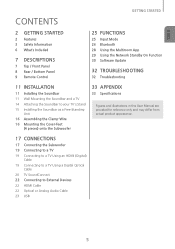
... the Network Standby On Function 30 Software Update 32 TROUBLESHOOTING 32 Troubleshooting 11 INSTALLATION 11 Installing the Soundbar 11 Wall Mounting the Soundbar and a TV 14 Attaching the Soundbar to your TV's Stand 15 Installing the Soundbar as a Free-Standing Unit 16 Assembling the Clamp-Wire 16 Mounting the Cover-Feet (4 pieces) onto the...
... the Network Standby On Function 30 Software Update 32 TROUBLESHOOTING 32 Troubleshooting 11 INSTALLATION 11 Installing the Soundbar 11 Wall Mounting the Soundbar and a TV 14 Attaching the Soundbar to your TV's Stand 15 Installing the Soundbar as a Free-Standing Unit 16 Assembling the Clamp-Wire 16 Mounting the Cover-Feet (4 pieces) onto the...
User Manual
Page 7
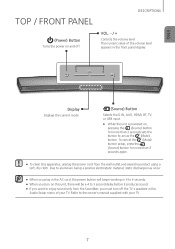
... AC cord, the power button will begin working in 4 to 6 seconds. ●● When you turn on this apparatus, unplug the power cord from the Soundbar, you must turn off . The numeric value of the volume level appears in the Audio Setup menu of your TV. 7 DESCRIPTIONS TOP / FRONT PANEL DESCRIPTIONS...
... AC cord, the power button will begin working in 4 to 6 seconds. ●● When you turn on this apparatus, unplug the power cord from the Soundbar, you must turn off . The numeric value of the volume level appears in the Audio Setup menu of your TV. 7 DESCRIPTIONS TOP / FRONT PANEL DESCRIPTIONS...

User Manual
Page 8
...cord input facing upwards, water or other components to an AC outlet until all connections between components are complete. ●● Make sure to your Soundbar to rest the AC/DC Adapter flat on the devices. ●● When disconnecting the power cable of the AC power adaptor from a wall... video and audio signals simultaneously using an HDMI cable. Do not pull the cable. ●● Do not connect this button to connect the Soundbar to a Samsung HUB. (not supplied) DC 24V (Power Supply In) Connect the DC power adaptor to the power supply jack, and then connect the AC ...
...cord input facing upwards, water or other components to an AC outlet until all connections between components are complete. ●● Make sure to your Soundbar to rest the AC/DC Adapter flat on the devices. ●● When disconnecting the power cable of the AC power adaptor from a wall... video and audio signals simultaneously using an HDMI cable. Do not pull the cable. ●● Do not connect this button to connect the Soundbar to a Samsung HUB. (not supplied) DC 24V (Power Supply In) Connect the DC power adaptor to the power supply jack, and then connect the AC ...
User Manual
Page 9
... turns on automatically when you turn the volume down to 0 with the push of sync with the audio, press the SOUND CONTROL button to the Soundbar. Repeat Press to set the audio delay between -6 and +6. REPEAT : Repeatedly play all tracks. ANYNET+ / ON - REPEAT : Repeatedly play a ... You can also activate Wi-Fi SETUP function by pressing and holding Anynet+ button on or off. (Default : Auto Power Link OFF, ON - If the Soundbar is a Samsung proprietary name. ●● Operate the TV using the TV's remote control. 9 ANYNET+ / OFF - TRACK - Then, use the [,] buttons to a...
... turns on automatically when you turn the volume down to 0 with the push of sync with the audio, press the SOUND CONTROL button to the Soundbar. Repeat Press to set the audio delay between -6 and +6. REPEAT : Repeatedly play all tracks. ANYNET+ / ON - REPEAT : Repeatedly play a ... You can also activate Wi-Fi SETUP function by pressing and holding Anynet+ button on or off. (Default : Auto Power Link OFF, ON - If the Soundbar is a Samsung proprietary name. ●● Operate the TV using the TV's remote control. 9 ANYNET+ / OFF - TRACK - Then, use the [,] buttons to a...
User Manual
Page 10
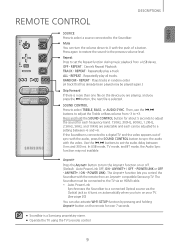
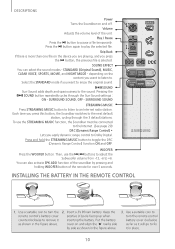
...modes - Volume Adjusts the volume level of the remote for over 5 seconds. WOOFER Press the WOOFER button. DESCRIPTIONS Power Turns the Soundbar on and align the '●' marks side by pressing and holding WOOFER button of the unit. SOUND EFFECT You can also activate.... 3. STANDARD (Original Sound), MUSIC, CLEAR VOICE, SPORTS, MOVIE, and NIGHT MODE - Select the STANDARD mode if you press this button, the Soundbar switches to +6. Pressing the SOUND button repeatedly cycles through the 3 default stations. To use the [,] buttons to adjust the Subwoofer volume from -12,...
...modes - Volume Adjusts the volume level of the remote for over 5 seconds. WOOFER Press the WOOFER button. DESCRIPTIONS Power Turns the Soundbar on and align the '●' marks side by pressing and holding WOOFER button of the unit. SOUND EFFECT You can also activate.... 3. STANDARD (Original Sound), MUSIC, CLEAR VOICE, SPORTS, MOVIE, and NIGHT MODE - Select the STANDARD mode if you press this button, the Soundbar switches to +6. Pressing the SOUND button repeatedly cycles through the 3 default stations. To use the [,] buttons to adjust the Subwoofer volume from -12,...

User Manual
Page 11
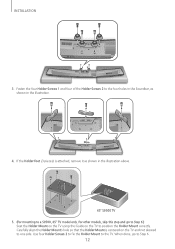
...illustration, ensuring that none of an incompatible TV. ENG INSTALLATION INSTALLING THE SOUNDBAR INSTALLATION WALL MOUNTING THE SOUNDBAR AND A TV ●● This Soundbar is compatible with the 55 inch and 65 inch S8500 and S9000 2015 Samsung curved TVs and with the TV you purchased. ●● You cannot...9679; To mount the TV on a wall, refer to the users' manual enclosed with the 65 inch S9500 2015 Samsung curved TV. Remove the Holder-Support (2 pieces) from the Soundbar as shown in the illustration. 11 OPTICAL IN HDMI OUT (TV-ARC) HDMI IN LAN AUX IN DC 24V ...
...illustration, ensuring that none of an incompatible TV. ENG INSTALLATION INSTALLING THE SOUNDBAR INSTALLATION WALL MOUNTING THE SOUNDBAR AND A TV ●● This Soundbar is compatible with the 55 inch and 65 inch S8500 and S9000 2015 Samsung curved TVs and with the TV you purchased. ●● You cannot...9679; To mount the TV on a wall, refer to the users' manual enclosed with the 65 inch S9500 2015 Samsung curved TV. Remove the Holder-Support (2 pieces) from the Soundbar as shown in the illustration. 11 OPTICAL IN HDMI OUT (TV-ARC) HDMI IN LAN AUX IN DC 24V ...
User Manual
Page 12
..., go to Step 6.) Seat the Holder-Mount on the TV using the Guide on the TV and not skewed to the four holes in the Soundbar, as shown in the illustration. 4. OPTICAL IN HDMI OUT (TV-ARC) HDMI IN LAN AUX IN DC 24V Wi-Fi SETUP SPK ADD 5V 0.5A...
..., go to Step 6.) Seat the Holder-Mount on the TV using the Guide on the TV and not skewed to the four holes in the Soundbar, as shown in the illustration. 4. OPTICAL IN HDMI OUT (TV-ARC) HDMI IN LAN AUX IN DC 24V Wi-Fi SETUP SPK ADD 5V 0.5A...
User Manual
Page 13
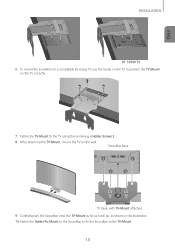
Fasten the TV-Mount to the TV-Mount. 13 After attaching the TV-Mount, mount the TV on the TV correctly. 7. Fasten the Holder-Fix Mount to the Soundbar to fix the Soundbar to the TV using the remaining 4 Holder-Screws 2. 8. Carefully push the Soundbar onto the TV-Mount as far as it will go, as shown in the illustration. 10. Soundbar base TV base, with TV-Mount attached 9. ENG INSTALLATION 65" S9500 TV 6. To mount the Soundbar on a compatible Samsung TV, use the Guide on the TV to position the TV-Mount on the wall.
Fasten the TV-Mount to the TV-Mount. 13 After attaching the TV-Mount, mount the TV on the TV correctly. 7. Fasten the Holder-Fix Mount to the Soundbar to fix the Soundbar to the TV using the remaining 4 Holder-Screws 2. 8. Carefully push the Soundbar onto the TV-Mount as far as it will go, as shown in the illustration. 10. Soundbar base TV base, with TV-Mount attached 9. ENG INSTALLATION 65" S9500 TV 6. To mount the Soundbar on a compatible Samsung TV, use the Guide on the TV to position the TV-Mount on the wall.

User Manual
Page 14
... shown in the illustration, ensuring that is lying on. You can attach the Soundbar to your TV's stand if you have a Samsung TV that has a stand that none of the buttons touch the surface it is compatible with this Soundbar. Holder-Foot : 3EA Holder-Screw 2 : 3EA 2 OPTICAL IN HDMI OUT (TV-ARC) HDMI... HDMI OUT (TV-ARC) HDMI IN LAN AUX IN DC 24V Wi-Fi SETUP SPK ADD 5V 0.5A 1 1. INSTALLATION ATTACHING THE SOUNDBAR TO YOUR TV'S STAND You can use the Soundbar's packaging to support its two ends. 2. OPTICAL IN HDMI OUT (TV-ARC) HDMI IN LAN AUX IN DC 24V Wi-Fi...
... shown in the illustration, ensuring that is lying on. You can attach the Soundbar to your TV's stand if you have a Samsung TV that has a stand that none of the buttons touch the surface it is compatible with this Soundbar. Holder-Foot : 3EA Holder-Screw 2 : 3EA 2 OPTICAL IN HDMI OUT (TV-ARC) HDMI... HDMI OUT (TV-ARC) HDMI IN LAN AUX IN DC 24V Wi-Fi SETUP SPK ADD 5V 0.5A 1 1. INSTALLATION ATTACHING THE SOUNDBAR TO YOUR TV'S STAND You can use the Soundbar's packaging to support its two ends. 2. OPTICAL IN HDMI OUT (TV-ARC) HDMI IN LAN AUX IN DC 24V Wi-Fi...
User Manual
Page 15
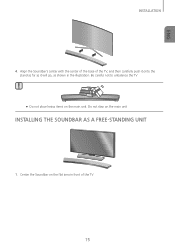
ENG INSTALLATION 4. Do not step on the main unit. INSTALLING THE SOUNDBAR AS A FREE-STANDING UNIT 1. Align the Soundbar's center with the center of the base of the TV. 15 Be careful not to unbalance the TV. ●● Do not place heavy items on the main unit. Center the Soundbar on the flat area in front of the TV, and then carefully push it onto the stand as far as it will go, as shown in the illustration.
ENG INSTALLATION 4. Do not step on the main unit. INSTALLING THE SOUNDBAR AS A FREE-STANDING UNIT 1. Align the Soundbar's center with the center of the base of the TV. 15 Be careful not to unbalance the TV. ●● Do not place heavy items on the main unit. Center the Soundbar on the flat area in front of the TV, and then carefully push it onto the stand as far as it will go, as shown in the illustration.

User Manual
Page 17
... and the subwoofer should be linked (connected). • The Link indicator (Blue LED) on the subwoofer stops blinking. Press the ID SET button on the Soundbar's display. 5. To finalize the link, turn off the main unit and start again from Step 2. • You can enjoy better sound from the wireless subwoofer...
... and the subwoofer should be linked (connected). • The Link indicator (Blue LED) on the subwoofer stops blinking. Press the ID SET button on the Soundbar's display. 5. To finalize the link, turn off the main unit and start again from Step 2. • You can enjoy better sound from the wireless subwoofer...
User Manual
Page 18
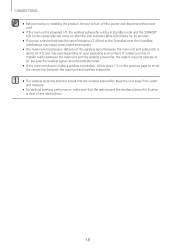
..., because the wireless signal cannot penetrate metal. ●● If the main unit doesn't make sure that uses the same frequency (2.4GHz) as the Soundbar near the Soundbar, interference may vary depending on after the Link indicator (Blue LED) blinks for 30 seconds. ●● If you use a device that the area...
..., because the wireless signal cannot penetrate metal. ●● If the main unit doesn't make sure that uses the same frequency (2.4GHz) as the Soundbar near the Soundbar, interference may vary depending on after the Link indicator (Blue LED) blinks for 30 seconds. ●● If you use a device that the area...

User Manual
Page 19
... audio data with a digital optical cable. 2. Connect an HDMI cable from the HDMI OUT (TV-ARC) jack on the back of the Soundbar or the SOURCE button on the Soundbar to select the D.IN mode. 19 ENG CONNECTING TO A TV CONNECTIONS CONNECTING TO A TV USING AN HDMI (DIGITAL) CABLE HDMI Cable HDMI...-ARC) HDMI IN LAN AUX IN DC 24V Wi-Fi SETUP SPK ADD 5V 0.5A 1. Press the (Source) button on the top panel of the Soundbar or the SOURCE button on the remote control to select the D.IN mode. ●● HDMI is not available if the HDMI cable does not...
... audio data with a digital optical cable. 2. Connect an HDMI cable from the HDMI OUT (TV-ARC) jack on the back of the Soundbar or the SOURCE button on the Soundbar to select the D.IN mode. 19 ENG CONNECTING TO A TV CONNECTIONS CONNECTING TO A TV USING AN HDMI (DIGITAL) CABLE HDMI Cable HDMI...-ARC) HDMI IN LAN AUX IN DC 24V Wi-Fi SETUP SPK ADD 5V 0.5A 1. Press the (Source) button on the top panel of the Soundbar or the SOURCE button on the remote control to select the D.IN mode. ●● HDMI is not available if the HDMI cable does not...
User Manual
Page 20
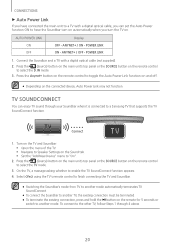
... button on the remote control to select the TV mode. 3. To connect to the other TV, follow Steps 1 through your Soundbar when it is connected to a Samsung TV that supports the TV SoundConnect function. CONNECTIONS ++Auto Power Link If you have connected the main unit to a TV with ...a digital optical cable (not supplied). 2. ANYNET+ / ON - On the TV, a message asking whether to Speaker Settings on . Turn on the TV and Soundbar. •...
... button on the remote control to select the TV mode. 3. To connect to the other TV, follow Steps 1 through your Soundbar when it is connected to a Samsung TV that supports the TV SoundConnect function. CONNECTIONS ++Auto Power Link If you have connected the main unit to a TV with ...a digital optical cable (not supplied). 2. ANYNET+ / ON - On the TV, a message asking whether to Speaker Settings on . Turn on the TV and Soundbar. •...

User Manual
Page 21
... Next, and Prev buttons on . ENG CONNECTIONS ●● The TV SoundConnect (SoundShare) function is supported by some Samsung TVs released from 2012 on the Soundbar or Soundbar's remote do not control the TV. 21 Check whether your TV supports the TV SoundConnect (SoundShare) function before you begin...For further information, refer to the TV's user manual.). ●● If your Samsung TV was released before 2014, check the SoundShare setting menu. ●● If the distance between the TV and Soundbar exceeds 32.8 ft, the connection may not be stable or the audio may stutter...
... Next, and Prev buttons on . ENG CONNECTIONS ●● The TV SoundConnect (SoundShare) function is supported by some Samsung TVs released from 2012 on the Soundbar or Soundbar's remote do not control the TV. 21 Check whether your TV supports the TV SoundConnect (SoundShare) function before you begin...For further information, refer to the TV's user manual.). ●● If your Samsung TV was released before 2014, check the SoundShare setting menu. ●● If the distance between the TV and Soundbar exceeds 32.8 ft, the connection may not be stable or the audio may stutter...

User Manual
Page 22
... the back of the product to the HDMI OUT jack on the remote control to analog and maintains the video and audio quality of the Soundbar or the SOURCE button on your digital device. 2. OPTICAL OR ANALOG AUDIO CABLE This unit comes equipped with one digital optical in jack and one...
... the back of the product to the HDMI OUT jack on the remote control to analog and maintains the video and audio quality of the Soundbar or the SOURCE button on your digital device. 2. OPTICAL OR ANALOG AUDIO CABLE This unit comes equipped with one digital optical in jack and one...

User Manual
Page 23
... 10 characters, it is not supported. ●● Connect USB devices directly to the USB port of the Soundbar or the SOURCE button on the display screen. • The Soundbar connection to the product via a multi-card reader. ENG CONNECTIONS ++AUX Cable 1. USB You can play music ...-- It may encounter a USB compatibility problem. ●● Do not connect multiple storage devices to the USB device is complete. • The Soundbar automatically turns off (Auto Power Off) if no USB device has been connected for more than 15 minutes. ++Before you may not operate properly. ...
... 10 characters, it is not supported. ●● Connect USB devices directly to the USB port of the Soundbar or the SOURCE button on the display screen. • The Soundbar connection to the product via a multi-card reader. ENG CONNECTIONS ++AUX Cable 1. USB You can play music ...-- It may encounter a USB compatibility problem. ●● Do not connect multiple storage devices to the USB device is complete. • The Soundbar automatically turns off (Auto Power Off) if no USB device has been connected for more than 15 minutes. ++Before you may not operate properly. ...

User Manual
Page 24
... 8 ~ 160kbps 8 ~ 160kbps ~ 8.8Mbps ~ 5.6Mbps ~ 1Mbps ~ 4.4Mbps ●● If there are too many folders and files stored on the USB device, it may take the Soundbar some time to access and play files. 24
... 8 ~ 160kbps 8 ~ 160kbps ~ 8.8Mbps ~ 5.6Mbps ~ 1Mbps ~ 4.4Mbps ●● If there are too many folders and files stored on the USB device, it may take the Soundbar some time to access and play files. 24


