User Manual
Page 1
Check Product's F/W Version 2. Update by Disc or USB device 1 DVD HOMETHEATER SYSTEM Firmware Update Contents 1.
Check Product's F/W Version 2. Update by Disc or USB device 1 DVD HOMETHEATER SYSTEM Firmware Update Contents 1.
User Manual
Page 2
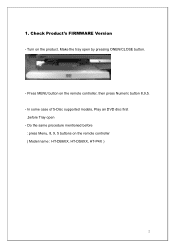
In some case of 5-Disc supported models, Play an DVD disc first ,before : press Menu, 8, 9, 5 buttons on the remote controller ( Model name : HT-DB6XX, HT-DS6XX, HT-P4X ) 2 Turn on the remote controller, then press Numeric button 8,9,5. - Make the tray open - Do the same procedure mentioned before Tray open by pressing ONEN/CLOSE button. - Press MENU button on the product. Check Product's FIRMWARE Version - 1.
In some case of 5-Disc supported models, Play an DVD disc first ,before : press Menu, 8, 9, 5 buttons on the remote controller ( Model name : HT-DB6XX, HT-DS6XX, HT-P4X ) 2 Turn on the remote controller, then press Numeric button 8,9,5. - Make the tray open - Do the same procedure mentioned before Tray open by pressing ONEN/CLOSE button. - Press MENU button on the product. Check Product's FIRMWARE Version - 1.
User Manual
Page 3
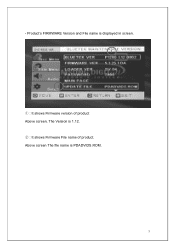
Above screen The file name is 1.12. ② : It shows Firmware File name of product. Product's FIRMWARE Version and File name is displayed in screen. 1 2 ① : It shows Firmware version of product Above screen, The Version is PDADVIDS.ROM. 3 -
Above screen The file name is 1.12. ② : It shows Firmware File name of product. Product's FIRMWARE Version and File name is displayed in screen. 1 2 ① : It shows Firmware version of product Above screen, The Version is PDADVIDS.ROM. 3 -
User Manual
Page 4
Multi-session : No Multi-session . You can not be done. 4 Check the F/W file name of the set , Firmware UPDATE can update new F/W, by select USB function after USB device plug-in ▶Important notice - Recording speed : under below recommendation. . If the file name is same - For the USB HOST playback supported model, Copy F/W file to USB device .Format the USB Device .Copy the firmware file to update is different between New F/W file and filename on the set and file name of Using a disc, Make an update disc under 8x - 2. In case of new firmware you want to USB ...
Multi-session : No Multi-session . You can not be done. 4 Check the F/W file name of the set , Firmware UPDATE can update new F/W, by select USB function after USB device plug-in ▶Important notice - Recording speed : under below recommendation. . If the file name is same - For the USB HOST playback supported model, Copy F/W file to USB device .Format the USB Device .Copy the firmware file to update is different between New F/W file and filename on the set and file name of Using a disc, Make an update disc under 8x - 2. In case of new firmware you want to USB ...
User Manual
Page 5
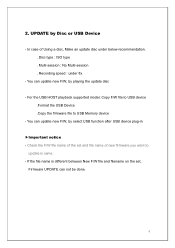
Turn on the main unit in "No disc" condition. 5 Press (STOP) button on the product, Play an Update disc or a USB Device - After Update complete, The set goes to turn off and turn on state automatically. ■ - Firmware update is carried, repeating ERASE and WRITE after READING - -
Turn on the main unit in "No disc" condition. 5 Press (STOP) button on the product, Play an Update disc or a USB Device - After Update complete, The set goes to turn off and turn on state automatically. ■ - Firmware update is carried, repeating ERASE and WRITE after READING - -
User Manual
Page 6
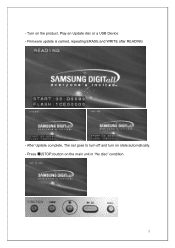
Pressing the button until INITIAL display in the SETUP Menu 6 After initial, you can select an OSD language in the Display window ■ - Pressing the button continuously until the Standby LED on the main unit again. - - In power off condition, Press (STOP) button on the main unit blink. -
Pressing the button until INITIAL display in the SETUP Menu 6 After initial, you can select an OSD language in the Display window ■ - Pressing the button continuously until the Standby LED on the main unit again. - - In power off condition, Press (STOP) button on the main unit blink. -
Quick Guide (easy Manual) (ver.1.0) (English)
Page 1
Samsung Electronics America, Inc. 1-800-SAMSUNG (7267864) www.samsung.com AH68-01963R REV : 00 Instruction Manual ENG DIGITAL HOME THEATER SYSTEM HT-X200 COMPACT DIGITAL AUDIO If you have any questions or comments relating to Samsung products, please contact the SAMSUNG customer care center.
Samsung Electronics America, Inc. 1-800-SAMSUNG (7267864) www.samsung.com AH68-01963R REV : 00 Instruction Manual ENG DIGITAL HOME THEATER SYSTEM HT-X200 COMPACT DIGITAL AUDIO If you have any questions or comments relating to Samsung products, please contact the SAMSUNG customer care center.

Quick Guide (easy Manual) (ver.1.0) (English)
Page 2
CLASS 1 LASER PRODUCT KLASSE 1 LASER PRODUKT LUOKAN 1 LASER LAITE KLASS 1 LASER APPARAT PRODUCTO LASER CLASE 1 Use of controls, adjustments or performance of procedures other than the other equipment which provides guidelines for future reference. 1) Read these instructions. 2) Keep these operating instructions carefully before using the unit. A polarized plug has two blades with enough space around it for long periods of the polarized or grounding- Install your player or disc has been stored in cold temperatures. Before moving the cart/ apparatus combination to the stand-...
CLASS 1 LASER PRODUCT KLASSE 1 LASER PRODUKT LUOKAN 1 LASER LAITE KLASS 1 LASER APPARAT PRODUCTO LASER CLASE 1 Use of controls, adjustments or performance of procedures other than the other equipment which provides guidelines for future reference. 1) Read these instructions. 2) Keep these operating instructions carefully before using the unit. A polarized plug has two blades with enough space around it for long periods of the polarized or grounding- Install your player or disc has been stored in cold temperatures. Before moving the cart/ apparatus combination to the stand-...

Quick Guide (easy Manual) (ver.1.0) (English)
Page 3
... be used to operate the main unit using a Samsung TV remote control, by connecting the Home Theater to Radio 47 Convenient Functions 49 Operating a TV with a sophisticated FM tuner, all in Stop mode. Power Saving Function The HT-X200 automatically shuts itself into the power saving mode after... ENG 5 Customized TV Screen Display The HT-X200 allows you 've made 43 DVD Playback Mode 44 DivX (R) registration 44 Setting the DRC (Dynamic Range Compression) ...45 Setting the AV SYNC 45 Setting the HDMI Audio 46 MISCELLANEOUS Listening to a SAMSUNG TV using an HDMI Cable. (This ...
... be used to operate the main unit using a Samsung TV remote control, by connecting the Home Theater to Radio 47 Convenient Functions 49 Operating a TV with a sophisticated FM tuner, all in Stop mode. Power Saving Function The HT-X200 automatically shuts itself into the power saving mode after... ENG 5 Customized TV Screen Display The HT-X200 allows you 've made 43 DVD Playback Mode 44 DivX (R) registration 44 Setting the DRC (Dynamic Range Compression) ...45 Setting the AV SYNC 45 Setting the HDMI Audio 46 MISCELLANEOUS Listening to a SAMSUNG TV using an HDMI Cable. (This ...

Quick Guide (easy Manual) (ver.1.0) (English)
Page 4
The Region Number for the disc to play DVDs that are played, a message appears on the TV screen. • DVD discs purchased abroad may not play . If such discs are coded by region. Playing Time Approx. 240 min. (single-sided) Approx. 480 min. (double-sided) Approx. 80 min. (single-sided) Approx. 160 min. (double-sided) 74 min. 20 min. 74 min. 20 min. Do not use the following types of the player. (Your DVD player will not play on this player. These regional codes must match in order for this player is given on the rear panel of disc! • LD, CD-G, CD-I, CD-ROM and DVD-...
The Region Number for the disc to play DVDs that are played, a message appears on the TV screen. • DVD discs purchased abroad may not play . If such discs are coded by region. Playing Time Approx. 240 min. (single-sided) Approx. 480 min. (double-sided) Approx. 80 min. (single-sided) Approx. 160 min. (double-sided) 74 min. 20 min. 74 min. 20 min. Do not use the following types of the player. (Your DVD player will not play on this player. These regional codes must match in order for this player is given on the rear panel of disc! • LD, CD-G, CD-I, CD-ROM and DVD-...

Quick Guide (easy Manual) (ver.1.0) (English)
Page 5
Description Front Panel 1 2 3 4 567 89 10 1. Function button 6. Volume Control button Rear Panel 1 23 4 5 11 10 9 8 7 6 1. 2.1 Channel Speaker Output Connector 2. Video Output Jack Connect your TV's video input jacks (VIDEO IN) to these jacks. 3. AUX IN 2 Jacks 7. Power ( ) button 2. Disc Insert Hole 3. Tuning Down & Skip ( ) button 7. Headphone Jack 2 2. Display 4. Play/Pause ( ) button 9. HDMI OUT Jack 6. AUX IN 1 Jack 3 3. Stop ( ) button 8. Stand Fix Hole 11. Cooling Fan 8 Side Panel ENG PREPARATION 1 1. Eject button 5. Tuning Up & Skip ...
Description Front Panel 1 2 3 4 567 89 10 1. Function button 6. Volume Control button Rear Panel 1 23 4 5 11 10 9 8 7 6 1. 2.1 Channel Speaker Output Connector 2. Video Output Jack Connect your TV's video input jacks (VIDEO IN) to these jacks. 3. AUX IN 2 Jacks 7. Power ( ) button 2. Disc Insert Hole 3. Tuning Down & Skip ( ) button 7. Headphone Jack 2 2. Display 4. Play/Pause ( ) button 9. HDMI OUT Jack 6. AUX IN 1 Jack 3 3. Stop ( ) button 8. Stand Fix Hole 11. Cooling Fan 8 Side Panel ENG PREPARATION 1 1. Eject button 5. Tuning Up & Skip ...

Quick Guide (easy Manual) (ver.1.0) (English)
Page 6
TV button 3. TV/VIDEO button 4. POWER button 5. TUNER MEMORY, SD(Standard Definition)/HD(High Definition) button 15.V-SOUND(Virtual Sound), V-H/P(Virtual Headphone) button 16. CANCEL button 21. PLAY/PAUSE button STOP button SEARCH buttons 23. ZOOM button 30. Number (0~9) buttons 6. REMAIN button 7. Tuning Preset/CD Skip buttons 9. SUBTITLE button 28. INFO button 31. Operation Range of the Remote Control The remote control can also be used up to 30° from the remote control sensor. 11 PREPARATION SLIDE MODE button 14. TUNING/CH ...
TV button 3. TV/VIDEO button 4. POWER button 5. TUNER MEMORY, SD(Standard Definition)/HD(High Definition) button 15.V-SOUND(Virtual Sound), V-H/P(Virtual Headphone) button 16. CANCEL button 21. PLAY/PAUSE button STOP button SEARCH buttons 23. ZOOM button 30. Number (0~9) buttons 6. REMAIN button 7. Tuning Preset/CD Skip buttons 9. SUBTITLE button 28. INFO button 31. Operation Range of the Remote Control The remote control can also be used up to 30° from the remote control sensor. 11 PREPARATION SLIDE MODE button 14. TUNING/CH ...

Quick Guide (easy Manual) (ver.1.0) (English)
Page 7
... the colors of the speaker terminals match the colors of the connecting plugs. • Do not let children play with or near your ear. L SW R HT-X200 Front Speaker (R) ENG Front Speaker (L) Subwoofer CONNECTIONS Position of the DVD Player • Place it anywhere you . • Place the speakers so that the polarity...
... the colors of the speaker terminals match the colors of the connecting plugs. • Do not let children play with or near your ear. L SW R HT-X200 Front Speaker (R) ENG Front Speaker (L) Subwoofer CONNECTIONS Position of the DVD Player • Place it anywhere you . • Place the speakers so that the polarity...

Quick Guide (easy Manual) (ver.1.0) (English)
Page 8
Arranging the Cables Use the cable tie to the bottom of the arrow and pull it to keep the cables together. 14 15 Preparation s Disconnect the AC power cord from the stand. 1 Turn the stand in the direction of the DVD Player. s Connect the cables before installing the main unit. Installing the Main Unit Method 1 : Installing the Stand so that it is slightly slanted. 3 Insert the 2 stand anchors into the holes on the bottom of the DVD Player. 4 Turn the right side of the stand clockwise to fix it apart. s Connect the cables before installing the main unit. Preparation s ...
Arranging the Cables Use the cable tie to the bottom of the arrow and pull it to keep the cables together. 14 15 Preparation s Disconnect the AC power cord from the stand. 1 Turn the stand in the direction of the DVD Player. s Connect the cables before installing the main unit. Installing the Main Unit Method 1 : Installing the Stand so that it is slightly slanted. 3 Insert the 2 stand anchors into the holes on the bottom of the DVD Player. 4 Turn the right side of the stand clockwise to fix it apart. s Connect the cables before installing the main unit. Preparation s ...

Quick Guide (easy Manual) (ver.1.0) (English)
Page 9
... If your TV owner's manual for HDMI output. Using Anynet+(HDMI-CEC) Anynet+ is a function that enables you to control other Samsung Devices with your Samsung TV's remote control, Anynet + can listen to the TV sound through the Home Theater. s : You can be able to see ... the Play button on the back of the Home Theater to DIGITAL IN. s : The Home Theater disc playback information will automatically switch to a Samsung TV with SAMSUNG TVs that support Anynet+(HDMI-CEC). • Please check the logo. s : You can access the Home Theater menu. METHOD 2 METHOD 3 ...
... If your TV owner's manual for HDMI output. Using Anynet+(HDMI-CEC) Anynet+ is a function that enables you to control other Samsung Devices with your Samsung TV's remote control, Anynet + can listen to the TV sound through the Home Theater. s : You can be able to see ... the Play button on the back of the Home Theater to DIGITAL IN. s : The Home Theater disc playback information will automatically switch to a Samsung TV with SAMSUNG TVs that support Anynet+(HDMI-CEC). • Please check the logo. s : You can access the Home Theater menu. METHOD 2 METHOD 3 ...

Quick Guide (easy Manual) (ver.1.0) (English)
Page 10
The mode switches as follows : DVD ➝ D.IN ➝ AUX 1 ➝ AUX 2 ➝ USB ➝ FM. 19 s Be sure to match connector colors. 2 Press the AUX button on the main unit. The mode switches as follows : DVD ➝ D.IN ➝ AUX 1 ➝ AUX 2 ➝ USB ➝ FM. s You can connect the Video Output jack of your VCR to the TV, and connect the Audio Output jacks of the external digital component. 2 Press the AUX button on the remote control to this product. 18 Optical Cable (not supplied) OPTICAL : Connecting an External Digital Component Digital signal ...
The mode switches as follows : DVD ➝ D.IN ➝ AUX 1 ➝ AUX 2 ➝ USB ➝ FM. 19 s Be sure to match connector colors. 2 Press the AUX button on the main unit. The mode switches as follows : DVD ➝ D.IN ➝ AUX 1 ➝ AUX 2 ➝ USB ➝ FM. s You can connect the Video Output jack of your VCR to the TV, and connect the Audio Output jacks of the external digital component. 2 Press the AUX button on the remote control to this product. 18 Optical Cable (not supplied) OPTICAL : Connecting an External Digital Component Digital signal ...

Quick Guide (easy Manual) (ver.1.0) (English)
Page 11
s Make sure the unit is well-ventilated. This involves a function available with CD-R/-RW discs. This involves tips or instructions on the content of the disc, the initial screen may be cancelled. Please observe the following terms before reading the user manual. This involves a function available with CD-R/-RW discs. ENG OPERATION • In this manual, the instructions marked with "DVD ( DVD )" are covered with a newspaper or cloth, heat may build up inside the unit may rise and may result.) Before Reading the User's Manual Make sure to check the following cautions ...
s Make sure the unit is well-ventilated. This involves a function available with CD-R/-RW discs. This involves tips or instructions on the content of the disc, the initial screen may be cancelled. Please observe the following terms before reading the user manual. This involves a function available with CD-R/-RW discs. ENG OPERATION • In this manual, the instructions marked with "DVD ( DVD )" are covered with a newspaper or cloth, heat may build up inside the unit may rise and may result.) Before Reading the User's Manual Make sure to check the following cautions ...

Quick Guide (easy Manual) (ver.1.0) (English)
Page 12
...is pressed, playback starts from the stop playback, press the STOP button during playback. Before Using Your Home Theater To Operate your Samsung TV and the Home Theater with the HT-X200's Remote Control The DVD Home Theater's remote can be stored in this remote. 4 Press the TV/VIDEO button to select VIDEO... mode on the remote to operate the DVD Home Theater 6 Press the FUNCTION button on the main unit or DVD button on your Samsung TV with ...
...is pressed, playback starts from the stop playback, press the STOP button during playback. Before Using Your Home Theater To Operate your Samsung TV and the Home Theater with the HT-X200's Remote Control The DVD Home Theater's remote can be stored in this remote. 4 Press the TV/VIDEO button to select VIDEO... mode on the remote to operate the DVD Home Theater 6 Press the FUNCTION button on the main unit or DVD button on your Samsung TV with ...

Quick Guide (easy Manual) (ver.1.0) (English)
Page 13
s The appearance of the menu depends on the disc. s To select another album in Stop mode and select a desired icon from the top part of a MP3-CD varies depending on the MP3/WMA track format recorded on the MP3/WMA disc. To play a file icon in the screen, Press the Cursor , , , button when it is pressed, the image makes the transition as follows: SLIDE SHOW MODE : 1~5 ➝ SLIDE SHOW MODE : RANDOM ➝ SLIDE SHOW MODE : NONE Digest Function Press the button to skip to select another album and track, repeat Steps 2 and 3 above. 4 Press the STOP( ) button to stop playback. &#...
s The appearance of the menu depends on the disc. s To select another album in Stop mode and select a desired icon from the top part of a MP3-CD varies depending on the MP3/WMA track format recorded on the MP3/WMA disc. To play a file icon in the screen, Press the Cursor , , , button when it is pressed, the image makes the transition as follows: SLIDE SHOW MODE : 1~5 ➝ SLIDE SHOW MODE : RANDOM ➝ SLIDE SHOW MODE : NONE Digest Function Press the button to skip to select another album and track, repeat Steps 2 and 3 above. 4 Press the STOP( ) button to stop playback. &#...

Quick Guide (easy Manual) (ver.1.0) (English)
Page 14
s Goes to the previous file whenever you press the button, if there are DivX and may not match the movie and you will have to select your selection will toggle between and . • is displayed when there is one supported language in the disc. 26 ENG OPERATION Subtitle Display Press the SUBTITLE button. s Each time you press the button, your subtitle language as follows: 1 In Stop mode, press the Cursor , button, select the desired subtitle ( ) from the TV screen, and then press the ENTER button. 2 When you want to enlarge. • A DivX file can be played automatically. s ...
s Goes to the previous file whenever you press the button, if there are DivX and may not match the movie and you will have to select your selection will toggle between and . • is displayed when there is one supported language in the disc. 26 ENG OPERATION Subtitle Display Press the SUBTITLE button. s Each time you press the button, your subtitle language as follows: 1 In Stop mode, press the Cursor , button, select the desired subtitle ( ) from the TV screen, and then press the ENTER button. 2 When you want to enlarge. • A DivX file can be played automatically. s ...
