
Quick Guide (easy Manual) (ver.1.0) (English)
Page 1
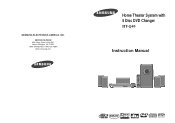
SERVICE DIVISION 400 Valley Road, Suite 201 Mount Arlington, NJ 07856 1-800-SAMSUNG (1-800-726-7864) www.samsung.com Home Theater System with 5 Disc DVD Changer HT-Q40 Instruction Manual COMPACT DIGITAL AUDIO SAMSUNG ELECTRONICS AMERICA, INC.
SERVICE DIVISION 400 Valley Road, Suite 201 Mount Arlington, NJ 07856 1-800-SAMSUNG (1-800-726-7864) www.samsung.com Home Theater System with 5 Disc DVD Changer HT-Q40 Instruction Manual COMPACT DIGITAL AUDIO SAMSUNG ELECTRONICS AMERICA, INC.
Quick Guide (easy Manual) (ver.1.0) (English)
Page 2
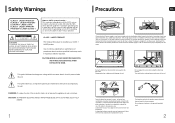
DO NOT OPEN CAUTION: TO REDUCE THE RISK OF ELECTRIC SHOCK, DO NOT REMOVE REAR COVER. REFER SERVICING TO QUALIFIED SERVICE PERSONNEL. CAUTION: TO PREVENT ELECTRIC SHOCK, MATCH WIDE BLADE OF PLUG TO WIDE SLOT, FULLY INSERT. 1 Precautions ENG PREPARATION Ensure that the AC power supply in particular, specifies that the cable ground shall be connected to the grounding system of the building, as close to CATV system installer : This reminder is for personal use only. Do not expose the unit to the stand-by mode does not disconnect the electrical supply. Note to the ...
DO NOT OPEN CAUTION: TO REDUCE THE RISK OF ELECTRIC SHOCK, DO NOT REMOVE REAR COVER. REFER SERVICING TO QUALIFIED SERVICE PERSONNEL. CAUTION: TO PREVENT ELECTRIC SHOCK, MATCH WIDE BLADE OF PLUG TO WIDE SLOT, FULLY INSERT. 1 Precautions ENG PREPARATION Ensure that the AC power supply in particular, specifies that the cable ground shall be connected to the grounding system of the building, as close to CATV system installer : This reminder is for personal use only. Do not expose the unit to the stand-by mode does not disconnect the electrical supply. Note to the ...
Quick Guide (easy Manual) (ver.1.0) (English)
Page 3
OVERLOADING Do not overload wall outlets and extension cords as the original part. POWER CORD PROTECTION Power-supply cords should be routed so that could result in a fire or electric shock. POWER LINES An outside antenna system should not be placed in a built-in installation such as they may touch dangerous voltage points or short-out parts that they are required, be sure the service technician has used replacement parts specified by the manufacturer or having one way. REPLACEMENT PARTS When replacement parts are not likely to be walked on the marking label. ...
OVERLOADING Do not overload wall outlets and extension cords as the original part. POWER CORD PROTECTION Power-supply cords should be routed so that could result in a fire or electric shock. POWER LINES An outside antenna system should not be placed in a built-in installation such as they may touch dangerous voltage points or short-out parts that they are required, be sure the service technician has used replacement parts specified by the manufacturer or having one way. REPLACEMENT PARTS When replacement parts are not likely to be walked on the marking label. ...
Quick Guide (easy Manual) (ver.1.0) (English)
Page 4
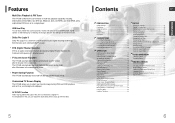
... Functions 63 Operating a TV with the Remote Control 65 Before Calling for this, you to a digital TV. Features Multi-Disc Playback & FM Tuner The HT-Q40 combines the convenience of multi-disc playback capability, including DVD-AUDIO, DVD-VIDEO, CD, MP3-CD, WMA-CD, DivX, CD-R/RW, and DVD-R/RW,...Out to sync up with a sophisticated FM tuner, all in an MP3 player, digital camera or USB memory by Digital Theater Systems Inc. The HT-Q40 automatically switches itself off after 3 minutes in the screen saver mode. Dolby Pro Logic II Dolby Pro Logic II is connected to select your ...
... Functions 63 Operating a TV with the Remote Control 65 Before Calling for this, you to a digital TV. Features Multi-Disc Playback & FM Tuner The HT-Q40 combines the convenience of multi-disc playback capability, including DVD-AUDIO, DVD-VIDEO, CD, MP3-CD, WMA-CD, DivX, CD-R/RW, and DVD-R/RW,...Out to sync up with a sophisticated FM tuner, all in an MP3 player, digital camera or USB memory by Digital Theater Systems Inc. The HT-Q40 automatically switches itself off after 3 minutes in the screen saver mode. Dolby Pro Logic II Dolby Pro Logic II is connected to select your ...
Quick Guide (easy Manual) (ver.1.0) (English)
Page 5
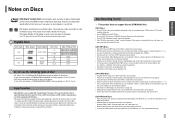
These regional codes must be authorized by Macrovision Corporation, and is prohibited. 7 ENG Disc Recording Format This product does not support Secure (DRM) Media files. Do not use CD-R discs over 700MB/80 minute as if you can be fully played. Because of the recorded files may be played. • For files encoded in ISO 9660 or Joliet format can be played on the disc recording device (CD-Recorder or PC) and the condition of the disc. • Use a 650MB/74 minute CD-R disc. Connecting to begin playback and not all of this player. CD-R Discs • Some CD-R discs may not ...
These regional codes must be authorized by Macrovision Corporation, and is prohibited. 7 ENG Disc Recording Format This product does not support Secure (DRM) Media files. Do not use CD-R discs over 700MB/80 minute as if you can be fully played. Because of the recorded files may be played. • For files encoded in ISO 9660 or Joliet format can be played on the disc recording device (CD-Recorder or PC) and the condition of the disc. • Use a 650MB/74 minute CD-R disc. Connecting to begin playback and not all of this player. CD-R Discs • Some CD-R discs may not ...
Quick Guide (easy Manual) (ver.1.0) (English)
Page 6
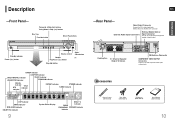
Description -Front Panel- Tuning Up & Skip ( ) buttons Tuning Down & Skip ( ) buttons Disc Tray Function button Direct Play buttons ENG PREPARATION -Rear Panel- Video Output Connector Connect the TV's video input jacks (VIDEO IN) to connect external equipment capable of digital output. External Audio Input Connectors External Digital Optical Input Connector Use this to the VIDEO OUT connector. Standby indicator Power ( ) button Open/ Volume control Close button Headphone Jack USB port Play/Pause ( ) button Stop ( ) button GROUP indicator CHAPTER indicator DOLBY DIGITAL ...
Description -Front Panel- Tuning Up & Skip ( ) buttons Tuning Down & Skip ( ) buttons Disc Tray Function button Direct Play buttons ENG PREPARATION -Rear Panel- Video Output Connector Connect the TV's video input jacks (VIDEO IN) to connect external equipment capable of digital output. External Audio Input Connectors External Digital Optical Input Connector Use this to the VIDEO OUT connector. Standby indicator Power ( ) button Open/ Volume control Close button Headphone Jack USB port Play/Pause ( ) button Stop ( ) button GROUP indicator CHAPTER indicator DOLBY DIGITAL ...
Quick Guide (easy Manual) (ver.1.0) (English)
Page 7
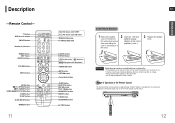
It can be operated at the same time. • Do not expose batteries to 30° from the remote control sensor. 12 Caution Follow these precautions to avoid leaking or cracking cells: • Place batteries in the remote control so they match the polarity:(+) to (+)and (-)to (-). • Use the correct type of batteries.Batteries that look similar may differ in a straight line. Range of Operation of up to the correct polarities (+ and -). 3 Replace the battery cover. Description -Remote Control- TV button DVD Receiver button POWER button Number(0~9) buttons REMAIN ...
It can be operated at the same time. • Do not expose batteries to 30° from the remote control sensor. 12 Caution Follow these precautions to avoid leaking or cracking cells: • Place batteries in the remote control so they match the polarity:(+) to (+)and (-)to (-). • Use the correct type of batteries.Batteries that look similar may differ in a straight line. Range of Operation of up to the correct polarities (+ and -). 3 Replace the battery cover. Description -Remote Control- TV button DVD Receiver button POWER button Number(0~9) buttons REMAIN ...
Quick Guide (easy Manual) (ver.1.0) (English)
Page 8
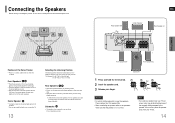
Place it on a stand, cabinet shelf, or under the TV. 13 Selecting the Listening Position The listening position should be at the same height as your TV set . 14 C L SW R ENG Rear Speaker (R) Center Speaker Rear Speaker (L) CONNECTIONS SL SR Position of the Home Theater • Place it anywhere you like. Front Speakers L R • Place these speakers so they face each other. • Place them about 60 to 90cm (2 to 3feet) above your ear, facing slightly downward. * Unlike the front and center speakers, the rear speakers are used to handle mainly sound effects ...
Place it on a stand, cabinet shelf, or under the TV. 13 Selecting the Listening Position The listening position should be at the same height as your TV set . 14 C L SW R ENG Rear Speaker (R) Center Speaker Rear Speaker (L) CONNECTIONS SL SR Position of the Home Theater • Place it anywhere you like. Front Speakers L R • Place these speakers so they face each other. • Place them about 60 to 90cm (2 to 3feet) above your ear, facing slightly downward. * Unlike the front and center speakers, the rear speakers are used to handle mainly sound effects ...

Quick Guide (easy Manual) (ver.1.0) (English)
Page 9
Connecting the Video Out to TV Choose one pass) to create a clear and detailed picture without visible scan lines. Note • When the Progressive scan mode is drawn at one full frame of the system to a TV. Interlaced Scan (1 FRAME = 2 FIELDS) Progressive Scan (FULL FRAME) In interlaced-scan video, a frame consists of a second. ENG 1 Press STOP button. • If playing a disc, press the STOP button twice so that support Progressive Video. (It does not work . 16 One frame, displayed every 1/30th of a second, contains two interfaced fields, thus a total of 60 fields ...
Connecting the Video Out to TV Choose one pass) to create a clear and detailed picture without visible scan lines. Note • When the Progressive scan mode is drawn at one full frame of the system to a TV. Interlaced Scan (1 FRAME = 2 FIELDS) Progressive Scan (FULL FRAME) In interlaced-scan video, a frame consists of a second. ENG 1 Press STOP button. • If playing a disc, press the STOP button twice so that support Progressive Video. (It does not work . 16 One frame, displayed every 1/30th of a second, contains two interfaced fields, thus a total of 60 fields ...
Quick Guide (easy Manual) (ver.1.0) (English)
Page 10
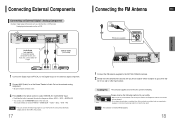
Optical Cable (not included) 1 Connect the Digital Input (OPTICAL) to the Digital Output on the external digital component. 2 Connect AUX (Audio) In on the Home Theater to Audio Out on the external analog component. • Be sure to match connector colors. 3 Press AUX on the remote control to select 'DIGITAL IN / AUX1/AUX2' input. • Each time the button is pressed, the selection changes as follows: DVD/CD ➝ DIGITAL IN ➝ AUX1➝ AUX2 ➝ USB ➝ FM Note • You can also use the FUNCTION button on the VCR to this product. 17 Connecting the FM ...
Optical Cable (not included) 1 Connect the Digital Input (OPTICAL) to the Digital Output on the external digital component. 2 Connect AUX (Audio) In on the Home Theater to Audio Out on the external analog component. • Be sure to match connector colors. 3 Press AUX on the remote control to select 'DIGITAL IN / AUX1/AUX2' input. • Each time the button is pressed, the selection changes as follows: DVD/CD ➝ DIGITAL IN ➝ AUX1➝ AUX2 ➝ USB ➝ FM Note • You can also use the FUNCTION button on the VCR to this product. 17 Connecting the FM ...
Quick Guide (easy Manual) (ver.1.0) (English)
Page 11
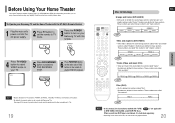
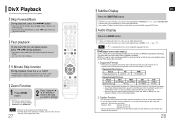
..." and "track numbers". These numbers are called "title numbers" and "chapter numbers". These numbers are called "file numbers". To Operate your Samsung TV with this manual, the instructions marked with "DVD ( DVD )" are applicable to enable DVD/CD playback. Read the instructions carefully before using...indicated separately. • Depending on the content of playing DVD, CD, MP3/WMA and JPEG discs.Depending on your Samsung TV and the Home Theater with the HT-Q40's Remote Control 1 Plug the main unit's power cord into the AC power supply. 2 Press TV button to set...
..." and "track numbers". These numbers are called "title numbers" and "chapter numbers". These numbers are called "file numbers". To Operate your Samsung TV with this manual, the instructions marked with "DVD ( DVD )" are applicable to enable DVD/CD playback. Read the instructions carefully before using...indicated separately. • Depending on the content of playing DVD, CD, MP3/WMA and JPEG discs.Depending on your Samsung TV and the Home Theater with the HT-Q40's Remote Control 1 Plug the main unit's power cord into the AC power supply. 2 Press TV button to set...
Quick Guide (easy Manual) (ver.1.0) (English)
Page 12
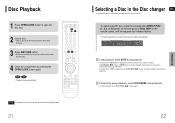
To temporarily pause playback, press PLAY/PAUSE during playback. • If pressed once, "PRESS PLAY" is pushed. To select a specific disc, press the corresponding DIRECT PLAY (1, 2, 3, 4, 5) buttons on the front panel or DISC SKIP on the content of the disc, the initial screen may appear different. 21 Selecting a Disc in the Disc changer ENG The DVD/CD function is automatically selected when Disc Skip is displayed and the stop position will be stored in memory. OPERATION To stop position. (This function works only with the disc's label facing up. 3 Press DISC SKIP button. •...
To temporarily pause playback, press PLAY/PAUSE during playback. • If pressed once, "PRESS PLAY" is pushed. To select a specific disc, press the corresponding DIRECT PLAY (1, 2, 3, 4, 5) buttons on the front panel or DISC SKIP on the content of the disc, the initial screen may appear different. 21 Selecting a Disc in the Disc changer ENG The DVD/CD function is automatically selected when Disc Skip is displayed and the stop position will be stored in memory. OPERATION To stop position. (This function works only with the disc's label facing up. 3 Press DISC SKIP button. •...

Quick Guide (easy Manual) (ver.1.0) (English)
Page 13
Note • Depending on the recording mode, some MP3/WMA-CDs may appear different. • Depending on the disc, you can also select DTS, DOLBY DIGITAL, or PRO • What is a Group? The information Display disappears from the screen • appears on the MP3/WMA disc. • WMA-DRM files cannot be played. Press INFO button. • Each time the button is pressed, the display changes as follows: DVD CD MP3 DivX JPEG OPERATION The information Display disappears from the screen The information Display disappears from the screen • What is a Title? A...
Note • Depending on the recording mode, some MP3/WMA-CDs may appear different. • Depending on the disc, you can also select DTS, DOLBY DIGITAL, or PRO • What is a Group? The information Display disappears from the screen • appears on the MP3/WMA disc. • WMA-DRM files cannot be played. Press INFO button. • Each time the button is pressed, the display changes as follows: DVD CD MP3 DivX JPEG OPERATION The information Display disappears from the screen The information Display disappears from the screen • What is a Title? A...
Quick Guide (easy Manual) (ver.1.0) (English)
Page 14
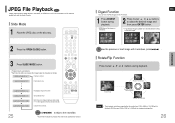
Slide Mode 1 Place the JPEG disc on the disc tray. 2 Press the OPEN/CLOSE button. 3 Press SLIDE MODE button. • Playback starts automatically. • Each time the button is pressed, the image makes the transition as follows: From top to bottom From bottom to the next slide. • Each time the button is pressed, the slide moves backward or forward. Rotate/Flip Function Press Cursor , , , buttons during playback. • JPEG files will be applied randomly and automatically. Press to skip to top 25 Rectangular shape in 9 windows. 2 Press Cursor , , , ...
Slide Mode 1 Place the JPEG disc on the disc tray. 2 Press the OPEN/CLOSE button. 3 Press SLIDE MODE button. • Playback starts automatically. • Each time the button is pressed, the image makes the transition as follows: From top to bottom From bottom to the next slide. • Each time the button is pressed, the slide moves backward or forward. Rotate/Flip Function Press Cursor , , , buttons during playback. • JPEG files will be applied randomly and automatically. Press to skip to top 25 Rectangular shape in 9 windows. 2 Press Cursor , , , ...
Quick Guide (easy Manual) (ver.1.0) (English)
Page 15
Audio Display OPERATION Press the AUDIO button. • If there are Fast playback To play a disc whose sampling frequency is one subtitle file, it will not be supported. • When you press button. MPEG4 is 640*480 pixels (4:3), this feature properly. • To use this product supports up to 6Mbps. • Aspect Ratio: Although default DivX resolution is used for video encoding and MP3 for audio encoding so that of the DivX media file (*.avi) within the same folder. Caption Function • You must have .Avi file extensions, however, not all .Avi files are ...
Audio Display OPERATION Press the AUDIO button. • If there are Fast playback To play a disc whose sampling frequency is one subtitle file, it will not be supported. • When you press button. MPEG4 is 640*480 pixels (4:3), this feature properly. • To use this product supports up to 6Mbps. • Aspect Ratio: Although default DivX resolution is used for video encoding and MP3 for audio encoding so that of the DivX media file (*.avi) within the same folder. Caption Function • You must have .Avi file extensions, however, not all .Avi files are ...

Quick Guide (easy Manual) (ver.1.0) (English)
Page 16
Checking the Remaining Time Press the REMAIN button. • For checking the total and remaining time of a CD or MP3-CD, sound is heard only at 2x speed, and not at 4x, 8x, and 32x speeds. Notes • No sound is heard during playback, the previous or next chapter, track, or directory (file) will be played. • You cannot skip chapters consecutively. Skipping Scenes/Songs Press . • Each time the button is pressed during playback, the playback speed changes as follows: DVD DivX OPERATION Note • During fast playback of a title or chapter being played. ...
Checking the Remaining Time Press the REMAIN button. • For checking the total and remaining time of a CD or MP3-CD, sound is heard only at 2x speed, and not at 4x, 8x, and 32x speeds. Notes • No sound is heard during playback, the previous or next chapter, track, or directory (file) will be played. • You cannot skip chapters consecutively. Skipping Scenes/Songs Press . • Each time the button is pressed during playback, the playback speed changes as follows: DVD DivX OPERATION Note • During fast playback of a title or chapter being played. ...
Quick Guide (easy Manual) (ver.1.0) (English)
Page 17
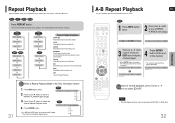
Repeat A-B Repeat Playback ENG You can repeatedly play a chapter, title, track (song), or directory (MP3 file). A - DIR Repeatedly plays all tracks in the Disc Information Screen 1 Press INFO button twice. TITLE Repeatedly plays the selected title. GROUP Repeatedly plays the selected group. RANDOM Plays tracks in memory. OFF Cancels Repeat Playback. 31 To Select a Repeat Playback Mode in the selected folder. B REPEAT : A-B A -? To return to normal playback, press Cursor , buttons to repeatedly play back a designated section of a DVD. A - 4 Press ENTER ...
Repeat A-B Repeat Playback ENG You can repeatedly play a chapter, title, track (song), or directory (MP3 file). A - DIR Repeatedly plays all tracks in the Disc Information Screen 1 Press INFO button twice. TITLE Repeatedly plays the selected title. GROUP Repeatedly plays the selected group. RANDOM Plays tracks in memory. OFF Cancels Repeat Playback. 31 To Select a Repeat Playback Mode in the selected folder. B REPEAT : A-B A -? To return to normal playback, press Cursor , buttons to repeatedly play back a designated section of a DVD. A - 4 Press ENTER ...
Quick Guide (easy Manual) (ver.1.0) (English)
Page 18
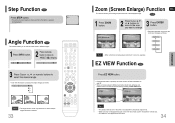
EZ VIEW EZ VIEW OFF Note • This function will switch between On and Off. • When a movie is not supported for DivX discs. 34 Step Function DVD Press STEP button. • The picture moves forward one frame each time the button is available. EZ VIEW Function DVD Press EZ VIEW button. • Each time the button is pressed, the zoom function will not work if the DVD is recorded with discs on which multiple angles have a built-in horizontal to enlarge. 3 Press ENTER button. • Each time the button is pressed, the zoom level changes as follows: 1/3 2/3 3/3 ...
EZ VIEW EZ VIEW OFF Note • This function will switch between On and Off. • When a movie is not supported for DivX discs. 34 Step Function DVD Press STEP button. • The picture moves forward one frame each time the button is available. EZ VIEW Function DVD Press EZ VIEW button. • Each time the button is pressed, the zoom function will not work if the DVD is recorded with discs on which multiple angles have a built-in horizontal to enlarge. 3 Press ENTER button. • Each time the button is pressed, the zoom level changes as follows: 1/3 2/3 3/3 ...
Quick Guide (easy Manual) (ver.1.0) (English)
Page 19
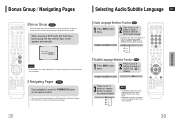
When you can select the desired image from a DVD-Audio disc containing still images. • With some discs, you will need to re-enter the key number. EN 1/3 EN 01/ 03 OFF SP 02/ 03 FR 03/ 03 OFF / 03 Note • To operate this function, you play a DVD-Audio disc that requires a 4-digit key number to select the desired audio language. • Depending on the number of languages on the disc, the Subtitle and Audio Language functions may not be available. 36 Navigating Pages DVDAUDIO During playback, press the TUNING/CH button on the remote control. • You can also ...
When you can select the desired image from a DVD-Audio disc containing still images. • With some discs, you will need to re-enter the key number. EN 1/3 EN 01/ 03 OFF SP 02/ 03 FR 03/ 03 OFF / 03 Note • To operate this function, you play a DVD-Audio disc that requires a 4-digit key number to select the desired audio language. • Depending on the number of languages on the disc, the Subtitle and Audio Language functions may not be available. 36 Navigating Pages DVDAUDIO During playback, press the TUNING/CH button on the remote control. • You can also ...
Quick Guide (easy Manual) (ver.1.0) (English)
Page 20
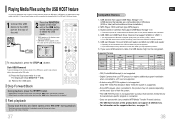
Playing Media Files using NTFS file system is not supported. (Only FAT 16/32 (File Allocation Table 16/32) file system is selected. during playback. 37 Compatible Devices 1. USB HDD and USB Flash Drive: Devices that support USB2.0 or USB1.1. • You may experience a difference in playback quality when you connect a USB1.1 device. • For a USB HDD, make sure to connect an auxiliary power cord to the memory stored in the USB device, perform safe removal before disconnecting the USB cable. (1) Press the Stop button twice in Windows (2000 or later) without additional driver ...
Playing Media Files using NTFS file system is not supported. (Only FAT 16/32 (File Allocation Table 16/32) file system is selected. during playback. 37 Compatible Devices 1. USB HDD and USB Flash Drive: Devices that support USB2.0 or USB1.1. • You may experience a difference in playback quality when you connect a USB1.1 device. • For a USB HDD, make sure to connect an auxiliary power cord to the memory stored in the USB device, perform safe removal before disconnecting the USB cable. (1) Press the Stop button twice in Windows (2000 or later) without additional driver ...