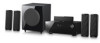
User Manual (user Manual) (ver.1.0) (English)
Page 1
HT-AS730S AV Receiver System user manual imagine the possibilities Thank you for purchasing this Samsung product. To receive more complete service, please register your product at www.samsung.com/register
User Manual (user Manual) (ver.1.0) (English)
Page 5
... converting a digital PCM or analog stereo signal using an HDMI Cable. (This function is a pure digital AV receiver that can enjoy music files by connecting the receiver to a SAMSUNG TV using DTS digital matrix decoding. DTS Provides a full range of 2 channel or multi channel sources.It... also provides Music,Movie and Game modes. EnG Features Digital AV Receiver This product is available only in connection with Samsung TV and DVD player supporting Anynet+(HDMI-CEC).) Adds a surround back channel for more realistic surround sound with...
User Manual (user Manual) (ver.1.0) (English)
Page 6
... Components setup 30 30 Setup Menu Tree 34 Input Setup 35 Speaker Setup 39 Surround Setup 44 Option Setup Operation 47 47 Before Using the AV Receiver 48 Selecting Digital/Analog Input 49 Using the Surround Modes 52 Using the Speaker Adjustment Buttons 53 Listening to the Radio 54 Using an iPod...
User Manual (user Manual) (ver.1.0) (English)
Page 8
... Panel 1 2 15 14 13 12 11 10 9 8 7 6 5 4 3 1 STANDBY/ON button 2 VOLUME Control 3 SELECT button 4 TUNING MODE button 5 TONE CONTROL button 6 S.DIRECT 7 SURROUND button Sets the AV receiver to change the radio frequency or select detailed options in Surround mode. Used to Standby. Used to output 2 CH PCM audio signal without any signal...
User Manual (user Manual) (ver.1.0) (English)
Page 16
... subwoofer with the front face of the center speaker or place them slightly in the menu). Speaker positioning SL SBL SR SBR Position of AV Receiver Place AV Receiver on . ~ Using the subwoofer's VOLUME control, you can set the desired bass level (See page 37 "Setting the speaker level" ... it anywhere you . Front Speakers Place these speakers in front of your ears. Connections This section involves various methods of connecting the AV receiver to set the subwoofer level in front of the center speaker. 16 Place the speakers so thatSthBeLir tweeteSrBsRwill be sure to turn the ...
User Manual (user Manual) (ver.1.0) (English)
Page 18
...Red 1 Connecting the Speakers 1. Press down the terminal tab on the back of the AV receiver match the colors of the speaker. 2. Connect the connecting plugs to the back of the AV Receiver. ~ Make sure the colors of the speaker terminals on the back of the connecting plugs...). ` Never touch speaker terminals while the power is on. COnneCting tHe SpeakerS FRONT (R) ACTIVE SUBWOOFER (BUILT-IN POWER AMPLIFIER) CENTER FRONT (L) AV RECEIVER SURROUND(R) SURROUND BACK (R) (not supplied) Connecting Speaker Wire 1. Insert the bare part of the wire into the red (+) terminal, and then ...
User Manual (user Manual) (ver.1.0) (English)
Page 19
OR Connect the Video cable from the Component Video Output (PR, PB and Y) jacks on the back of your AV Receiver to the Component Video Input jacks on your TV. Connecting the Video Out to your TV EnG ● Connections OPTICAL AUDIO OUT OUT VIDEO COMPONENT ... inputs, connect a Component video cable(not supplied) from the VIDEO OUT (MONITOR) jack on the back of your AV Receiver to the Video Input jack on your TV. OR Connect AUDIO IN (TV) on your AV Receiver to the Digital Output of the TV. 19 Audio Connection Connect the Digital Input (OPTICAL 3) on your...
User Manual (user Manual) (ver.1.0) (English)
Page 21
...EXIT 1. Press ◀▶ button to audio through the TV. "SETUP OFF" appears on your TV for more than two AV receivers (Anynet+ installed). If your Samsung TV's remote control. Press SETUP/MENU button, and then press the ENTER button. ~ "SETUP MODE" appears on and you...Using Anynet+(HDMI-CEC) Anynet+ is a function that support Anynet+. 1. Connect the AV receiver to a Samsung TV with an HDMI cable. (See page 20) 2. Press the ▲▼button to set to audio through the AV receiver. ~ Receiver : Off : You can cause a malfunction. ` Anynet+ does not work if the...
User Manual (user Manual) (ver.1.0) (English)
Page 22
OR Connect AUDIO IN (DVD) on your AV Receiver to the Digital Output of the DVD/BD player. Audio Connection Connect the Digital Input (OPTICAL 1) on your AV Receiver to the Audio Out of the DVD/BD player. 22 OR Connect a Video cable from the COMPONENT IN (DVD) (PR, PB and Y) jacks on the ...back of your AV Receiver to the Component Video Output jacks on your DVD/BD player. Connecting a DVD or BD(Blu-Ray) Player DVD or BD Player OPTICAL AUDIO OUT...
User Manual (user Manual) (ver.1.0) (English)
Page 23
... AUDIO IN (SAT) on your SAT. OR Connect a Video cable from the VIDEO IN (SAT) jack on the back of your AV Receiver to the Video Output jack on your AV Receiver to the Audio Out of the SAT. Connect the audio cable's red plug to the red jack and white cable to the... either the right or left audio input jack of the main unit. M ` Disconnect the power plug from the outlet if you will not use the AV Receiver to control your DVD/BD player, the pause function will not work. 23 Audio Connection Connect the Digital Input (OPTICAL 2) on your SAT. EnG ●...
User Manual (user Manual) (ver.1.0) (English)
Page 24
... the Audio In of the VCR. audio Connection for recording Connect AUDIO OUT (VCR) on your AV Receiver to the Audio Out of the VCR. for a long period of time. M ` Disconnect the power plug from ...you will not use this unit for recording Connect a Video cable from the VIDEO IN (VCR) jack on the back of your AV Receiver to the Video Input jack on your VCR. COnneCting a VCr VCR AUDIO OUT VIDEO OUT VIDEO IN AUDIO IN VIDEO IN (...) Video Connection for playback Connect a Video cable from the VIDEO OUT (VCR) jack on the back of your AV Receiver to the Video Output jack on your VCR.
User Manual (user Manual) (ver.1.0) (English)
Page 25
OR Connect AUDIO IN (CD) on your AV Receiver to either the right or left audio input jack of the CD player. M ` If the external component has only one audio output jack, connect it to the Audio Out of the main unit. EnG Connecting a CD player CD player COAXIAL OUT AUDIO OUT or ● Connections Audio Connection Connect the Digital Input (COAXIAL) on your AV Receiver to the white jack. 25 Connect the audio cable's red plug to the red jack and white cable to the Digital Output of the CD Player.
User Manual (user Manual) (ver.1.0) (English)
Page 26
Connecting 7.1 channel devices You can connect the AV receiver to a DVD player, SUPER AUDIO CD player or other device with 7.1 channel output. SW C FRONT SW C SURROUND 5.1 CH 7.1 CH SUB CENTER WOOFER SURROUND BACK 7.1 Channel device 26
User Manual (user Manual) (ver.1.0) (English)
Page 27
... in the Dock. ~ If you want to play a movie stored in your iPod player, you connect an iPod, the unit will charge your iPod and AV Receiver. ` When the unit is powered on and you should set the player's TV Out option to On before you connect your iPod's battery. ` Make sure... to connect the dock connector so that the label "SAMSUNG" faces upward. ` "Made for iPod" means that an electronic accessory has been designed to connect specifically to iPod and has been certified by the developer...
User Manual (user Manual) (ver.1.0) (English)
Page 30
setup For your AV Receiver. INPUT DVD OPTICAL 1,2,3 COAXIAL SAT OPTICAL 1,2,3 COAXIAL TV OPTICAL 1,2,3 COAXIAL CD OPTICAL 1,2,3 COAXIAL AUX OPTICAL 1,2,3 COAXIAL SPEAKER SURROUND OPTION 30 Setup MENU TREE Here's a quick look at how the setup menus are organized on your convenience, you can set this AV receiver's features for the best use.
User Manual (user Manual) (ver.1.0) (English)
Page 34
... the display and Setup Mode is released, press the RETURN button. 34 Press SETUP/MENU button ~ "INPUT" appears on the front of your AV Receiver. ` To move up one level from SETUP/MENU or EXIT SETUP when the SETUP mode is exited. - Press the ▶ button to ...select a desired jack. - INPUT SETUP Selecting a source device and connection jack Select the external devices you have connected to the receiver. 1. SOURCE DEVICE INPUT JACK DVD SAT TV CD AUX AUDIO OPTIC1,2,3,COAX OPTIC1,2,3,COAX OPTIC1,2,3,COAX OPTIC1,2,3,COAX OPTIC1,2,3,COAX Default OPTIC1 OPTIC2 OPTIC3 ...
User Manual (user Manual) (ver.1.0) (English)
Page 44
AV SYNC Video may look slower than the audio if it from SETUP/MENU or EXIT SETUP when the SETUP mode is connected to enhance your ... transition. ~ Off ~ On M ` To move up one level from 0 to 200mS in 10mS steps. MP3 Enhancer This also helps enhance your AV receiver experience. 1. Press button to set the OPTION you to make different audio settings to a digital TV. option setup The Option menu enables you want to...
User Manual (user Manual) (ver.1.0) (English)
Page 46
... up one level from a component that's connected to an HDMI IN, through your TV's speakers. On : Anynet + enabled. - disabled. . AUTO LIPSYNC : ON, OFF The AV receiver can use this function to enjoy Dolby Digital sound when watching movies at low volume at the HDMI IN is output by the HDMI OUT...this preference on the data from the connected monitor. - AVR : HDMI audio is released, press the RETURN button. ` This function works only if your Samsung TV's remote control. - HDMI Setup Use this if you want to listen to the audio from SETUP/MENU or EXIT SETUP when the SETUP mode...
User Manual (user Manual) (ver.1.0) (English)
Page 47
... set to the outlet. Method 2 Press DVD/BD, SAT, TV, VCR, CD, AUX, 7.1CH, IPOD or TUNER button. ~ You can operate your AMP (this AV receiver), TV, DVD and BD player with this button, FM DVD SAT TV VCR CD AUX 7.1 MULTI... control functions You can directly select the desired function. 47 See pages 58 ~ 60 for more details. EnG ● Operation Operation Before using the AV receiver Turning On/Off Connect the power plug to Standby mode. To select a function Method 1 Press the Function button. ~ Each time you press this...
User Manual (user Manual) (ver.1.0) (English)
Page 48
... MODE button on the remote control to select the external device you have connected. ~ Each time you connect the digital audio output jack of your AV Receiver. ` You can change input mode by pressing the INPUT MODE button on the main unit. 48