Owners Instructions
Page 4
...Screen Image retention Do not display a still image (such as on the plasma display panel for viewing. This image retention is also known as burned-in...refer to page 40 of this manual to fill the screen if your Samsung limited warranty. Although the panels are not covered by your model offers ...video and programming, should be in -Picture 44 Changing the Screen Size 50 Freezing the Picture 51 Sound Control Customizing the Sound 54 Using Automatic Sound ... 14 Connections Connecting VHF and UHF Antennas 20 Connecting Cable TV 20 Connecting Speakers 22 Connecting a VCR 24 Connecting a ...
...Screen Image retention Do not display a still image (such as on the plasma display panel for viewing. This image retention is also known as burned-in...refer to page 40 of this manual to fill the screen if your Samsung limited warranty. Although the panels are not covered by your model offers ...video and programming, should be in -Picture 44 Changing the Screen Size 50 Freezing the Picture 51 Sound Control Customizing the Sound 54 Using Automatic Sound ... 14 Connections Connecting VHF and UHF Antennas 20 Connecting Cable TV 20 Connecting Speakers 22 Connecting a VCR 24 Connecting a ...
Owners Instructions
Page 6
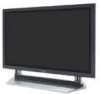
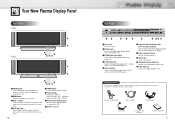
...External Speaker Out jacks Connect external speakers. Remote Control/AAA Batteries Antenna Cable Speaker Cables Power Cord Ferrite Cores; 3EA (HPN5039) Owner's Instructions 11 Your New Plasma Display Panel Front Panel HPN5039 HPN6339 Œ SOURCE button Press to display all the parts shown here. If any piece is missing or broken,... Off ∏ Remote Control Signal Receiver Aim the remote control towards this spot on your dealer. Checking Accessories Once you have unpacked your TV, check to the Sub-woofer speaker jack. ˝ Power Input jack Connect the supplied power cord.
...External Speaker Out jacks Connect external speakers. Remote Control/AAA Batteries Antenna Cable Speaker Cables Power Cord Ferrite Cores; 3EA (HPN5039) Owner's Instructions 11 Your New Plasma Display Panel Front Panel HPN5039 HPN6339 Œ SOURCE button Press to display all the parts shown here. If any piece is missing or broken,... Off ∏ Remote Control Signal Receiver Aim the remote control towards this spot on your dealer. Checking Accessories Once you have unpacked your TV, check to the Sub-woofer speaker jack. ˝ Power Input jack Connect the supplied power cord.

Owners Instructions
Page 10
PLASMA DISPLAY PANEL Connections Connecting VHF and UHF Antennas 20 Connecting Cable TV 20 Connecting Speakers 22 Connecting a VCR 24 Connecting a Camcorder 25 Connecting a DVD Player 26 Connecting a DTV Receiver 27
PLASMA DISPLAY PANEL Connections Connecting VHF and UHF Antennas 20 Connecting Cable TV 20 Connecting Speakers 22 Connecting a VCR 24 Connecting a Camcorder 25 Connecting a DVD Player 26 Connecting a DTV Receiver 27
Owners Instructions
Page 39
Fine 53 76 PLASMA DISPLAY PANEL Time Setting Setting the Clock 78 Setting the Sleep Timer 79 Setting the Timers 80 Setting the Preferred Channel and Volume Level 82 ... RIGHT button. (If Fine is not set properly, noise will appear on the screen.) Corase Fine Adjust 50 7 Move Adjust Menu 4 Press the MENU button to select "Fine". Fine Tuning (Fine) Preset: • Press the TV/VIDEO button, then press the UP or DOWN button to select PC mode. 1 Press the MENU...
Fine 53 76 PLASMA DISPLAY PANEL Time Setting Setting the Clock 78 Setting the Sleep Timer 79 Setting the Timers 80 Setting the Preferred Channel and Volume Level 82 ... RIGHT button. (If Fine is not set properly, noise will appear on the screen.) Corase Fine Adjust 50 7 Move Adjust Menu 4 Press the MENU button to select "Fine". Fine Tuning (Fine) Preset: • Press the TV/VIDEO button, then press the UP or DOWN button to select PC mode. 1 Press the MENU...
Owners Instructions
Page 42
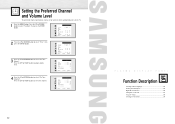
... adjust volume level. am On Time - - : - - am Off Off Time - - : - - am Off Sleep Off On Time Volume 10 On Time Channel 3 Move Select Menu 82 PLASMA DISPLAY PANEL Function Description Selecting a Menu Language 84 Viewing Closed Captions 85 Digital Noise Reduction 86 Setting Auto Power Off 87 Using the V-Chip 88... ENTER button. Setting the Preferred Channel and Volume Level The preferred channel and volume can be set for when the timer automatically turns on the TV. 1 Press the MENU button.
... adjust volume level. am On Time - - : - - am Off Off Time - - : - - am Off Sleep Off On Time Volume 10 On Time Channel 3 Move Select Menu 82 PLASMA DISPLAY PANEL Function Description Selecting a Menu Language 84 Viewing Closed Captions 85 Digital Noise Reduction 86 Setting Auto Power Off 87 Using the V-Chip 88... ENTER button. Setting the Preferred Channel and Volume Level The preferred channel and volume can be set for when the timer automatically turns on the TV. 1 Press the MENU button.


