
User Manual (ENGLISH)
Page 4
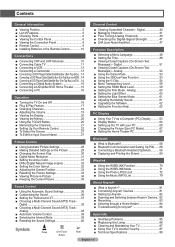
... and Printing the Screen 69 Wiselink ■ Using the WISELINK Function 70 ■ Using the WISELINK Mode 71 ■ Using the Photo (JPEG) List 72 ■ Using the Music (MP3) List 79 About Anynet+ ■ What is Anynet 81 ■ Connecting Anynet+ Devices 81 ■ Setting Up ... Turning the TV On and Off 16 ■ Plug & Play Feature 17 ■ Changing Channels 19 ■ Adjusting the Volume 19 ■ Viewing the Display 20 ■ Viewing the Menus 20 ■ Using the TOOLS Button 20 ■ Memorizing the Channels 21 ■ Setting Up Your Remote Control 22 ■...
... and Printing the Screen 69 Wiselink ■ Using the WISELINK Function 70 ■ Using the WISELINK Mode 71 ■ Using the Photo (JPEG) List 72 ■ Using the Music (MP3) List 79 About Anynet+ ■ What is Anynet 81 ■ Connecting Anynet+ Devices 81 ■ Setting Up ... Turning the TV On and Off 16 ■ Plug & Play Feature 17 ■ Changing Channels 19 ■ Adjusting the Volume 19 ■ Viewing the Display 20 ■ Viewing the Menus 20 ■ Using the TOOLS Button 20 ■ Memorizing the Channels 21 ■ Setting Up Your Remote Control 22 ■...
User Manual (ENGLISH)
Page 5
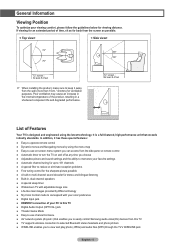
... an increase in the internal temperature of the product, resulting in a shortened component life and degraded performance. 72˝ screen : At least 8.4 feet List of Features Your TV is a full-featured, high-performance unit that enables you to view and play photo (JPEG) and audio...control Samsung audio-video(AV) devices from the wall (more than 10cm / 4inches) for ventilation purposes. In addition, it away from this TV ● Digital Audio Output (OPTICAL) jack ● Theater Game Mode ● Easy-to-use on-screen menu system you can access from the side panel or remote control...
... an increase in the internal temperature of the product, resulting in a shortened component life and degraded performance. 72˝ screen : At least 8.4 feet List of Features Your TV is a full-featured, high-performance unit that enables you to view and play photo (JPEG) and audio...control Samsung audio-video(AV) devices from the wall (more than 10cm / 4inches) for ventilation purposes. In addition, it away from this TV ● Digital Audio Output (OPTICAL) jack ● Theater Game Mode ● Easy-to-use on-screen menu system you can access from the side panel or remote control...
User Manual (ENGLISH)
Page 6
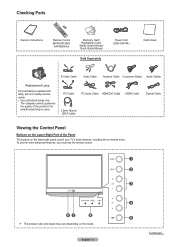
...... The company cannot guarantee the quality of the Panel The buttons on the lower-right panel control your TV's basic features, including the on-screen menu. To use the more advanced features, you must use the remote control. ➢ The product color and shape may vary depending on the Lower-Right Part of the...
...... The company cannot guarantee the quality of the Panel The buttons on the lower-right panel control your TV's basic features, including the on-screen menu. To use the more advanced features, you must use the remote control. ➢ The product color and shape may vary depending on the Lower-Right Part of the...
User Manual (ENGLISH)
Page 7
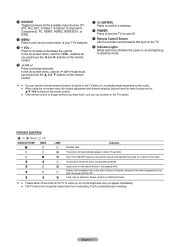
buttons as you would use the ▲ and ▼ buttons on the remote control. 5 (ENTER) Press to confirm a selection. 6 POWER Press to turn the TV on and off. 7 Remote Control Sensor Aim the remote control towards this spot on the TV. 8 Indicator Lights Blinks and turns off . In the on-screen menu, use the ...set and the set is on and lights up , so normal brightness may be turned on the remote control. A cooling fan inside lamp from overheating. Lamp may not appear immediately. ● The TV has a fan to keep the inside the set will automatically be defective. In the on -screen...
buttons as you would use the ▲ and ▼ buttons on the remote control. 5 (ENTER) Press to confirm a selection. 6 POWER Press to turn the TV on and off. 7 Remote Control Sensor Aim the remote control towards this spot on the TV. 8 Indicator Lights Blinks and turns off . In the on-screen menu, use the ...set and the set is on and lights up , so normal brightness may be turned on the remote control. A cooling fan inside lamp from overheating. Lamp may not appear immediately. ● The TV has a fan to keep the inside the set will automatically be defective. In the on -screen...
User Manual (ENGLISH)
Page 9
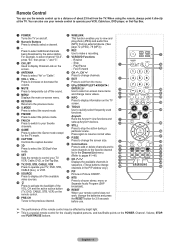
... change channels. When using the remote, always point it directly at the TV. You can use the remote control up Anynet+ devices. a WISELINK This function enables you to view and play photo (JPEG) and audio files (MP3) from an external device. (See page 72 (JPEG), 79 (MP3)) b... REC Use to exit from the TV. Stop - e EXIT Press to make a recording. Press again to select additional channels being broadcast by bright light. ➢ This is a special remote control for the TV mode. $ CAPTION Controls the caption decoder. % 3D Press...
... change channels. When using the remote, always point it directly at the TV. You can use the remote control up Anynet+ devices. a WISELINK This function enables you to view and play photo (JPEG) and audio files (MP3) from an external device. (See page 72 (JPEG), 79 (MP3)) b... REC Use to exit from the TV. Stop - e EXIT Press to make a recording. Press again to select additional channels being broadcast by bright light. ➢ This is a special remote control for the TV mode. $ CAPTION Controls the caption decoder. % 3D Press...
User Manual (ENGLISH)
Page 10
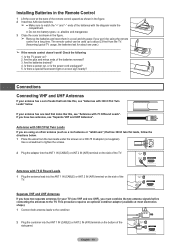
...2 Plug the combiner into the ANT 1 IN (CABLE) or ANT 2 IN (AIR) terminal on the bottom of the TV. Is there a special fluorescent light or a neon sign nearby? The remote control can be using an off-air antenna (such as a roof antenna or "rabbit ears") that has 300 Ω twin flat... Ω Flat Twin Leads" below . 1 Place the wires from the TV. (Assuming typical TV usage, the batteries last for your antenna has a set of the batteries reversed? 3. Separate VHF and UHF Antennas If you are using the remote control for a long time. Are the plus and minus ends of leads that...
...2 Plug the combiner into the ANT 1 IN (CABLE) or ANT 2 IN (AIR) terminal on the bottom of the TV. Is there a special fluorescent light or a neon sign nearby? The remote control can be using an off-air antenna (such as a roof antenna or "rabbit ears") that has 300 Ω twin flat... Ω Flat Twin Leads" below . 1 Place the wires from the TV. (Assuming typical TV usage, the batteries last for your antenna has a set of the batteries reversed? 3. Separate VHF and UHF Antennas If you are using the remote control for a long time. Are the plus and minus ends of leads that...
User Manual (ENGLISH)
Page 16
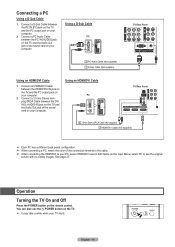
See page 27. You can also use the POWER button on the TV. ➢ It may take a while when your computer. English - 16 Operation Turning the TV On and Off Press the POWER button on the remote control. Using a D-Sub Cable PC TV Rear Panel 2 PC Audio Cable (Not supplied) 1 D-Sub Cable (Not ...supplied) Using an HDMI/DVI Cable 1 Connect an HDMI/DVI Cable between the HDMI3/DVI IN jack on the TV and the PC output jack on your computer. 2...
See page 27. You can also use the POWER button on the TV. ➢ It may take a while when your computer. English - 16 Operation Turning the TV On and Off Press the POWER button on the remote control. Using a D-Sub Cable PC TV Rear Panel 2 PC Audio Cable (Not supplied) 1 D-Sub Cable (Not ...supplied) Using an HDMI/DVI Cable 1 Connect an HDMI/DVI Cable between the HDMI3/DVI IN jack on the TV and the PC output jack on your computer. 2...
User Manual (ENGLISH)
Page 17
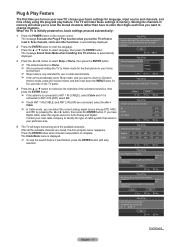
... powered on, basic settings proceed automatically: 1 Press the POWER button on the remote control. English Menu Language : EEnsgplaisñhol Français Move Enter Skip Plug & Play Select Home Mode when installing this TV at first or reset it . Move Enter Skip Plug & Play Select the ... to select language, then press the ENTER button. Sets channels, clock and other functions. The message Select Home Mode when installing this TV at first or reset it . Sets channels, clock and other functions. OK Enter Exit Plug & Play Select Language of the selected ...
... powered on, basic settings proceed automatically: 1 Press the POWER button on the remote control. English Menu Language : EEnsgplaisñhol Français Move Enter Skip Plug & Play Select Home Mode when installing this TV at first or reset it . Move Enter Skip Plug & Play Select the ... to select language, then press the ENTER button. Sets channels, clock and other functions. The message Select Home Mode when installing this TV at first or reset it . Sets channels, clock and other functions. OK Enter Exit Plug & Play Select Language of the selected ...
User Manual (ENGLISH)
Page 18
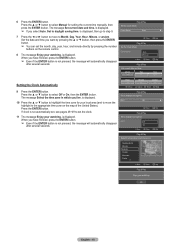
... pages 48~49 to Month, Day, Year, Hour, Minute, or am /pm - - Press the ▲ or ▼ button to the appropriate time zone on the remote control. 8 The message Enjoy your watching. Clock Mode : Auto Enter Skip Plug & Play Set the Clock Mode. Move Minute - -
... pages 48~49 to Month, Day, Year, Hour, Minute, or am /pm - - Press the ▲ or ▼ button to the appropriate time zone on the remote control. 8 The message Enjoy your watching. Clock Mode : Auto Enter Skip Plug & Play Set the Clock Mode. Move Minute - -
User Manual (ENGLISH)
Page 20
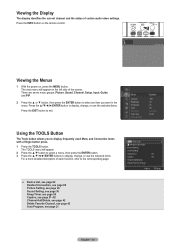
Press the INFO button on , press the MENU button. Air 3 No Time Information Viewing the Menus 1 With the power on the remote control. Viewing the Display The display identifies the current channel and the status of each function, refer to exit. There are seven menu groups: Picture, Sound, ...
Press the INFO button on , press the MENU button. Air 3 No Time Information Viewing the Menus 1 With the power on the remote control. Viewing the Display The display identifies the current channel and the status of each function, refer to exit. There are seven menu groups: Picture, Sound, ...
User Manual (ENGLISH)
Page 21
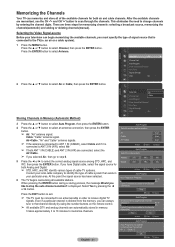
...Start Start Start Return IRC IRC Move Enter Return Auto Program Auto Program in memory. Air 10 3% Digital Channels are added on the remote control. ➢ All available DTV and analog channels are memorized, use the CH and CH button to scan through the channels. Memorizing the Channels...If the antenna is connected to ANT 1 IN (CABLE), select Cable and if it is displayed. It takes approximately 3 to 10 minutes to receive digital TV signals. Air : 1 Cable : 2 OK Enter Return When pressing the ENTER button during a storing process, the message Would you like to select the ...
...Start Start Start Return IRC IRC Move Enter Return Auto Program Auto Program in memory. Air 10 3% Digital Channels are added on the remote control. ➢ All available DTV and analog channels are memorized, use the CH and CH button to scan through the channels. Memorizing the Channels...If the antenna is connected to ANT 1 IN (CABLE), select Cable and if it is displayed. It takes approximately 3 to 10 minutes to receive digital TV signals. Air : 1 Cable : 2 OK Enter Return When pressing the ENTER button during a storing process, the message Would you like to select the ...
User Manual (ENGLISH)
Page 22
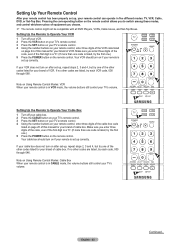
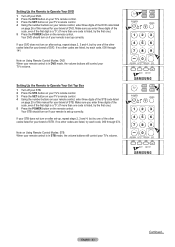
...22 Continued... Setting Up Your Remote Control After your remote control has been properly set up, your remote control can operate in VCR mode, the volume buttons still control your TV's volume. Pressing the corresponding button on the remote control allows you choose. ➢ The remote control might not be compatible with all... 3 and 4, but try one of VCR. Setting Up the Remote to Operate Your VCR 1 Turn off your cable box. 2 Press the CABLE button on your TV's remote control. 3 Press the SET button on your TV's remote control. 4 Using the number buttons on your brand of the other ...
...22 Continued... Setting Up Your Remote Control After your remote control has been properly set up, your remote control can operate in VCR mode, the volume buttons still control your TV's volume. Pressing the corresponding button on the remote control allows you choose. ➢ The remote control might not be compatible with all... 3 and 4, but try one of VCR. Setting Up the Remote to Operate Your VCR 1 Turn off your cable box. 2 Press the CABLE button on your TV's remote control. 3 Press the SET button on your TV's remote control. 4 Using the number buttons on your brand of the other ...
User Manual (ENGLISH)
Page 23
...1 Turn off your DVD. 2 Press the DVD button on your TV's remote control. 3 Press the SET button on your TV's remote control. 4 Using the number buttons on your remote control, enter three digits of the DVD code listed on the remote control. Make sure you enter three digits of the code, even if ... each code, 000 through 141. Setting Up the Remote to Operate Your DVD 1 Turn off your STB. 2 Press the STB button on your TV's remote control. 3 Press the SET button on your TV's remote control. 4 Using the number buttons on your remote control, enter three digits of the STB code listed on...
...1 Turn off your DVD. 2 Press the DVD button on your TV's remote control. 3 Press the SET button on your TV's remote control. 4 Using the number buttons on your remote control, enter three digits of the DVD code listed on the remote control. Make sure you enter three digits of the code, even if ... each code, 000 through 141. Setting Up the Remote to Operate Your DVD 1 Turn off your STB. 2 Press the STB button on your TV's remote control. 3 Press the SET button on your TV's remote control. 4 Using the number buttons on your remote control, enter three digits of the STB code listed on...
User Manual (ENGLISH)
Page 27
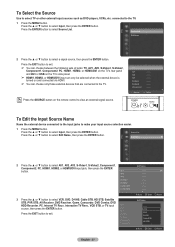
...Component1, Component2, PC, HDMI1, HDMI2, or HDMI3/DVI on the TV's rear panel and AV3 or USB on the TV's side panel. ➢ HDMI1, HDMI2, or HDMI3/DVI input can only be selected when the external device is turned on the remote control to select Edit Name, then press the ENTER button. To Edit... STB, HD STB, Satellite STB, PVR STB, AV Receiver, DVD Receiver, Game, Camcorder, DVD Combo, DVD HDD Recorder, PC, Internet TV Recv., Interactive TV Recv., VOD STB, or TV input source, then press the ENTER button. Press the ▲ or ▼ button to view an external signal source. Press the ▲...
...Component1, Component2, PC, HDMI1, HDMI2, or HDMI3/DVI on the TV's rear panel and AV3 or USB on the TV's side panel. ➢ HDMI1, HDMI2, or HDMI3/DVI input can only be selected when the external device is turned on the remote control to select Edit Name, then press the ENTER button. To Edit... STB, HD STB, Satellite STB, PVR STB, AV Receiver, DVD Receiver, Game, Camcorder, DVD Combo, DVD HDD Recorder, PC, Internet TV Recv., Interactive TV Recv., VOD STB, or TV input source, then press the ENTER button. Press the ▲ or ▼ button to view an external signal source. Press the ▲...
User Manual (ENGLISH)
Page 28
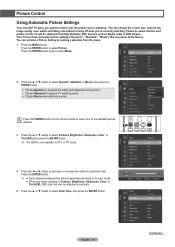
Your TV has three automatic picture settings ("Dynamic", "Standard", "Movie") that the best picture on the remote control to select one of the standard picture settings. 3 Press the ▲ or ▼ button to select Contrast, Brightness, Sharpness, Color, or Tint ...button to increase the clarity and sharpness of a particular item. Press the ENTER button again to select Picture. Picture Control Using Automatic Picture Settings Your new DLP TV gives you optimal control over the picture you 're currently watching. Please be aware that are preset at the factory. Mode :Dynamic &#...
Your TV has three automatic picture settings ("Dynamic", "Standard", "Movie") that the best picture on the remote control to select one of the standard picture settings. 3 Press the ▲ or ▼ button to select Contrast, Brightness, Sharpness, Color, or Tint ...button to increase the clarity and sharpness of a particular item. Press the ENTER button again to select Picture. Picture Control Using Automatic Picture Settings Your new DLP TV gives you optimal control over the picture you 're currently watching. Please be aware that are preset at the factory. Mode :Dynamic &#...
User Manual (ENGLISH)
Page 30
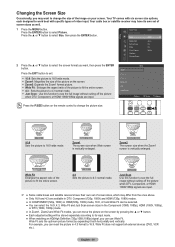
.... Press the EXIT button to exit. 16:9: Sets the picture to 16:9 wide mode. Zoom1: Magnifies the size of the picture on the remote control to change the size of screen sizes as well. 1 Press the MENU button. Wide Fit Enlarges the aspect ratio of the picture to fit the.... Press the ▲ or ▼ button to work best with six screen size options, each designed to select Size, then press the ENTER button. Your TV comes with specific types of screen sizes, which may have their own set of the image on the screen by expanding it both horizontally and...
.... Press the EXIT button to exit. 16:9: Sets the picture to 16:9 wide mode. Zoom1: Magnifies the size of the picture on the remote control to change the size of screen sizes as well. 1 Press the MENU button. Wide Fit Enlarges the aspect ratio of the picture to fit the.... Press the ▲ or ▼ button to work best with six screen size options, each designed to select Size, then press the ENTER button. Your TV comes with specific types of screen sizes, which may have their own set of the image on the screen by expanding it both horizontally and...
User Manual (ENGLISH)
Page 34
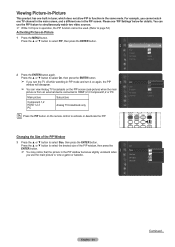
...: : Cable : Cable 3 2 Press the ENTER button again. You can view Analog TV broadcasts on the remote control to activate or deactivate the PIP. For example, you use the PIP feature to simultaneously watch one TV channel in the main screen, and a different one built-in tuner, which does not ... Air/Cable Channel : On : : : Cable : Cable 3 English - 34 Continued... Main picture Sub picture Component 1,2 HDMI 1,2,3 PC Analog TV broadcasts only Press the PIP button on the PIP screen (sub-picture) when the main picture is in operation, the PIP function cannot be used...
...: : Cable : Cable 3 2 Press the ENTER button again. You can view Analog TV broadcasts on the remote control to activate or deactivate the PIP. For example, you use the PIP feature to simultaneously watch one TV channel in the main screen, and a different one built-in tuner, which does not ... Air/Cable Channel : On : : : Cable : Cable 3 English - 34 Continued... Main picture Sub picture Component 1,2 HDMI 1,2,3 PC Analog TV broadcasts only Press the PIP button on the PIP screen (sub-picture) when the main picture is in operation, the PIP function cannot be used...

User Manual (ENGLISH)
Page 35
...differ depending on the signal type. PIP Position Air/Cable Channel : : Cable : CableC3able 3 Press the PIP CH and CH and buttons on the remote control. Selecting a Signal Source (Air or Cable) for PIP 5 Press the ▲ or ▼ button to change the PIP channel. Press the ▲ ...cancel this function, press the STILL button again or press any button on the remote control to select Air/Cable, then press the ENTER button. Press the EXIT button to TV. Changing the Position of the remote to select the desired channel in the PIP window, then press the ENTER button...
...differ depending on the signal type. PIP Position Air/Cable Channel : : Cable : CableC3able 3 Press the PIP CH and CH and buttons on the remote control. Selecting a Signal Source (Air or Cable) for PIP 5 Press the ▲ or ▼ button to change the PIP channel. Press the ▲ ...cancel this function, press the STILL button again or press any button on the remote control to select Air/Cable, then press the ENTER button. Press the EXIT button to TV. Changing the Position of the remote to select the desired channel in the PIP window, then press the ENTER button...

User Manual (ENGLISH)
Page 36
... Sound Music : OMffovie : ESnpgelisehch : MCounsotom Auto Volume : Off Internal Mute : Off Sound Reset Press the S.MODE button on the remote control to select one of the standard sound settings. Mode Balance L : StSatnadndaardrd Music R 100Hz - Sound Mode : Custom Equalizer ...press the ENTER button. Or, you can use one of the "automatic" settings.) 1 Press the MENU button. Sound Control Using the Automatic Sound Settings Your TV has automatic sound settings ("Standard", "Music", "Movie", "Speech", and "Custom") that is mostly dialog (i.e., news)....
... Sound Music : OMffovie : ESnpgelisehch : MCounsotom Auto Volume : Off Internal Mute : Off Sound Reset Press the S.MODE button on the remote control to select one of the standard sound settings. Mode Balance L : StSatnadndaardrd Music R 100Hz - Sound Mode : Custom Equalizer ...press the ENTER button. Or, you can use one of the "automatic" settings.) 1 Press the MENU button. Sound Control Using the Automatic Sound Settings Your TV has automatic sound settings ("Standard", "Music", "Movie", "Speech", and "Custom") that is mostly dialog (i.e., news)....

User Manual (ENGLISH)
Page 38
...: EEnngglliisshh Multi-Track Sound Auto Volume : MSopnaonish : OFffrench Internal Mute : Off Sound Reset Press the MTS button on the remote control repeatedly to exit. Choose Mono for channels that are having difficulty receiving a stereo signal. Choose Stereo for example, ...or ▼ button to select Sound, then press the ENTER button. Preferred Language 1 Press the MENU button. Digital The digital-TV transmission system is capable of simultaneous transmission of many audio tracks (for channels that are broadcasting in stereo. Choose SAP...
...: EEnngglliisshh Multi-Track Sound Auto Volume : MSopnaonish : OFffrench Internal Mute : Off Sound Reset Press the MTS button on the remote control repeatedly to exit. Choose Mono for channels that are having difficulty receiving a stereo signal. Choose Stereo for example, ...or ▼ button to select Sound, then press the ENTER button. Preferred Language 1 Press the MENU button. Digital The digital-TV transmission system is capable of simultaneous transmission of many audio tracks (for channels that are broadcasting in stereo. Choose SAP...

