User Manual (ENGLISH)
Page 1
DLP TV Owner's Instructions HL-T5076S HL-T5676S HL-T6176S Register your product at www.samsung.com/global/register Record your Model and Serial number here for future reference. ▪ Model Serial No
DLP TV Owner's Instructions HL-T5076S HL-T5676S HL-T6176S Register your product at www.samsung.com/global/register Record your Model and Serial number here for future reference. ▪ Model Serial No

User Manual (ENGLISH)
Page 2
...) video. 480i programs are granted for commercial use by end-user consumers for product features or functions that do not conform to Digital TV ● What is licensed under this product unit and the license does not extend to any product unit other than this license for ... while the 480p format offers improved image detail over 480i. A Guide to the ISO/IEC 11172-3 or ISO/IEC 13818-3. © 2007 Samsung Electronics Co., Ltd. Using DTV, broadcasters can be combined into a single digital broadcast. Digital Television Services ● Digital Picture Quality DTV programs ...
...) video. 480i programs are granted for commercial use by end-user consumers for product features or functions that do not conform to Digital TV ● What is licensed under this product unit and the license does not extend to any product unit other than this license for ... while the 480p format offers improved image detail over 480i. A Guide to the ISO/IEC 11172-3 or ISO/IEC 13818-3. © 2007 Samsung Electronics Co., Ltd. Using DTV, broadcasters can be combined into a single digital broadcast. Digital Television Services ● Digital Picture Quality DTV programs ...

User Manual (ENGLISH)
Page 3
... is possible that in common areas and are used for your present antenna may work fine. It is it was originally encoded for transmitting digital TV programs that you will have to pay a monthly or per-program charge to enjoy clear, sharp widescreen images and high-quality audio. So you ...channels. Is the antenna I connect my DTV set -top receiver to watch OTA DTV and HDTV programs. They're free, unlike subscription satellite TV or premium cable TV. DTV receivers do not require as much signal as those antennas are not located in some markets, both VHF and UHF channels are no...
... is possible that in common areas and are used for your present antenna may work fine. It is it was originally encoded for transmitting digital TV programs that you will have to pay a monthly or per-program charge to enjoy clear, sharp widescreen images and high-quality audio. So you ...channels. Is the antenna I connect my DTV set -top receiver to watch OTA DTV and HDTV programs. They're free, unlike subscription satellite TV or premium cable TV. DTV receivers do not require as much signal as those antennas are not located in some markets, both VHF and UHF channels are no...

User Manual (ENGLISH)
Page 4
...; Using the V-Chip 46 ■ Viewing Closed Captions (On-Screen Text Messages) - Analog 15 ■ Connecting a PC 16 OPERATION ■ Turning the TV On and Off 16 ■ Plug & Play Feature 17 ■ Changing Channels 18 ■ Adjusting the Volume 19 ■ Viewing the Display 19 ■... ■ Setting the Function Help 57 ■ Upgrading the Software 58 PC DISPLAY ■ Using Your TV as a Computer (PC) Display .......... 59 ■ Display Modes 60 ■ Setting up the TV with your PC 61 ■ Changing the Picture Size (PC Mode 63 ■ Setting the Home Theater...
...; Using the V-Chip 46 ■ Viewing Closed Captions (On-Screen Text Messages) - Analog 15 ■ Connecting a PC 16 OPERATION ■ Turning the TV On and Off 16 ■ Plug & Play Feature 17 ■ Changing Channels 18 ■ Adjusting the Volume 19 ■ Viewing the Display 19 ■... ■ Setting the Function Help 57 ■ Upgrading the Software 58 PC DISPLAY ■ Using Your TV as a Computer (PC) Display .......... 59 ■ Display Modes 60 ■ Setting up the TV with your PC 61 ■ Changing the Picture Size (PC Mode 63 ■ Setting the Home Theater...

User Manual (ENGLISH)
Page 5
... system you can access from the side panel or remote control ● Automatic timer to turn the TV on top of time, sit as far back from the screen as possible. < Top view> < Side view> 50˝ screen : At least 5.9 feet 56˝ screen : At least 6.6 feet 61˝ ... the sharpest picture possible ● A built-in multi-channel sound decoder for stereo and bilingual listening ● Built-in a shortened component life and degraded performance. 50˝ screen : At least 5.9 feet 56˝ screen : At least 6.6 feet 61˝ screen : At least 7.2 feet ➢ For optimal picture ...
... system you can access from the side panel or remote control ● Automatic timer to turn the TV on top of time, sit as far back from the screen as possible. < Top view> < Side view> 50˝ screen : At least 5.9 feet 56˝ screen : At least 6.6 feet 61˝ ... the sharpest picture possible ● A built-in multi-channel sound decoder for stereo and bilingual listening ● Built-in a shortened component life and degraded performance. 50˝ screen : At least 5.9 feet 56˝ screen : At least 6.6 feet 61˝ screen : At least 7.2 feet ➢ For optimal picture ...

User Manual (ENGLISH)
Page 6
.... • Use authorized lamps only. English - 6 Continued... The company cannot guarantee the quality of the Panel The buttons on the lower-right panel control your TV's basic features, including the on the model.
.... • Use authorized lamps only. English - 6 Continued... The company cannot guarantee the quality of the Panel The buttons on the lower-right panel control your TV's basic features, including the on the model.
User Manual (ENGLISH)
Page 7
...ventilation hole on -screen menu of the set will automatically be defective. English - 7 Press to see an on the side of your TV's features. 3 + VOL - In the on the TV. 8 Indicator Lights Blinks and turns off . You'll occasionally hear it is in about 15 seconds. buttons as the buttons on ...have lost it, you can use the ▲ and ▼ buttons on the remote control. 5 (ENTER) Press to confirm a selection. 6 POWER Press to turn the TV on and off. 7 Remote Control Sensor Aim the remote control towards this spot on -screen menu, use the CH buttons as you would use controls...
...ventilation hole on -screen menu of the set will automatically be defective. English - 7 Press to see an on the side of your TV's features. 3 + VOL - In the on the TV. 8 Indicator Lights Blinks and turns off . You'll occasionally hear it is in about 15 seconds. buttons as the buttons on ...have lost it, you can use the ▲ and ▼ buttons on the remote control. 5 (ENTER) Press to confirm a selection. 6 POWER Press to turn the TV on and off. 7 Remote Control Sensor Aim the remote control towards this spot on -screen menu, use the CH buttons as you would use controls...

User Manual (ENGLISH)
Page 8
... with HDMI output. English - 8 For more information on connecting equipment, see pages 10~16. ➢ The product color and shape may vary depending on your TV allow you to receive left and right audio from your PC. # PC AUDIO IN Connect to the HDMI jack of an external device. 7 S-VIDEO (AV...
... with HDMI output. English - 8 For more information on connecting equipment, see pages 10~16. ➢ The product color and shape may vary depending on your TV allow you to receive left and right audio from your PC. # PC AUDIO IN Connect to the HDMI jack of an external device. 7 S-VIDEO (AV...

User Manual (ENGLISH)
Page 9
... select channel "54-3", press "54", then press "-" and "3". 4 CH LIST Used to display Channel Lists on the remote control. ) PRE-CH Tunes to / from the TV. Stop - k Color buttons Press to add or delete channels and to store channels to the favorite channel list in the Channel List menu. (See pages... channels to the previous channel. m SRS Selects SRS TruSurround XT mode. P.MODE Press to select the picture mode. @ FAV.CH Press to switch to your TV, DVD, STB, CABLE (box), or VCR. * SOURCE Press to display all of the available video sources. ( Press to select the sound mode. ! g INFO Press to...
... select channel "54-3", press "54", then press "-" and "3". 4 CH LIST Used to display Channel Lists on the remote control. ) PRE-CH Tunes to / from the TV. Stop - k Color buttons Press to add or delete channels and to store channels to the favorite channel list in the Channel List menu. (See pages... channels to the previous channel. m SRS Selects SRS TruSurround XT mode. P.MODE Press to select the picture mode. @ FAV.CH Press to switch to your TV, DVD, STB, CABLE (box), or VCR. * SOURCE Press to display all of the available video sources. ( Press to select the sound mode. ! g INFO Press to...

User Manual (ENGLISH)
Page 10
... leads under the screws on ? 2. Is there a special fluorescent light or a neon sign nearby? Antennas with 75 Ω Round Leads". English - 10 Is the TV power on a 300-75 Ω adapter (not supplied). If you won't be used up to tighten the screws. 2 Plug the adaptor into the ANT 1 IN... (CABLE) or ANT 2 IN (AIR) terminal on the side of the TV. Are the batteries drained? 4. This procedure requires an optional combiner-adaptor (available at the back of the remote control upward as shown in the figure...
... leads under the screws on ? 2. Is there a special fluorescent light or a neon sign nearby? Antennas with 75 Ω Round Leads". English - 10 Is the TV power on a 300-75 Ω adapter (not supplied). If you won't be used up to tighten the screws. 2 Plug the adaptor into the ANT 1 IN... (CABLE) or ANT 2 IN (AIR) terminal on the side of the TV. Are the batteries drained? 4. This procedure requires an optional combiner-adaptor (available at the back of the remote control upward as shown in the figure...

User Manual (ENGLISH)
Page 11
... "VHF IN" or simply, "IN". Incoming cable Incoming cable Splitter Splitter Cable Box Splitter Cable Box RF (A/B) Switch Splitter Cable Box RF (A/B) Switch TV Side Splitter Cable Box RF (A/B) Switch After you have made this connection, set the A/B switch to "B", you will need a cable box to the ...the "B" position to view scrambled channels. (When you do not need a two-way splitter, an RF (A/B) switch, and four lengths of the TV. ➢ Because this cable to the cable box's output channel, which is connected to the ANT IN terminal on your cable box descrambles only...
... "VHF IN" or simply, "IN". Incoming cable Incoming cable Splitter Splitter Cable Box Splitter Cable Box RF (A/B) Switch Splitter Cable Box RF (A/B) Switch TV Side Splitter Cable Box RF (A/B) Switch After you have made this connection, set the A/B switch to "B", you will need a cable box to the ...the "B" position to view scrambled channels. (When you do not need a two-way splitter, an RF (A/B) switch, and four lengths of the TV. ➢ Because this cable to the cable box's output channel, which is connected to the ANT IN terminal on your cable box descrambles only...

User Manual (ENGLISH)
Page 12
... the VCR. ➢ If you have not yet connected to an antenna or a cable system. 1 Unplug the cable or antenna from the side of the TV 2 Connect the cable or antenna to 1 the ANT IN terminal on the VCR. 1 Antenna cable(Not supplied) 3 Audio Cable (Not supplied) 2 S-Video... color of the connection terminal to the cable. ➢ Some games may be connected to a game player. S-Video Connection Your Samsung TV can be displayed with a cut off picture when the TV is stereo, you must connect two cables. 3 Antenna cable(Not supplied) 5 Audio Cable(Not supplied) 4 Video Cable(Not supplied...
... the VCR. ➢ If you have not yet connected to an antenna or a cable system. 1 Unplug the cable or antenna from the side of the TV 2 Connect the cable or antenna to 1 the ANT IN terminal on the VCR. 1 Antenna cable(Not supplied) 3 Audio Cable (Not supplied) 2 S-Video... color of the connection terminal to the cable. ➢ Some games may be connected to a game player. S-Video Connection Your Samsung TV can be displayed with a cut off picture when the TV is stereo, you must connect two cables. 3 Antenna cable(Not supplied) 5 Audio Cable(Not supplied) 4 Video Cable(Not supplied...
User Manual (ENGLISH)
Page 13
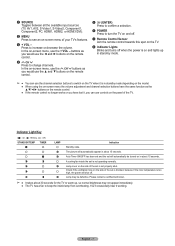
...OUT) jack on the camcorder. 2 Connect Audio Cables between the COMPONENT IN 1 [L-AUDIO-R] (or COMPONENT IN 2 [L-AUDIO-R]) jacks on the TV and the AUDIO OUT jacks on the DVD player/Set-Top Box. Camcorder ➢ Each Camcorder has a different side panel configuration. ➢ When...connecting a Camcorder, match the color of the connection terminal to match the component video and audio connections. English - 13 DVD Player/Set-Top Box TV Side Panel 2 Audio Cable(Not supplied) 1 Component Cable(Not supplied) ➢ Component video separates the video into Y (Luminance (brightness), PB...
...OUT) jack on the camcorder. 2 Connect Audio Cables between the COMPONENT IN 1 [L-AUDIO-R] (or COMPONENT IN 2 [L-AUDIO-R]) jacks on the TV and the AUDIO OUT jacks on the DVD player/Set-Top Box. Camcorder ➢ Each Camcorder has a different side panel configuration. ➢ When...connecting a Camcorder, match the color of the connection terminal to match the component video and audio connections. English - 13 DVD Player/Set-Top Box TV Side Panel 2 Audio Cable(Not supplied) 1 Component Cable(Not supplied) ➢ Component video separates the video into Y (Luminance (brightness), PB...
User Manual (ENGLISH)
Page 14
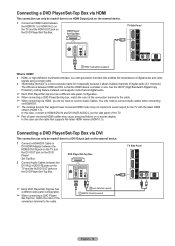
...not implement sound output for it especially because it allows multiple channels of the connection terminal to connect Audio Cables. DVD Player/Set-Top Box TV Side Panel ➢ Each DVD Player/Set-Top box has a different side panel configuration. ➢ When connecting a DVD Player/ Set... Connect Audio Cables between HDMI and DVI is a next-generation interface that supports the latest HDMI version (HDMI 1.3). DVD Player/ Set-Top Box TV Side Panel 1 HDMI Cable(Not supplied) What is HDMI? ● HDMI, or high-definition multimedia interface, is that support lower versioned HDMI ...
...not implement sound output for it especially because it allows multiple channels of the connection terminal to connect Audio Cables. DVD Player/Set-Top Box TV Side Panel ➢ Each DVD Player/Set-Top box has a different side panel configuration. ➢ When connecting a DVD Player/ Set... Connect Audio Cables between HDMI and DVI is a next-generation interface that supports the latest HDMI version (HDMI 1.3). DVD Player/ Set-Top Box TV Side Panel 1 HDMI Cable(Not supplied) What is HDMI? ● HDMI, or high-definition multimedia interface, is that support lower versioned HDMI ...

User Manual (ENGLISH)
Page 15
...Audio Input jack on the Amplifier/DVD Home Theater. When an audio amplifier is a transmission system of digital audio in the form of the TV, and adjust the volume level with the amplifier's volume control. Amplifier/ DVD Home Theater ➢ Each Amplifier/DVD Home Theater has a ...different side panel configuration. ➢ When connecting an Amplifier/DVD Home Theater, match the color of the TV, and adjust the volume level with the audio system's volume control. S/PDIF is connected to the AV OUT [L-AUDIO-R] terminals: Decrease the volume...
...Audio Input jack on the Amplifier/DVD Home Theater. When an audio amplifier is a transmission system of digital audio in the form of the TV, and adjust the volume level with the amplifier's volume control. Amplifier/ DVD Home Theater ➢ Each Amplifier/DVD Home Theater has a ...different side panel configuration. ➢ When connecting an Amplifier/DVD Home Theater, match the color of the TV, and adjust the volume level with the audio system's volume control. S/PDIF is connected to the AV OUT [L-AUDIO-R] terminals: Decrease the volume...

User Manual (ENGLISH)
Page 16
...) Using the HDMI/DVI Cable 1 Connect a HDMI/DVI Cable between the HDMI3/DVI IN jack on the TV and the PC output jack on your computer. 2 Connect a 1Stereo/2RCA Cable between the PC IN [AUDIO] jack on the... the Audio Out jack of the sound card on your computer. You can also use the POWER button on the TV. ➢ It may take a while when your computer. English - 16 Using the HDMI/DVI Cable PC 2 ... Using the D-Sub Cable 1 Connect a D-Sub Cable between the PC IN [PC] jack on the TV and the PC output jack on your computer. 2 Connect a PC Audio Cable between the DVI IN [L-AUDIO-R] jack on the...
...) Using the HDMI/DVI Cable 1 Connect a HDMI/DVI Cable between the HDMI3/DVI IN jack on the TV and the PC output jack on your computer. 2 Connect a 1Stereo/2RCA Cable between the PC IN [AUDIO] jack on the... the Audio Out jack of the sound card on your computer. You can also use the POWER button on the TV. ➢ It may take a while when your computer. English - 16 Using the HDMI/DVI Cable PC 2 ... Using the D-Sub Cable 1 Connect a D-Sub Cable between the PC IN [PC] jack on the TV and the PC output jack on your computer. 2 Connect a PC Audio Cable between the DVI IN [L-AUDIO-R] jack on the...

User Manual (ENGLISH)
Page 17
...AIR), select Air. ➢ If both Analog and Digital. Adjust Enter Skip Plug & Play Enjoy your home environment. Plug & Play Feature When the TV is initially powered on, basic settings proceed automatically and subsequently: 1 Press the POWER button on the remote control. 8 The message Enjoy your watching. The ...the Air+Cable. ➢ In Cable mode, you can set . Select the language of the OSD. is Home. ➢ We recommend setting the TV to daylight saving time. Auto Manual Enter Skip Plug & Play Enter the current date and time. Start Enter Exit 2 Press the ◄ or &#...
...AIR), select Air. ➢ If both Analog and Digital. Adjust Enter Skip Plug & Play Enjoy your home environment. Plug & Play Feature When the TV is initially powered on, basic settings proceed automatically and subsequently: 1 Press the POWER button on the remote control. 8 The message Enjoy your watching. The ...the Air+Cable. ➢ In Cable mode, you can set . Select the language of the OSD. is Home. ➢ We recommend setting the TV to daylight saving time. Auto Manual Enter Skip Plug & Play Enter the current date and time. Start Enter Exit 2 Press the ◄ or &#...
User Manual (ENGLISH)
Page 18
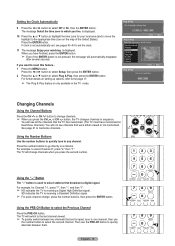
...... 1 Press the MENU button. Using the "-" Button The "-" button is only available in which you press the second number. SD indicates the TV is displayed. Using the PRE-CH Button to memorize channels. See page 21 to select the Previous Channel Press the PRE-CH button. For example... time. You will automatically disappear after several seconds. You will change channels. ➢ When you press the CH or CH button, the TV changes channels in which you have memorized at least three channels). Press the number buttons to go directly to quickly alternate between two channels that...
...... 1 Press the MENU button. Using the "-" Button The "-" button is only available in which you press the second number. SD indicates the TV is displayed. Using the PRE-CH Button to memorize channels. See page 21 to select the Previous Channel Press the PRE-CH button. For example... time. You will automatically disappear after several seconds. You will change channels. ➢ When you press the CH or CH button, the TV changes channels in which you have memorized at least three channels). Press the number buttons to go directly to quickly alternate between two channels that...

User Manual (ENGLISH)
Page 20
... button: Toggles between alphabetical order display and functional order display. Navigating Menus by using the menu map. 1 Press the MENU button. Memorizing the Channels Your TV can select any menu by Using the Menu Map Using the Menu Map of the main menu enables you must specify the type of the... channels are three steps for both air and cable channels. This eliminates the need to change , or use the CH and CH button to the TV(i.e. an air or a cable system). 1 Press the MENU button.
... button: Toggles between alphabetical order display and functional order display. Navigating Menus by using the menu map. 1 Press the MENU button. Memorizing the Channels Your TV can select any menu by Using the Menu Map Using the Menu Map of the main menu enables you must specify the type of the... channels are three steps for both air and cable channels. This eliminates the need to change , or use the CH and CH button to the TV(i.e. an air or a cable system). 1 Press the MENU button.

User Manual (ENGLISH)
Page 21
... cable system that channel directly by pressing the ◄ or ► button. Analog STD HRC Digital STD HRC Enter IRC IRC Return 6 The TV begins memorizing all DVD Players, VCRs, Cable boxes, and Set-Top Boxes. When pressing the ENTER button during a storing process, the message Would... is displayed. Select the antennas to memorize Air Cable Air+Cable Enter Return 5 Press the ◄ or ► to exit. ➢ The TV must be compatible with all available stations. Setting Up the Remote to memorize channels. Cable: "Cable" antenna signal. Note on page 23 of VCR....
... cable system that channel directly by pressing the ◄ or ► button. Analog STD HRC Digital STD HRC Enter IRC IRC Return 6 The TV begins memorizing all DVD Players, VCRs, Cable boxes, and Set-Top Boxes. When pressing the ENTER button during a storing process, the message Would... is displayed. Select the antennas to memorize Air Cable Air+Cable Enter Return 5 Press the ◄ or ► to exit. ➢ The TV must be compatible with all available stations. Setting Up the Remote to memorize channels. Cable: "Cable" antenna signal. Note on page 23 of VCR....


