
User Manual (ENGLISH)
Page 2
...the ISO/IEC 11172-3 or ISO/IEC 13818-3. This license is limited to the ISO/IEC 11172-3 or ISO/IEC 13818-3. © 2007 Samsung Electronics Co., Ltd. All rights reserved. U.S.A Only The product unit accompanying this product unit and the license does not extend to any product unit... to the ISO/IEC 11172-3 or ISO/IEC 13818-3. Some 480p programs are broadcast in widescreen, and offer much higher picture quality than one program on the same TV channel) and datacasting. The first is Standard Definition Television (SDTV) and the second is Digital Television? No rights are ...
...the ISO/IEC 11172-3 or ISO/IEC 13818-3. This license is limited to the ISO/IEC 11172-3 or ISO/IEC 13818-3. © 2007 Samsung Electronics Co., Ltd. All rights reserved. U.S.A Only The product unit accompanying this product unit and the license does not extend to any product unit... to the ISO/IEC 11172-3 or ISO/IEC 13818-3. Some 480p programs are broadcast in widescreen, and offer much higher picture quality than one program on the same TV channel) and datacasting. The first is Standard Definition Television (SDTV) and the second is Digital Television? No rights are ...

User Manual (ENGLISH)
Page 4
...Function Help 57 ■ Upgrading the Software 58 PC DISPLAY ■ Using Your TV as a Computer (PC) Display .......... 59 ■ Display Modes 60 ■ Setting up the TV with your PC 61 ■ Changing the Picture Size (PC Mode 63 ■ Setting the Home Theater PC 63 WISELINK &#... 31 ■ Setting the Active Color 32 ■ Setting the Color Gamut 32 ■ Adjusting the Screen Position 33 ■ Freezing the Picture 33 SOUND CONTROL ■ Using Automatic Sound Settings 33 ■ Customizing the Sound 34 ■ Setting the TruSurround XT 35 ■ Choosing ...
...Function Help 57 ■ Upgrading the Software 58 PC DISPLAY ■ Using Your TV as a Computer (PC) Display .......... 59 ■ Display Modes 60 ■ Setting up the TV with your PC 61 ■ Changing the Picture Size (PC Mode 63 ■ Setting the Home Theater PC 63 WISELINK &#... 31 ■ Setting the Active Color 32 ■ Setting the Color Gamut 32 ■ Adjusting the Screen Position 33 ■ Freezing the Picture 33 SOUND CONTROL ■ Using Automatic Sound Settings 33 ■ Customizing the Sound 34 ■ Setting the TruSurround XT 35 ■ Choosing ...

User Manual (ENGLISH)
Page 5
If viewing for an extended period of time, sit as far back from the screen as possible. < Top view> < Side view> 50˝ screen : At least 5.9 feet 56˝ screen : At least 6.6 feet 61˝ screen : At least 7.2 feet ➢ When installing the product, make sure to ... the latest technology. In addition, it away from the side panel or remote control ● Automatic timer to turn the TV on and off at any time you choose ● Adjustable picture and sound settings and the ability to memorize your favorite settings ● Automatic channel tuning for up to 181 channels...
If viewing for an extended period of time, sit as far back from the screen as possible. < Top view> < Side view> 50˝ screen : At least 5.9 feet 56˝ screen : At least 6.6 feet 61˝ screen : At least 7.2 feet ➢ When installing the product, make sure to ... the latest technology. In addition, it away from the side panel or remote control ● Automatic timer to turn the TV on and off at any time you choose ● Adjustable picture and sound settings and the ability to memorize your favorite settings ● Automatic channel tuning for up to 181 channels...
User Manual (ENGLISH)
Page 7
.... ➢ ● You can use the channel selection buttons to turn the TV on and off. 7 Remote Control Sensor Aim the remote control towards this spot on the TV. 8 Indicator Lights Blinks and turns off . Indication The picture will automatically appear in about 15 seconds. Indicator Light Key ( : On, ...; When using the on-screen menu the volume adjustment and channel selection buttons have the same function as the buttons on the panel of your TV's features. 3 + VOL - Please contact a certified technician. ➢ ● It takes about 15 seconds. In the on-screen menu, ...
.... ➢ ● You can use the channel selection buttons to turn the TV on and off. 7 Remote Control Sensor Aim the remote control towards this spot on the TV. 8 Indicator Lights Blinks and turns off . Indication The picture will automatically appear in about 15 seconds. Indicator Light Key ( : On, ...; When using the on-screen menu the volume adjustment and channel selection buttons have the same function as the buttons on the panel of your TV's features. 3 + VOL - Please contact a certified technician. ➢ ● It takes about 15 seconds. In the on-screen menu, ...

User Manual (ENGLISH)
Page 9
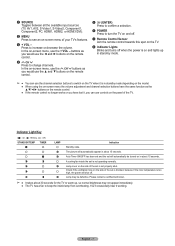
... by bright light. ➢ This is a special remote control for 2-3 seconds before use. ➢ The performance of the VOL, CH and the active source button (TV, DVD, CABLE, STB, VCR) on the screen. 5 ANTENNA Press to select "Air" or "Cable". 6 VOL +, VOL - Press again to stop the action ...decoder. o RESET When your remote control does not work, change channels. Rewind - e EXIT Press to exit from memory. P.MODE Press to select the picture mode. @ FAV.CH Press to switch to your favorite channels. # GAME Press to select the Theater Game mode except for automatic shut off . 2 Numeric...
... by bright light. ➢ This is a special remote control for 2-3 seconds before use. ➢ The performance of the VOL, CH and the active source button (TV, DVD, CABLE, STB, VCR) on the screen. 5 ANTENNA Press to select "Air" or "Cable". 6 VOL +, VOL - Press again to stop the action ...decoder. o RESET When your remote control does not work, change channels. Rewind - e EXIT Press to exit from memory. P.MODE Press to select the picture mode. @ FAV.CH Press to switch to your favorite channels. # GAME Press to select the Theater Game mode except for automatic shut off . 2 Numeric...

User Manual (ENGLISH)
Page 12
...or antenna to 1 the ANT IN terminal on the side of the connection terminal to the cable. S-Video Connection Your Samsung TV can be displayed with a cut off picture when the TV is stereo, you must connect two cables. 3 Antenna cable(Not supplied) 5 Audio Cable(Not supplied) 4 Video Cable(...VCR, use a Y-connector (not supplied) to hook up to the right and left 2 audio input jacks of a VCR. (This connection delivers a better picture when compared to the regular video connection above.) 1 To begin, follow steps 1-3 in the previous section to connect the antenna or cable to your VCR...
...or antenna to 1 the ANT IN terminal on the side of the connection terminal to the cable. S-Video Connection Your Samsung TV can be displayed with a cut off picture when the TV is stereo, you must connect two cables. 3 Antenna cable(Not supplied) 5 Audio Cable(Not supplied) 4 Video Cable(...VCR, use a Y-connector (not supplied) to hook up to the right and left 2 audio input jacks of a VCR. (This connection delivers a better picture when compared to the regular video connection above.) 1 To begin, follow steps 1-3 in the previous section to connect the antenna or cable to your VCR...

User Manual (ENGLISH)
Page 17
...skip to step 9.) 7 Press the ◄ or ► button to move to Home mode for the best picture in retail environments. ➢ If the unit is Home. ➢ We recommend setting the TV to Month, Day, Year, Hour, or Min. Press the ENTER button, then the message Select the language of...6 Press the ◄ or ► button to memorize the channels of the available channels. Adjust Enter Skip Plug & Play Enjoy your particular area. 5 The TV will be set . Plug & Play 3 Press the ◄ or ► button to memorize Air Cable Air+Cable Enter Skip Plug & Play Selects the cable ...
...skip to step 9.) 7 Press the ◄ or ► button to move to Home mode for the best picture in retail environments. ➢ If the unit is Home. ➢ We recommend setting the TV to Month, Day, Year, Hour, or Min. Press the ENTER button, then the message Select the language of...6 Press the ◄ or ► button to memorize the channels of the available channels. Adjust Enter Skip Plug & Play Enjoy your particular area. 5 The TV will be set . Plug & Play 3 Press the ◄ or ► button to memorize Air Cable Air+Cable Enter Skip Plug & Play Selects the cable ...

User Manual (ENGLISH)
Page 19
... the selected items. Select Return by pressing the ▲ or ▼ button, then press the ENTER button to return to exit. Picture Enter Picture Return Mode Dynamic Contrast 100 Brightness 45 Sharpness 75 Color 55 Tint G50 R50 Color Tone Cool1 Detailed Settings Size 16... want in the menu. button. Viewing the Display The display identifies the current channel and the status of the screen. Sets the picture options. There are seven menu groups: Picture, Sound, Channel, Setup, Input, Application, and Menu Map. 2 Press the ◄ or ► button, then press the...
... the selected items. Select Return by pressing the ▲ or ▼ button, then press the ENTER button to return to exit. Picture Enter Picture Return Mode Dynamic Contrast 100 Brightness 45 Sharpness 75 Color 55 Tint G50 R50 Color Tone Cool1 Detailed Settings Size 16... want in the menu. button. Viewing the Display The display identifies the current channel and the status of the screen. Sets the picture options. There are seven menu groups: Picture, Sound, Channel, Setup, Input, Application, and Menu Map. 2 Press the ◄ or ► button, then press the...

User Manual (ENGLISH)
Page 20
... to the next page. Yellow button: Moves to select Menu Map, then press the ENTER button. There are memorized, use the selected items. Menu Map Picture Sound Channel Setup 1/2 Mode І Contrast І Brightness І Shapness І Color І Tint Color Tone І Detailed Settings І Size ... or use the CH and CH button to change channels by using the menu map. 1 Press the MENU button. Memorizing the Channels Your TV can select any menu by entering the channel digits. You can memorize and store all menus and select a function quickly. Green button: Moves...
... to the next page. Yellow button: Moves to select Menu Map, then press the ENTER button. There are memorized, use the selected items. Menu Map Picture Sound Channel Setup 1/2 Mode І Contrast І Brightness І Shapness І Color І Tint Color Tone І Detailed Settings І Size ... or use the CH and CH button to change channels by using the menu map. 1 Press the MENU button. Memorizing the Channels Your TV can select any menu by entering the channel digits. You can memorize and store all menus and select a function quickly. Green button: Moves...
User Manual (ENGLISH)
Page 27
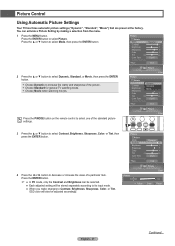
...9650; or ▼ button to increase the clarity and sharpness of the picture. Choose Standard for general TV watching mode. Choose Movie when watching movies. Picture Return Mode Dynamic Contrast 100 Brightness 45 Sharpness 75 Color 55 Tint G50 ...Tint G50 R50 Color Tone Cool1 Detailed Settings Size 16:9 Picture Enter Picture ▲ Contrast ▼ Adjust Enter 100 Return English - 27 Continued... Picture Control Using Automatic Picture Settings Your TV has three automatic picture settings ("Dynamic", "Standard", "Movie") that are preset at...
...9650; or ▼ button to increase the clarity and sharpness of the picture. Choose Standard for general TV watching mode. Choose Movie when watching movies. Picture Return Mode Dynamic Contrast 100 Brightness 45 Sharpness 75 Color 55 Tint G50 ...Tint G50 R50 Color Tone Cool1 Detailed Settings Size 16:9 Picture Enter Picture ▲ Contrast ▼ Adjust Enter 100 Return English - 27 Continued... Picture Control Using Automatic Picture Settings Your TV has three automatic picture settings ("Dynamic", "Standard", "Movie") that are preset at...

User Manual (ENGLISH)
Page 28
... Cool2, Cool1, Normal, Warm1, or Warm2, then press the ENTER button. ➢ When the picture mode is set to Dynamic or Standard, Warm1 and Warm2 cannot be reset. Picture Return Mode Dynamic Contrast 100 Brightness 45 Sharpness 75 Color 55 Tint G50 R50 Color Tone Cool1 Detailed ... Settings Size 16:9 Digital NR Auto DNIe On Active Color On Color Gamut Normal Position OK Reset CancelOK Picture Enter English - 28 Press the EXIT button to exit. ➢ Each picture mode can be selected. Press the ▲ or ▼ button to select Reset, then press the...
... Cool2, Cool1, Normal, Warm1, or Warm2, then press the ENTER button. ➢ When the picture mode is set to Dynamic or Standard, Warm1 and Warm2 cannot be reset. Picture Return Mode Dynamic Contrast 100 Brightness 45 Sharpness 75 Color 55 Tint G50 R50 Color Tone Cool1 Detailed ... Settings Size 16:9 Digital NR Auto DNIe On Active Color On Color Gamut Normal Position OK Reset CancelOK Picture Enter English - 28 Press the EXIT button to exit. ➢ Each picture mode can be selected. Press the ▲ or ▼ button to select Reset, then press the...
User Manual (ENGLISH)
Page 29
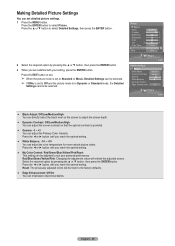
... Standard Contrast 80 Brightness 50 Sharpness 50 Color 50 Tint G50 R50 Color Tone Cool1 Detailed Settings ► Size 16:9 Picture Enter Detailed Settings Return Black Adjust Dynamic Contrast Gamma White Balance My Color Control Edge Enhancement Medium Medium +1 0 On Picture Enter ● Black Adjust:...the screen contrast so that the optimal contrast is provided. ● Gamma: -3 ~ +3 You can adjust the color temperature for more natural picture colors. Press the ◄ or ► button until you reach the optimal setting. ● White Balance: -10 ~ +10 You...
... Standard Contrast 80 Brightness 50 Sharpness 50 Color 50 Tint G50 R50 Color Tone Cool1 Detailed Settings ► Size 16:9 Picture Enter Detailed Settings Return Black Adjust Dynamic Contrast Gamma White Balance My Color Control Edge Enhancement Medium Medium +1 0 On Picture Enter ● Black Adjust:...the screen contrast so that the optimal contrast is provided. ● Gamma: -3 ~ +3 You can adjust the color temperature for more natural picture colors. Press the ◄ or ► button until you reach the optimal setting. ● White Balance: -10 ~ +10 You...
User Manual (ENGLISH)
Page 30
...(1080i) mode. ● In DTV (720p), Component (720p) or HDMI (720p) mode, any of 16:9, 4:3 and Wide Fit can be selected. ● In Analog TV, AV, S-VIDEO, Component (480i, 480p), HDMI (480i, 480p), or DTV (480i, 480p) mode, any truncation when DTV(1080i), HDMI (1080i, 1080p) or Component ... Brightness 45 Sharpness 16:9 75 Color Zoom1 55 Tint G50 Zoom2 R50 Color Tone WidCeoFoilt1 Detailed Settings 4:3 OK Size Just 1S6c:9an Picture Enter 16:9 Sets the picture to select the screen format you want, then press the ENTER button. Press the ▲ or ▼ button to select Size...
...(1080i) mode. ● In DTV (720p), Component (720p) or HDMI (720p) mode, any of 16:9, 4:3 and Wide Fit can be selected. ● In Analog TV, AV, S-VIDEO, Component (480i, 480p), HDMI (480i, 480p), or DTV (480i, 480p) mode, any truncation when DTV(1080i), HDMI (1080i, 1080p) or Component ... Brightness 45 Sharpness 16:9 75 Color Zoom1 55 Tint G50 Zoom2 R50 Color Tone WidCeoFoilt1 Detailed Settings 4:3 OK Size Just 1S6c:9an Picture Enter 16:9 Sets the picture to select the screen format you want, then press the ENTER button. Press the ▲ or ▼ button to select Size...

User Manual (ENGLISH)
Page 31
...button to provide a high visual quality. Press the EXIT button to high. Auto : Reduces the noise of the picture automatically. Picture Enter Picture Tint G50 R50 Color Tone Cool1 Detailed Settings Size 16:9 Digital NR DNIe Active Color Color Gamut Position Reset Off Low LowCooOl1n ...MediOumKOff High Normal AutoLow OK Picture Enter DNIe (Digital Natural Image engine) This TV includes the DNIe function so as to select Picture. Press the ENTER button to select DNIe, then press the ENTER button. ➢...
...button to provide a high visual quality. Press the EXIT button to high. Auto : Reduces the noise of the picture automatically. Picture Enter Picture Tint G50 R50 Color Tone Cool1 Detailed Settings Size 16:9 Digital NR DNIe Active Color Color Gamut Position Reset Off Low LowCooOl1n ...MediOumKOff High Normal AutoLow OK Picture Enter DNIe (Digital Natural Image engine) This TV includes the DNIe function so as to select Picture. Press the ENTER button to select DNIe, then press the ENTER button. ➢...

User Manual (ENGLISH)
Page 32
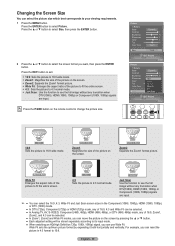
...61559; sRGB: Supports color tone of the sky and grass will be stronger and clearer for a more vivid on-screen picture. 1 Press the MENU button. Picture Enter Picture Tint G50 R50 Color Tone Cool1 Detailed Settings Size 16:9 Digital NR Auto DNIe On Active Color On Color Gamut Position ...Auto On On Normal 0 OK 2 Press the ▲ or ▼ button to select Color Gamut, then press the ENTER button. Picture Enter Picture Tint G50 R50 Color Tone Cool1 Detailed Settings Size 16:9 Digital NR Auto DNIe On Active Color Color Gamut Position Off Off On Normal ...
...61559; sRGB: Supports color tone of the sky and grass will be stronger and clearer for a more vivid on-screen picture. 1 Press the MENU button. Picture Enter Picture Tint G50 R50 Color Tone Cool1 Detailed Settings Size 16:9 Digital NR Auto DNIe On Active Color On Color Gamut Position ...Auto On On Normal 0 OK 2 Press the ▲ or ▼ button to select Color Gamut, then press the ENTER button. Picture Enter Picture Tint G50 R50 Color Tone Cool1 Detailed Settings Size 16:9 Digital NR Auto DNIe On Active Color Color Gamut Position Off Off On Normal ...
User Manual (ENGLISH)
Page 33
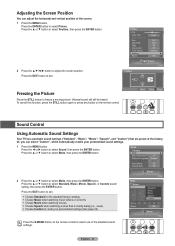
...Off Preferred Language English Multi-Track Sound Stereo Auto Volume Off Internal Mute Off 2 Press the ▲ or ▼ button to select Picture. English - 33 Press the ENTER button to select Mode, then press the ENTER button. Press the ▲ or ▼ button ...10kHz Reset OK Sound Enter Press the S.MODE button on the remote control. ▼ Move Enter Return Sound Control Using Automatic Sound Settings Your TV has automatic sound settings ("Standard", "Music", "Movie", "Speech", and "Custom") that is mostly dialog (i.e., news). Choose Custom to...
...Off Preferred Language English Multi-Track Sound Stereo Auto Volume Off Internal Mute Off 2 Press the ▲ or ▼ button to select Picture. English - 33 Press the ENTER button to select Mode, then press the ENTER button. Press the ▲ or ▼ button ...10kHz Reset OK Sound Enter Press the S.MODE button on the remote control. ▼ Move Enter Return Sound Control Using Automatic Sound Settings Your TV has automatic sound settings ("Standard", "Music", "Movie", "Speech", and "Custom") that is mostly dialog (i.e., news). Choose Custom to...

User Manual (ENGLISH)
Page 42
...LNA On On Channel Enter English - 42 Continue to increase the signal strength. Press the EXIT button to exit. ➢ If the picture is weak, physically adjust your antenna to clear, digital (HDTV) channels have either perfect reception quality or you find the best position ..., unlike analog channels, you cannot fine tune a digital channel. Checking the Digital-Signal Strength - Channel Enter LNA (Low Noise Amplifier) If the TV is operating in reception quality from "snowy" to improve the reception of available digital channels. 1 Press the MENU button. Press the ◄ or...
...LNA On On Channel Enter English - 42 Continue to increase the signal strength. Press the EXIT button to exit. ➢ If the picture is weak, physically adjust your antenna to clear, digital (HDTV) channels have either perfect reception quality or you find the best position ..., unlike analog channels, you cannot fine tune a digital channel. Checking the Digital-Signal Strength - Channel Enter LNA (Low Noise Amplifier) If the TV is operating in reception quality from "snowy" to improve the reception of available digital channels. 1 Press the MENU button. Press the ◄ or...
User Manual (ENGLISH)
Page 45
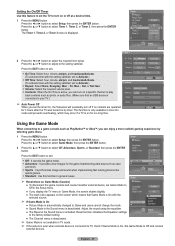
...Timer 1 Timer 2 Timer 3 Off AdvenOtufrfe Game Mode SportsOff DLP® 3D/Dual-ViewStandaOrfdf ● Sound Mode in TV mode. ➢ If the picture is poor when external device is connected to TV, check if Game Mode is On. Setup Enter ● The Channel menu is deactivated. ➢ Game Mode .... Setting the On/Off Timer Use this feature to set the TV to turn on a specific channel or play back contents such as cave and room. Sports : It synchronizes image and sound when implementing fast moving pictures like sports games. Standard : Use this function in ...
...Timer 1 Timer 2 Timer 3 Off AdvenOtufrfe Game Mode SportsOff DLP® 3D/Dual-ViewStandaOrfdf ● Sound Mode in TV mode. ➢ If the picture is poor when external device is connected to TV, check if Game Mode is On. Setup Enter ● The Channel menu is deactivated. ➢ Game Mode .... Setting the On/Off Timer Use this feature to set the TV to turn on a specific channel or play back contents such as cave and room. Sports : It synchronizes image and sound when implementing fast moving pictures like sports games. Standard : Use this function in ...
User Manual (ENGLISH)
Page 49
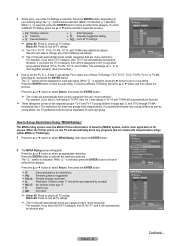
..., press the ▲ or ▼ button and then repeat the process. How to Set up separately for these TV-Ratings: TV-Y, TV-Y7, TV-G, TV-PG, TV-14, or TV-MA (See Step 4), and press the ENTER button. When the V-Chip lock is on your existing setup, the " " symbol will automatically block certain ... Guidelines Return Allow All Block All Setup Enter 6 How to set up Restrictions Using "MPAA Ratings" The MPAA rating system uses the Motion Picture Association of America (MPAA) system, and its main application is for each age group. While " " is selected, press the ► button to go ...
..., press the ▲ or ▼ button and then repeat the process. How to Set up separately for these TV-Ratings: TV-Y, TV-Y7, TV-G, TV-PG, TV-14, or TV-MA (See Step 4), and press the ENTER button. When the V-Chip lock is on your existing setup, the " " symbol will automatically block certain ... Guidelines Return Allow All Block All Setup Enter 6 How to set up Restrictions Using "MPAA Ratings" The MPAA rating system uses the Motion Picture Association of America (MPAA) system, and its main application is for each age group. While " " is selected, press the ► button to go ...
User Manual (ENGLISH)
Page 54
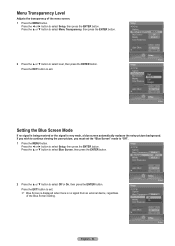
... no signal from an external device, regardless of the menu screen. 1 Press the MENU button. If you wish to continue viewing the poor picture, you must set the "Blue Screen" mode to select Setup, then press the ENTER button. Setup V-Chip Caption Menu Transparency Medium Blue Screen... ▲ or ▼ button to exit. ➢ Blue Screen is displayed when there is very weak, a blue screen automatically replaces the noisy picture background. Press the EXIT button to select Off or On, then press the ENTER button. Menu Transparency Level Adjusts the transparency of the Blue Screen...
... no signal from an external device, regardless of the menu screen. 1 Press the MENU button. If you wish to continue viewing the poor picture, you must set the "Blue Screen" mode to select Setup, then press the ENTER button. Setup V-Chip Caption Menu Transparency Medium Blue Screen... ▲ or ▼ button to exit. ➢ Blue Screen is displayed when there is very weak, a blue screen automatically replaces the noisy picture background. Press the EXIT button to select Off or On, then press the ENTER button. Menu Transparency Level Adjusts the transparency of the Blue Screen...


